Overview
Yodeck AI Agent (also known as Yodeck MCP) connects your AI assistant to your Yodeck account so you can manage screens, media, playlists, and schedules through natural conversation. Instead of clicking through menus, you type what you need. For example, “Push the updated playlist to all screens in the London Workspace” and your AI assistant handles the rest.
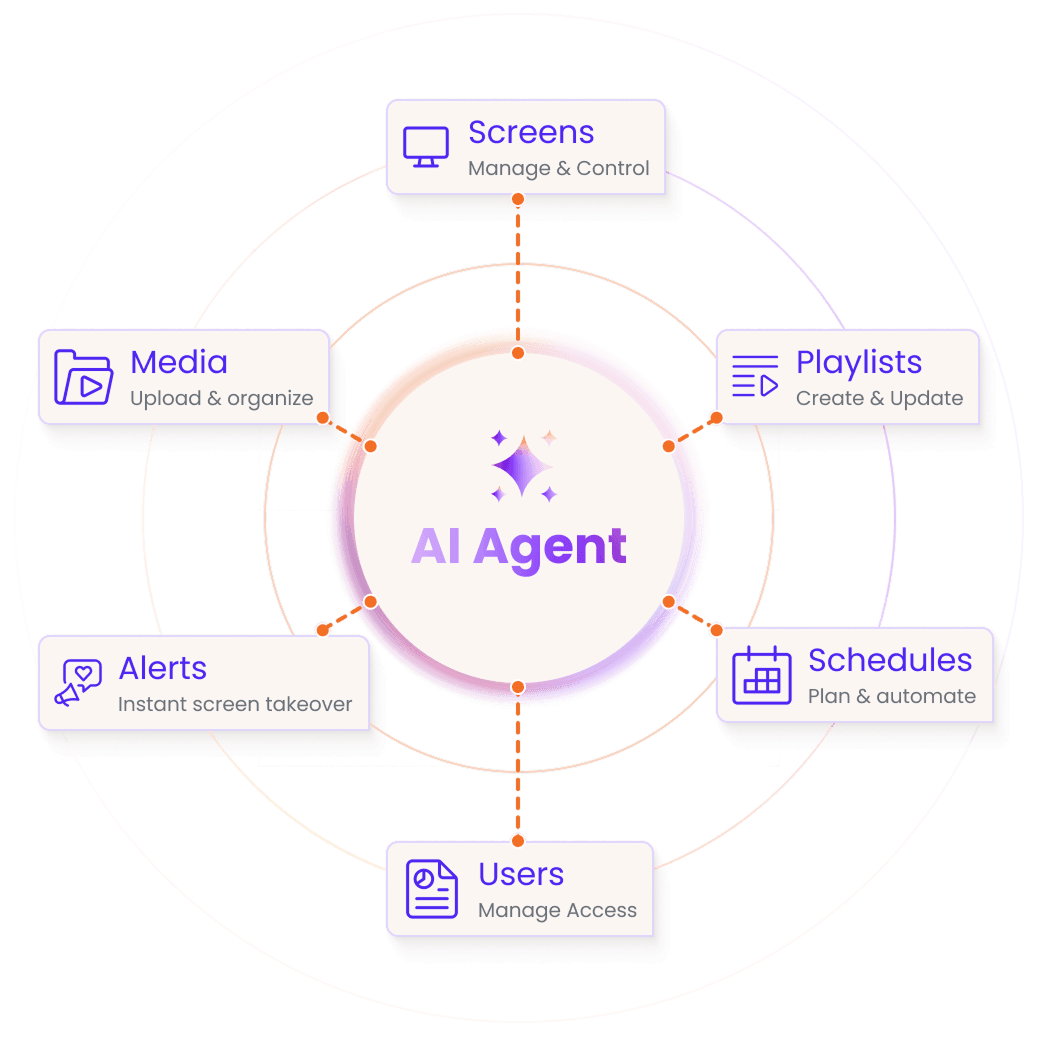
Setup takes a few minutes: you paste one URL into your AI tool, sign in to Yodeck once and you are connected. No software to install and, for most tools, no configuration files or API keys needed.
Before You Start
Make sure you have the following:
- A Yodeck account on a Premium or Enterprise plan. Yodeck MCP is included in these plans at no extra charge.
- One of the supported AI tools: Claude.ai, Claude Desktop, ChatGPT, Cursor, VS Code, Windsurf or Claude Code CLI.
- A web browser for the one-time sign-in.
You will use this MCP server URL in every setup analyzed below:
https://mcp.yodeck.com/mcp
How It Works
MCP (Model Context Protocol) is an open standard that lets AI tools connect securely to other services. The Yodeck MCP server uses OAuth 2.1, the same secure sign-in flow behind the “Sign in with Google” buttons you see across the web.
Here is the whole process from start to finish:
- You add the Yodeck MCP server URL to your AI tool using the instructions here.
- Your browser opens the Yodeck login page.
- You sign in with your regular Yodeck username and password.
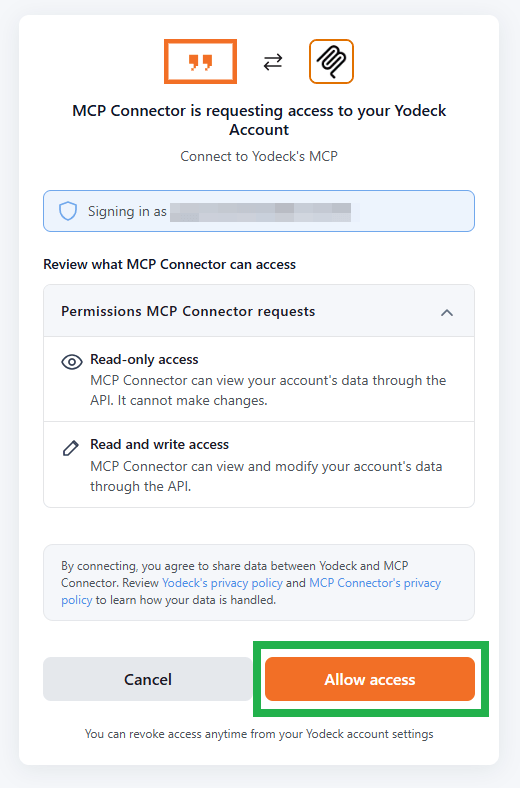
- You grant permission for your AI tool to access your Yodeck account.
- The browser closes and you return to your AI tool, now connected.
Your password is never shared with the AI tool. The tool receives a temporary token that lets it make requests on your behalf. The token expires automatically. When it does, you simply sign in again.
Most AI tools handle this flow automatically. You do not need to configure anything extra. Just add the URL and the sign-in prompt appears when needed.
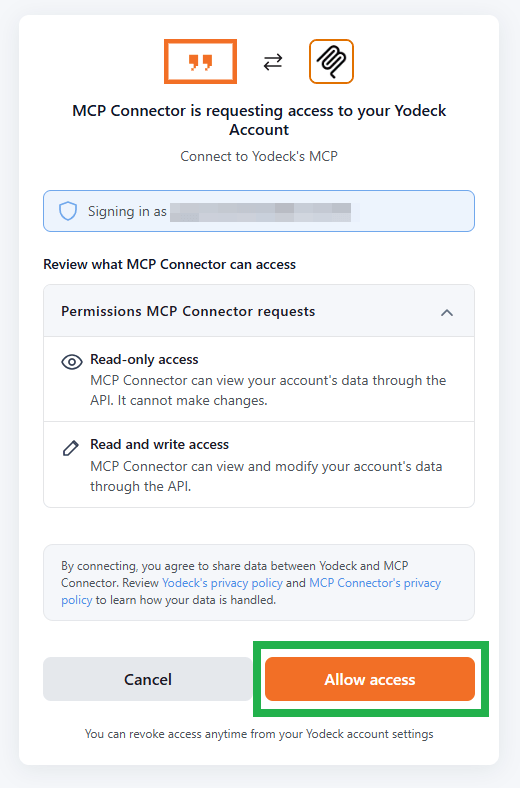
From that point on, you simply describe what you want in plain language and your AI assistant takes care of the task: list screens, upload media, create playlists, push content, and more.
Access Levels
Your AI assistant works within your existing Yodeck permissions — no more, no less. If your Yodeck account can create and edit content in the Portal, your AI assistant can do the same.
If your account is view-only, your AI assistant is view-only, too. You do not need to grant write access separately during sign-in; it happens automatically based on your role.
If your AI tool does not support OAuth, or you prefer working with API tokens, see this article section.
What You Can Do With Yodeck MCP
Once connected, you can ask your AI assistant to work with:
- Screens: List, create or update screens and push content to them.
- Media: Upload images and videos, browse your media library and manage tags.
- Playlists: Create and edit playlists, add or reorder items.
- Schedules: Set up and modify screen schedules.
- Layouts: Create multi-zone layouts for your screens.
- Workspaces: Manage Workspaces for multi-location setups.
- Users and roles: Manage team access and permissions.
Here are a few example prompts to get you started:
- “Show me all my screens and their current status”
- “Upload this image from URL and add it to my lobby playlist”
- “Create a new schedule that shows the sales playlist on weekdays from 9 to 5”
- “Push the updated playlist to all screens in the London Workspace”
- “Audit my account and find empty Workspaces and playlists not assigned to any screen”
Quick Reference
Use this table to find your AI tool, then jump to the matching setup below.
| AI tool | Category | How to add | Restart required? |
|---|---|---|---|
| Claude.ai | Cloud | Settings > Connectors > paste URL | No |
| Claude Desktop | Cloud | Settings > Connectors > paste URL | No |
| ChatGPT | Cloud | Settings > Connectors > paste URL | No |
| Cursor | IDE | Edit .cursor/mcp.json | No |
| VS Code | IDE | Edit .vscode/mcp.json | No |
| Windsurf | IDE | Edit ~/.codeium/windsurf/mcp_config.json | Yes |
| Claude Code | CLI | claude mcp add --transport http | No |
Set Up Yodeck in Your AI Assistant
Pick your AI tool below and follow the steps. Claude and ChatGPT cover cloud-based assistants that require no software installation. Then, the following article sections cover IDEs and command-line tools aimed at developers.
Claude
5.1 Claude.ai (browser)
- Go to claude.ai and sign in to your Anthropic account.
- Click your profile icon, then go to Settings > Connectors.
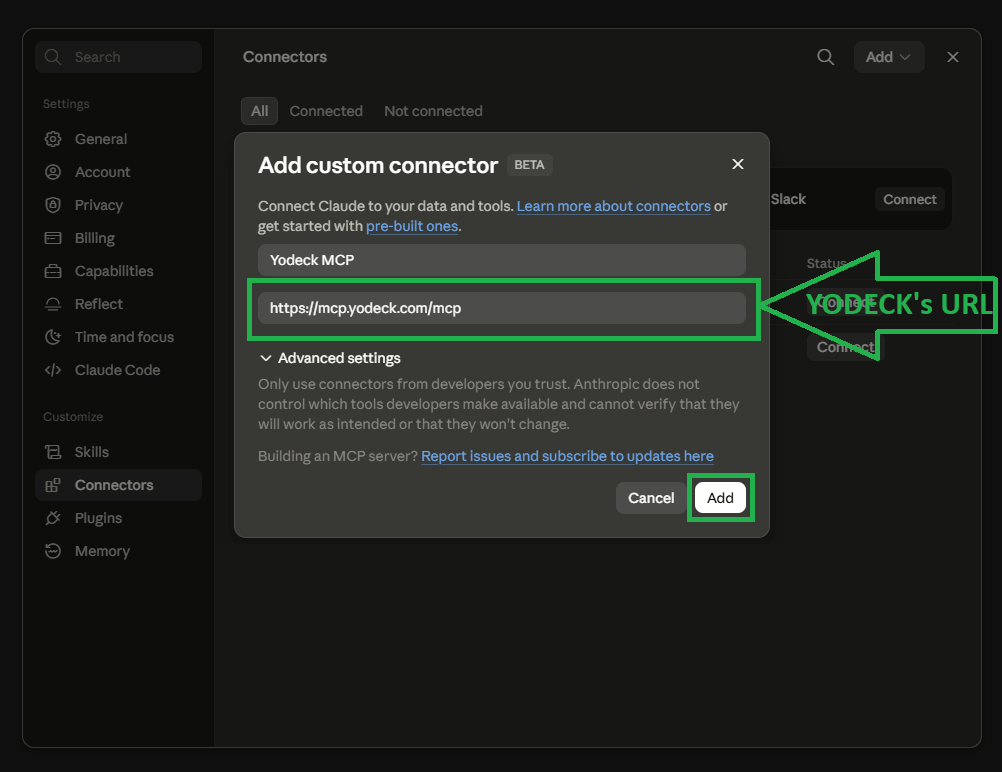
- Click the Add (button) and select the Add custom connector option.
- Provide a meaningful name for the Yodeck MCP connector.
- Paste this URL: “
https://mcp.yodeck.com/mcp” (without the quotes) inside the respective MCP URL field. - Click Save.
- The Yodeck login page appears.
- Enter your Yodeck credentials and approve access.
- ✅You are now connected. Start a new conversation and ask Claude something about Yodeck, for example, “Show me my screens”.
- ⚠️Note: Custom connectors require a Claude Pro, Team, or Enterprise plan.
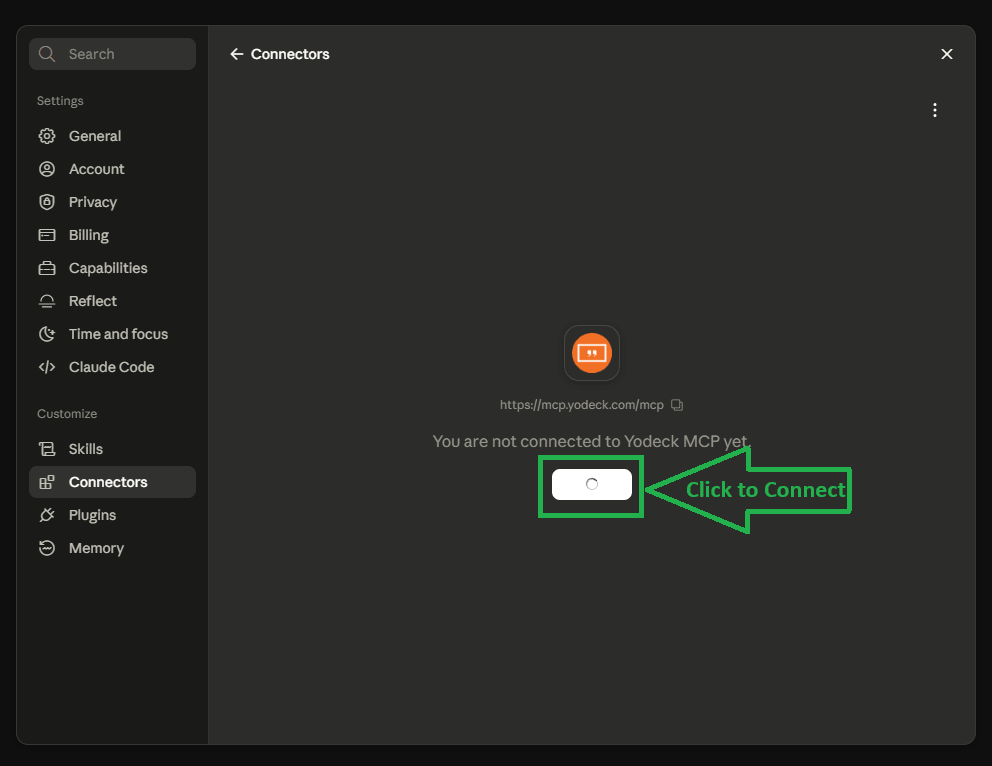
5.2 Claude Desktop (app)
- Open Claude Desktop on macOS, Windows or Linux.
- Go to Settings > Connectors.
- Click the Add (button) and select the Add custom connector option.
- Provide a meaningful name for the Yodeck MCP connector.
- Paste this URL: “
https://mcp.yodeck.com/mcp” (without the quotes) inside the respective MCP URL field. - Click Save.
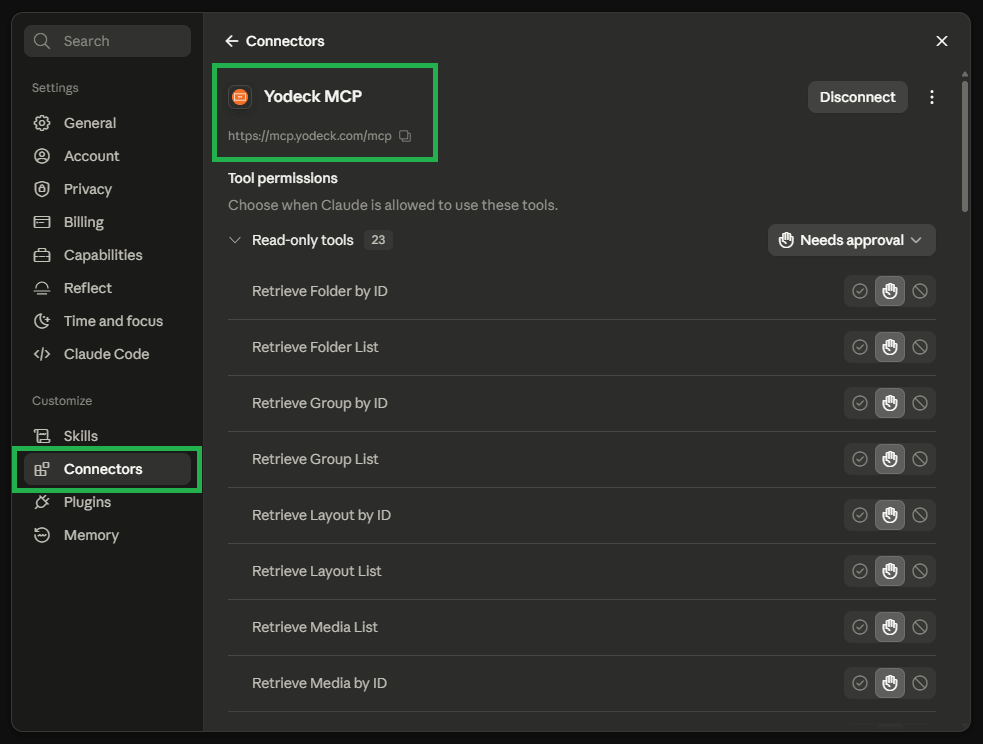
- The Yodeck login page opens in your browser. Enter your Yodeck credentials and approve access.
- ✅You are now connected. Start a new conversation and ask Claude something about Yodeck.
ChatGPT
ChatGPT requires a Plus, Pro, Business, Enterprise, or Education plan.
- Open ChatGPT in your browser.
- Go to Settings > Connectors (or Apps).
- Scroll to Advanced settings and toggle Developer mode on.
- Click Create (or Add connector).
- Fill in the name Yodeck and the MCP Server URL
https://mcp.yodeck.com/mcp. Leave Authentication set to OAuth. - Click Create.
- The Yodeck login page appears. Enter your Yodeck credentials and approve access.
Once connected, you will see the available Yodeck tools listed. To use them in a conversation:
- Start a new conversation in ChatGPT.
- Click the + button (or tools menu) at the bottom of the chat.
- Select Yodeck from the list of connected apps.
- Ask ChatGPT to do something, for example “Show me all my screens”. ChatGPT asks you to confirm before running each action.
⚠️Note: Developer mode is required for custom connectors and is currently available on paid plans via the web interface.
Please also note that OpenAI frequently updates the ChatGPT interface, so menu names and locations may differ slightly from the steps above. If you cannot find an option, look for Connectors, Apps, or Developer mode in the ChatGPT Settings.
Set Up Yodeck in Developer Tools
These setups are aimed at developers and involve editing a small configuration file or using the terminal. If you connected through a cloud assistant in the previous article sections, you are all set.
Cursor
- Open Cursor and go to Settings > Tools & MCP.
- Click Add new MCP server. This opens the
mcp.jsonconfiguration file. - Add the following and save the file:
{
  "mcpServers": {
    "yodeck": {
      "url": "https://mcp.yodeck.com/mcp"
    }
  }
}- The Yodeck login page opens in your browser. Enter your Yodeck credentials and approve access.
⚠️Note: If you already have other MCP servers configured, add the "yodeck": { ... } block inside the existing "mcpServers" object. Do not replace what is already there.
💡Global setup (all projects): To make Yodeck available in every Cursor project, put the same configuration in your global file instead: ~/.cursor/mcp.json on macOS/Linux or %USERPROFILE%\.cursor\mcp.json on Windows.
VS Code with GitHub Copilot
Option A: Command Palette
- Open VS Code and press Ctrl+Shift+P (or Cmd+Shift+P on macOS) to open the Command Palette.
- Type MCP: Add Server and select it.
- Choose HTTP/SSE as the type.
- Enter
https://mcp.yodeck.com/mcpas the URL andyodeckas the server name. - Choose whether to save it to the Workspace or User configuration.
- In the
mcp.jsonfile that opens, click Start from the CodeLens above the server. - The Yodeck login page opens in your browser. Enter your Yodeck credentials and approve access.
Option B: Configuration file
- In your project root, create a
.vscodefolder if it does not exist. - Inside
.vscode, create a file calledmcp.jsonwith the following content:
{
  "servers": {
    "yodeck": {
      "type": "http",
      "url": "https://mcp.yodeck.com/mcp"
    }
  }
}- Save the file and click Start from the CodeLens that appears above the server entry.
- The Yodeck login page opens in your browser. Enter your Yodeck credentials and approve access.
💡Global setup (all workspaces): Use the Command Palette option MCP: Open User Configuration and add the same server entry there.
Windsurf
- Open the MCP configuration file:
~/.codeium/windsurf/mcp_config.jsonon macOS/Linux or%USERPROFILE%\.codeium\windsurf\mcp_config.jsonon Windows. Alternatively, in Windsurf click the MCPs icon in the Cascade panel and select Configure. - Add the following, creating the file if it does not exist:
{
  "mcpServers": {
    "yodeck": {
      "serverUrl": "https://mcp.yodeck.com/mcp"
    }
  }
}- Save the file and restart Windsurf.
- The Yodeck login page opens in your browser. Enter your Yodeck credentials and approve access.
⚠️Important: Windsurf uses serverUrl, not url. If you copy configurations from other tools, make sure to change url to serverUrl.
Claude Code CLI
- Open your terminal and run:
claude mcp add --transport http yodeck https://mcp.yodeck.com/mcp- Start a Claude Code session with
claude. - Type
/mcpand select yodeck. - The Yodeck login page opens in your browser. Enter your Yodeck credentials and approve access, then return to your terminal.
Claude Code remembers your session, so you will not need to sign in again until the token expires.
💡Make it available in all projects: To use Yodeck across all your projects, not just the current folder, run:
claude mcp add --transport http --scope user yodeck https://mcp.yodeck.com/mcpAlternative: Connect With a Yodeck API Token
If your AI tool does not support OAuth (the browser sign-in flow), you can connect using a Yodeck API token instead.
Generate an API token
- Sign in to the Yodeck Portal.
- On the top navigation bar, click Account, then click Account Settings.
- In the Advanced Settings section, click API Tokens.
- At the bottom left of the screen, click Generate Token.
- In the Token name field, enter a recognizable name, for example “Cursor MCP” or “Claude Desktop”.
- In the Choose Access section, select the Role you want the token to have. The API token acts as a user, so its role determines its permissions in Yodeck. For more information, see User Roles. On an Enterprise account, you select a role per Workspace, and you can create and assign custom roles to API tokens. For more information, see Custom Roles.
- Click Create Token.
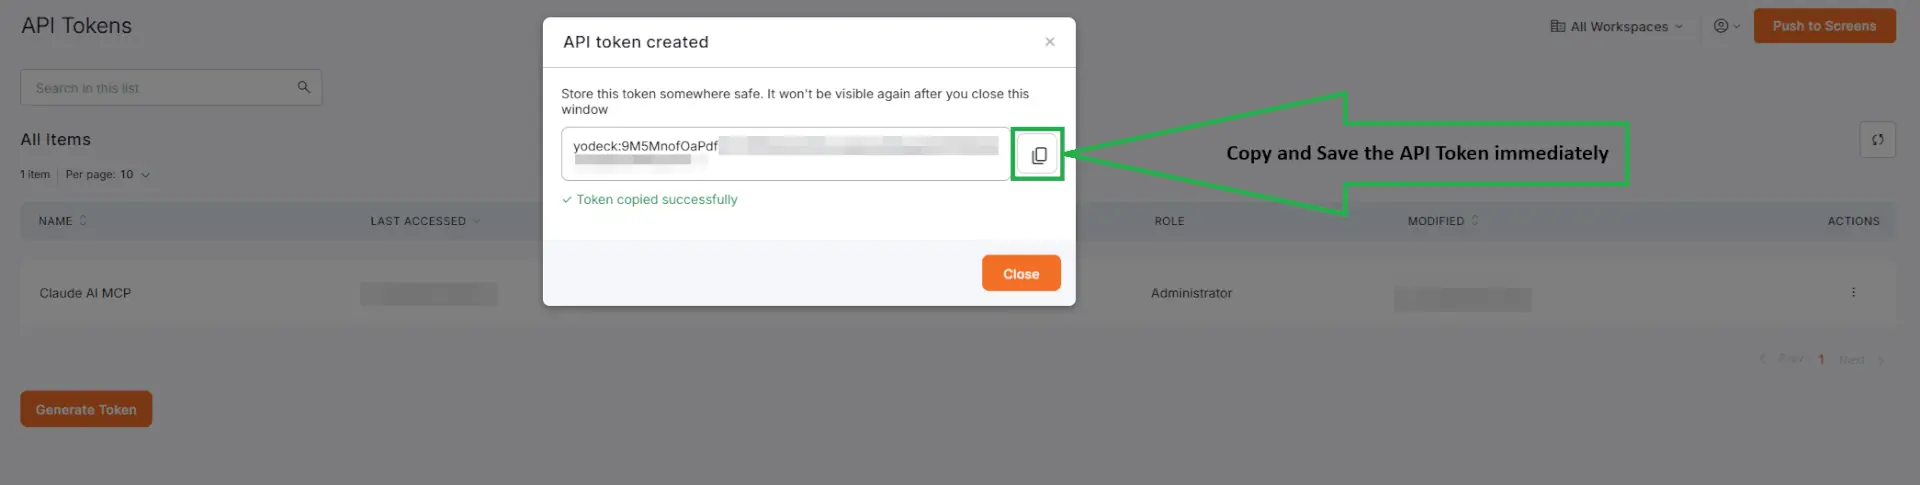
- Once the token is created, click Copy and store it somewhere safe, as you will not be able to see it again.
- Click Close.
⚠️Keep your token secret. Anyone with your token can access your Yodeck account. Do not share it publicly or commit it to version control.
Configure your AI tool
The token is passed as an HTTP header in the format Authorization: Token <label>:<token>, where the label is the token name you entered when generating it. Below are the configurations for each tool.
Claude Code CLI
claude mcp add --transport http yodeck https://mcp.yodeck.com/mcp \
  --header "Authorization: Token your-label:your-token"
Cursor (.cursor/mcp.json)
{
  "mcpServers": {
    "yodeck": {
      "url": "https://mcp.yodeck.com/mcp",
      "headers": {
        "Authorization": "Token your-label:your-token"
      }
    }
  }
}
VS Code (.vscode/mcp.json)
{
  "servers": {
    "yodeck": {
      "type": "http",
      "url": "https://mcp.yodeck.com/mcp",
      "headers": {
        "Authorization": "Token your-label:your-token"
      }
    }
  }
}
Windsurf (~/.codeium/windsurf/mcp_config.json)
{
  "mcpServers": {
    "yodeck": {
      "serverUrl": "https://mcp.yodeck.com/mcp",
      "headers": {
        "Authorization": "Token your-label:your-token"
      }
    }
  }
}⚠️ChatGPT: ChatGPT requires OAuth and does not support custom headers for authentication. Use the standard sign-in flow described in the ChatGPT section of this article.
Security tips for API tokens
- Do not hardcode tokens in files you share or commit to Git. Use environment variables where possible: Cursor and Windsurf support the
${env:YODECK_TOKEN}syntax in the headers field, and VS Code supports${input:yodeck-token}to prompt you on each session. - Rotate tokens regularly. Delete old tokens in the Yodeck Portal and create new ones.
- Use minimal permissions. Assign the token a role with only the permissions it needs. A view-only role gives your AI assistant read access without the ability to make changes.
Troubleshooting
| Symptom | Cause | Fix |
|---|---|---|
| “Connection failed” or “Server not reachable” | Wrong URL, network issue or blocked domain | Make sure you use the exact URL https://mcp.yodeck.com/mcp. Check your internet connection. If you are behind a corporate firewall or VPN, make sure mcp.yodeck.com is not blocked. |
| Sign-in window does not appear | Browser pop-up blocking | Allow pop-ups for your AI tool in your browser. If your tool’s logs show an authorization URL, open it manually. |
| Tools not showing up | The AI tool has not picked up the new configuration | Restart your AI tool. In Cursor or VS Code, check that the MCP server shows a green status indicator. In Claude Desktop, look under Settings > Developer > MCP Servers. |
| Signed in but getting authentication errors | Expired session token | Remove and re-add the server, then sign in again. In Claude Code, run claude mcp remove yodeck and add it again. |
| AI assistant can view content but cannot create or update anything | The connection has read-only access | Reconnect and grant write access during sign-in, or ask your account admin about your Yodeck permissions. |
| Configuration file errors (IDE setups) | Invalid JSON, such as trailing commas or missing brackets | Validate your configuration with a tool like jsonlint.com. If you already have other servers configured, add "yodeck" as a new entry inside the existing "mcpServers" (or "servers") object. |
FAQs
Got questions? We’ve got answers! This section addresses common questions about the Yodeck MCP integration with various AI tools.
No. For cloud assistants like Claude and ChatGPT, you paste one URL into the tool’s connectors panel, sign in with your existing Yodeck account and you are connected. No code and no API keys. Only the developer-focused IDE setups involve a small configuration file.
Any AI tool that supports MCP works with Yodeck. This guide covers Claude.ai, Claude Desktop, ChatGPT, Cursor, VS Code, Windsurf and Claude Code CLI.
Yodeck MCP is available on Premium and Enterprise plans at no extra charge. These plans include the API and OAuth access that MCP requires.
No. Delete operations are disabled as a safety measure. You can read, create, update and manage all content freely through your AI assistant. To remove assets, do so directly in the Yodeck Portal.
No. Yodeck MCP makes common tasks faster. Bulk actions, status reports and campaign deployments that take several minutes of navigation take one sentence. The Yodeck Portal remains the right place for detailed configuration and content creation.
Only what you explicitly ask about. Your AI assistant retrieves the specific data needed to answer your request. Your full account is not shared with the AI provider by default. Sign-in uses OAuth 2.1, all traffic runs over TLS and Yodeck complies with GDPR and CCPA.
Need Help?
The Yodeck Support Team can help you out! Log in to your Yodeck account and send us a message from the bottom right corner!
