Table of Contents
Setting Up Zoom Rooms
To utilize Zoom Rooms, you’ll require two sets of hardware components. First, you’ll need equipment for your meeting room, including a TV, a macOS or Windows computer, and a webcam with a built-in microphone or an external microphone. Alternatively, you can use an all-in-one macOS or Windows computer that integrates the display, computer, webcam, and microphone.
Second, you’ll need a tablet to operate the Zoom Rooms controller app. This tablet can be an iOS, Android, or Windows device. The Yodeck Rooms app’s tablet can be configured as a ‘Room Controller’ for room control only or as a ‘Scheduling Display’ for comprehensive scheduling options. Note that the ‘Scheduling Display’ feature is only available on the iOS and Android versions of the app, not on the Windows version.
Equipment Required for Zoom Rooms
As previously mentioned, you’ll need a TV, a macOS or Windows computer, and a webcam with an embedded microphone or an additional microphone.
For a macOS setup, use a device with a built-in screen, camera, and microphones like an iMac or a standalone macOS device like a Mac Mini with added camera and microphone (note that your macOS device must run OS X Yosemite 10.10.X or higher).
For a Windows setup, use a device with a built-in screen, camera, and microphone, like an all-in-one PC, or a standalone Windows device like an Intel NUC with added camera and microphone (note that your Windows device should run Windows 10; preferably the most recent version).
1. You will also need an iOS, Android, or Windows tablet for Zoom’s Controller app, which is used to start and stop meetings.
2. A Zoom Rooms license is also required.
Obtaining a Zoom Rooms License
1. To set up Zoom Rooms, purchase a license.
2. Ensure your account has administrator privileges to complete the following steps.
Creating a Zoom Room
1. Log in to your account After acquiring a Zoom Rooms license.
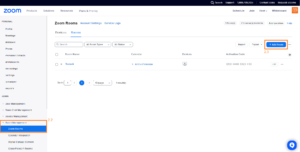
2. To create a room, select ‘Room Management’ in the left sidebar, then choose ‘Zoom Rooms.’
3. Click ‘Add Room’ to create your room.
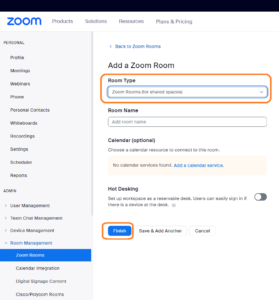
4. Name your room and ensure the room type is set to ‘Zoom Room (for shared spaces).’ You can also select a location for your room. Then click ‘Finish.’
Set up your Zoom Room Account with Yodeck Integration
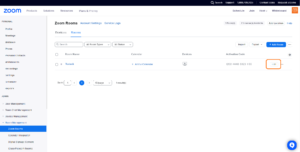
1. Return to ‘Room Management’ > ‘Zoom Rooms’ in your Yodeck Rooms account, and click ‘Edit’ next to the room name you want to use with Yodeck.
2. Choose the ‘Digital Signage’ tab
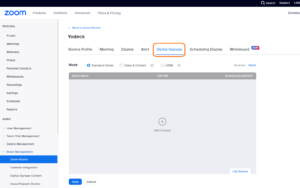
3. Click the ‘Add Content’ button.
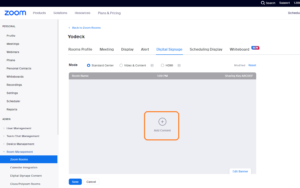
4. Select the ‘URL’ option and paste the link for Yodecks’s WEB player (https://player.yodeck.com), then click ‘Add URL’ and ‘Add items’.

5. To implement the perfect settings to set up Yodeck’s WEB player with Zoom Rooms:
- Set the duration of the URL you just added to 23:59:59.
- Set the ‘Display Period’ minutes under ‘Start displaying content ▢ min after a meeting ends’ to 0 (keep in mind that you might want to set it higher than this, as if you have a scheduled meeting and go over time, it will stop the meeting, so you may want to set this to ‘10 minutes‘ to allow for scheduled meetings to go a bit over time if necessary).
- Also, set minutes for ‘Stop displaying content ▢ min before a meeting is scheduled to begin’ to 0.
- Activate the ‘Digital Signage’ option.
- Finally, click ‘Save’.

6. Your setup should now look similar to the below:
Setting up Zoom Rooms with Yodeck
Next, you’ll need to install the Zoom Rooms app on your macOS or Windows device and your iOS, Android, or Windows tablet.
- First, download and install the Zoom Rooms app onto the macOS or Windows device that you are using for your meeting room setup. Use the appropriate download link at the bottom of the Zoom Rooms download page.
- Now, on your iOS, Android, or Windows tablet, download the Zoom Rooms controller app from the app store. Links to these downloads can be found under the ‘Controllers for Zoom Rooms’ section on Zoom’s Download Center page. https://zoom.us/download
- Then, sign in to your Zoom Rooms account on both your macOS or Windows device and your iOS, Android, or Windows tablet and select the correct Zoom Room to use.
- Please note: If you’re ever asked for your ‘Room Passcode’ to sign out or exit the app, remember that the default passcode is 00000 unless you’ve changed it in your Zoom account in the Room Management > Zoom Rooms section, under the ‘Rooms Profile’ tab.
- Open the Zoom Rooms app on your macOS or Windows device and sign in to your Zoom Rooms account using your email and password or using your Google account linked to your Zoom account.
- Open the Zoom Rooms controller app on your iOS, Android, or Windows tablet and sign in to your Zoom Rooms account. Then, select the room you set up earlier for use with Yodeck.
- The Yodeck Zoom Rooms integration should start automatically and work as a screensaver when your Zoom Room Conference is not actively used.
Adding Content to Your Screens
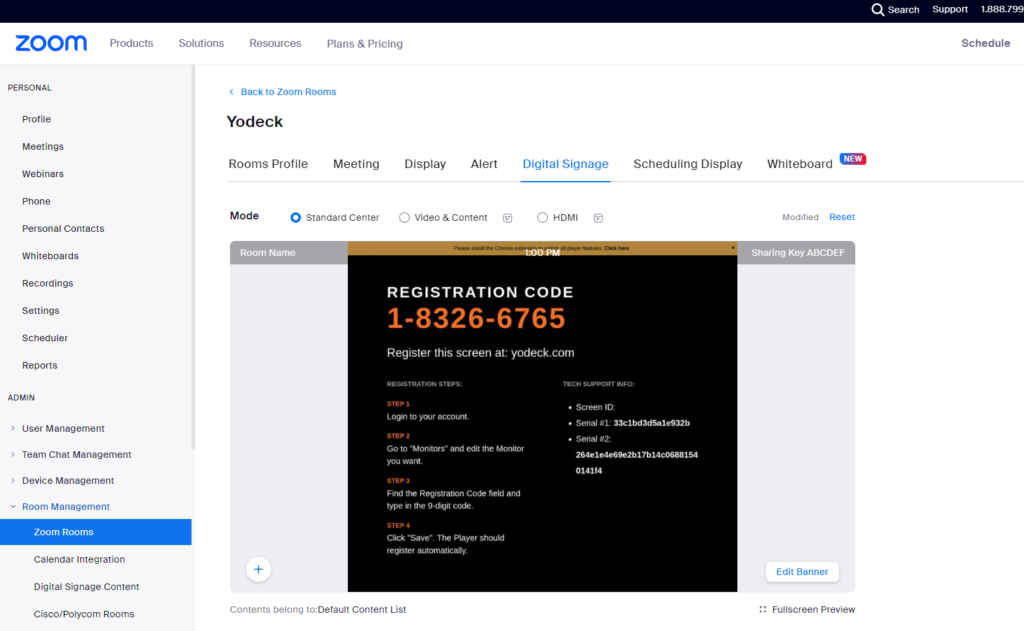
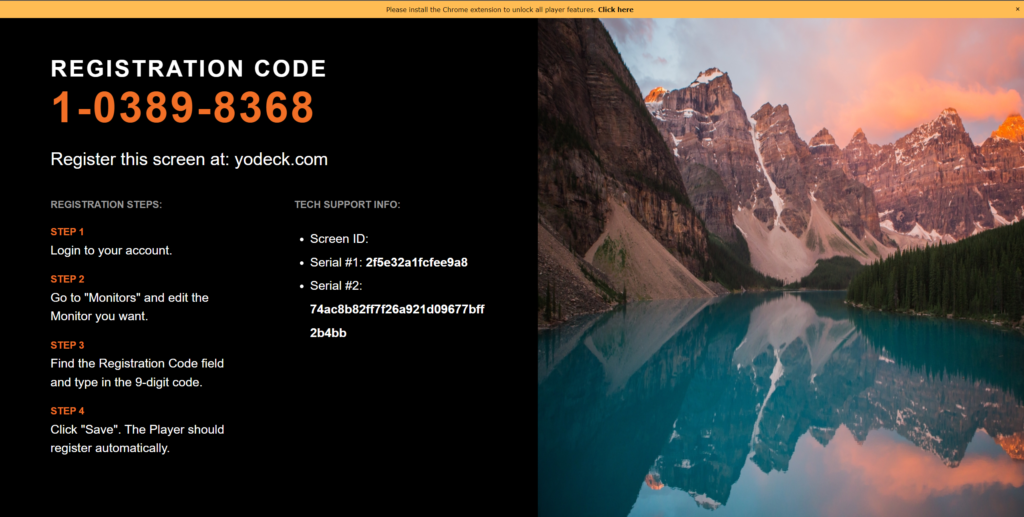
Once you’ve completed the previous steps, the Yodeck Zoom Rooms integration will automatically load on your Zoom Rooms screen when it’s not used for a video meeting. The first time the Yodeck Zoom Rooms integration loads (which might take up to 30-60 seconds), you will see a 9-character pairing code and instructions in order to add your screen to your Yodeck account.
Supported Devices, Apps, and Content
We Recommend the Following Devices:
macOS
- Mac Mini Late 2018
- Mac Mini Late 2014
- Mac Mini Late 2012
- iMac (Retina 5K, 27-inch, 2019)
- iMac (Retina 4K, 21.5-inch, 2019)
- iMac (Retina 5K, 27-inch, 2017)
- iMac (Retina 4K, 21.5-inch, 2017)
- iMac (21.5-inch, 2017)
- iMac (Retina 5K, 27-inch, Late 2015)
- iMac (Retina 4K, 21.5-inch, Late 2015)
- iMac (21.5-inch, Late 2015)
- iMac (Retina 5K, 27-inch, Mid 2015)
- iMac (Retina 5K, 27-inch, Late 2014)
- iMac (21.5-inch, Mid 2014)
- iMac (27-inch, Late 2013)
- iMac (21.5-inch, Late 2013)
- iMac (27-inch, Late 2012)
- iMac (21.5-inch, Late 2012)
Windows
- Intel NUC 7 Celeron
- Intel NUC 8 Core i3
- Intel NUC 8 Core i5
- Intel NUC 8 Core i7
- Azulle Byte3
- Azulle Inspire Celeron
- Azulle Inspire Core i3
- Azulle Inspire Core i5
- Azulle Inspire Core i7
Need Help?
The Yodeck Support Team can help you out! Log in to your Yodeck account and send us a message from the bottom right corner!