Table of Contents
Introduction
Workspace Hierarchies help you represent your organization’s structure in Yodeck, managing users and content more intuitively and scalably.
Hierarchical workspaces facilitate organization and navigation, as well as user access management.
How-to
Log in to your Yodeck account and select “Manage Workspaces” from the “All Workspaces” drop-down menu at the top-right corner.
- You can either create a new workspace and select its parent workspace in the “Parent Workspace” field, or click the “(+)” icon in the Actions column on the right to create a sub-workspace directly under another existing workspace.
- You can use the “Parent Workspace” field at any time to move a workspace under a different parent.
- You can click the “Preview Workspace Organization” eye icon at the top right to view a chart diagram of your current workspace hierarchy.

Best Practice using User Groups and Workspace Hierarchies
- Create Workspaces and sub-workspaces representing your organization’s structure.
- Determine the roles you want to assign to your users in each branch/region or HQ, and use or create the relevant user groups.
- You can create custom roles if the default roles don’t meet your needs.
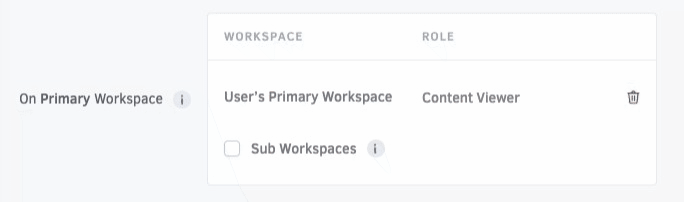
- Please choose the correct groups based on the role you want your users to have in their Primary Workspace & their sub-workspaces.
- Add your users, set their Primary Workspace, and add them to their respective group. We provide pre-defined groups for each standard user role.
- You can create a group for users who need access to a workspace and all their sub-workspaces and add the appropriate option.
Example
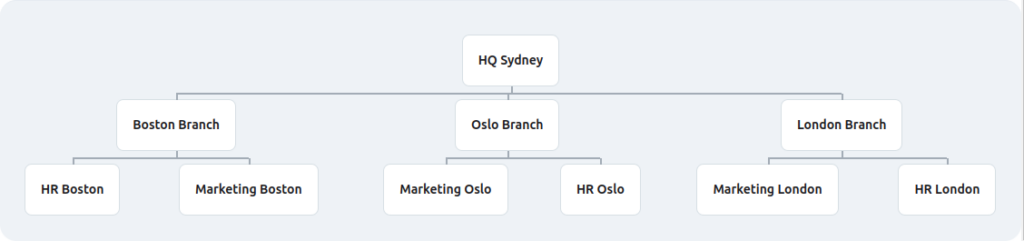
A multinational company has three branches in 3 different cities worldwide (Boston, London & Oslo), and its HQ is in Sydney.
Additionally, each branch must have two workspaces: one for marketing and one for the HR department. The company wants to give the users who belong to the Marketing and HR workspaces the ability to manage the media in their workspace and update the playback on the screens, but not be able to configure the screens; this task should be left to a dedicated user with full access in both sub-workspaces for each branch.
You can represent the above with the following workspace configuration:
You then add the users to the corresponding workspace and assign each user a specific role. For example, you can add users in the Marketing and HR sub-workspaces for each branch in the “Content Managers” group. You could then have one user for each main branch to manage the screens in each sub-workspace and the users in them. You can add a user to the “Boston Branch” and assign the user to the “Workspace Admins” group. Additionally, users with access to the “HQ Sydney” parent workspace will have access to every sub-workspace. You can add such users to the “Global Admins” group.
The users in total will be:
- One or more “Global Admins”.
- A “Workspace Admin” for each main branch with full access to the sub-workspaces under each branch.
- Users in each branch’s “HR” sub-workspace have access only to their media and screens.
- Users in each branch’s “Marketing” sub-workspace have access only to their media and screens.