Table of Contents
Part 3: Setup Workflow, Screen Limits, Working Hours, Emergency Alerts, and SSO
Overview
Once your Workspace structure and access model are in place, the next step is rolling everything out in a way that stays manageable as your deployment grows. This article covers the operational side of Workspaces: setup workflow, screen limits, Working Hours, Emergency Alerts, and SSO.
If you also need safety guidance, troubleshooting help, and long-term best practices, continue to the final article in this series after finishing this one.
Recommended setup workflow
For larger accounts, you can follow this order below:
- Map your real-world structure, for example, HQ → Region → Store.
- Create your Workspaces, including parents and sub-Workspaces. Keep it simple.
- Decide what should be shared. Create shared content Workspaces (like read-only brand assets) only where they add clear value.
- Create your user Groups: Workspace Admins, Content Managers, Content Viewers, and so on.
- Set each user’s Primary Workspace. This is critical for scalable access.
- Add users to the right Groups.
- Add explicit access only for exceptions.
- Configure screen limits and Working Hours at the Workspace level.
- Test with a non-admin user. Sign in as someone with limited access and confirm they:
- See the right Workspaces
- Reach the right content
- Can’t access anything outside their scope
ℹ️ Five minutes of testing here saves hours of support tickets later. Seriously.
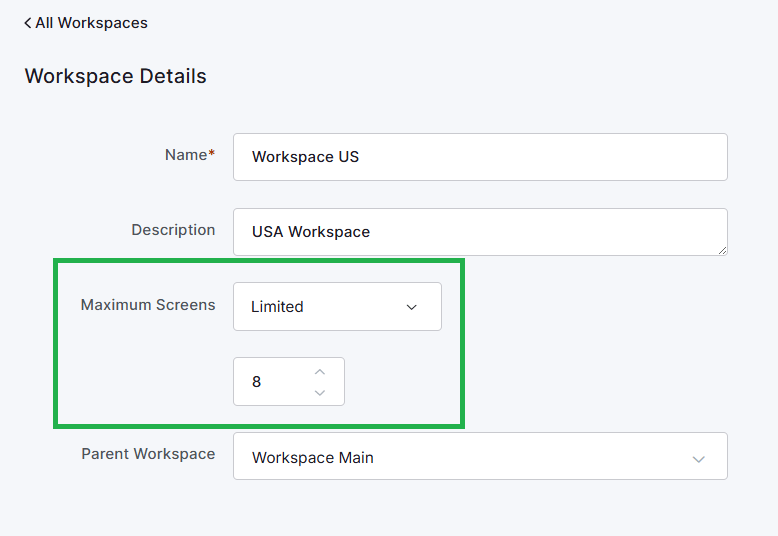
Screen limits per Workspace
Control how many screens each Workspace can hold.
How it works: edit a Workspace and set a Screen Limit. Once the Workspace hits that number, users in it can’t add more screens until you raise the limit.
Why it’s useful:
- Keeps device allocation aligned with your plan
- Prevents over-registration
- Supports approval-based deployments
- Keeps large accounts tidy
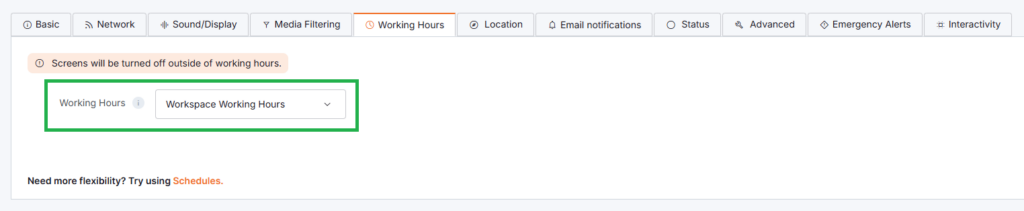
Working Hours per Workspace
Each Workspace can follow its own Working Hours, so screens in different locations can run on different schedules. Remember that you can change the Working Hours from each Screen’s configuration options.
For example:
- London Office screens: Mon–Fri, 8:00 AM – 6:00 PM
- New York Office screens: Mon–Fri, 9:00 AM – 7:00 PM
- Retail store screens: Daily, 9:00 AM – 9:00 PM
Perfect for organizations with different opening hours, time zones, or shift patterns.
💡 Workspace-level Working Hours let you manage local schedules without touching the rest of the account.
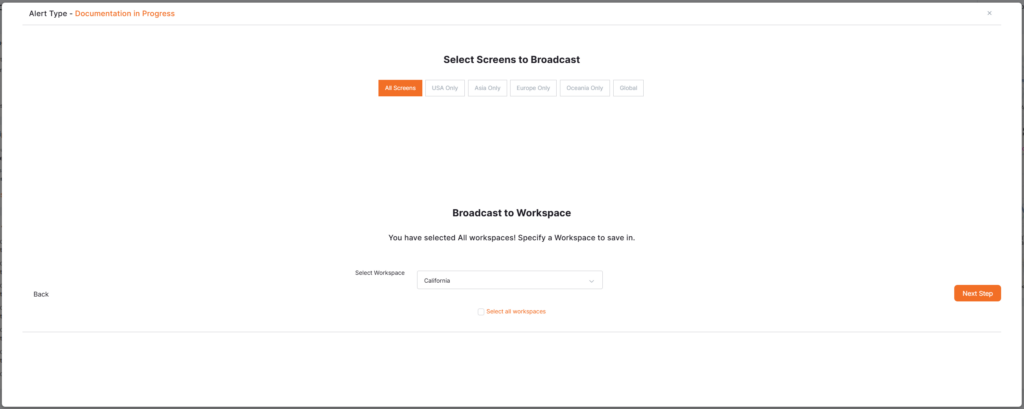
Target Emergency Alerts by Workspace
When something goes wrong, you don’t always want to alert every screen in the account. Workspaces let you send Emergency Alerts to a specific area instead.
For example: if there’s an incident at one branch, send the alert only to that branch’s screens. The rest of the organization continues as normal.
You can initiate a new Emergency Alert broadcast from the Dashboard by clicking on the New Broadcast button of the Emergency Alerts module.
Then, follow the instructions on the new pop-up window that appears, and on the second step, you can select either All Workspaces or the Workspace and/or Sub-Workspace that you wish to target the emergency alert.
Use SSO with Workspaces
If your organization uses Single Sign-On (SSO), you can combine it with Workspaces to automate user assignment and access.
Primary Workspace with SSO
Map a SAML claim to a user’s Primary Workspace so users land in the right place automatically at sign-in. Less manual setup, more consistent onboarding.
Group-based access with SSO
Map your identity provider’s groups to Yodeck Groups. This automates both:
- Where the user belongs
- What permissions they receive
💡 For larger organizations, the most scalable setup combines Workspace hierarchies + Primary Workspace + Groups + SSO group mapping. It’s a bit more work up front, and it pays off every day after that.
How-To Example of Setting up a Primary Workspace SSO
You can click on the following PDF file to view and follow the respective guide:
ℹ️Please note that the example of the above guide is based on Azure SSO, but the same logic and steps also apply to Okta SSO.
Next steps in the Workspaces Series
With your rollout plan in place, the final step is making sure your Workspace setup stays safe, supportable, and easy to maintain over time.
Continue with the final article in this series: Yodeck Workspaces: Safety, Troubleshooting, and Best Practices.
- Article 1: Yodeck Workspaces: Introduction and Basics
- Article 2: Organize Yodeck Workspaces: Hierarchies, Roles, Groups, and Primary Workspace
- Article 3: Roll Out Yodeck Workspaces at Scale: Setup Workflow, Screen Limits, Working Hours, Emergency Alerts, and SSO -> You are here!
- Article 4: Yodeck Workspaces: Safety, Troubleshooting, and Best Practices