Table of Contents
Part 2: Hierarchies, Roles, Groups, and Primary Workspace
Overview
Once you have created your Workspaces, the next step is organizing them properly. This article covers the structure and access model behind Yodeck Workspaces, including hierarchies, roles, Groups, and Primary Workspace.
If you are planning a broader operational rollout, continue to the next article in this series after finishing this one.
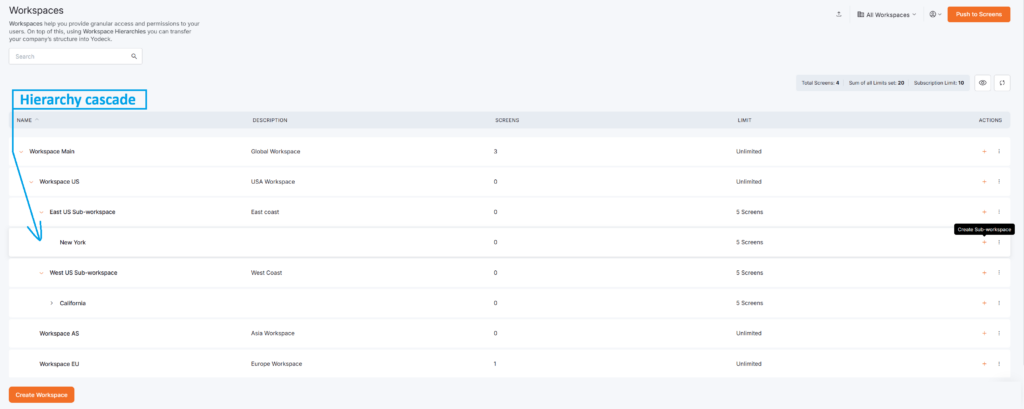
Workspace hierarchies
Hierarchies let you nest Workspaces into parents and sub-Workspaces, mirroring your real structure:
- HQ → Region → Branch
- Company → Department → Team
- Global → Country → Office
How to build one
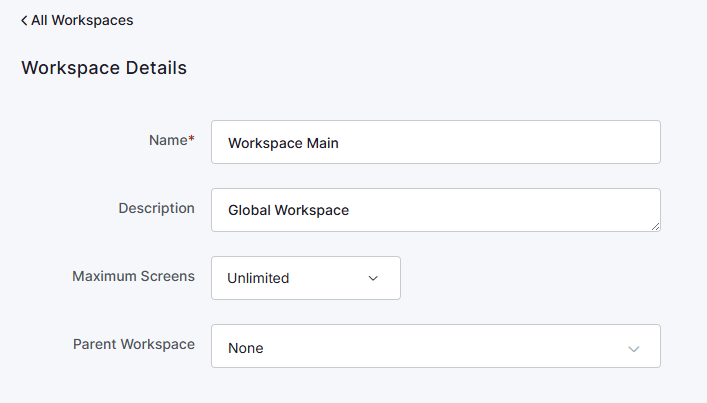
- Create a new Workspace and choose a Parent Workspace
- Create a sub-Workspace directly under an existing one
- Move a Workspace later by changing its Parent Workspace
You can preview the full structure with the hierarchy diagram.
💡Workspace hierarchies can reach up to 5 levels deep.
Parents work best as containers
In most cases, parent Workspaces work best as organizational containers: structure, not storage.
💡 Only add content to a parent Workspace if it’s relevant to most or all of its sub-Workspaces.
Example hierarchy
HQ Sydney
├── Boston Branch
│   ├── Boston - Marketing
│   ├── Boston - Sales
|   └── Boston - Support
├── London Branch
│   ├── London - Marketing
│   ├── London - Sales
|   └── London - Support
└── Oslo Branch
    ├── Oslo - Marketing
    ├── Oslo - Sales
    └── Oslo - Support
With this setup:
- Global admins oversee the full structure
- Branch admins manage their branch and everything inside it
- Department users work only in their own Workspace
➡️For more information on Workspace Hierarchies, please also check this article.
User Roles in Workspaces
Roles are where Workspaces get really flexible. A single user can have:
- One role in one Workspace
- A different role in another
- Access to several Workspaces at once
Role comparison
| Role | Account-wide access | Manage content | Publish content | Manage screens | Manage Workspace settings |
|---|---|---|---|---|---|
| Administrator | ✅ | ✅ | ✅ | ✅ | ✅ |
| Workspace Admin | ❌ | ✅ | ✅ | ✅ | ✅ (within assigned Workspaces) |
| Content & Device Manager | ❌ | ✅ | ✅ | ✅ | ❌ |
| Content Manager | ❌ | ✅ | ✅ | ❌ | ❌ |
| Restricted Content Manager | ❌ | ✅ | ❌ | ❌ | ❌ |
| Content Viewer | ❌ | Read-only | ❌ | ❌ | ❌ |
Example: One user could be a Workspace Admin in London, a Content Manager in Athens, and a Content Viewer in HQ. One login, three different levels of responsibility. Match permissions to real work, not the other way around.
Scale access with Groups and Primary Workspace
Assigning roles one user at a time works for small teams. Beyond that, it gets messy fast. That’s where Groups and Primary Workspace come in.
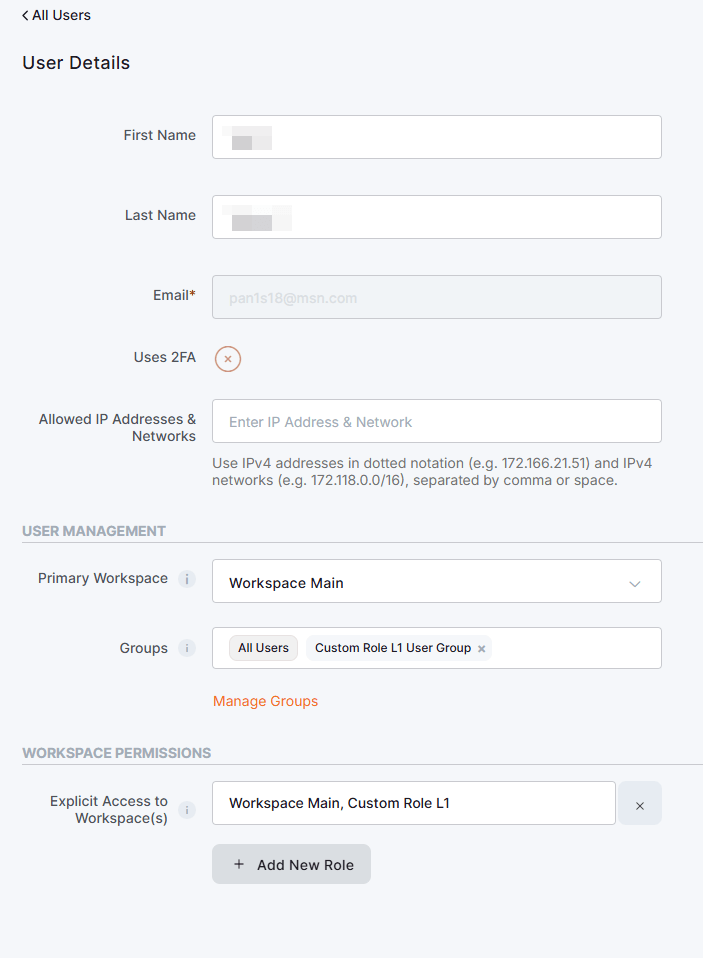
What is a Primary Workspace?
A user’s Primary Workspace is the main one they belong to. It’s what lets Yodeck organize users cleanly and apply Group-based access consistently.
Setting a Primary Workspace helps you:
- Keep users organized
- Apply access rules consistently
- Use Group-based permissions effectively
- Route users to the right Workspace Admin
💡 Give every user a Primary Workspace. It’s the foundation for everything else.
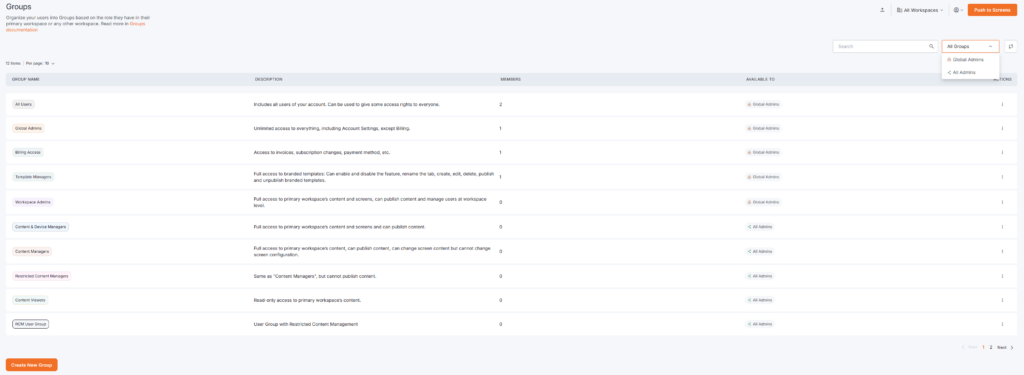
Why use Groups?
Groups let you manage access at scale. Moreover, instead of clicking through each user:
- Create a Group for a specific role.
- Define how it applies access.
- Assign users to it.
- Yodeck applies the right permissions based on each user’s Primary Workspace.
This is the go-to setup for larger organizations.
Sub-Workspace access through Groups
Groups can also extend access down the hierarchy. A regional manager whose Primary Workspace is UK Region automatically gets access to every Workspace beneath it, with no manual setup per branch.
Explicit access (for the exceptions)
You can still assign direct access to individual Workspaces when you need to. It’s perfect for contractors, consultants, and short-term collaborations that don’t fit your regular Group structure.
💡 Use Groups as the rule. Use explicit access as the exception. Your setup stays clean that way.
Next steps in the Workspaces Series
Now that your Workspace structure and access model are in place, the next step is rolling Workspaces out cleanly across a larger deployment.
Continue with the next article in this series: Roll Out Yodeck Workspaces at Scale: Setup Workflow, Screen Limits, Working Hours, Emergency Alerts, and SSO.
- Article 1: Yodeck Workspaces: Introduction and Basics
- Article 2: Organize Yodeck Workspaces: Hierarchies, Roles, Groups, and Primary Workspace -> You are here!
- Article 3: Roll Out Yodeck Workspaces at Scale: Setup Workflow, Screen Limits, Working Hours, Emergency Alerts, and SSO
- Article 4: Yodeck Workspaces: Safety, Troubleshooting, and Best Practices