Table of Contents
Overview
The Billing Entities feature allows large customers to keep a single Yodeck account while billing each legal entity, subsidiary, department, or franchise location separately. This means you can now order centrally and bill separately, without juggling multiple Yodeck accounts or routing every billing change through your Account Manager.
Available only on the Enterprise/Enterprise Plus plan!
This feature is only available on the “Enterprise/Enterprise Plus” Plan. You might not see some menus below if you are not on these Plans.
Remember that the “Enterprise” Plan is free if you only manage 1 screen to evaluate these features quickly.
💡Best for: Enterprise and Enterprise Plus accounts that need centralized account management with separate invoicing per entity.
What are Billing Entities?
Billing Entities is a Yodeck feature for Enterprise customers that allows you to create separate Billing Organizations within a single account. Each one gets its own invoices, billing details, currency, shipping addresses, license balance, and renewal date while your team manages everything from one place.
Key Benefits
- One account, separate invoices. No more manual invoice splits over email and spreadsheets.
- Centralized purchasing. A global admin places orders for any Billing Organization in one place.
- Local currency per entity. Each Billing Organization is invoiced in its own currency.
- Volume discounts are fairly applied. Discounts are calculated on your account’s total license count and shared proportionally across all Billing Organizations.
- Per-organization renewal cycles and clean records filterable by entity, straight from your portal.
Who is “Billing Entities” for?
Billing Entities is designed for organizations with multiple billing entities under a single Yodeck account. Common cases include:
- Global enterprises with subsidiaries in different countries
- Companies with multiple departments, business units, or cost centers
- Franchise networks where HQ manages Yodeck, but each location pays its own bills
- Holdings with several legal entities that need their own tax IDs and invoices
If your finance team currently reconciles a single Yodeck invoice across multiple entities or asks Yodeck Support to manually split invoices per location, Billing Entities is for you.
Standard Billing vs. Billing Entities
| Without “Billing Entities” | With “Billing Entities” |
|---|---|
| One billing entity per account | Multiple Billing Organizations per account |
| One billing address, currency, and renewal date | Each Billing Organization sets its own |
| Manual coordination for separate invoices | Each entity gets its own invoice automatically |
| One central record of orders and invoices | Records filterable per Billing Organization |
| Single account renewal date | Per-Billing-Organization renewal dates |
How “Billing Entities” works
The current version supports central ordering with separate invoicing. A central admin, typically in IT or Finance, handles purchasing for the whole account and selects which Billing Organization to bill at checkout.
- Start an order from the Yodeck account.
- Select the Billing Organization that should be billed.
- Yodeck issues the invoice using that Billing Organization’s billing details and local currency.
- The invoice is delivered to the configured invoice recipients.
ℹ️Important: Every Billing Entities order must be attributed to one Billing Organization. Make sure you select the correct one before submitting.
What Is a Billing Organization?
A Billing Organization (BO) is a separate billing entity inside your Yodeck account. It represents a distinct legal entity, subsidiary, department, country branch, franchise location, or any unit that needs its own invoices.
Each Billing Organization can include its own:
- Organization name and description
- Owner email and additional invoice recipients
- Billing address and tax/VAT details
- One or more shipping addresses
- Currency
- License balance and subscription balance
- Renewal date
- Orders, quotes, and invoices
When the Billing Entities feature is enabled, your account always has at least one Billing Organization. Existing accounts get a default Billing Organization created automatically; new accounts start with one and can add more anytime.
Billing Organizations and Workspaces
Billing Organizations and Workspaces are two separate parts of Yodeck that answer different questions.
| Area | Answers | Controls |
|---|---|---|
| Billing Organizations | Who pays for this? | Billing details, invoices, quotes, orders, license balance, renewals |
| Workspaces | Who manages and uses these screens? | Screen organization, content access, user access |
In the current version, Billing Organizations are not directly tied to specific Workspaces. Licenses contribute to your account’s overall license pool, and any Workspace can use those licenses according to your Workspace setup and limits. This separation is intentional since the billing structure doesn’t always match the content structure. A regional subsidiary might run several Workspaces while all those screens are paid for by the parent company.
License Distribution Tip Regarding Workspaces
Since Billing Organizations are not directly tied to Workspaces, you can use Workspace limits to manage license distribution across Workspaces.
💡Good to know: Billing Entities controls who is billed. Workspaces control how screens, content, and users are organized. To distribute licenses across Workspaces, use Workspace license limits in your Workspace settings.
Best Practices Before You Start
Before enabling the feature and then creating new Billing Organizations, prepare the following details for each entity:
- Official organization or legal entity name
- Billing owner email and additional invoice recipients
- Billing address and tax/VAT details
- One or more shipping addresses
- Preferred currency
- Number of licenses that should belong to the Billing Organization
💡Tip: Use the official legal entity name that should appear on invoices. This helps finance teams reconcile Yodeck invoices with their internal records on the first try.
Actions Handled by Yodeck
To protect your billing and license data, a few actions are managed by Yodeck rather than from the portal. Contact your Yodeck Account Manager or Yodeck Support if you need to:
- Delete a Billing Organization
- Disable Billing Entities or downgrade an account that has it enabled
- Move licenses between Billing Organizations
- Purchase, change, or remove add-ons
- Migrate an existing account into a multi-Billing-Organization structure
Enabling Billing Entities on your Account
Enabling Billing Entities (Billing Organizations) varies by plan and requires communication with your account manager.
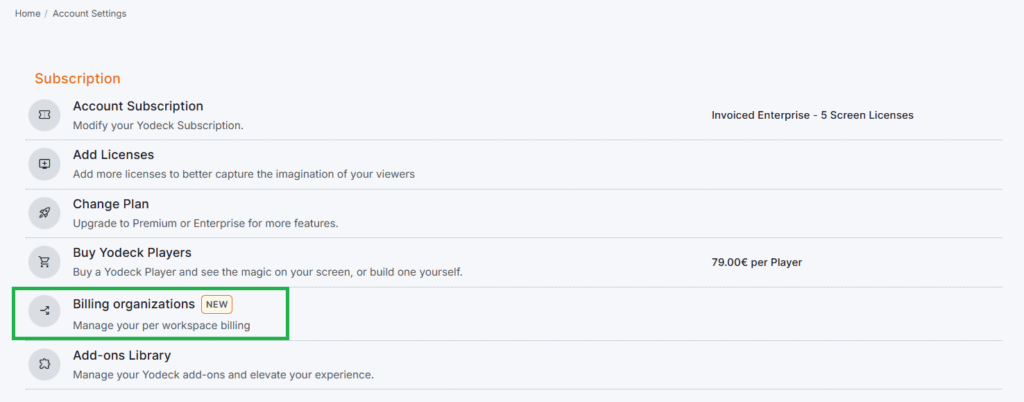
- Enterprise Plus: Included by default, and available under the Account Settings > Subscription section.
- Enterprise: Available as an add-on. Activate it from the Account Settings > Add-ons Library, or contact your Account Manager.
When the Billing Entities feature is enabled on an existing account, your current billing setup is migrated to a default Billing Organization. From there, you can add and configure additional ones as needed.
💡Tip: Have your billing details, tax IDs, and shipping addresses ready before adding new Billing Organizations. See Best Practices Before You Start for the full checklist.
Create a Billing Organization
Once the Billing Entities feature is enabled, you can add a new Billing Organization at any time from your account.
- Go to Account Settings → Subscription → Billing Organizations.
- Click Create organization at the top of the list.
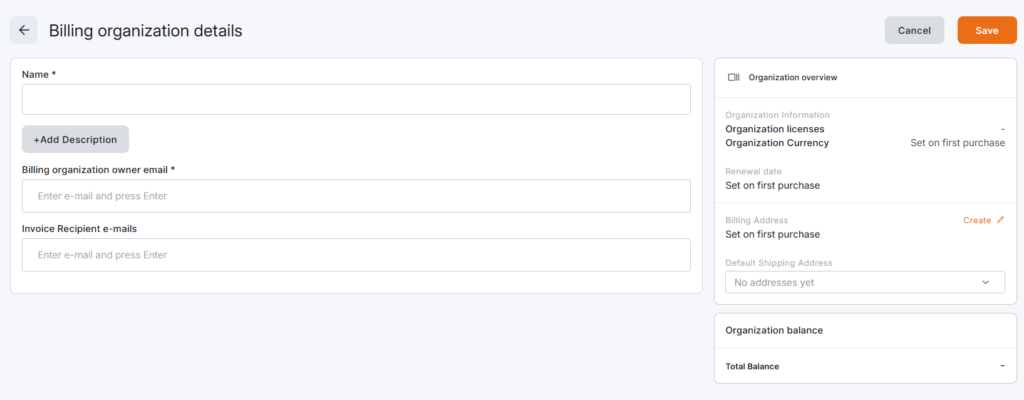
- Fill in the creation form:
- Name (required) — the official name that should appear on this entity’s invoices.
- Description (optional) — an internal label to help your team recognize the Billing Organization at a glance.
- Billing Organization owner email (required) — the primary contact for this Billing Organization.
- Invoice recipient emails (required) — one or more addresses that should receive this Billing Organization’s invoices.
- Optionally, you can set the Default Shipping Address, on the right side of the form:
- Select an existing address from your account, or
- Create a new address and save it for this Billing Organization.
- Click Save to create the Billing Organization.
✅The new Billing Organization appears in your Billing Organizations list and is immediately available for selection at checkout.
💡Good to know: Currency, billing address, tax/VAT details, and renewal date are not set in the creation form. The Billing Organization’s currency, and renewal date, are automatically set on the first order, while the billing address, shipping address, and VAT details can also be completed during the first order checkout (or at any time afterward from the Billing Organization’s detail page).


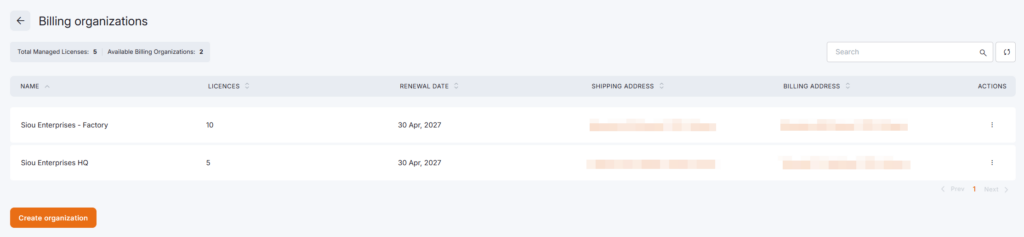
View and Manage Your Billing Organizations
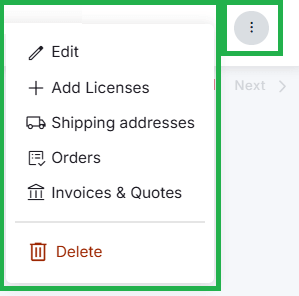
Go to Account Settings > Subscription section > Billing Organizations to see every entity connected to your account, with its name, license count, renewal date, and key billing details (shipping address & billing address). Open any Billing Organization to view, delete, or edit its full details, such as owner email, invoice recipients, billing address, shipping addresses, currency, and license balance. You can also access the quick actions of each Billing organization in the list by clicking on the three-dot icon next to each organization.
Add Licenses with Billing Entities
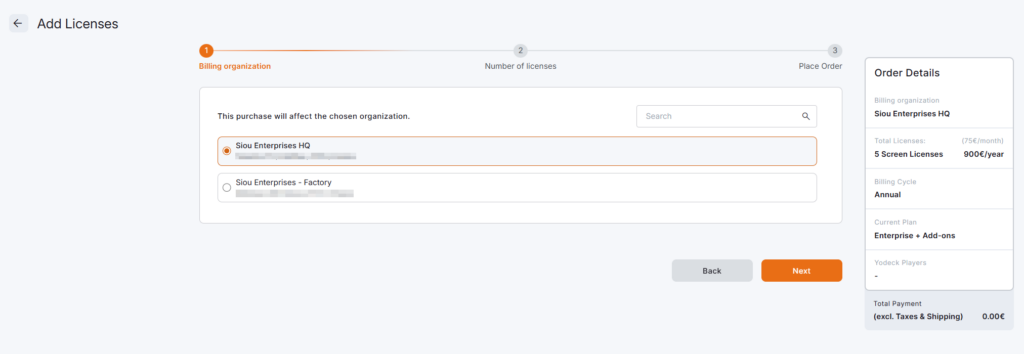
When the Billing Entities feature is enabled, the Add Licenses flow includes a step to select a Billing Organization.
- Start the Add Licenses flow from your subscription or billing area.
- Select the Billing Organization that should be billed.
- Enter the number of licenses you want to add.
- Review or complete the required billing and shipping details. If the Billing Organization is brand new, you’ll set its currency on this first purchase.
- Review the order summary: Billing Organization, line items, applied volume discount, and total.
- Submit the order.
The order and resulting invoice are attributed to the Billing Organization you selected.
How volume discounts work: Discounts are calculated on your account’s total license count across all Billing Organizations, then split proportionally across each Billing Organization’s invoices. Every entity gets a fair share of the savings your full account earns.
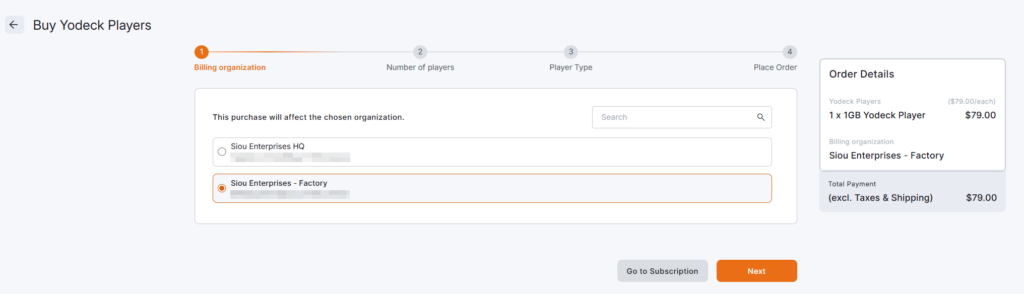
Buy Yodeck Players and Other Hardware
Hardware orders follow the same logic: the Billing Organization you select determines which entity is billed.
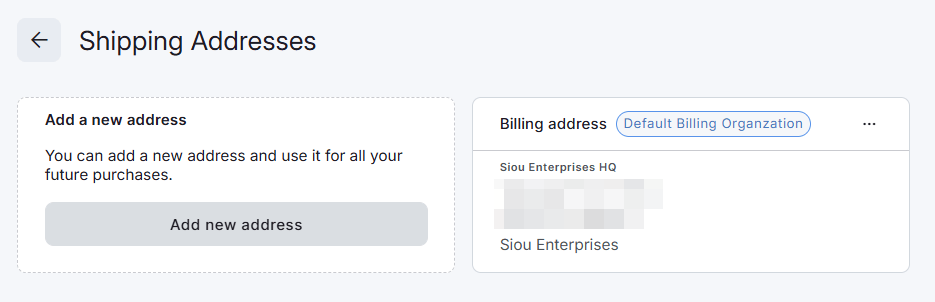
At checkout, you’ll also confirm the shipping address. Because each Billing Organization can have multiple shipping addresses, you can ship products directly to a specific office, branch, or franchise location.
If you start the order from a specific Billing Organization’s detail page, that Billing Organization (and its addresses) is preselected at checkout. The same logic applies also to licenses.
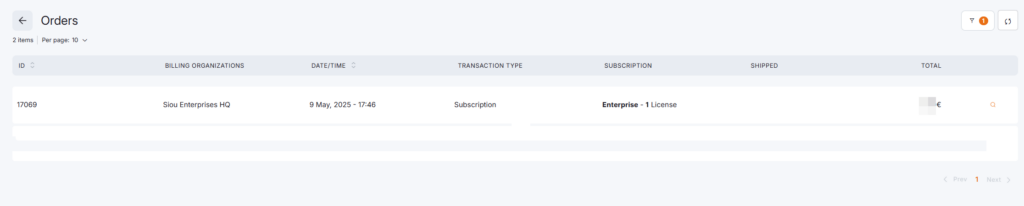
View Orders, Invoices, and Quotes by Billing Organization
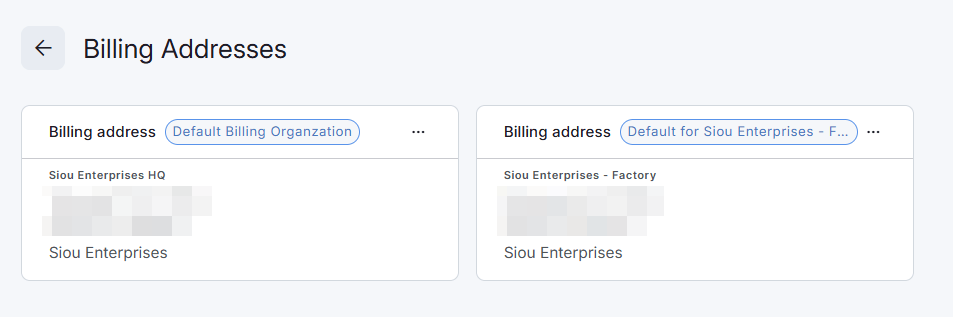
From your Account Settings > Account Subscription page (account’s billing page), you can view orders, invoices, quotes, and shipping addresses, and filter them by Billing Organization.
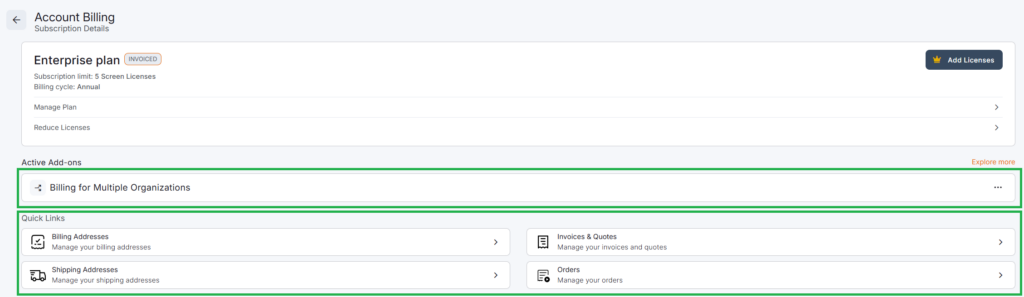
Each record is tagged with the Billing Organization it belongs to, so finance teams can quickly find what belongs to a specific entity. You can also download invoice PDFs per record, issued in the Billing Organization’s billing details and local currency.
ℹ️You can access the invoices & quotes, orders, billing addresses, and shipping addresses from within each organization listed inside the Billing organization’s list page via their quick actions button.
ℹ️When there are pending quotes, the platform notifies you promptly and automatically, especially when a new quote is created.
⬇️You can view the following screenshots to have a better understanding of each billing element:

Payments
Billing Entities currently uses invoice-based payment at checkout, with wire transfer as the supported method. Card payment may be available through the invoice payment link in some cases. Please contact your Account Manager or Yodeck Support for help with payment options.
⚠️Heads up: Direct card-on-file checkout for Billing Organizations isn’t part of the current release.
Renewals and In-App Notifications
Each Billing Organization renews on its own schedule. Existing Billing Organizations inherit the account’s current renewal date during migration; new Billing Organizations have their renewal date set automatically on the first purchase.
When a renewal needs your attention, Yodeck shows in-app notifications:
- Order processing: confirms an invoiced order is being processed and that you can keep using Yodeck as usual.
- Renewal pending: reminds you to complete payment by a specific date to avoid disruption, with a Make Payment link.
Add-ons and Billing Entities
Add-ons aren’t fully self-service in the current release. Because some add-ons affect screens or licenses across multiple Billing Organizations, their costs need to be fairly distributed between entities. Your Account Manager handles those changes today.
⚙️Contact your Account Manager or Yodeck Support to purchase, change, or remove any add-on while Billing Entities is active.
What’s Coming Next
The next iteration introduces local ordering: designated admins for a specific Billing Organization will be able to place orders for that entity directly, without access to the rest of the account. Workspace-level connections to Billing Organizations and richer permission controls will follow as part of the same expansion. We’ll share more details closer to release.
F.A.Q.s
Got questions? We’ve got answers! This section addresses common questions about the Yodeck Billing Entities feature.
Yes. Each order is attributed to a single Billing Organization, and the invoice is issued using that Billing Organization’s billing details and currency.
Yes. Billing Entities is designed for central ordering. The admin selects the relevant Billing Organization during checkout.
Not yet. Local ordering per Billing Organization is planned for a future phase.
Discounts are calculated on your account’s total license count across all Billing Organizations, then split proportionally across each entity’s invoices.
Not directly. Billing Organizations manage billing; Workspaces manage screens, content, and users. Distribute licenses across Workspaces using Workspace limits.
Yes. Each Billing Organization can have its own owner email and additional invoice recipients, its own currency (set on the first purchase), and its own renewal schedule.
Deletion is handled by Yodeck. Contact your Account Manager or Yodeck Support so we can apply the change safely.
Add-ons are handled with help from your Account Manager in the current version. Reach out and we’ll arrange the purchase or change for you.
Direct card checkout isn’t supported in the Billing Entities checkout flow. Wire transfer is the supported payment method. Card payment may be available through the invoice payment link in some cases.
Your existing billing setup is migrated to a default Billing Organization. If you’d like historical invoices attributed differently, talk to your Account Manager so we can review your case.
License reassignment between Billing Organizations is handled by your Account Manager in the current release.
Need Help?
The Yodeck Support Team can help you out! Log in to your Yodeck account and send us a message from the bottom right corner!