Table of Contents
Configuring Salesforce SAML for Yo deck
- In Salesforce, from Setup, enter Single Sign-On Settings in the Quick Find box, then select Single Sign-On Settings , and click Edit .
- Select SAML Enabled. You must enable SAML to view the SAML single sign-on settings.
- Specify the SAML version used by your identity provider.
- Click Save .
- In Salesforce, from Setup click Build ->Create > Apps -> Connected Apps and then click NEW
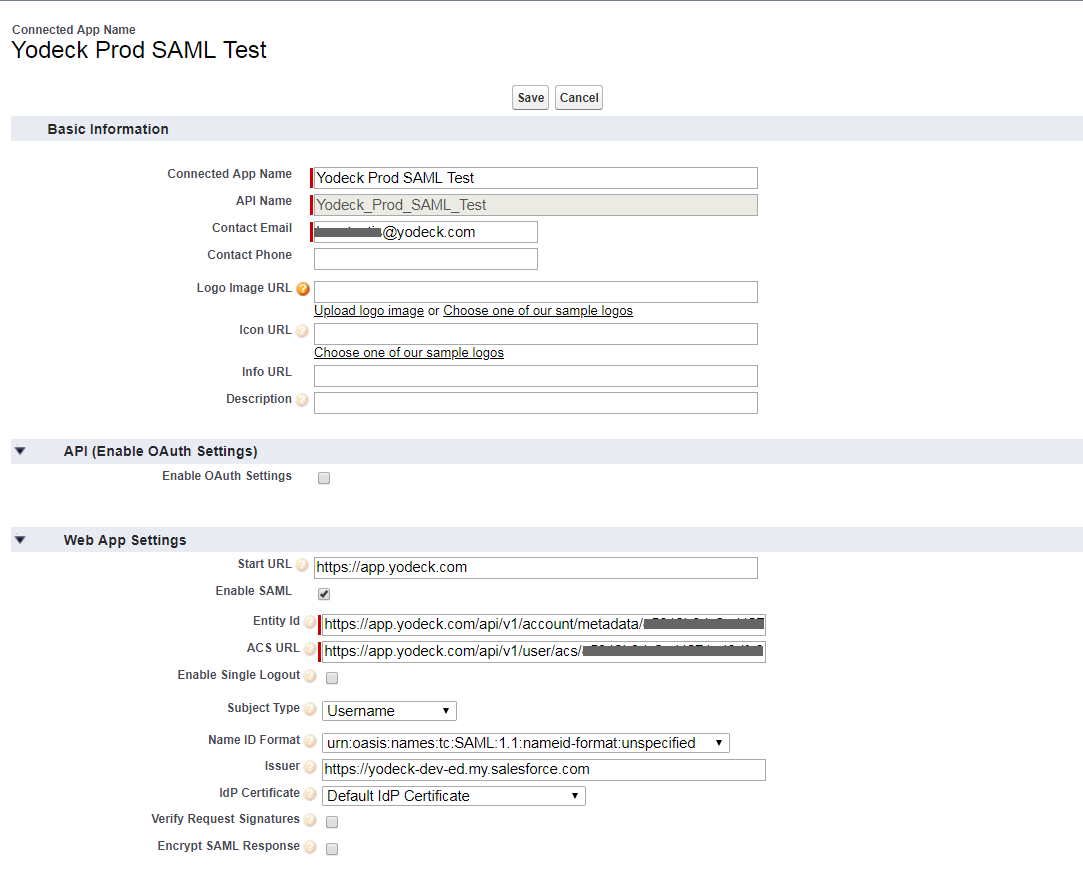
- In the textboxes, type the URLs that you will find from the SAML configuration:
-
- From the Yodeck portal go to your Account Settings and then click the SAML tab. After that you will find a URL” Service Metadata URL”, click it and you will be prompted to a new page.
- In the Start URL textbox : Copy the link of the Yodeck app and paste it in the textbox.
- In the Entity Id textbox: From the new page, in the EntityDescriptor copy the link next to Identifier and paste it in the textbox.
- In the ACS URL textbox: From the new page, in the AssertionConsumerService copy the link next to Assertion Consumer Service and paste it in the textbox.
- Enable Single Logout :
-
- In the Single Logout URL textbox: From the new page, go to the SingleLogoutService and copy the link next to Logout Service and paste it in the textbox.
- At Single Logout Binding : Choose “HTTP Redirect”.
vi. In the Subject textbox: Choose “Username”
-
-
- You can add a different attribute and paste it in the Yodeck SAML Configuration in the “Attribute name for NameID” textbox or leave the “Use Default NameID” that uses the email as the username.
-
-
- Click Save.
Create OneLogin test user
- Read the guidelines for adding users.
- From Setup, enter Users in the Quick Find box, then select Users .
- Click New User .
- Enter the user’s name and email address and a unique username in the form of an email address. By default, the username is the same as the email address.
Important
Your username must be unique across all Salesforce orgs. The username must be in the format of an email address, for example, jane@salesforce.com. The email used for your username doesn’t have to function. You can have the same email address associated with your account across multiple orgs. Remember: The username in the form of an email address must remain unique.
- In Professional, Enterprise, Unlimited, Performance, and Developer Editions, select a Role.
- Select a User License. The user license determines which profiles are available to the user.
- Select a profile, which specifies the user’s minimum permissions and access settings.
- If your organization has Approvals enabled, you can set the user’s approver settings, such as delegated approver, manager, and preference for receiving approval request emails.
- Check Generate new password and notify user immediately to have the user’s login name and a temporary password emailed to the new user.
Note: These values are not real. Update these values with the actual Sign-On URL and Identifier. Contact the Yodeck Client support team if you are experiencing any issues obtaining the URLs.
Assign your App
To assign the app that you have created to a user please follow the steps below:
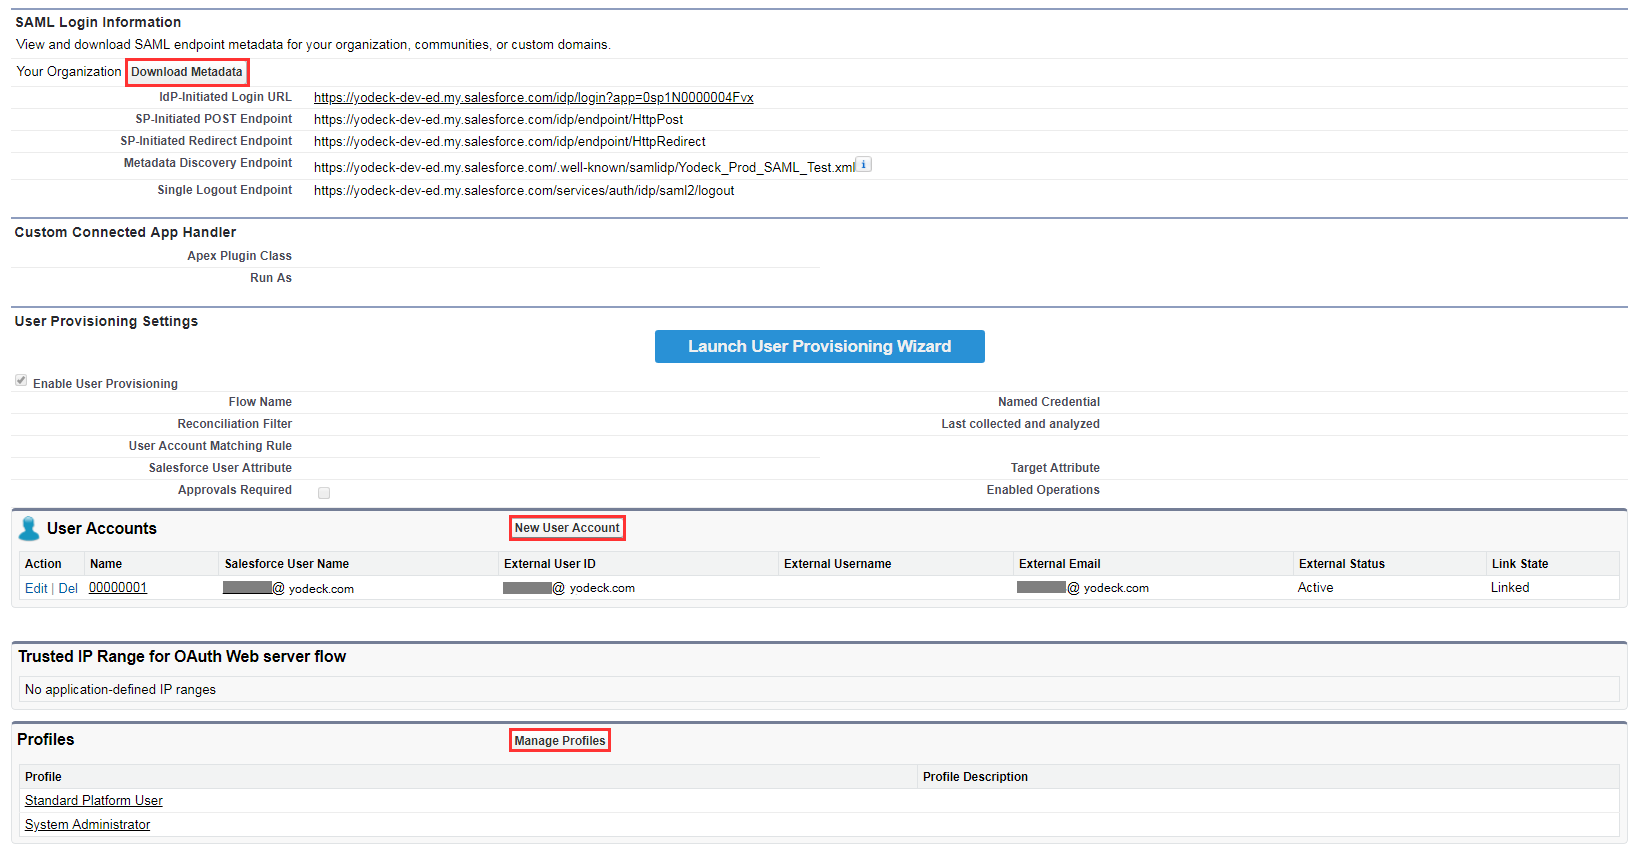
1. Click New User Account
2. In the Salesforce User field find and add the user that you have created.
3. Link State=Linked
4. Click Save
5. Click Manage Profiles and add the profile of your assigned User
(e.g. System Administrator)
6. Click Download Metadata.
Create a Yodeck test user
To enable Azure AD users to log in to Yodeck, they must be provisioned into Yodeck. In the case of Yodeck, provisioning is a manual task.
To provision a user account, perform the following steps:
- Log in to your Yodeck account.
- Click Users , and then click Add User .
- On the Add user dialog page, perform the following steps:
a. In the First name textbox, enter the first name, like SAML .
b. In the Last name textbox, enter the last name, like User .
c. In the Email address textbox, enter the email of the user that we have created from the previous step. In this example case samluser@yodeck.com .
d. Select a Role for your User.
e. Click Save .
Configuring SAML through the Yodeck Portal
After you successfully created the App in the Salesforce account follow the below steps to configure SAML in the Yodeck Portal.
- From the Administer tab in your Salesforce Account
Manage Apps-> Connected Apps-> click the app that you have created.
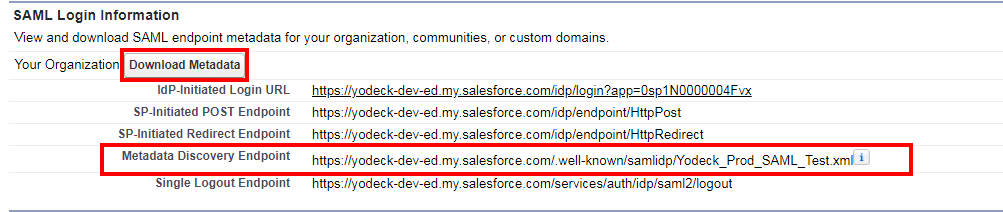
( NOT the edit button). - Copy the URL “Metadata Discovery Endpoint”. You can also download the Metadata and paste it
- Now login to your Yodeck account and go to the SAML Configuration Tab
and click the enable button. - Choose “Import From URL” and paste the copied URL and click import. Now you will see the URLs that have been preconfigured.
Also you can choose “Import From XML”:
-
- Download Metadata as shown in the picture above and open the downloaded file with Notepad or any text editor and copy the whole text.
- Click the “Import From XML” option and paste the copied text and click import. Now you will see the URLs that have been preconfigured.
5. Click Save.