Table of Contents
Overview
The Users section is where you control access to your Yodeck account, meaning who gets in, what they can see, and what they can do. Whether you run a single-screen storefront or a global network with hundreds of displays, Yodeck’s user management scales with you. Each user is identified by their email address and the permissions assigned to them.
📍You’ll find the Users module in the top-right menu of the Yodeck Portal within your Profile icon button.
Before You Begin
Which user-management features you can access depends on your Yodeck plan. Here’s a quick reference:
| Component | Availability |
|---|---|
| Invite and manage users | All plans |
| Standard roles | All plans |
| One role per user | Basic and Premium plans |
| One role per Workspace | Enterprise plan |
| Custom Roles | Premium and Enterprise plans |
| Primary Workspace | Enterprise plan |
| Groups | Enterprise plan |
| SAML / SSO group access | Enterprise plan |
| Security Policies | Enterprise plan |
How User Access Works
User access in Yodeck is built on three core concepts:
| Concept | What it means |
|---|---|
| Users | The people who can access your Yodeck account |
| Roles | What users can do |
| Workspaces | Where those permissions apply |
On Basic and Premium plans, each user has one role. On the Enterprise plan, each user can have a different role in each Workspace, and you can use Groups to apply roles to many users at once — with optional SSO integration to automate the whole thing at sign-in. We’ll cover each of those further down.
The Account Owner
Every Yodeck account has one designated Account Owner, usually the person who originally created the account. The Owner has special privileges that no other role can match:
- The Account Owner cannot be deleted.
- The Owner is automatically included in the Global Admins group and cannot be removed from it.
- Only the Account Owner can transfer ownership to another user.
Transfer Account Ownership
Only the current Account Owner can do this, not Administrators, not Workspace Admins, not anyone else.
- Log in as the current Account Owner.
- Click the top-right menu and select My Profile.
- Change the email address to the new owner’s email and click Save.
If the new owner’s email is already registered as a user on your account, delete that user first, then change the email. The new owner can then reset their password and sign in as the Account Owner.
Example
Your IT manager (it.manager@company.com) is leaving, and you want to hand the account over to new.manager@company.com. Log in as the current owner, open My Profile, and update the email address. The new owner takes it from there.
Inviting New Users
To bring someone new onto your account, click the “Invite User” button. Enter their email address, assign a role, and Yodeck handles the rest.
Here’s what happens behind the scenes:
- The invited user receives a personalized invitation link, valid for 30 days.
- Two days before expiration, Yodeck sends a reminder email if they haven’t accepted yet.
- They click the link, set their own password (or sign up via Google or Microsoft, depending on your account settings), and they’re in.
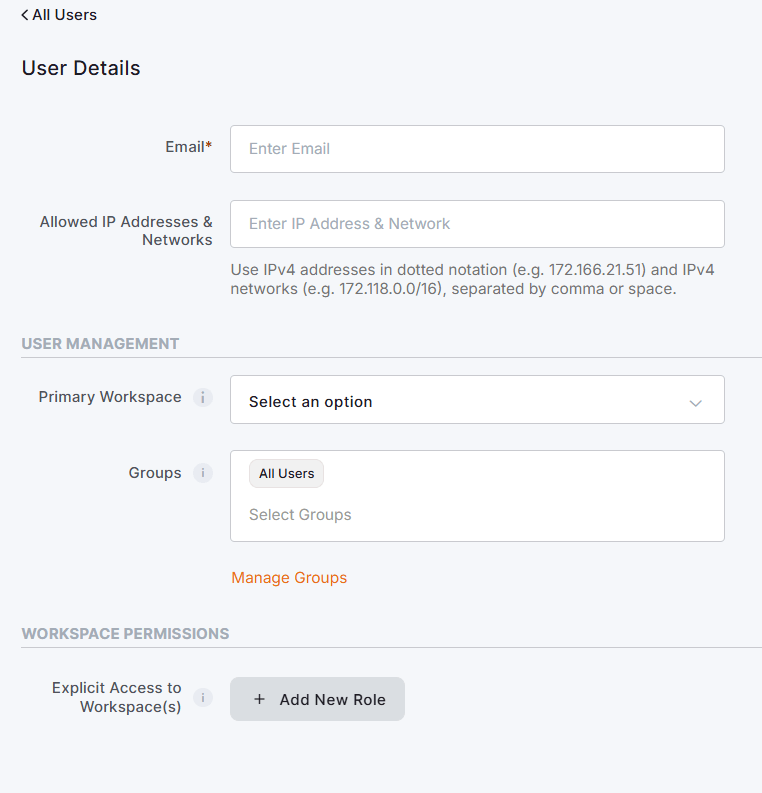
When you edit a user, the User Details form covers:
- First Name and Last Name
- Allowed IP Addresses & Networks
- Role or permissions
- Primary Workspace, Group membership, and explicit Workspace access (Enterprise only)
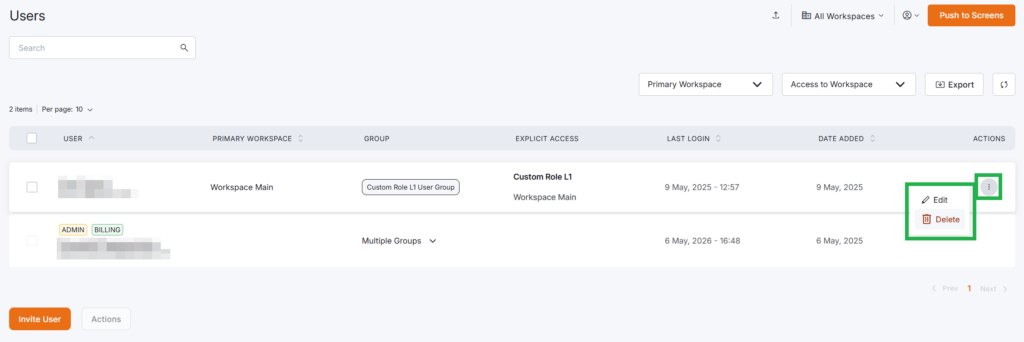
To delete a user, an Administrator can do so in the Users list page via the quick actions button (three dots). The Account Owner is the only exception. To remove the current Owner, you must first transfer ownership of the Account.
Troubleshoot User Invitations
You can find the answers to all the issues listed below by clicking them to expand.
Email already in use
If you can’t invite someone because their email is already in use, the email is most likely tied to another Yodeck account, usually a standalone account they signed up for separately. Each email can only belong to one Yodeck account.
To resolve the conflict:
- Reinvite them. Once the old account is gone, send the invitation again.
- Confirm the conflict. Have the user check whether they have a separate Yodeck login under that email.
- Delete the standalone account. The user deletes the existing account from their own profile settings. Heads up: deleting the account also removes any media uploaded to it, so make sure that content is no longer needed.
Invitation email not received
If the invited user doesn’t see the email in their inbox:
- Resend the invitation if needed.
- Ask them to check their spam or junk folder.
- Confirm the email address is spelled correctly.
User signed up individually
Sometimes a user creates their own Yodeck account instead of accepting your invitation, for instance, by signing up directly on the website rather than through your team’s SSO flow. In that case, their email is locked to that standalone account. To bring them onto your account, they need to delete the standalone account first; then you can reinvite them.
Standard User Roles
Roles & Permissions define a user’s access rights to specific parts of your Yodeck account. To make life easier, Yodeck ships with a set of standard roles that cover the vast majority of use cases.
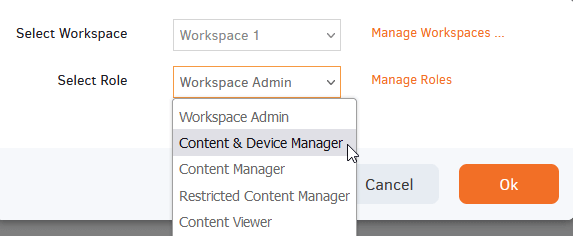
On the “Basic” and “Premium” plans, each user gets one role. On the “Enterprise” plan, you can assign one role per Workspace. Please also check the “User Roles in Workspaces” article section.
| Role | Best for | What they can do |
|---|---|---|
| Global Admins | Trusted users who need full account control | Full, unrestricted access to the entire account |
| Billing Access | Finance, purchasing, or accounting teams | Access to billing, invoices, and subscription management only |
| Workspace Admin | Local or regional admins managing one Workspace | Full access to a Workspace’s content, screens, and users |
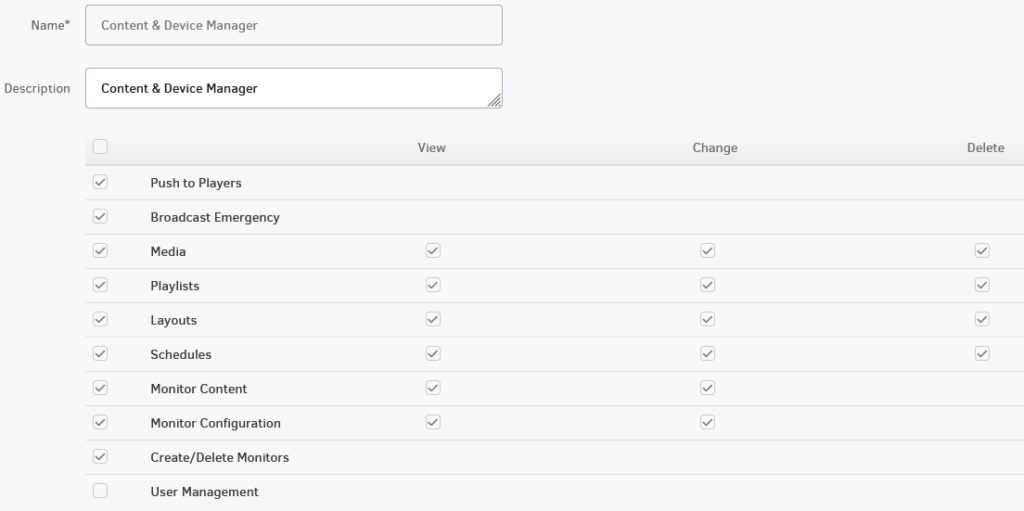
| Content & Device Manager | Users handling both content and screens | Full access to content and screens; can push to players and broadcast emergencies |
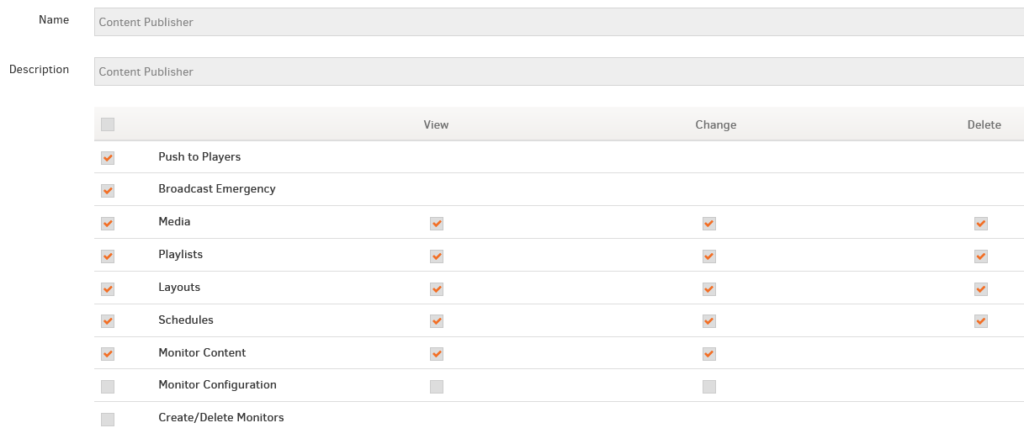
| Content Manager | Day-to-day content creators and publishers | Full access to content; can push to players |
| Restricted Content Manager | Creators who need approval before publishing | Full access to content, but cannot publish to screens |
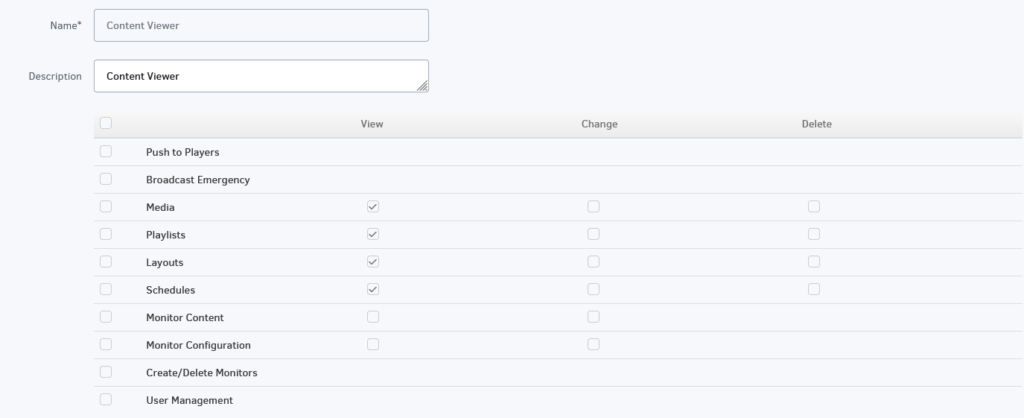
| Content Viewer | Stakeholders who need visibility but shouldn’t edit | Read-only access to media, playlists, layouts, and schedules |
| Template Managers | Managing Layout Templates | Full access to Branded templates in Layouts |
Click through the tabs below for the full permission breakdown of each role:
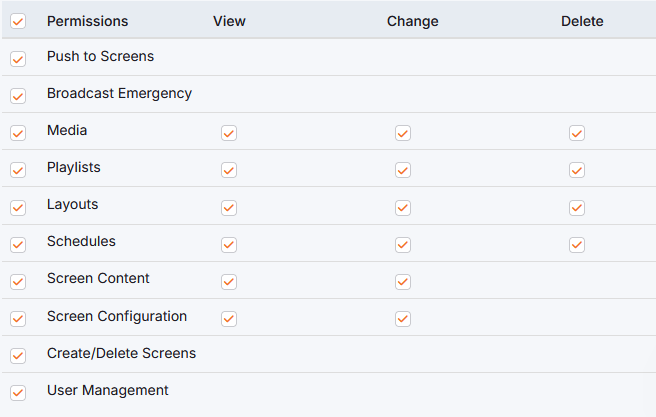
The Global Admin role grants unrestricted access to your entire Yodeck account. Beyond full access to content and screens, it’s the only role (alongside the Account Owner) that can:
- Manage other users: create, edit, or delete them
- Manage Workspaces: create, edit, or delete them
- Manage Custom Roles
- Create or delete screens (other roles can edit existing screens)
- Manage Tags account-wide (also available to any user with media change permissions)
- Configure global account settings (Password Policy, SAML)
- Receive every email notification when a device goes offline or back online
Tailor-made for purchasing and accounting teams who need access to billing without touching content. Users with this role can:
- Access all subscription-related screens
- Upgrade, downgrade, or modify the subscription
- View billing history, invoices, and credit card charges
- Receive purchasing and billing emails (orders, failed charges, shipping notifications)
Full ownership of a Workspace’s content and screens. The Workspace Admin is also the only role, besides Administrators, that can manage users whose Primary Workspace matches.
Permissions include:
- Full access to Workspace media, playlists, layouts, and schedules
- Full access to Workspace screens (configuration and content)
- Create and delete screens
- Push to Players
- Broadcast Emergency
- Manage users within their Workspace
The same content and screen permissions as Workspace Admin, minus user management. Granular enough for a senior content lead who shouldn’t be managing user accounts.
- Full access (view/add, edit, delete) on Workspace’s media, playlists, layouts, and schedules
- Full access (view, edit) to the Workspace’s screen content
- Create and delete screens
- Push to Players
- Broadcast Emergency
Hands-on content role. Can publish to screens, but cannot change screen configuration. Allows the user to view, change, and delete:
- Media
- Playlists
- Layouts
- Schedules
- Screen Content
- Push to Players
- Broadcast Emergency Alerts
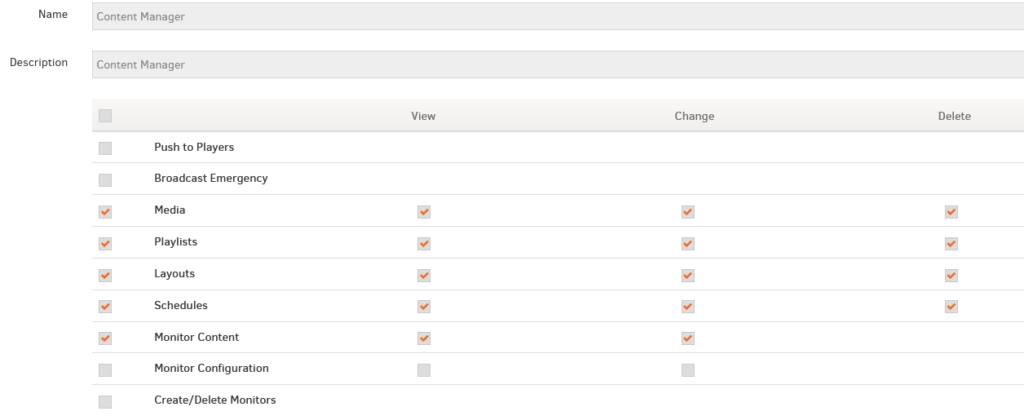
Same as Content Manager, minus publishing. Useful when you want a creator who can build content but needs another team member to approve before it goes live. Allows the user to view, change, and delete:
- Media
- Playlists
- Layouts
- Schedules
- Screen Content
Read-only access. Useful for stakeholders who want visibility into the content pipeline but shouldn’t be making changes. Allows the user to view:
- Media
- Playlists
- Layouts
- Schedules
This role allows members to create, edit, and delete Branded Templates.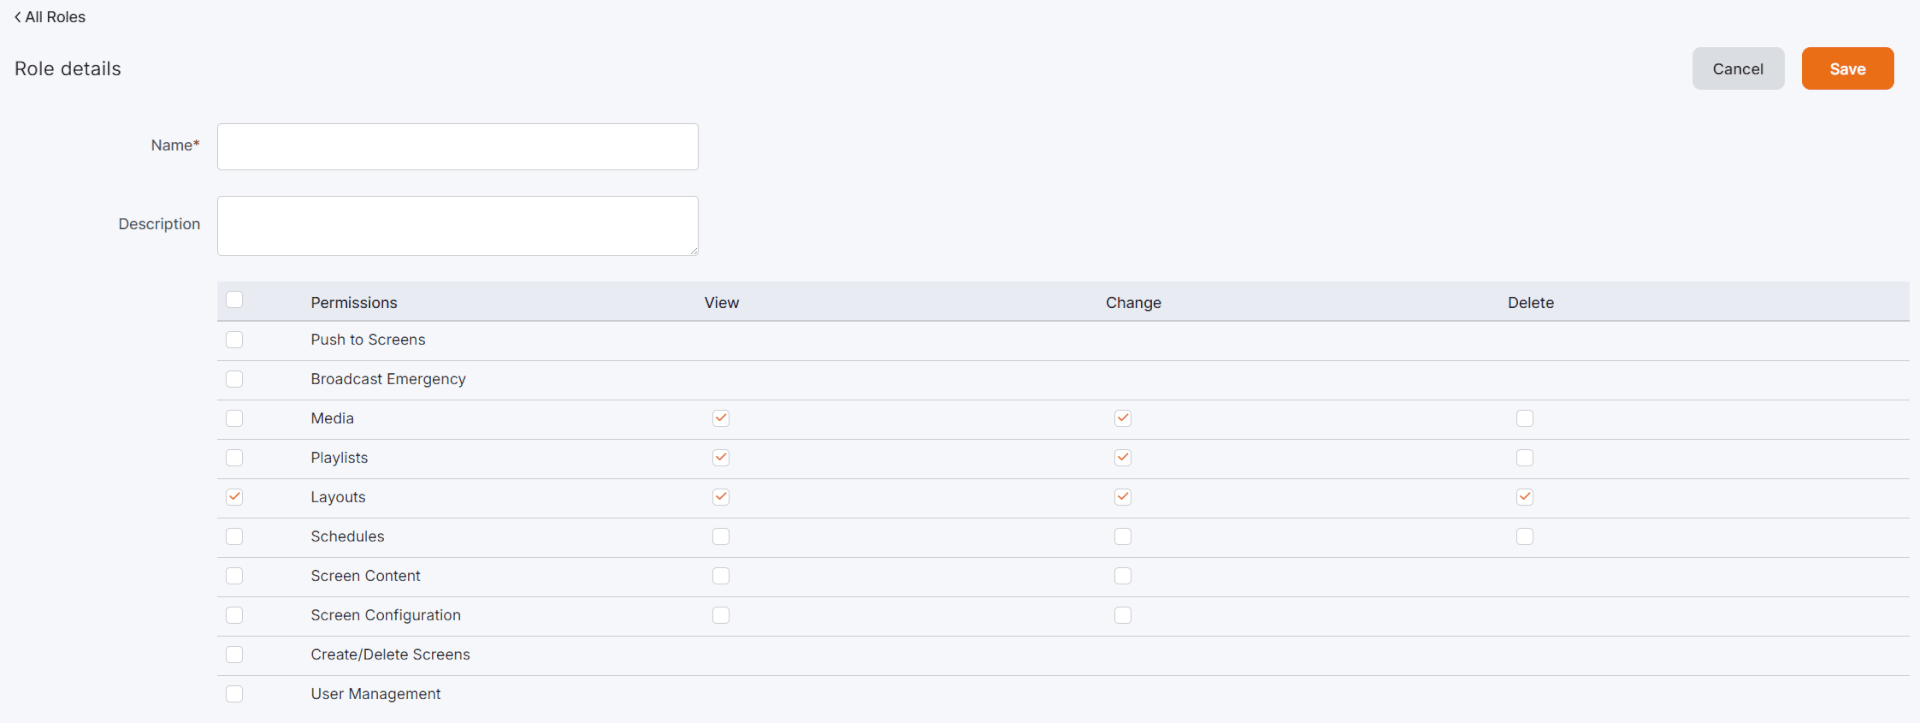
How Permissions Cascade
Yodeck permissions follow a logical hierarchy: Schedules contain Layouts, Layouts contain Playlists, and Playlists contain Media. When you grant access to a higher-level item, view access to everything inside it follows automatically. This keeps your permission model consistent and prevents users from being locked out of items they need to see to do their jobs.
| If you give this permission | Yodeck also allows |
|---|---|
| View Schedules | View the related Media, Playlists, and Layouts |
| Change Layouts | View Layouts, plus the related Playlists and Media |
In practice
Grant a user permission to Change Layouts, and they automatically gain View access to those Layouts, along with the Playlists and Media inside them. You don’t need to tick each box manually, since Yodeck selects the relevant permissions for you.
Media Tags are account-wide
Media Tags are not scoped to a Workspace. Any user with change_media permission in at least one Workspace can create and edit Media Tags, regardless of their role or admin status. Because Tags apply across the entire account, changes made by one user affect the tag structure for everyone.
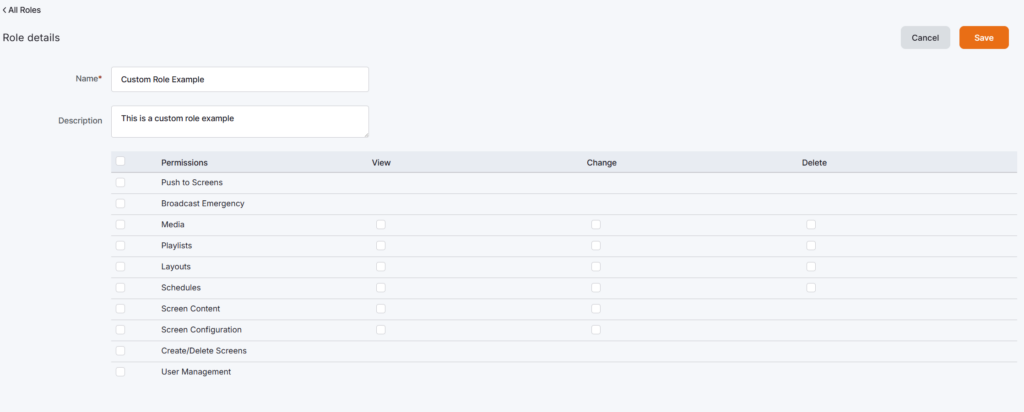
Custom Roles (Premium & Enterprise)
If the standard roles don’t fit your needs precisely, Custom Roles let you define exactly what a user can view, change, or delete. They’re ideal when:
- A specific job function doesn’t map to a standard role (think: an IT technician who manages screen configuration but never touches content)
- You need to limit access for security or compliance reasons
- You want roles that scale as your organization grows
To create one, go to Account Settings > Custom Roles, click Add Custom Role, and check the boxes for the actions you want to allow.
Primary Workspace (Enterprise Plan)
Primary Workspace is an optional field that declares which Workspace a user belongs to. Once set, two things become possible:
- Workspace Admins can manage their users. A Workspace Admin can edit or delete any user whose Primary Workspace matches their own.
- Groups can dynamically assign roles based on each user’s Primary Workspace.
Example
Frank is the Workspace Admin of “Workspace London.” Dolly is a Content Manager based in the London branch. By setting “Workspace London” as Dolly’s Primary Workspace, Frank can manage Dolly’s user account directly (edit or delete).
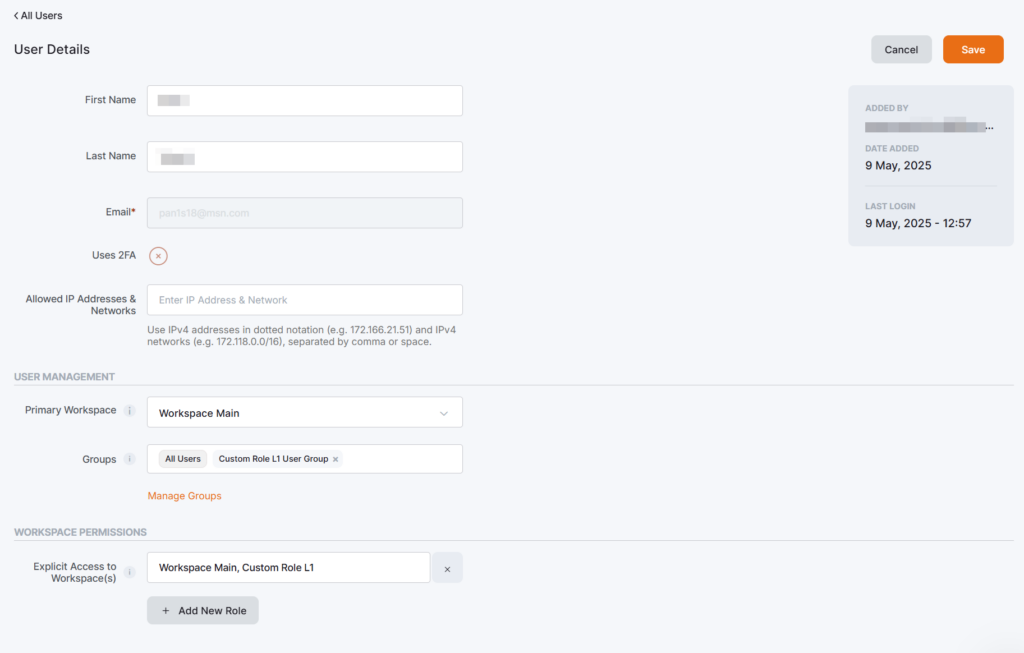
Explicit Workspace Access (Enterprise Plan)
A user can have explicit access to specific Workspaces, with a different role in each one. This is how you build flexible, layered permission structures. For instance, granting full content management in one Workspace and read-only access in another.

To assign explicit access:
- Open the User Details section.
- Click + Add New Role.
- Pick the Workspace and the role for that Workspace.
Example
A regional manager needs full Content & Device Manager access to the “Europe” Workspace, but only Content Viewer (read-only) access to “US.” Use explicit Workspace access to set both, in the same user record.
💡Best practice: Use explicit Workspace access for exceptions. For access patterns that apply to many users, use Groups instead.
Groups (Enterprise Plan)
Groups apply roles to many users at once. Instead of editing each user manually whenever something changes, you add them to the right Group, and the Group handles role assignment.
Yodeck includes System Managed Groups. All Users, Global Admins, Billing Access, Template Managers, and a set of Predefined Groups matching the standard roles. You can also create your own.
Group Permission Modes
Groups can apply roles in two ways. Pick the mode that fits how your team is organized:
| Mode | Use it when… | Example |
|---|---|---|
| On Primary Workspace (recommended) | Users need the same role in their own Workspace | A cross-regional marketing team that all need access to a shared “Global Campaigns” Workspace |
| On Other Workspace | Users need shared access to one specific Workspace | A cross-regional marketing team that all needs access to a shared “Global Campaigns” Workspace |
The cleanest pattern: create one Group per common responsibility, set it to apply to each member’s Primary Workspace, and let it scale as you onboard new users.
Groups and SSO (SAML 2.0)
Groups also work with SSO (SAML 2.0). By enabling Use SAML Group Access, you can map your identity provider’s groups to Yodeck Groups, so permissions are assigned automatically when users sign in.
Supported identity providers include:
- Microsoft Azure Active Directory / Microsoft Entra
- ADFS (Active Directory Federation Services)
- Okta
- Salesforce
- OneLogin
- Google Workspace
⚠️One important caveat: you can use SAML for automatic role assignment or assign roles manually but not both at the same time.
My User Profile
Every user can manage their own settings under My User Profile (top-right menu). The profile is split into four tabs: Basic Info, Notifications, Password, and Two Factor (2FA).
Security Policies (Enterprise Plan)
Administrators can enforce account-wide security policies under Account Settings > Security Policies. Available controls include:
- Disable Email Password Reset: Block password resets via email
- Enforce Password Change Every: Require password changes every 1, 3, 6, or 12 months
- Enforce Two Factor Authentication: Make 2FA mandatory for all users
- Enforce Password Reset on First Login: Require new users to change their password on first login
- Password Policy Templates: Apply ready-made password rules
- Regular Expression Check: Define your own custom password pattern
- IP Address Whitelist: Restrict portal access to specific IP addresses
- Social Login Toggle: Disable Google sign-in account-wide
- Session Policies: Set session timeout and duration
Best Practice
For accounts managing sensitive or public-facing screens, we recommend enabling Enforce Two Factor Authentication and setting Enforce Password Change Every 3 months.
User Management via API
You can now manage Users, Groups, and Roles via the Yodeck API:
/v2/users/v2/groups/v2/roles
These endpoints make it straightforward to automate onboarding, role assignment, and group management, particularly useful when integrating Yodeck with HR systems or identity providers.
Best Practices
Keep your setup simple and scalable by following these principles:
- Build your Workspace structure to mirror your organization (one Workspace per branch, region, or team).
- Give users only the access they need and nothing more.
- Use standard roles whenever possible. Reach for Custom Roles only when standard roles aren’t specific enough.
- Set a Primary Workspace for each Enterprise user so Groups can do their work.
- Use Groups for recurring access patterns; reserve explicit Workspace access for genuine exceptions.
- Review user access regularly and delete users who no longer need access.
- Enable two-factor authentication for stronger account security.
For large Enterprise accounts, the recommended pattern is:
- Create one Group per role or responsibility.
- Assign each user a Primary Workspace.
- Add each user to the Group that matches their role.
- Let the Group apply the right role to the right Workspace automatically.
- Reserve explicit Workspace access for the exceptions.
F.A.Q.s
Got questions? We’ve got answers! This section addresses common questions about Yodeck Users.
The user’s email is most likely already connected to another Yodeck account. Each email can only belong to one Yodeck account, so they need to delete their standalone account before you can invite them.
No. Each email address can only be associated with one Yodeck account.
Have them delete the standalone account they created, then invite them again from your Yodeck account.
No. The Account Owner cannot be deleted. To replace the Owner, the current Owner must transfer ownership from My Profile.
No. Only the current Account Owner can transfer ownership.
Administrators can delete users from the Users section. The Account Owner is the only exception. You have to transfer ownership first if you need to remove the current Owner.
Use Groups for access patterns that apply to many users; that’s where they shine. Reserve explicit Workspace access for exceptions or special cases.
Yes. A user can belong to multiple Groups, one Group, or no Group at all. If multiple Groups grant roles on the same Workspace, the user receives the combined permissions.
Not directly. Workspace Admins can’t view or edit Groups. However, if a Group is set to be Available to all Workspace Admins, they can use it when adding or editing users.
Yes. You can map SAML groups from your identity provider to Yodeck Groups, so permissions are automatically assigned when users sign in via SSO.
Need Help?
The Yodeck Support Team can help you out! Log in to your Yodeck account and send us a message from the bottom right corner!