Overview
JumpCloud is a cloud directory platform that provides Single Sign-On (SSO) through SAML 2.0. This article explains how to connect JumpCloud to your Yodeck account as the identity provider, so that your users sign in to the Yodeck Portal with their JumpCloud credentials instead of a separate Yodeck password.
In SAML terms, JumpCloud acts as the Identity Provider (IdP) and Yodeck acts as the Service Provider (SP). The setup has two sides. In JumpCloud, you add the Yodeck application, give it a unique IdP Entity ID and authorize the users who may use it. In the Yodeck Portal, you import JumpCloud’s metadata so that Yodeck trusts the sign-in responses it receives. Yodeck supports both SP-initiated sign-in, where the user starts from the Yodeck login page, and IdP-initiated sign-in, where the user starts from the JumpCloud User Portal.
Before you start, make sure that:
- Your Yodeck account is on the Enterprise plan and you sign in as the Account Owner or as an administrator with access to Account Settings.
- You have administrator access to the JumpCloud Admin Portal and your JumpCloud plan includes the SSO feature.
- Every user who will sign in through SSO has a JumpCloud user whose email address matches the email address of a Yodeck user, unless you plan to turn on Automatically Create Users (see Advanced Settings below).
- An IT administrator with experience in configuring identity provider applications carries out the setup.
Step 1: Adding the Yodeck Application in JumpCloud
JumpCloud includes a ready-made connector for Yodeck in its application catalog, so you do not need to create a custom SAML application.
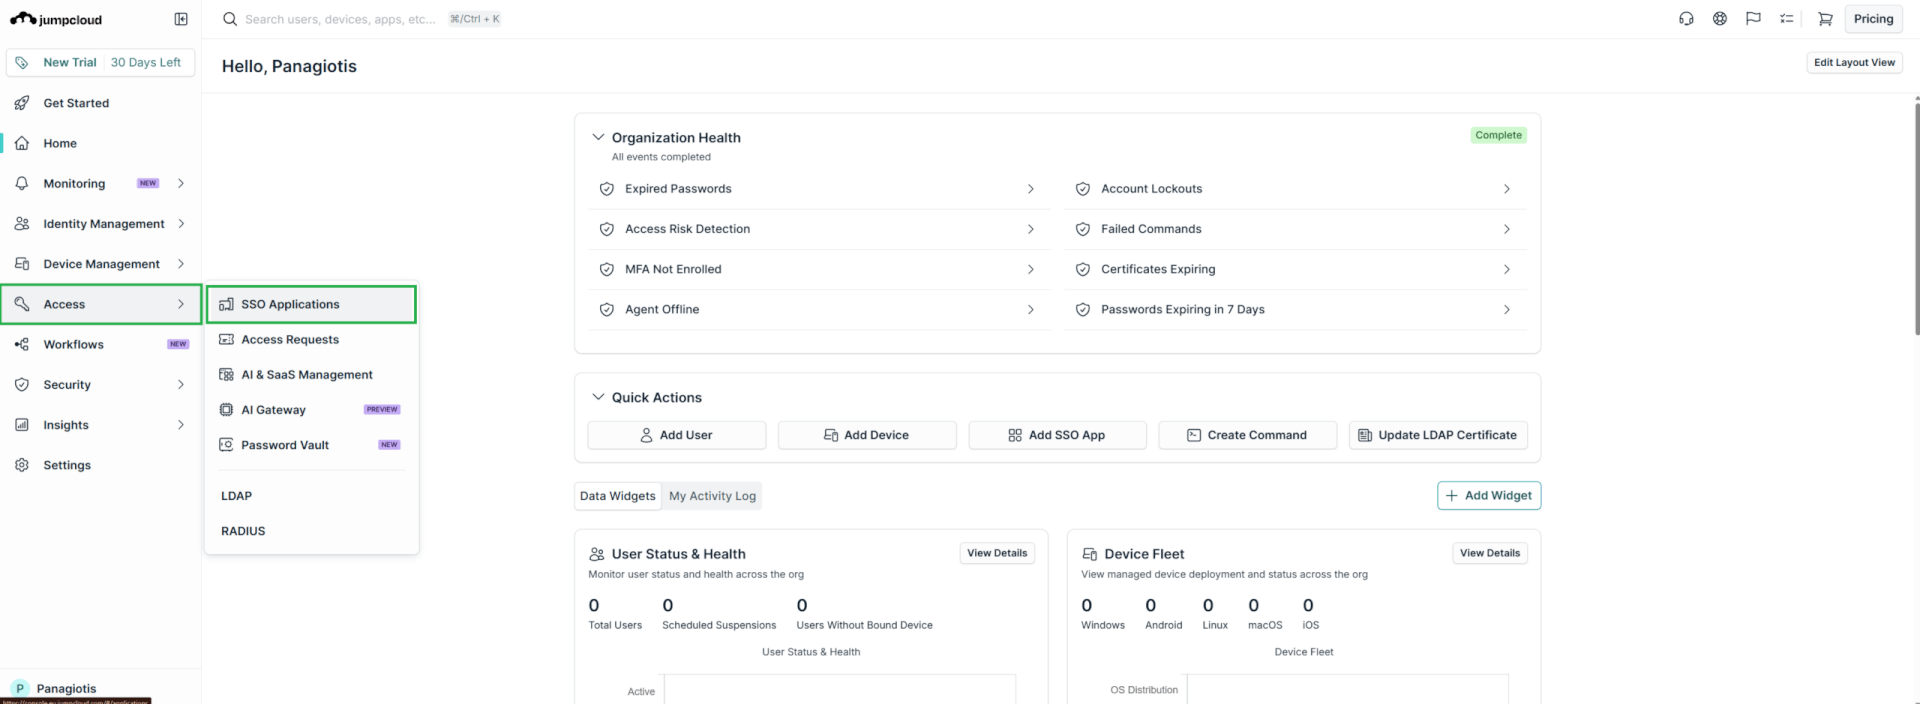
- Sign in to the JumpCloud Admin Portal.
- In the left menu, click Access > SSO Applications.
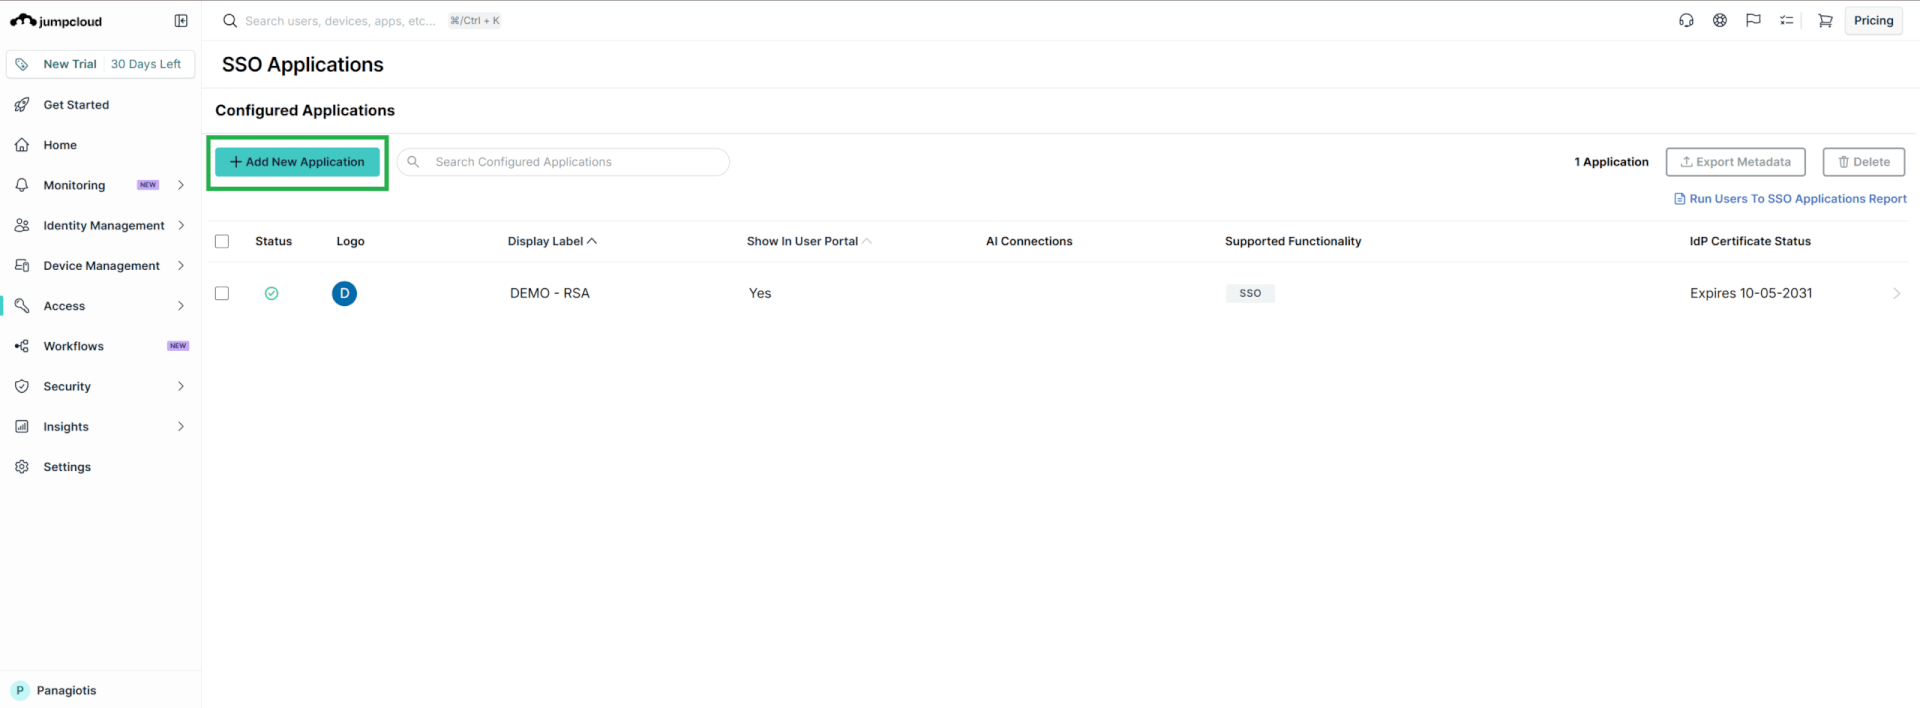
- Click + Add New Application.
- In the search field, type Yodeck and select the Yodeck application. The catalog lists SSO as its supported functionality.
- In the Select Options step, keep Manage Single Sign-On (SSO) selected and click Next.
- In the Enter General Info step, type a Display Label, for example, Yodeck. This is the name your users see in the JumpCloud User Portal. Click Save Application.
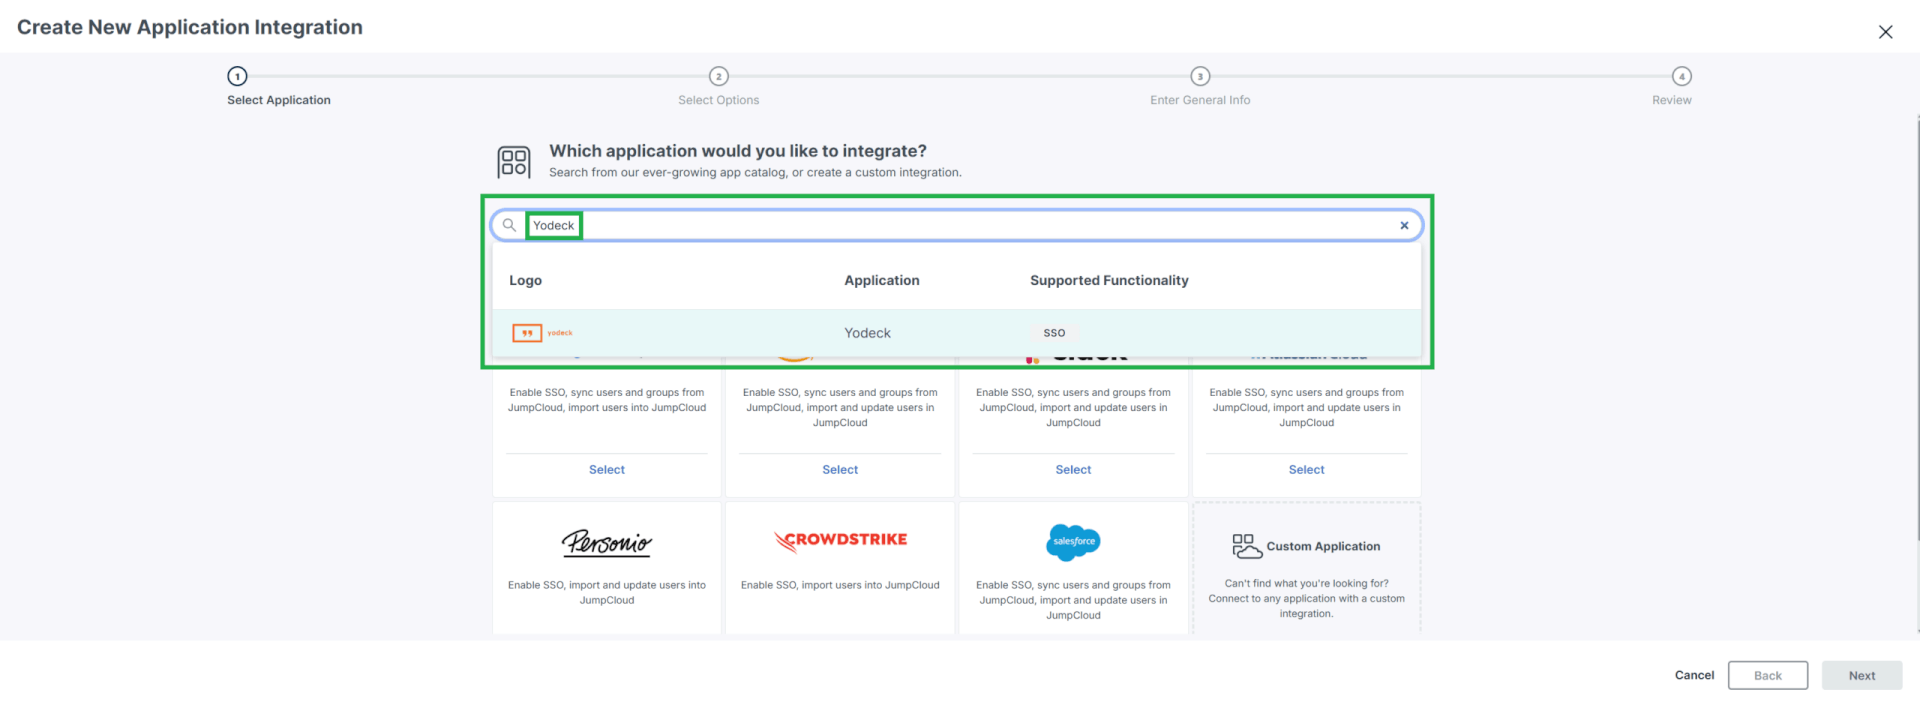
7. On the Review screen, JumpCloud confirms that Yodeck was successfully added. Click Configure Application to open the application settings.
Step 2: Configuring the SAML Settings in JumpCloud
- In the application settings, open the SSO tab.
- Under Configuration Settings, find the IdP Entity ID field. Delete the default value JumpCloud and type a unique identifier of your own, for example acme-yodeck.
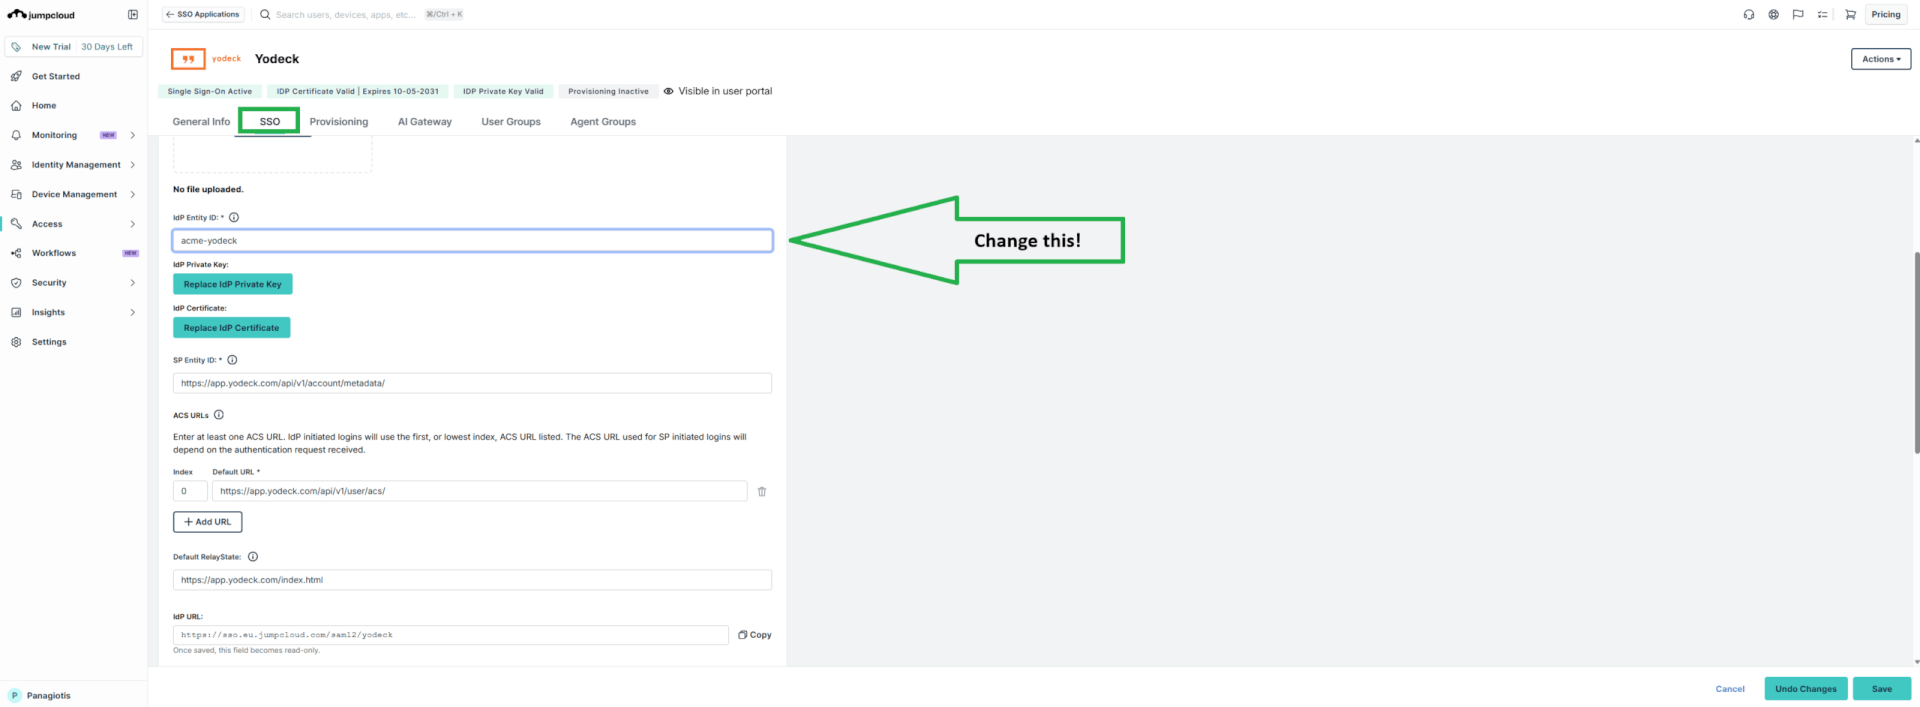
Why the IdP Entity ID must be unique: Yodeck uses the IdP Entity ID to recognize which account a sign-in response belongs to. Every Yodeck account shares the same Service Provider endpoints, so the value must be unique across Yodeck and not only within your JumpCloud organization. Include your company name in the value to keep it unique. You will see the same value again as the Entity Id in the Yodeck Portal.
- Leave the remaining settings at their defaults. The Yodeck connector already sets the SP Entity ID (https://app.yodeck.com/api/v1/account/metadata/) and the ACS URL, and it sends the user’s email address as the SAML NameID, which is what Yodeck expects.
- Click Save.
- Under JumpCloud Metadata, click Copy Metadata URL. Keep the URL at hand. You paste it into the Yodeck Portal in Step 4.
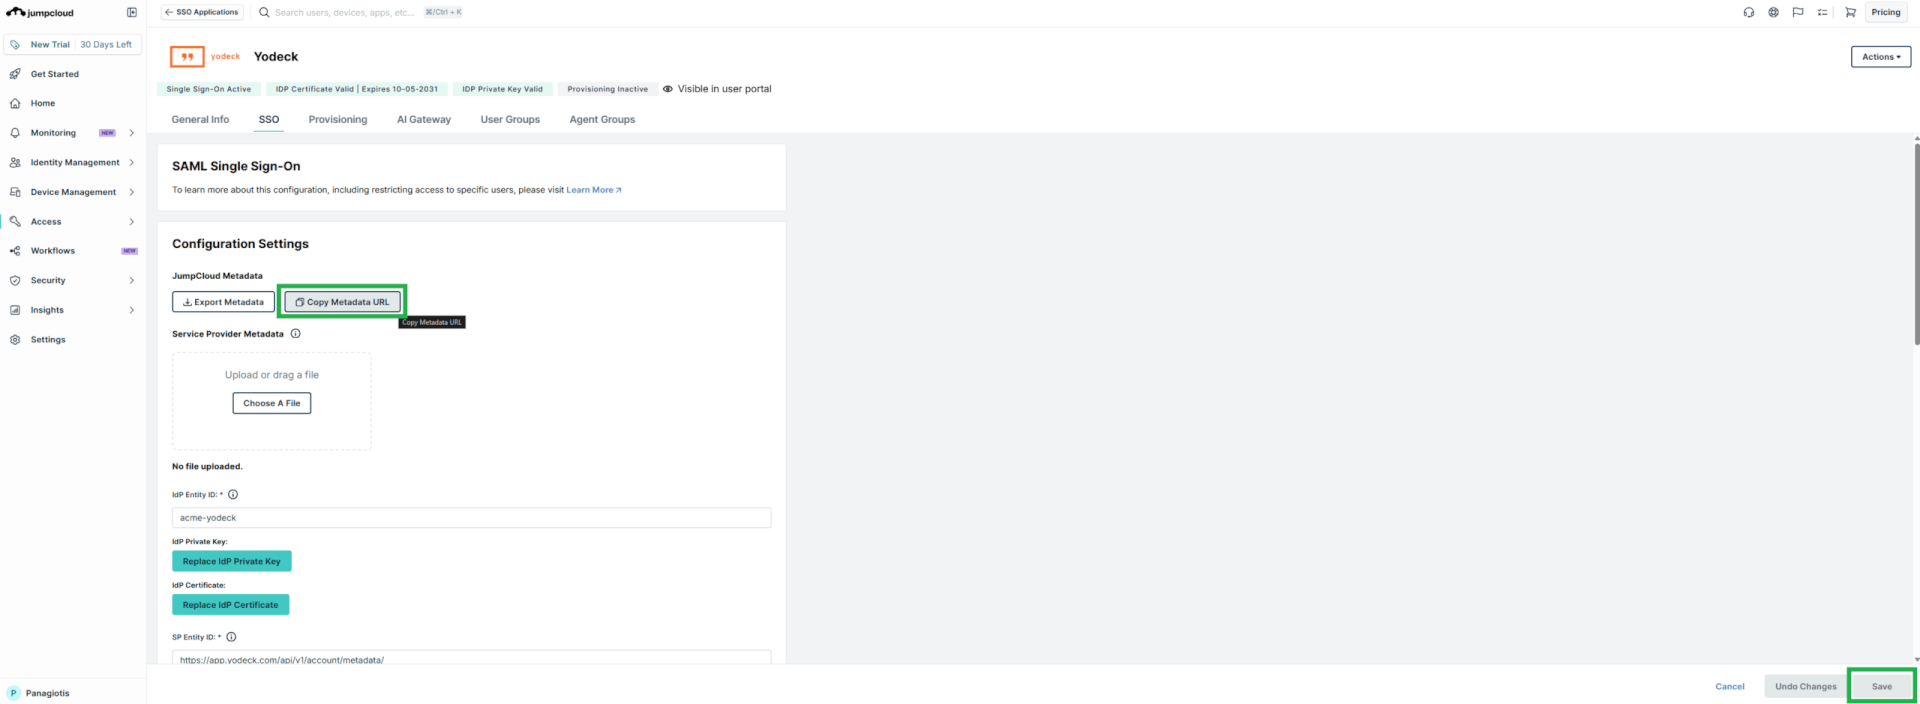
Note: Copy the metadata URL only after you save the IdP Entity ID. The metadata includes this value, and if you change it later you must import the metadata into Yodeck again. If you prefer to work with a file, click Export Metadata instead and use the Import From XML option described in Step 4.
Step 3: Authorizing Users in JumpCloud
JumpCloud grants access to SSO applications through user groups. A new application has no groups bound to it, so until you complete this step no user can sign in to Yodeck through JumpCloud, even when the SAML configuration is correct.
- In the Yodeck application settings, open the User Groups tab.
- Select the user groups that should have access to Yodeck.
- Click Save.
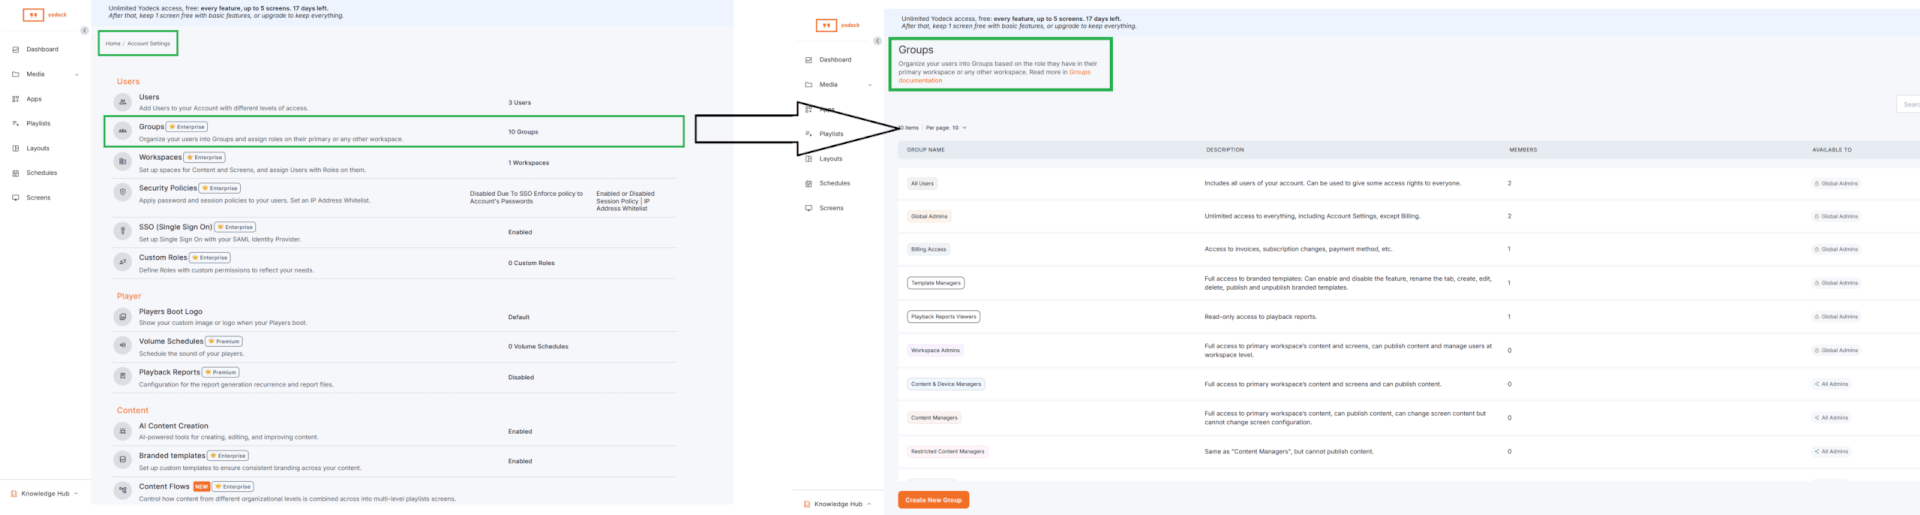
If you do not have a suitable group yet, create one under User Groups in the left menu of the Admin Portal and add the users to it first. Make sure that each member’s email address in JumpCloud matches the email address of their Yodeck user.
Step 4: Configuring SAML in the Yodeck Portal
- Sign in to the Yodeck Portal as the Account Owner or as an administrator.
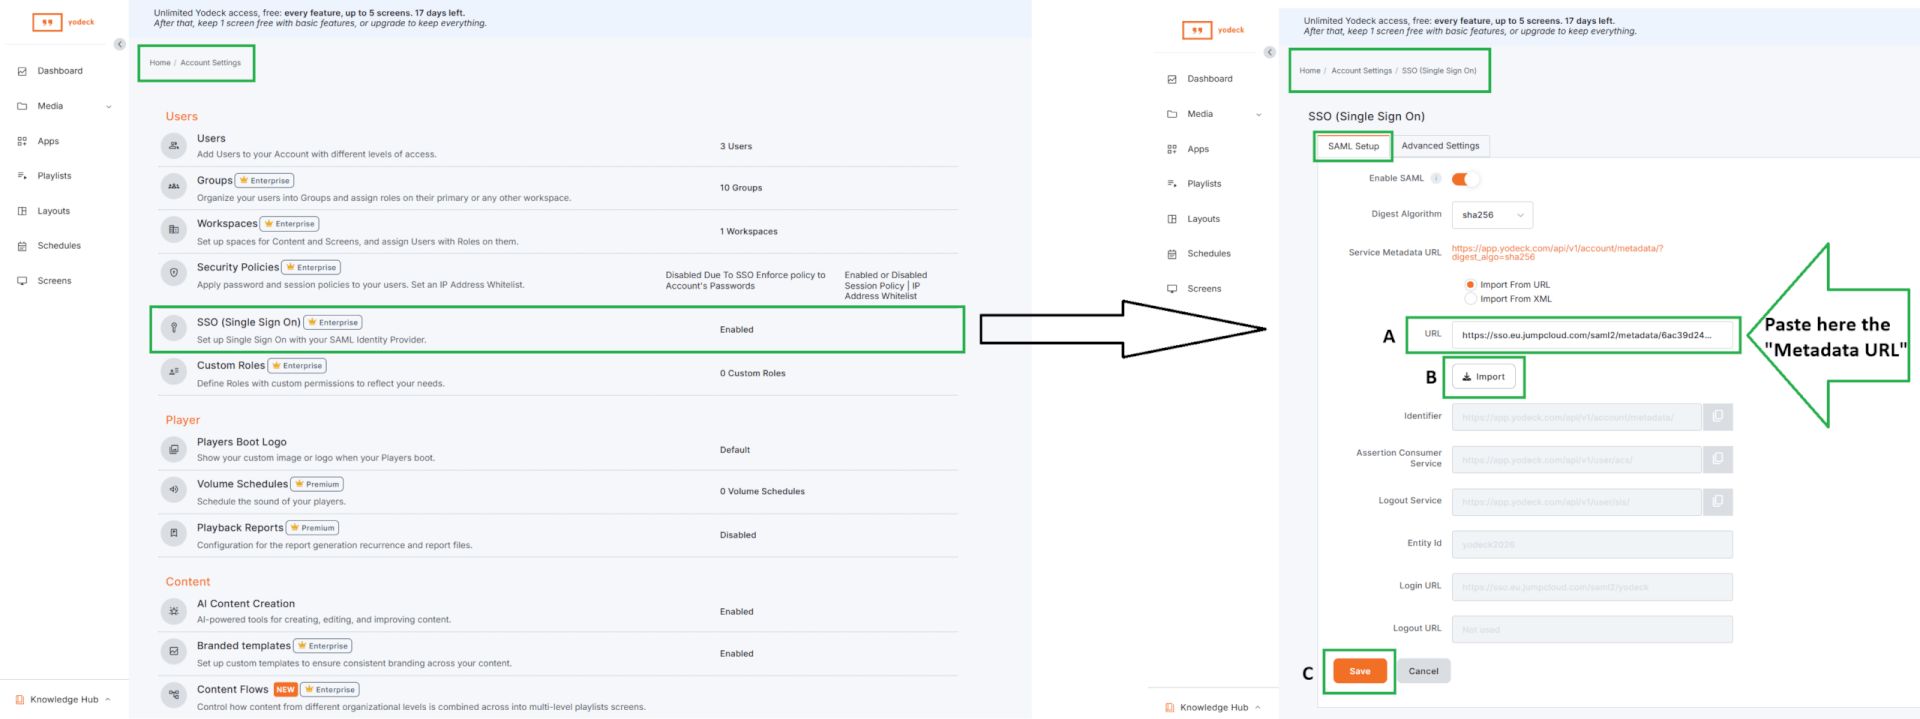
- Click the drop-down menu at the top right, select Account Settings and then click SSO (Single Sign On).
- In the SAML Setup tab, turn on the Enable SAML toggle.
- Keep the Digest Algorithm set to sha256.
- Select Import From URL.
- Paste the metadata URL you copied from JumpCloud into the URL field and click Import.
- Yodeck reads the metadata and fills in the Entity Id, Login URL and Logout URL fields. Check that:
- Entity Id shows the IdP Entity ID you set in Step 2.
- Login URL points to your JumpCloud SSO endpoint, for example https://sso.jumpcloud.com/saml2/yodeck. Organizations hosted in JumpCloud’s EU region see sso.eu.jumpcloud.com instead.
- Logout URL shows Not used. JumpCloud does not provide a Single Logout endpoint, so this is expected.
- Click Save. Yodeck validates the configuration and enables SSO for your account.
Importing from an XML file instead:
- In JumpCloud, open the SSO tab of the Yodeck application and click Export Metadata.
- Open the downloaded XML file in a text editor and copy its entire content.
- In the Yodeck Portal, select Import From XML, paste the content into the field and click Import.
- Click Save.
For reference, the table below lists the Service Provider values of your Yodeck account. The JumpCloud connector for Yodeck already contains them, so you only need them if you configure Yodeck as a custom SAML application. You can copy each value from the SAML Setup tab with the copy button next to the field.
| Field in the Yodeck Portal | Value | Field in JumpCloud |
|---|---|---|
| Identifier | https://app.yodeck.com/api/v1/account/metadata/ | SP Entity ID |
| Assertion Consumer Service | https://app.yodeck.com/api/v1/user/acs/ | ACS URL |
| Logout Service | https://app.yodeck.com/api/v1/user/sls/ | Not used by JumpCloud |
| Service Metadata URL | https://app.yodeck.com/api/v1/account/metadata/?digest_algo=sha256 | Service Provider Metadata (download the XML from this URL and upload it) |
Step 5: Testing the Sign-In
Test with a user who belongs to one of the JumpCloud groups you authorized in Step 3 and who already exists in Yodeck with the same email address. Keep your administrator session open in a separate browser or private window until the test succeeds, so that you can still adjust the settings if something fails.
Signing in from the Yodeck login page (SP-initiated)
- Go to https://app.yodeck.com/login.
- Type the user’s email address and click Continue.
- Yodeck recognizes that your account uses SSO and redirects the user to JumpCloud.
- Sign in with the JumpCloud credentials. JumpCloud redirects the user back to the Yodeck Portal, already signed in.
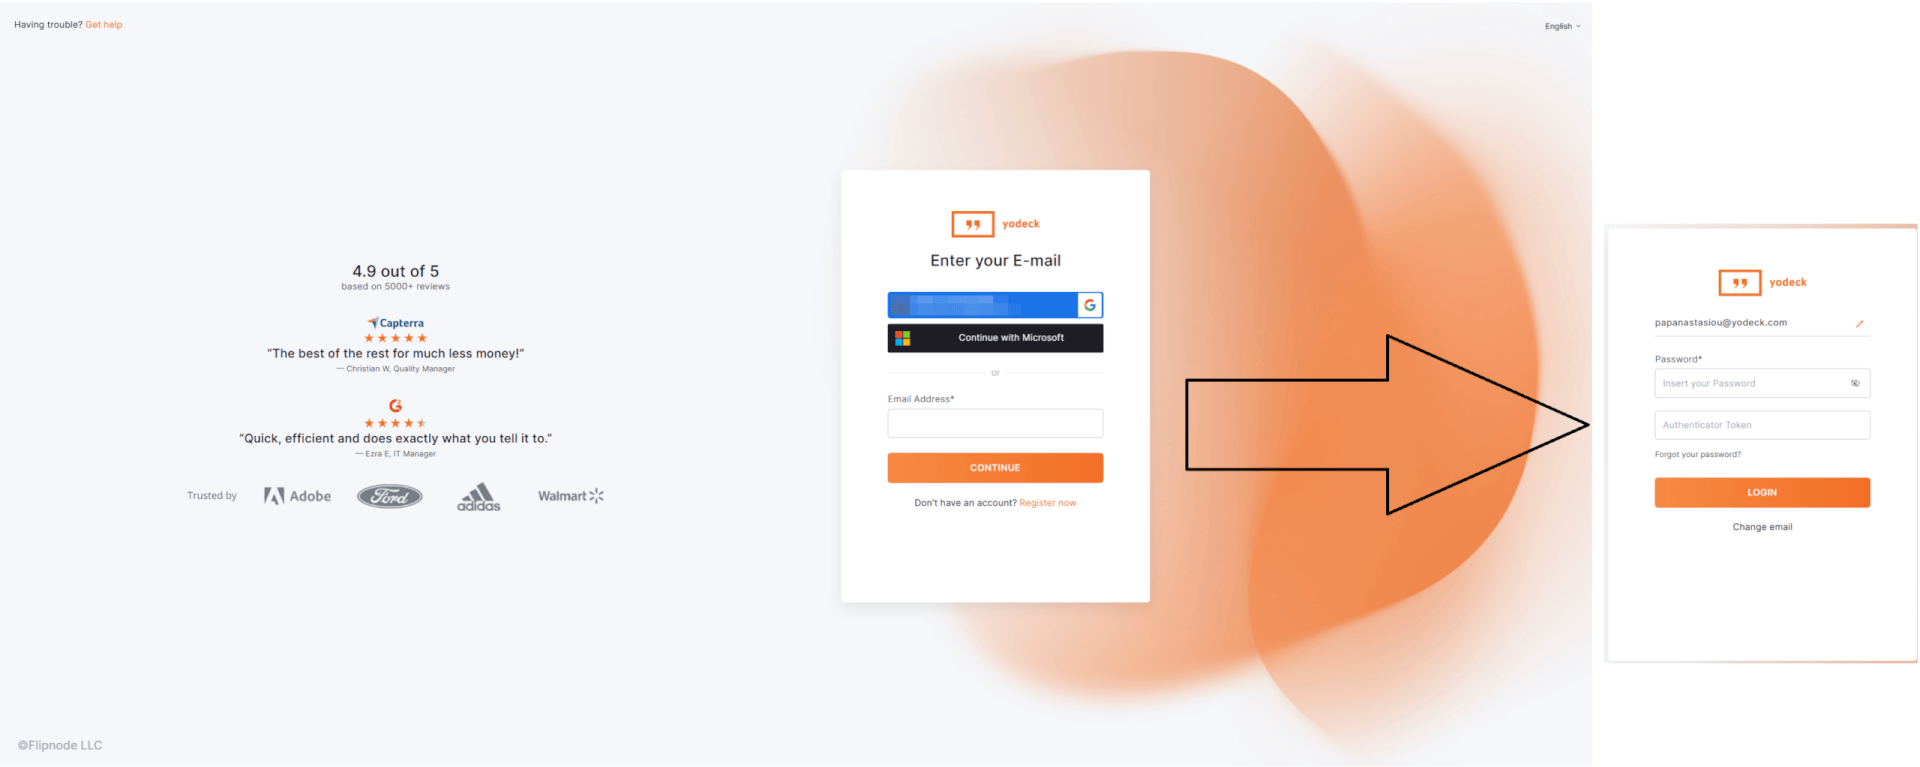
Signing in from the JumpCloud User Portal (IdP-initiated)
- Sign in to the JumpCloud User Portal.
- Click the Yodeck tile.
- JumpCloud signs the user in to the Yodeck Portal directly.
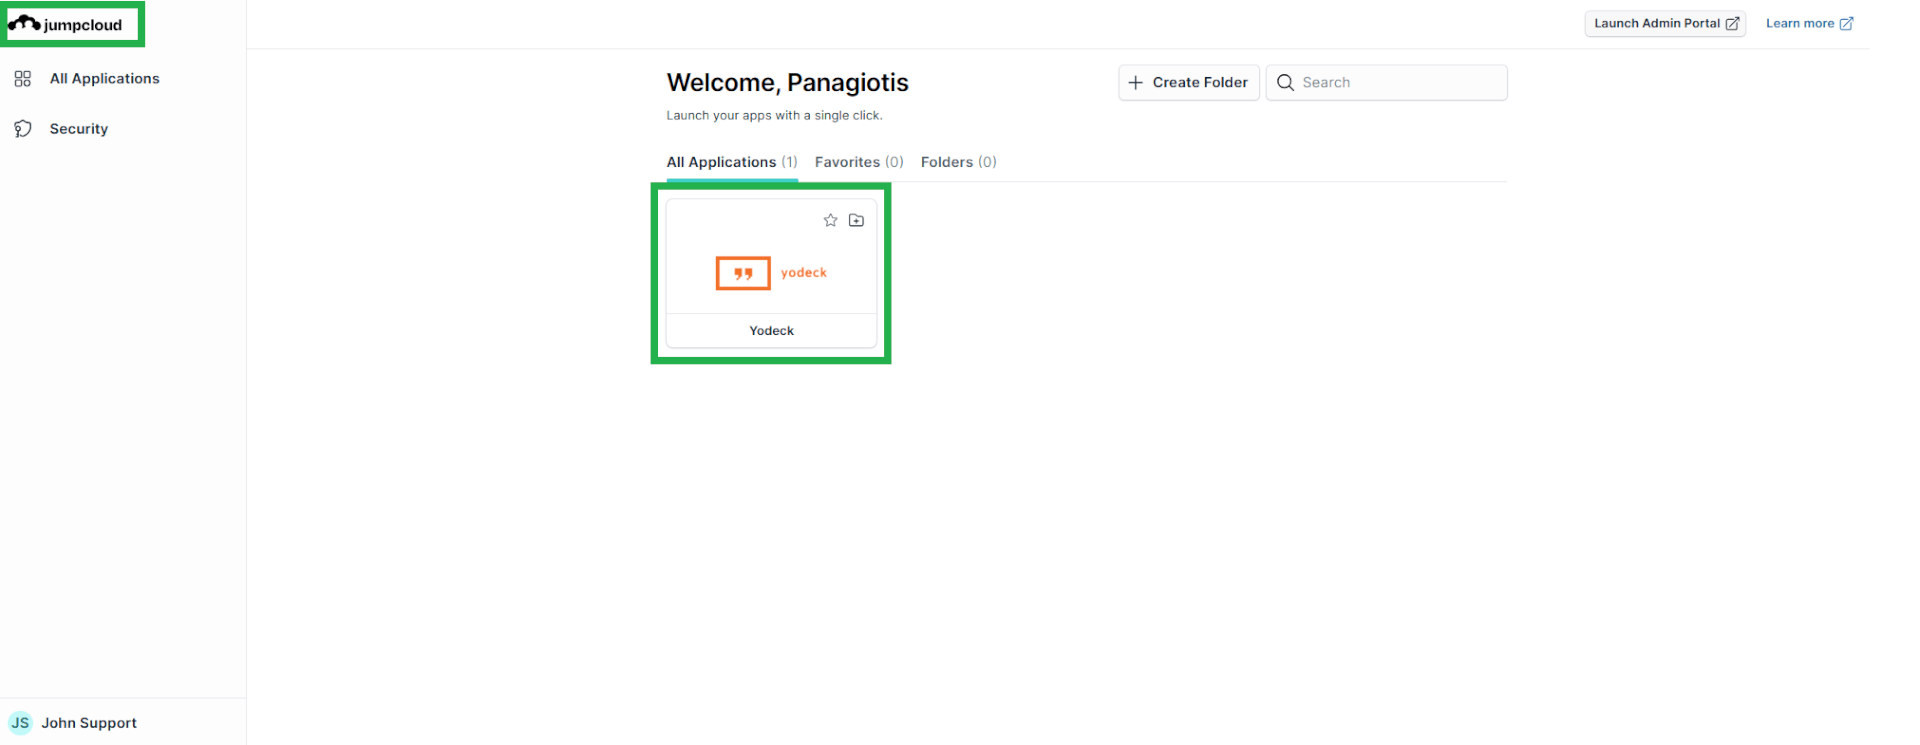
If either test fails, see the Troubleshooting section below.
Advanced Settings (Optional)
The Advanced Settings tab under Account Settings > SSO (Single Sign On) controls how Yodeck handles the users who arrive through JumpCloud. The default settings work with the JumpCloud connector without changes. The two options below are the ones most relevant to a JumpCloud setup. For a description of every option, see the Introduction to Single Sign-on (SAML 2.0) article.
Creating Yodeck users automatically (Just-in-Time provisioning)
By default, a user can sign in through SSO only if a Yodeck user with the same email address already exists. Turn on Automatically Create Users to let Yodeck create the user at the first successful sign-in instead. Combine this option with SAML Group Access (below) so that new users receive the right permissions immediately.
Mapping JumpCloud groups to Yodeck permissions (SAML Group Access)
With SAML Group Access, Yodeck assigns Account Permissions and Roles to a user based on the JumpCloud user groups they belong to, so you manage access entirely from JumpCloud. JumpCloud only sends the groups that are bound to the Yodeck application, so bind every group you want to map in the User Groups tab (Step 3).
In JumpCloud:
- Open the SSO tab of the Yodeck application and scroll down to the Attributes section.
- Under Group Attributes, select include group attribute and type an attribute name, for example memberOf.
- Click Save.
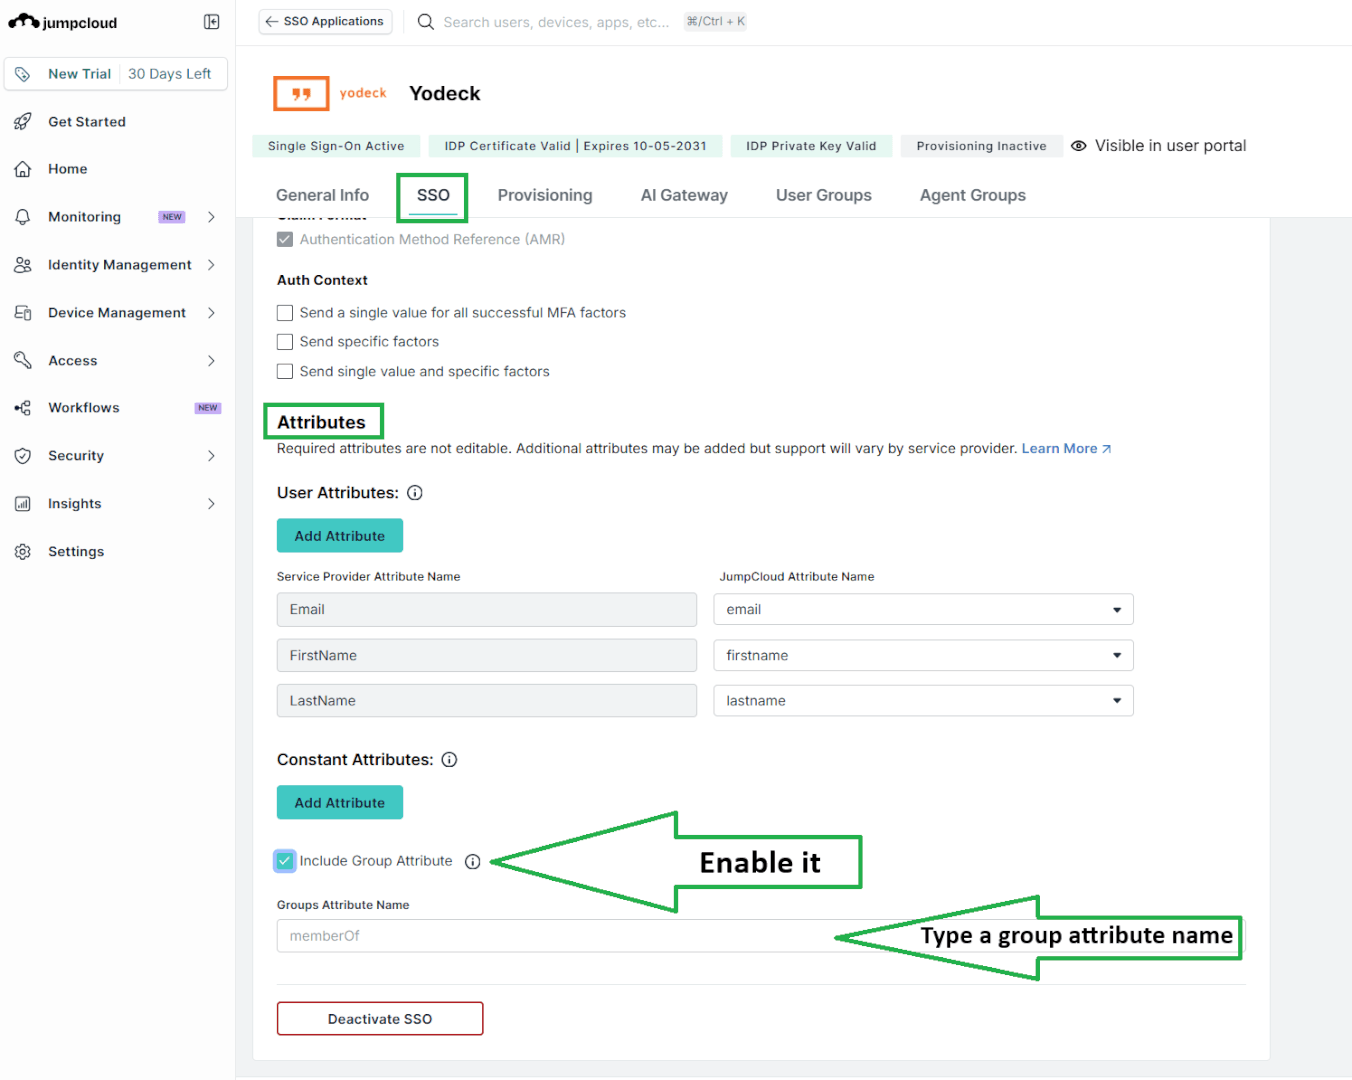
In the Yodeck Portal:
- Go to Account Settings > SSO (Single Sign On) > Advanced Settings.
- Turn on Use SAML Group Access.
- In Attribute name for Group, type the same attribute name you used in JumpCloud (memberOf in this example).
- In the groups list, enter the exact name of the matching JumpCloud user group in the SAML Group Name column next to each Yodeck Group.
- Click Save.
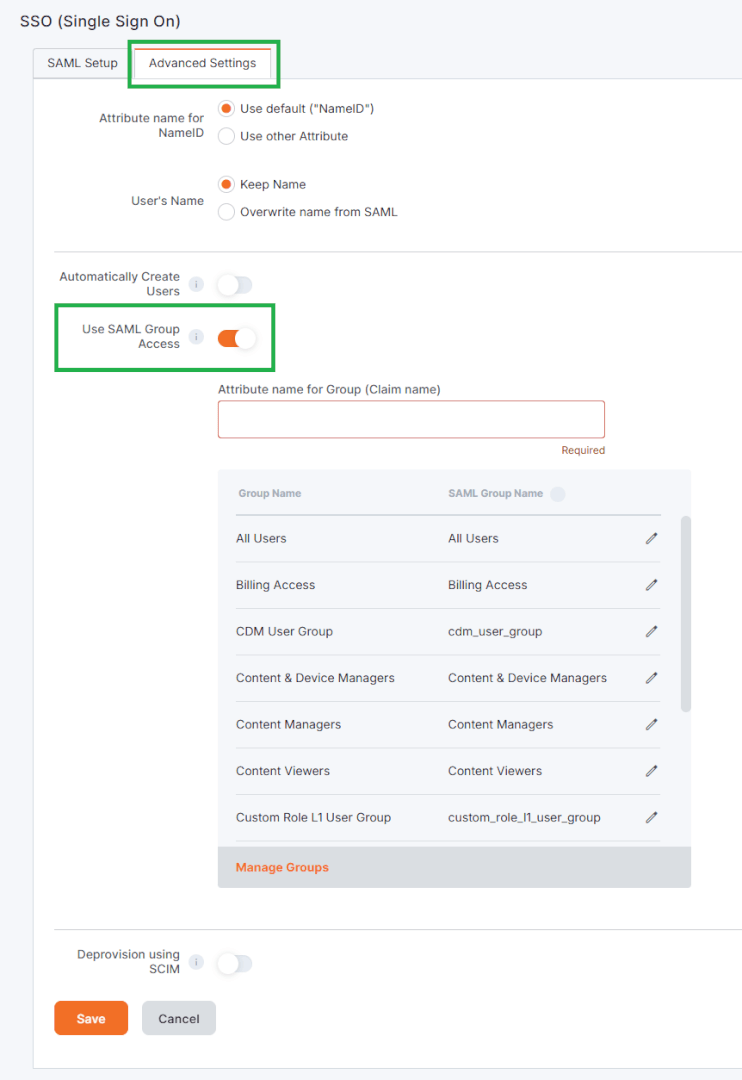
To create or edit the Yodeck Groups that appear in this list, see the Groups article. To review what each Role allows, see Custom Roles.
Troubleshooting
The table below lists the issues that come up most often during a JumpCloud setup and how to resolve them.
| Symptom | Likely cause | What to do |
|---|---|---|
| Import From URL fails or the Entity Id, Login URL and Logout URL fields stay empty. | You copied the metadata URL before you saved the IdP Entity ID, or the clipboard did not contain the full URL. | In JumpCloud, click Save and then Copy Metadata URL again, and retry the import. If it still fails, click Export Metadata and use Import From XML instead. |
| JumpCloud shows an access error after the user signs in, or the Yodeck tile does not appear in the User Portal. | The user is not a member of a user group that is bound to the Yodeck application. | Open the User Groups tab of the Yodeck application in JumpCloud and bind the user’s group (Step 3). |
| JumpCloud signs the user in, but Yodeck shows a sign-in error. | No Yodeck user has the email address that JumpCloud sent, or the application sends a NameID that is not the email address. | Create the user in Yodeck with the same email address (see Users), or turn on Automatically Create Users. In JumpCloud, confirm that SAMLSubject NameID is set to email. |
| Sign-in stopped working after you changed the Yodeck application in JumpCloud. | Yodeck still holds the previous metadata, for example an old IdP Entity ID or an expired certificate. | Copy the metadata URL again and import it in the Yodeck Portal, then click Save. |
| The Login URL shows sso.eu.jumpcloud.com instead of sso.jumpcloud.com. | Your JumpCloud organization is hosted in JumpCloud’s EU region. | No action is needed. This is the correct endpoint for your organization. |
| Nobody can sign in because JumpCloud is unavailable or the SSO configuration is broken. | SSO is enabled and Yodeck relies on JumpCloud for every sign-in. | The Account Owner or an administrator contacts support@yodeck.com and asks to deactivate SSO. Yodeck then handles sign-in itself and users request new passwords through the password reminder. See this FAQ. |
F.A.Q.s
Got questions? We’ve got answers! This section addresses common questions about configuring SSO with JumpCloud.
SSO is available on the Enterprise plan only. The Enterprise plan is free while you manage a single screen, so you can test the integration before you upgrade.
Yes, unless you turn on Automatically Create Users in the Advanced Settings tab. Without it, Yodeck accepts a sign-in only when a user with the same email address already exists in your account.
Yodeck identifies your account by the IdP Entity ID in each sign-in response. Because every Yodeck account uses the same Service Provider endpoints, the value must be unique across Yodeck. The default value JumpCloud is shared by every JumpCloud organization, so it does not identify your account.
Yes. Yodeck supports both SP-initiated and IdP-initiated sign-in. Users can click the Yodeck tile in the JumpCloud User Portal or enter their email address on the Yodeck login page.
No. JumpCloud does not provide a Single Logout endpoint for this integration, which is why the Logout URL field in Yodeck shows Not used. Signing out of the Yodeck Portal ends the Yodeck session only.
Yes. Turn on Use SAML Group Access in the Advanced Settings tab, include the group attribute in the Yodeck application in JumpCloud and map each JumpCloud user group to a Yodeck Group. The Advanced Settings section above describes the steps.
The Account Owner or an administrator can contact support@yodeck.com and ask to deactivate SSO for the account. Yodeck then handles sign-in itself and users request new passwords through the password reminder.
Need Help?
The Yodeck Support Team can help you out! Log in to your Yodeck account and send us a message from the bottom right corner!
