Table of Contents
Overview
Groups help you manage user access efficiently, especially in organizations with many users, multiple teams, or various workspaces. Instead of updating each user individually, Groups provide a simpler way to assign permissions. They are most effective when several users require the same type of access. By using a Group, you can define the access level once and apply it to multiple users simultaneously.
Available only on the Enterprise plan!
This feature is only available on the “Enterprise” Plan. You might not see some menus below if you are not on the “Enterprise” Plan.
Groups vs Roles
This is the easiest way to think about it:
- Roles define what a user can do
- Groups apply those roles to multiple users
In other words, Roles define permissions, while Groups help you assign those permissions more efficiently. Therefore, a user can belong to one group, multiple groups, or no group at all.
Why use Groups?
Use Groups to:
- Assign the same role to multiple users at once
- Match user access to your company’s structure
- Reduce manual permission changes
- Keep access rules easier to understand and maintain as your account grows
Recommended setup for large organizations
For most Enterprise accounts, we recommend this setup:
- Create one group for each common role or responsibility in your organization.
- Set a Primary Workspace for each user.
- Add each user to the group that matches their role.
- Let the group assign the correct role automatically to the user’s Primary Workspace.
- Use explicit workspace access only for exceptions.
ℹ️This setup keeps your account easier to manage and makes access rules more consistent.
How Groups fit your company structure
Before you create Groups, decide which roles your users need. You can use Yodeck’s predefined roles or create custom roles with the exact permissions your team requires. Once you know which roles you want to assign, create a group for each role or access policy.
ℹ️If you use workspaces, we recommend assigning roles through each user’s Primary Workspace. This gives you better visibility, cleaner access control, and a setup that scales more easily. After that, add users to the appropriate groups.
Types of Groups
Yodeck includes two main types of Groups:
- System Managed groups
- Predefined groups
Some groups are built into Yodeck and have fixed behavior. Others are included as a starting point and can be customized to match your organization.
System Managed groups
System Managed groups are required by the platform and always exist in the account.
| Group name | Description |
|---|---|
| All Users | Includes all users in your account. You can use it to grant some access rights to everyone. |
| Global Admins | Gives unlimited access to everything in the account except Billing. |
| Billing Access | Gives access to invoices, subscription changes, payment methods, and related billing settings. |
| Template Managers | Allows members to create, edit, and delete Branded Templates. |
The “Account Owner” is automatically included in the “Global Admins” Group!
The ‘Account Owner‘ is automatically included in the ‘Global Admins‘ group and cannot be removed.
Predefined groups
These groups come preconfigured in every new Enterprise account. Unlike System Managed groups, you can customize them.
| Group name | Description |
| Workspace Admins | Full access to the workspace’s content and screens, and can publish content. On the Enterprise plan, they can also manage users at the workspace level. |
| Content & Device Managers | Full access to the workspace’s content and screens, and can publish content. |
| Content Managers | Full access to workspace content, can publish content, and can change screen content, but cannot change screen configuration. |
| Restricted Content Managers | Full access to workspace content, but cannot publish content. |
| Content Viewers | Can only view the workspace’s content. |
What you can edit in each default group
| Group | Deletable | Change Group name | Change Group color | Set workspace roles | Add/remove members | Who can assign |
|---|---|---|---|---|---|---|
| All Users | No | No | No | Yes | Automatic | Global Admins only |
| Global Admins | No | No | No | No | Yes | Global Admins only |
| Billing Access | No | No | No | No | Yes | Global Admins only |
| Template Managers | No | No | No | No | Yes | Global Admins only |
| Workspace Admins | Yes | Yes | Yes | Yes | Yes | Yes |
| Content & Device Managers | Yes | Yes | Yes | Yes | Yes | Yes |
| Content Managers | Yes | Yes | Yes | Yes | Yes | Yes |
| Restricted Content Managers | Yes | Yes | Yes | Yes | Yes | Yes |
| Content Viewers | Yes | Yes | Yes | Yes | Yes | Yes |
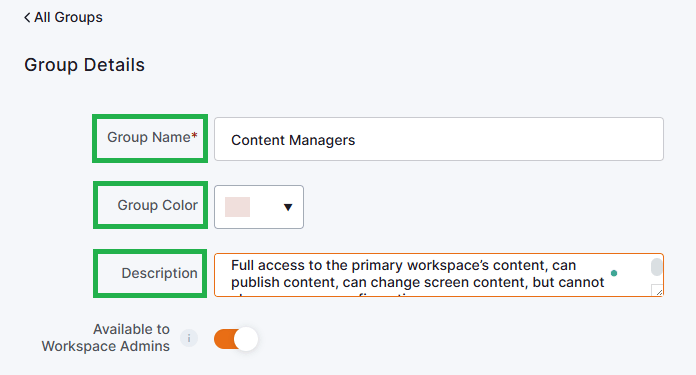
Create a new Group
Create a new group when the default groups do not match how your organization works.
When you create a group, you can define:
- The Name
- The Color
- The Description
ℹ️You can also enable the Available to all workspace admins option. When this option is enabled, Workspace Admins can use the group while adding or editing users from the Users page. However, they still cannot open the group or change its settings.
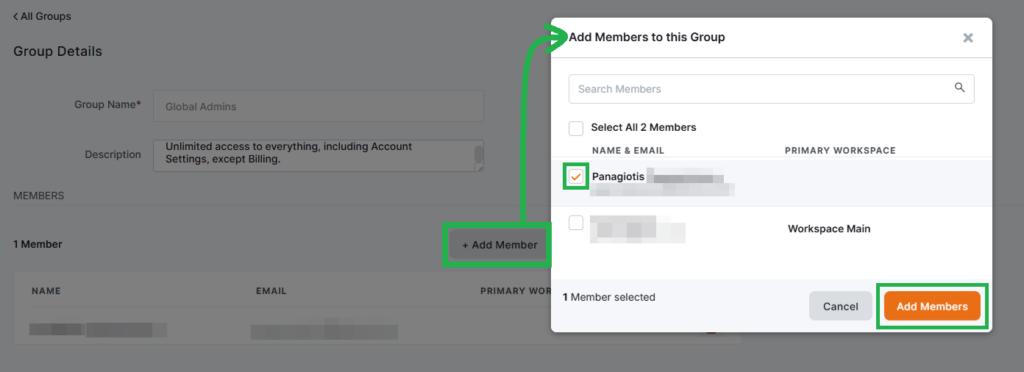
Add members to a Group
To add users to a group, navigate to and click the profile picture button > Account Settings > and locate the Groups option to select it:
- Open the desired group.
- Click the + Add Member button.
- Select the user(s) you want to add.
Once one or more users are added, they inherit the permissions defined by that group.
Group Permissions
Groups can assign permissions in two ways:
- On Primary Workspace
- On Other Workspace
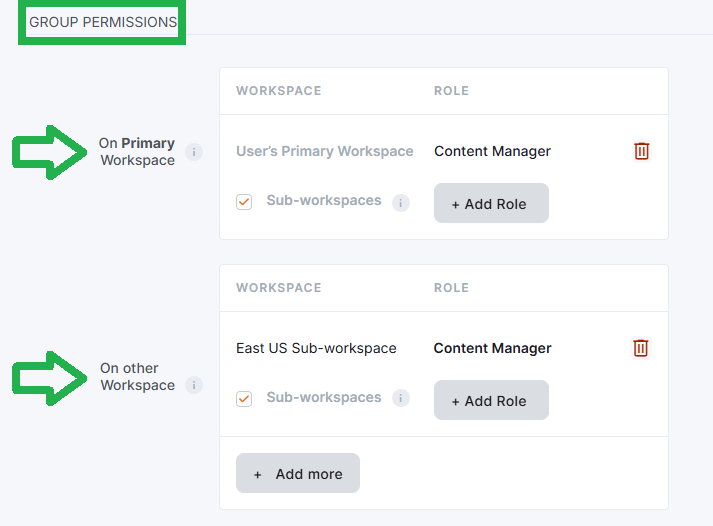
On Primary Workspace
This is the recommended way to assign permissions in organizations that use workspaces.
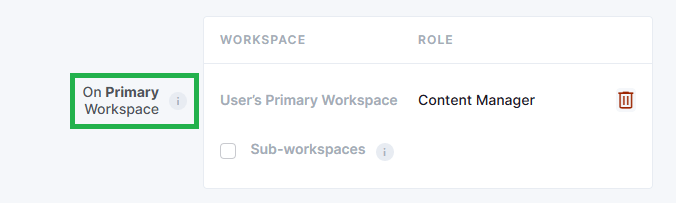
Instead of assigning a role to one fixed workspace, the group assigns a role to each member’s Primary Workspace. This means the same group can apply the same role to different users, even when those users belong to different workspaces.
If you want that role to also apply to workspaces below the Primary Workspace, enable Sub Workspaces. The role will then cascade to all sub-workspaces under that user’s Primary Workspace.
💡You can check the example below by clicking on it:
Example: using Primary Workspace
Let’s say:
- User A is a Content Manager in the Boston workspace
- User B is a Content Manager in the New Orleans workspace
- User C is a Content Manager in the Los Angeles workspace
Instead of creating separate permission rules for each user, you can:
- Use the predefined Content Managers group.
- Set each user’s Primary Workspace.
- Add all three users to the same group.
The group will automatically assign the Content Manager role to each user in their own Primary Workspace.
Why use Primary Workspace?
Using Groups with a Primary Workspace makes access easier to manage because you can:
- Apply permissions more consistently
- Understand a user’s access more easily from the Users page
- Reduce one-off permission changes
- Keep your setup simpler as your account grows
- Still handle exceptions with explicit workspace access when needed
On Other Workspace
Use this option when you want all members of a group to have a role on a specific workspace that is not their Primary Workspace.

This is useful when users need shared access outside their usual branch or hierarchy. If needed, you can also enable Sub Workspaces so the assigned role applies to the selected workspace and all of its sub-workspaces.
💡You can check the examples below by clicking on them to reveal them:
Example: assigning access to a parent workspace and its sub-workspaces
Suppose you want all users in a group to have the Restricted Content Manager role on all workspaces under France.
In that case, assign the role on the France workspace and enable Sub Workspaces. All group members will then receive that role across the France branch of your workspace hierarchy.
Practical example: shared workspaces
Imagine you have a shared workspace for a cross-regional team. Users from Athens and Atlanta both need access to upload and manage content there, even though that workspace is not part of their own branch.
In this case, use On Other Workspace to assign the required role to that shared workspace at the group level.
Best practices
To keep your setup simple and scalable:
- Build your workspace structure so it reflects your organization.
- Create one group per common responsibility.
- Assign users to groups based on their Primary Workspace.
- Enable Sub Workspaces when access should cascade downward.
- Use explicit access only for exceptions.
- Review your setup regularly.
💡Avoid relying too much on explicit access for many users. It works well for exceptions, but it becomes harder to manage as your account grows.
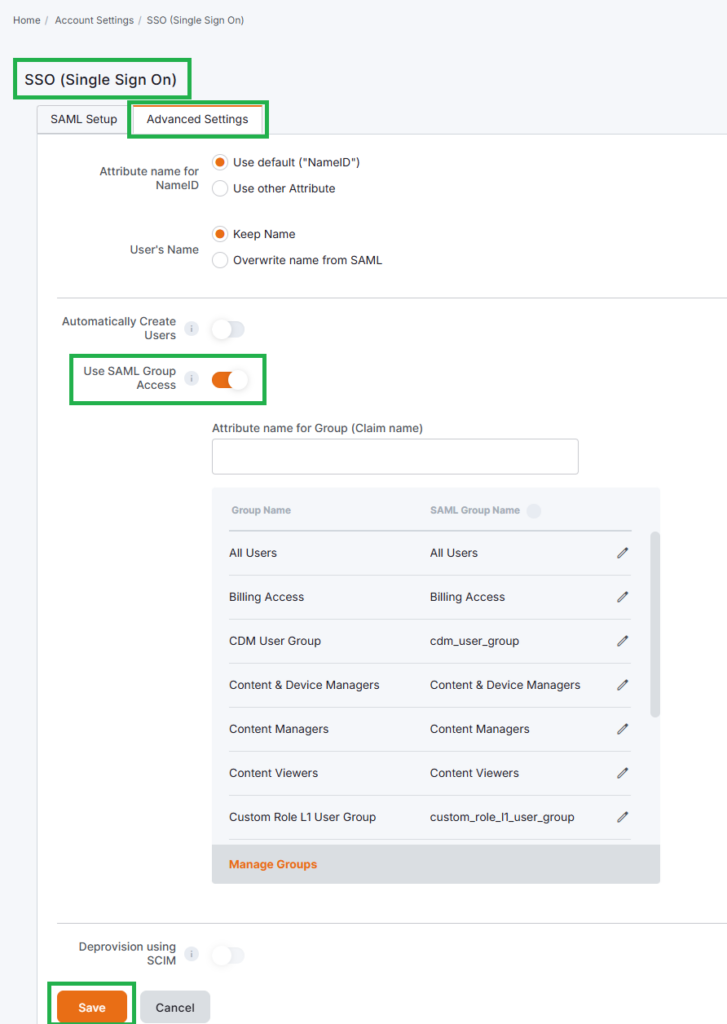
Groups and SSO (SAML 2.0)
Groups can also work with Single Sign-On (SAML 2.0).
By enabling Use SAML Group Access, you can map your identity provider’s groups to Yodeck Groups. This lets Yodeck assign permissions automatically when users sign in.
When a new user logs in through SSO, Yodeck checks the SAML group mapping and applies the permissions of the linked Yodeck Group.
Configure SAML Group Access
- Log in as an administrator.
- Go to Account Settings > SSO > Advanced Settings.
- Enable Use SAML Group Access.
- Enter the Attribute name for Group.
- Map your existing Yodeck Groups to your SAML group names.
You can also click Add Group Mapping to create mappings that match the groups in your identity provider. Users who join those SAML groups will inherit the linked Yodeck Group’s account permissions and workspace roles.
Manage Groups through the API
If your organization uses automated provisioning, you can also manage Groups through the Yodeck API.
Available endpoints include:
/v2/groupsfor Groups/v2/usersfor Users/v2/rolesfor Roles
These endpoints can help you automate onboarding, group management, and role assignment.
F.A.Q.s
Got questions? We’ve got answers! This section addresses common questions about the Yodeck Groups.
Groups are available only on the Enterprise plan.
No. System-managed groups cannot be deleted by users.
Yes. A user can belong to multiple groups, one group, or no group at all.
If more than one group grants roles on the same workspace, the user receives the combined permissions of the applicable roles.
Use Groups for the access patterns that apply to many users. Use explicit workspace access only for exceptions or special cases.
– On Primary Workspace assigns a role dynamically to each user’s own Primary Workspace. This is the recommended option for scalable user management.
– On Other Workspace assigns a role to a specific workspace outside the user’s Primary Workspace. Use it for shared access or special cases.
Use On Other Workspace when a group of users needs access to the same shared workspace outside their usual branch or hierarchy.
Not directly. However, if you enable Available to all workspace admins on a group, Workspace Admins can use that group while adding or editing users. They still cannot view or edit the group itself.
Use the All Users group. It includes every user in the account automatically.
Yes. You can map SAML groups from your identity provider to Yodeck Groups and automate permission assignment during login.
Need Help?
The Yodeck Support Team can help you out! Log in to your Yodeck account and send us a message from the bottom right corner!