Table of Contents
Troubleshooting Guide Specific ONLY for the Yodeck Player based on Raspberry Pi
This detailed troubleshooting guide focuses ONLY on the most common problems customers report with the Yodeck Player on the Raspberry Pi.
Boot Sequence
Stage 1 – Chip Booting [3 seconds]
As soon as you power up the Player, there is a 3-second delay because of booting. During this stage, nothing is shown on screen. This allows the Player to auto-detect the connected screen if a power failure affects all equipment. The delay allows the screen to “boot” first, so the Player can then detect the screen’s resolution.
Stage 2 – Firmware Booting [2 seconds]
The first picture on the screen is a multi-colored rectangular test image shown for just 2 seconds. This indicates that the CPU has loaded the firmware and will begin booting immediately.
By confirming that this screen is shown on boot, you confirm that:
- The SD card is plugged in correctly and read by the Player.
- The Player is powered adequately, with enough power for this stage.
- The booting stage works, and the next stage will ( probably) work.
- The screen is correctly connected to the Player, and colors appear normal.
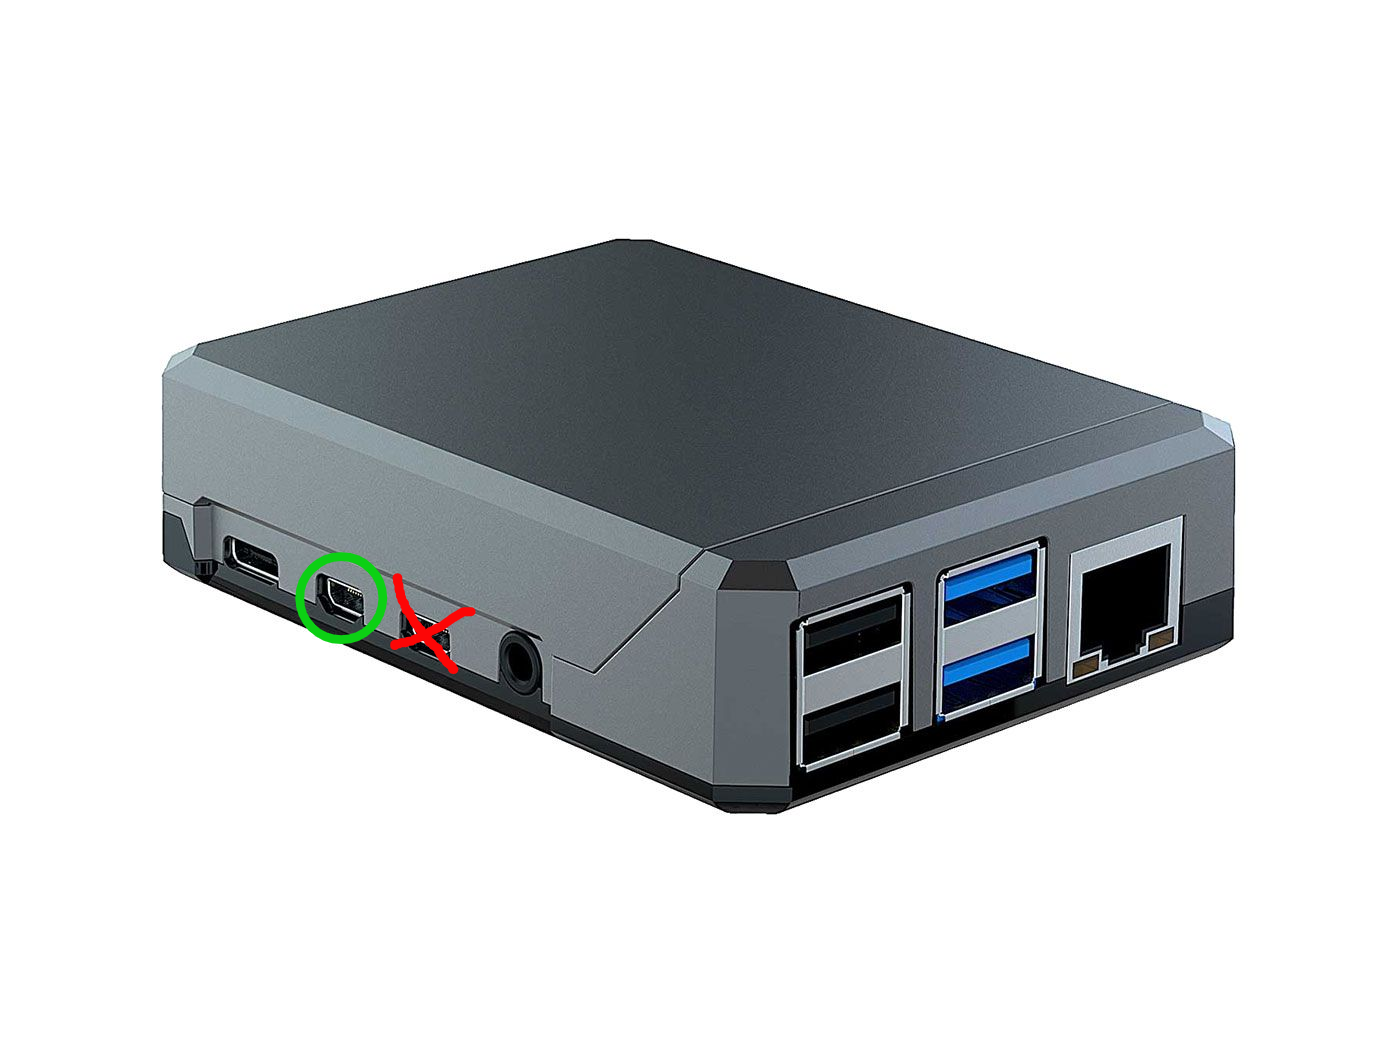
Yodeck player based on the Raspberry Pi 4
If your RPi 4 players are stuck at this screen for more than 1 minute, make sure that you are using the correct HDMI port on your Raspberry Pi 4, as shown in the image below:
Stage 3 – Bootloader Booting [3 seconds]
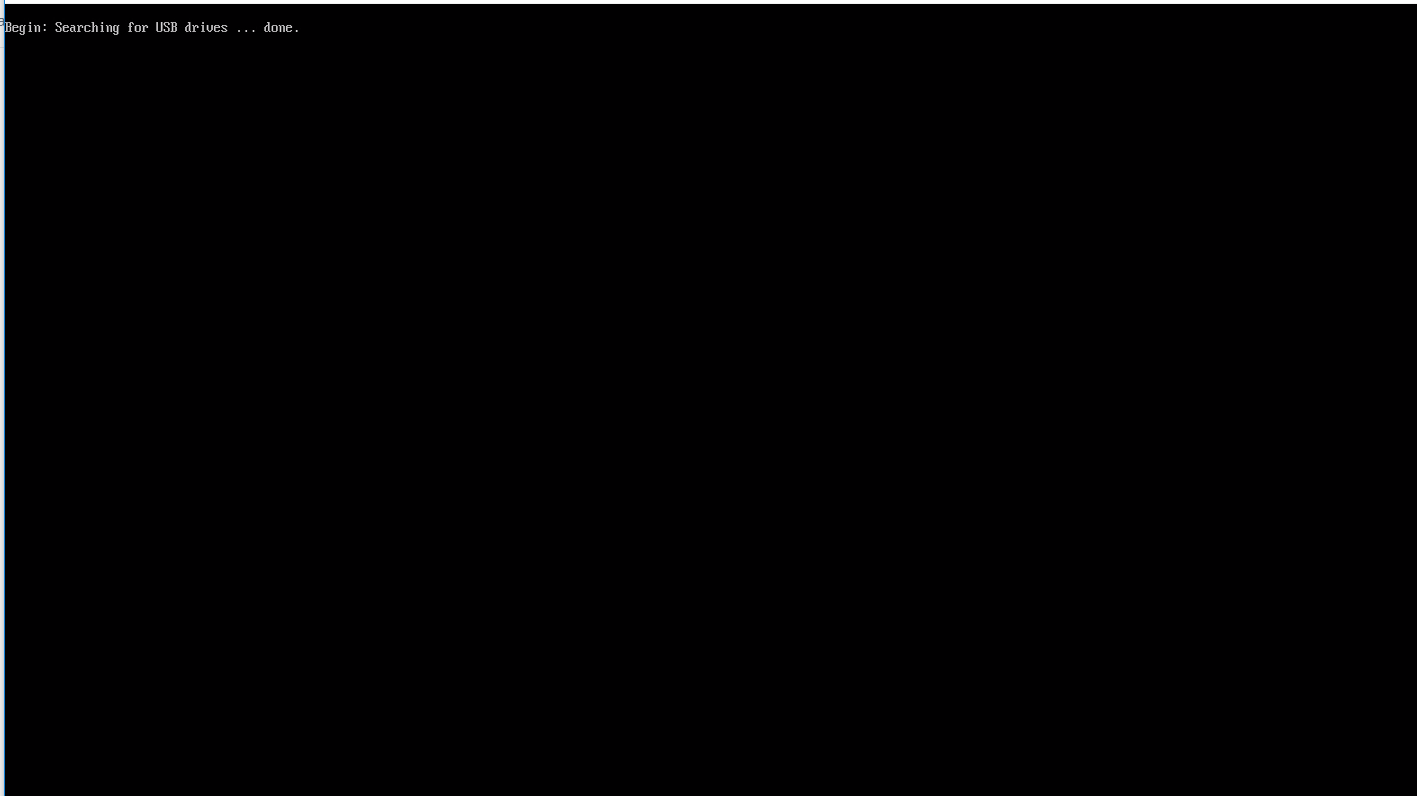
After the previous stage, the “Searching for USB drives…” message should appear in the top-left corner of the screen. At this stage, if the Player detects a USB flash drive connected to the zip file containing the software image, it will rewrite the entire software from scratch on the SD card. Check out the Recovery Procedure for the exact details. You might see an error message after the word “ done” appears right next to the dots. The boot sequence will proceed to the next stage if the error is automatically recovered. If there is an error message and the sequence stops here, you must use the Recovery Procedure to recover your Player.
Stage 4 – Boot Logo / Loading [3-15 seconds]
In this stage, the full-screen logo appears, and a blinking message saying “Loading” eventually appears in the bottom-right corner of the screen. At some point, the full-screen logo will disappear, and the screen will turn black, with the “ Loading” message still blinking. At some point, the “ Loading” message will stop, and Playback will commence. If the sequence stops at any point during this stage, our Support Team may be able to recover from this error remotely. Please note that if the black screen at the end of the boot sequence remains, this does not indicate a boot sequence problem. Instead, you should check the corresponding paragraph that describes how to investigate an unexpected black screen.
Status Messages in the Lower-Right Corner of the Player’s Screen
These blinking messages, located in the bottom-right corner of the screen, provide useful insight into the player’s status and may be helpful for troubleshooting.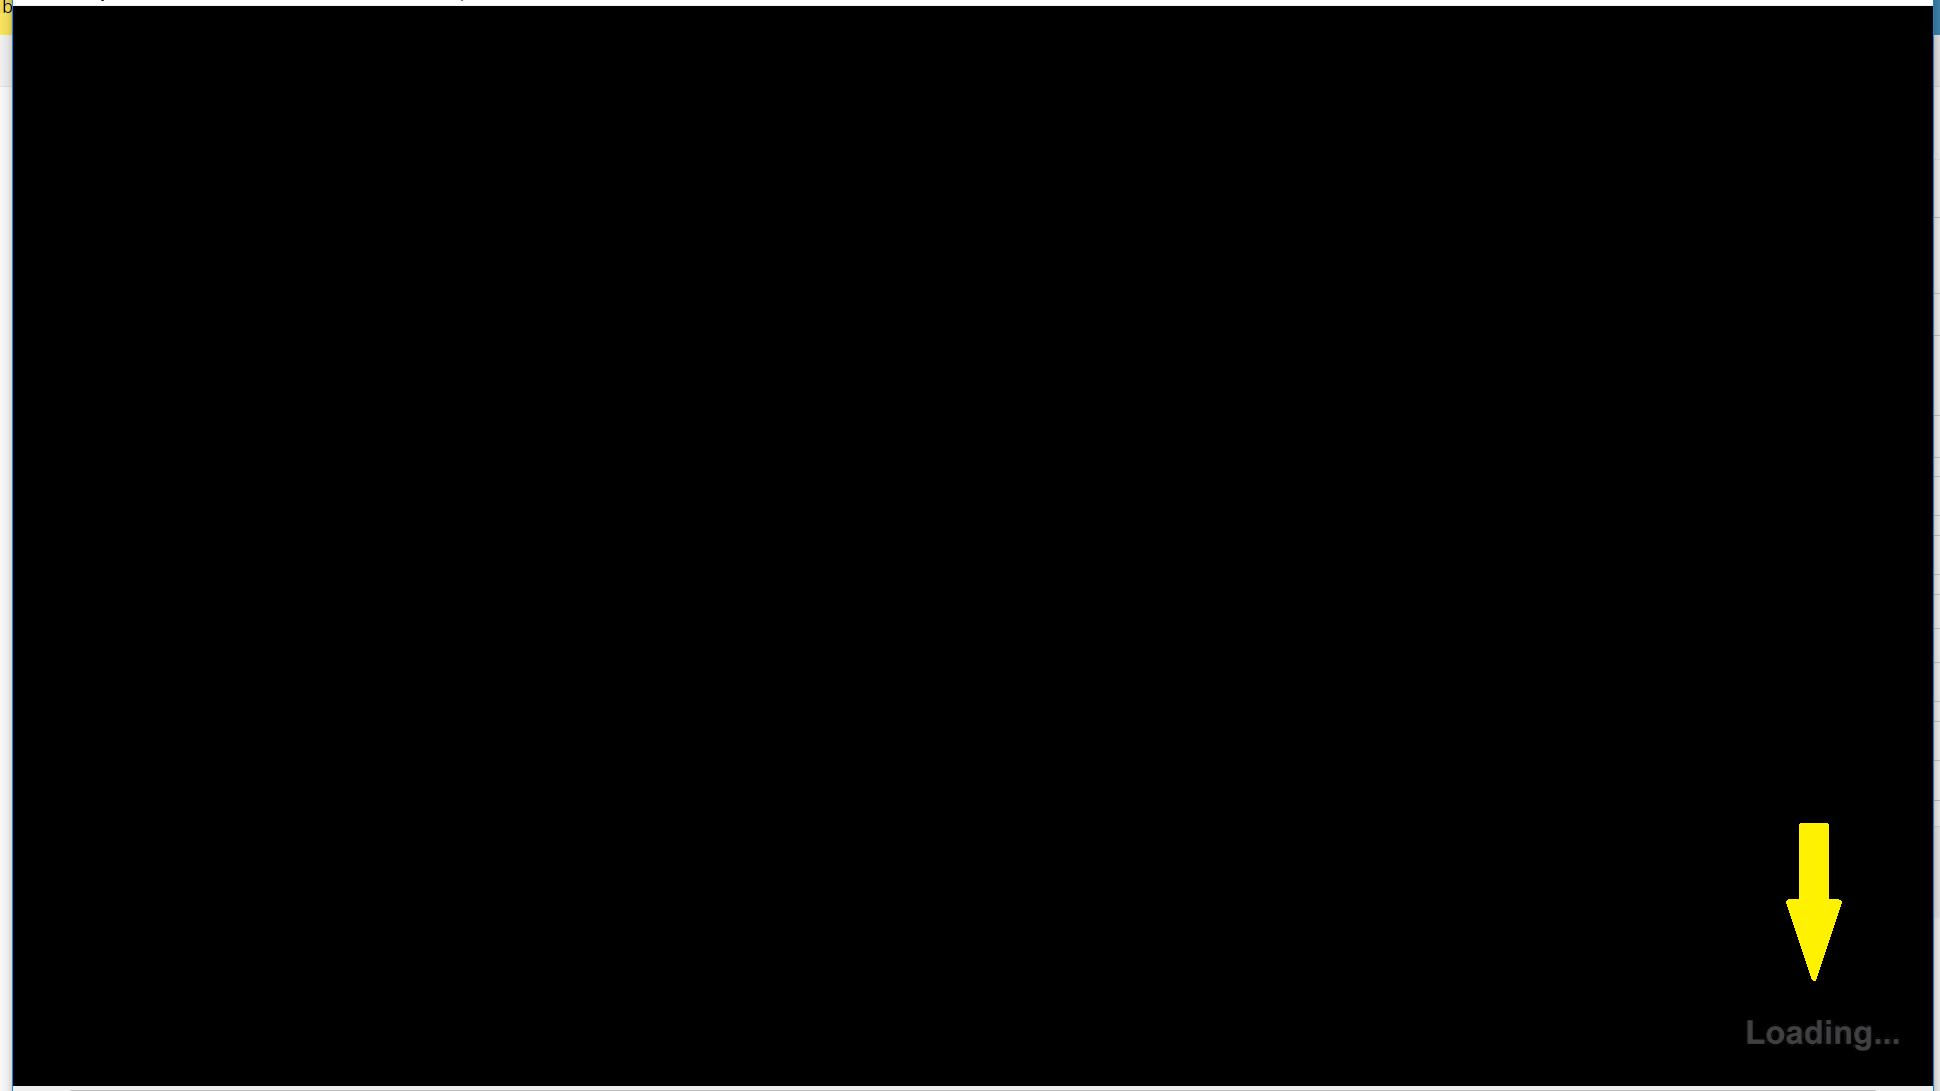
“Loading”
This indicates that the Player’s software is being loaded and starting up.
“Configuring”
This indicates that the Player must be reconfigured, and the new configuration is being applied. Note that re-registration might require reconfiguration.
“Downloading”
This indicates that the Player has received an update to the Scheduling information and/or Media changes, and is now downloading the new Media required. Note that a fresh version of the Scheduling information (called “Schedule File”) is issued automatically every 30 days, so this message might appear for a few seconds each time. After the download completes, playback resumes.
“Updating”
This indicates that the Player has been alerted to a software update and is trying to update. A device might be updated in 3 cases:
- When a device boots for the first time and comes online. If the device is an older version, it updates at that point. Note that there is no need to register the device for it to update.
- Regular software updates: Issued every 6 weeks on Tuesdays.
- Emergency software updates are issued for critical hotfixes that cannot wait until the next scheduled release and may occur at any time (they occur 1-2 times a year).
Updates take 2 to 30 minutes, depending on the update and network bandwidth. If a device is in an “Updating” state for more than 1-2 hours, this likely indicates an error in the update process that requires remote manual intervention to recover. Errors with updates might happen due to many factors, with the most common ones being:
- The update process was interrupted. This usually happens on 1st boot.
- Some network filters prevent the update process from downloading all required updates.
Error Messages on the Player’s Screen
All error messages appearing on the Player’s screen are described in this section.
Blank Screen
Please note that the black screen does not have an error message. Find and read the corresponding section on the Black Screen issue.
“Running startup diagnostics”

This error message is shown on boot only. Playback will start based on the downloaded data after 2 minutes if a valid schedule file and media are stored in the Player. This message is a vital troubleshooting method to identify
a) the network details of the device
and
b) The reason is that the device does not have internet access.
“Internet Access Required”
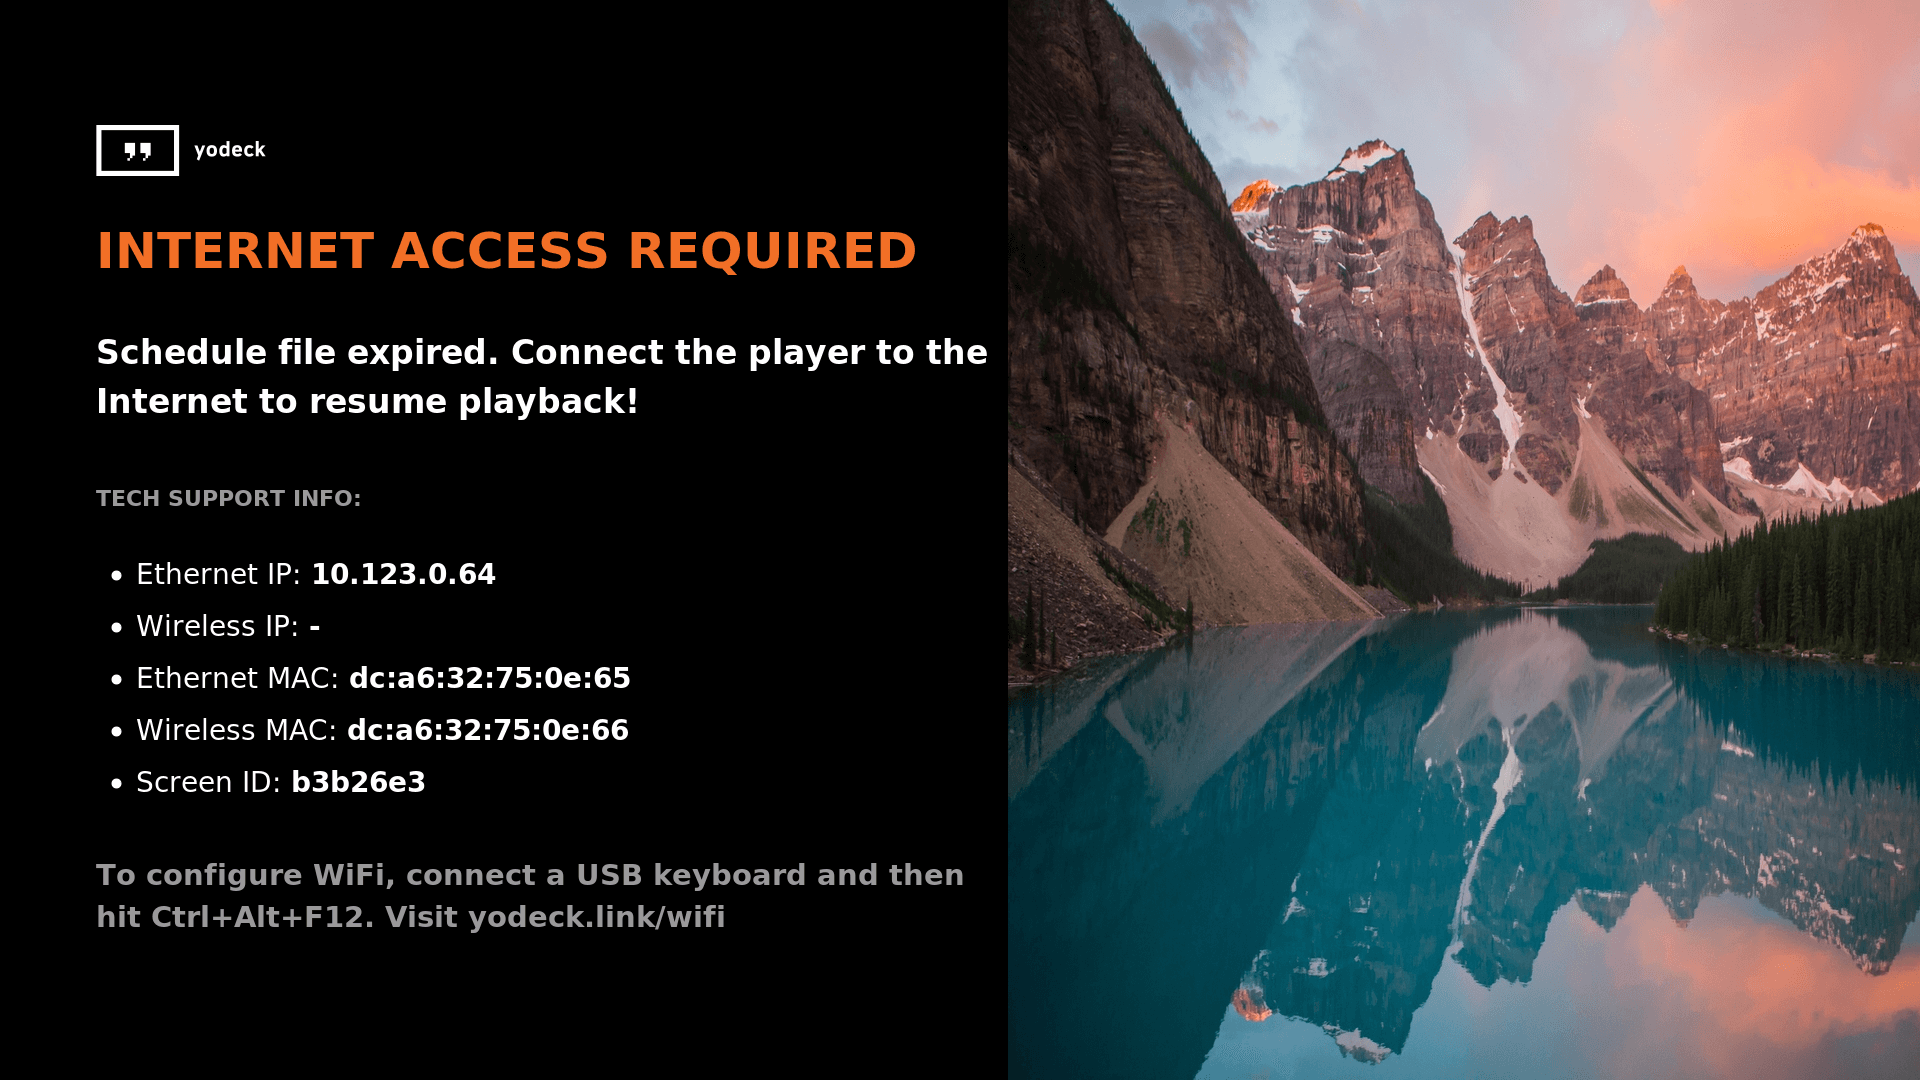
This error message is shown in a few cases:
- The Player has been offline for more than 30 days. It might take up to 45 ( or even more) days for the Player to stop Playback. If the Player is rebooted, it might restart playback for up to 1 hour, then return to that message again. This is the most common cause of this message. Check the “Last Online” date in the Portal to verify that the Player has been offline for over 30 days, to confirm this is the cause of the message.
- The Player has been deleted from an Account and registered to another account. In this case, the message should disappear after the Player downloads the latest valid schedule file and media from the cloud.
- The Player (SD card) storage has been swapped with another Player. In this case, the message should disappear within 2 minutes of the device’s online, and a Registration Code message should appear.
“Apply Needed”

The message below will appear at the bottom right of your TV screen three days before the Schedule file expires.
Solving the above issue
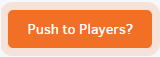
Connect the player to your wireless network using an Ethernet cable or follow our detailed guide to solve the above issue. When the player appears online on your account, click the “Push to Players” button.
“Registration Code”
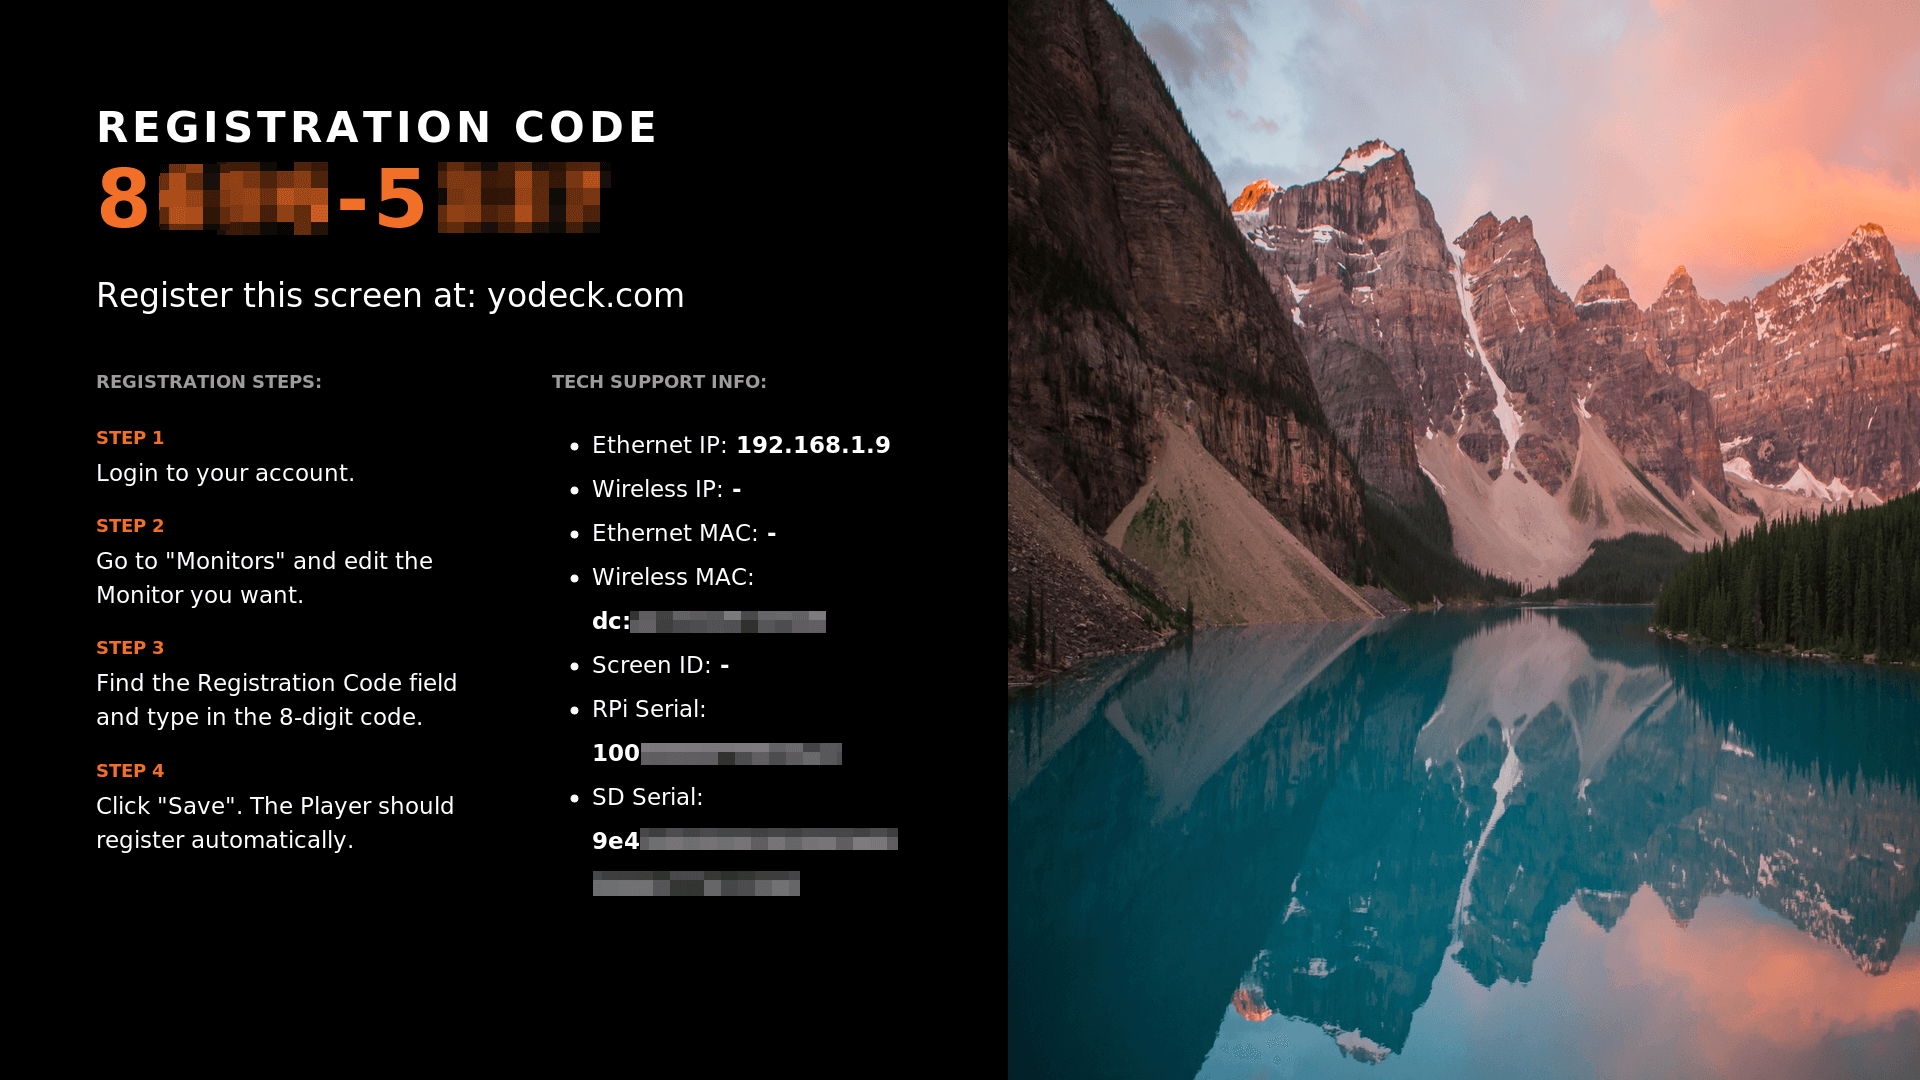
To register a newly imaged Player with the Yodeck Portal, the user must enter the device’s Registration Code in the Portal’s Screen section. In addition to this typical case, the device must be re-registered if the “SETTINGS.txt” file is modified or the SD card has been changed for the specific Raspberry Pi.
“Device Deactivated”
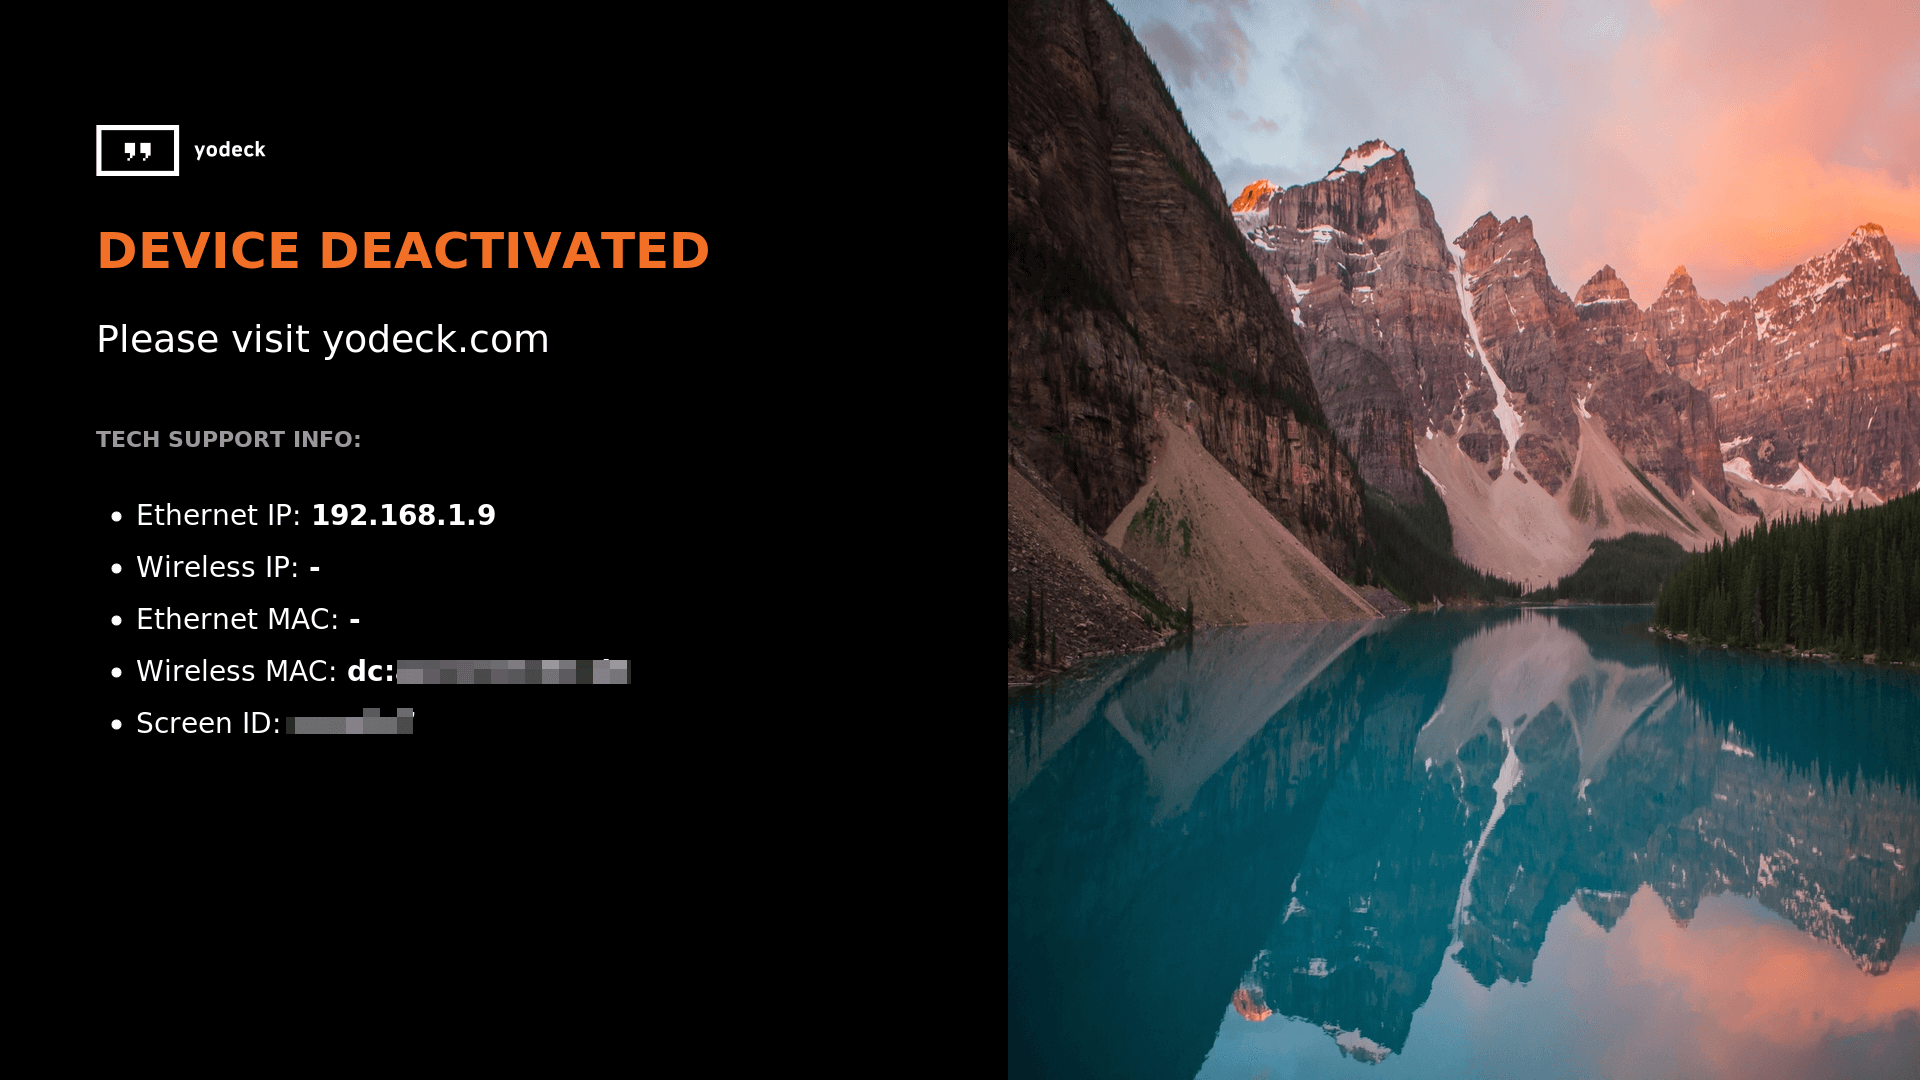
The “Device Deactivated” message appears when the Screen in the Account is disabled because the Quota (maximum number of Screens for the Account) has been reduced. If a Player is deactivated due to a lowered Quota, the Player displays the “Device Deactivated” message. If the screen is deleted, a Registration Code message will appear, not a “Device Deactivated” message. Only when the Screen is automatically disabled due to a lowered Quota can the “Device Deactivated” message appear.
“Could Not Get Video from YouTube”

There are cases when a YouTube video cannot be downloaded. This might happen due to several reasons:
- Random network issue
- The YouTube site has made slight changes, which have made it impossible for Yodeck’s internal software to download some videos.
- Blocking of the YouTube site in the Internet connection that the Player uses to access the Internet.
If a YouTube video cannot be downloaded, a message saying “Could Not Get Video from YouTube” is displayed instead of the Video itself.
Overview of Network Issues
WiFi Configuration
The recommended way to configure WiFi is through the Portal with the device connected via Ethernet. If this option is unavailable, you must use the Manual Configuration guide to enter the WiFi details directly in the Player’s configuration file.
HTTP Proxy
HTTP Proxies can cause trouble in network communications. Transparent HTTP Proxies cause issues with SSL certificates. Other proxies might also incorporate web filtering, blocking some types of files or sites ( e.g., downloading videos or the YouTube site).
SSL Certificates
SSL is used in HTTPS to enable secure communication. The Player checks SSL Certificates, so having a custom certification not signed by a well-known CA can cause headaches. If an organization uses its certificates or a CA, they must be stored in the Player so communications can be flawless.
DNS Servers
By default, Players also use Google DNS and local DNS entries. This allows for easier configuration without relying on local DNS servers or relays. This behavior can be disabled through the UI. Some networks block outbound DNS queries to the Internet (see Google DNS), making it impossible for them to work correctly without proper configuration first.
DHCP vs. Static IP
DHCP is another source of trouble in really crowded networks. Leases might be retained, and collisions might occur. Players are embedded in 24/7 devices. It might be difficult to recover from a DHCP issue. So, in crowded networks where IP addresses are crammed, it might appear that the device conflicts with other devices.
WiFi HotSpots
Hotspots have a captive portal. This is the web page you’re redirected to initially to accept the Terms of Use for the WiFi network. Then your computer can go online. This type of interactivity is not possible with an embedded device. The network administrator must configure the captive portal to allow the Player’s MAC addresses to access the Internet without requiring captive portal acknowledgment. Players currently support WPA-PSK, WEP, EAP, and Open Standards. The embedded adapter supports 802.11 b/g/n networks at 2.4 GHz. 802.11a 5GHz networks will work only with the embedded WiFi adapter on the RPi 4. RPi 3B+ does not support 5GHz networks.
Remote Support Access ( VPN)
Players are connected 24/7 to our remote access service ( VPN). You can deactivate it for each Player individually.
SSH Service
SSH is the only active service enabled on the Player.
Device Firewall
The Players have a software firewall that filters inbound traffic to everything besides SSH. This firewall must be set up if any third-party software needs inbound communication.
HDMI-in Multicasting
Like many IP streaming adapters, the HDMI-in adapter ( LKV373A) does IP Multicasting of video data. For most simple networks, video data is broadcast on the local network, which can cause network delays or even excessive network usage.
The player shows a black screen
- If the Player is “Online” in the Portal, check the last screenshot to see what should be showing.
Check the date the screenshot was last taken to ensure it is up to date. You may have to wait up to 3 minutes to ensure it is not updated. If the screenshot is outdated, the Player may have networking issues.
Make sure the screen is powered on.
Make sure the screen is set to the proper HDMI input. Perhaps someone changed the selected HDMI input, and nothing is shown.
Make sure the HDMI cable is connected on both sides.
Check that the Assigned Schedule and Default Content for the specific Screen in the Yodeck Portal have some content. If unsure, then:
If the “ Downloading” message flashes on the screen for over 5 minutes, there is a- network issue.
- If the screen stops being black, there is some scheduling/content problem. Investigate the assigned schedule and default content to determine what content should be shown. To check Schedules, confirm that the timezone is correct ( both for the specific Player and the User Account). Make sure you check expiration times for content.
- Note down the current Assigned Schedule and Default Content.
- Create a new Layout with a simple full-screen Image that does not have an expiration start/end date.
- Select “ None” as the Assigned Schedule and select the newly created Layout as the “ Default Content.”
- Push to Players and wait to see what happens.
- If the screenshot has some content that is not black, then:
- If the screenshot appears black, then:
- Try rebooting the device ( locally or remotely) while keeping an eye on the screen. If the multicolored rectangle appears on the screen, along with the boot logo, then the Player works but cannot play back content. If, after a reboot, the Player stays online on the Portal, you should contact support.
- If the Player is “Offline” in the Portal, troubleshooting is complex. We need to ensure that the device is experiencing a temporary difficulty connecting to the internet or has an internal failure.
Make sure the screen is powered on. If the TV is being turned off, the “Turned Off” option might have been scheduled in the past and may not work correctly- because the device was offline and doesn’t have an accurate clock.
- Make sure the screen is set to the proper HDMI input. Perhaps someone changed the selected HDMI input, and nothing is shown.
- Make sure the HDMI cable is connected on both sides.
- Check the Last Seen Online date: If the date is older than 30 days, there is a strong chance that the device has been automatically disabled due to excessive timeout.
- Do a pre-check with the basics:
- Try rebooting the device and seeing if it gets online. Otherwise, record the error message and try to troubleshoot using that.
The player stops at a black screen with small text/code (boot sequence)
Usually, this indicates a software problem. This might be due to recoverable software corruption or storage ( SD card) corruption.
- First, try rebooting to see if the error happens repeatedly. If at any point the device appears online in the Portal, remote access can help recover it.
- If the device is offline and remains in the same status, try using the Recovery Procedure via the USB Flash drive. If the USB Recovery Procedure works without error messages, then this should have solved the problem.
- If the procedure issued any warning messages, if the Player failed to boot after completing the procedure, or if the device has the same issue within 5-10 days of the recovery, then this is probably a permanent corruption of the storage medium (SD card), which will need a replacement.
The player does not Turn On
- First, ensure that the Player is the problem, not the screen. There are two LED indicator lights on the Player, right next to each other. One should be lit solid when the Player is connected to power, and the other should be blinking randomly when the Player is usually working. If both exhibit the expected behavior, before doing anything else, follow the steps for “Player Shows a Black Screen.” If that troubleshooting does not solve the issue, continue with the steps below.
- For the 2 LED indicator lights described above:
- Make sure the power LED is permanently lit. Otherwise, there is an issue with the power not reaching the Player.
- If the other LED light is off for more than 20 consecutive seconds, the Player will have problems.
- Try rebooting ( power-cycling) the Player. If the LED lights continue to behave as above (1 LED on, the other off for more than 20 seconds), then the issue is confirmed. Try the following:
- Make sure that the SD card is secured in place. Try removing and replacing the SD card.
- Try using a different PSU.
- Try unplugging the screen, then power-cycling. Some screens are not properly grounded, which may cause power issues.
- Try using a different SD card.
Clicking “Push to Players” does not change Playback on Players
- If the Player is “Online” in the Portal, a Push might take up to 3 minutes to appear on screen.
- If the Player is “ Offline” in the Portal, there is no way for the Player to receive the “ Push” command. This is a Network Issue, so please see other procedures that deal with networking and an “ Offline” state.
- Clicking “ Push to Players” should restart playback on all affected devices. Try using a Force Push (clicking the “Push” button while it’s gray). This should restart playback on all Players. If you want to troubleshoot a specific Player, there is a button called “ Push Again to this Screen” in each Screen entry in the Portal. This button should restart playback. This way, you can identify if there is working communication between the Player and the Portal. If Playback does not restart within 3 minutes AND you do not see the “ Downloading” message in the bottom-right corner, there is a network issue. This scheduling issue occurs when Playback restarts but does not display what the user wants. Try doing the following:
If the “ Downloading” message flashes on the screen for over 5 minutes, there is a- network issue.
- If the screen stops being black, there is some scheduling/content problem. Investigate the assigned schedule and default content to determine what content should be shown. To check schedules, confirm that the timezone is correct ( both for the specific player and user account). Make sure you check expiration times for content.
- Note down the current Assigned Schedule and Default Content.
- Create a new Layout with a simple full-screen Image that does not have an expiration start/end date.
- Select “None” as the Assigned Schedule and select the newly created Layout as the “ Default Content.”
- Push to Players and wait to see what happens.
- There is a case with web filtering where the Player might appear as “ Online” in the Portal and still cannot download content. This can only be investigated through the command line and advanced troubleshooting. Make sure that the network has no Transparent HTTP Proxy or Web Filtering of any sort.
The Player is “Offline” while connected to the Internet
- Are there any HTTP Proxies on the network? HTTP proxies can cause communication problems. You must get someone from your IT department or network to retrieve more information.
- Is there any filtering or outbound connection firewall? If yes, try adding an exception for the player’s MAC address. MAC addresses can be retrieved by booting the Player without a network connection (the Portal Connection error message will appear, showing the MAC and IP addresses).
- Confirm that the Internet connection is up and running.
- Try rebooting the Player. If it comes back online and then back offline after 15-20 minutes or more, this can be investigated remotely while the player is online.
- If you’re using a WiFi connection, try a wired connection for the remote support team to investigate the issue.
YouTube Videos are not working
Check the section regarding the “Cannot download YouTube video” screen message.
Downloading Takes Too Long
Excessive time spent downloading a video can indicate a network issue with the Player. If the bandwidth is terrible, the download can fail completely, even after a long time.
There is an icon in the top-right corner of the screen
Two warning icons can appear in the screen’s right-hand corner when the Player is not functioning optimally. Let’s have a look at their significance and how you can troubleshoot these problems:
1. Lightning / Thunderbolt / Thunder Icon
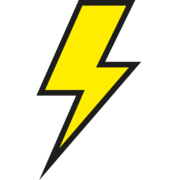
This indicates that the power supply is unstable and the player is underpowered, which could lead to the corruption of the SD card and overall instability. It would be best to replace the power adapter as soon as possible. The Raspberry Pi 2 needs a 5V/2A power adapter. The Raspberry Pi 3 needs a 5V/2.5A power adapter, whereas the Raspberry Pi 4 needs a 5V/3A power adapter.
2. Temperature / Thermometer Icons
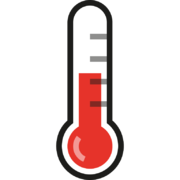
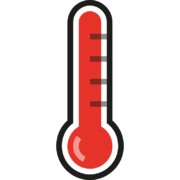
The thermometer icons mean the Player’s main chip is hotter than usual. The half-red thermometer icon means that the Player’s chip temperature is between 80 and 85 ℃, and the Player will throttle the CPU ( decreasing performance) to keep the temperature below 80 ℃. The completely red thermometer icon means that the Player’s chip temperature is above 85 ℃, and the Player will throttle both the CPU and GPU ( decreasing performance even further) to keep the temperature below 85 ℃. Why the overheating? Most probably, the content pushed to players is somehow too heavy. You might not realize it, but adding too many Playlists or transparent content might put too much of a burden on the Player. What can you do? Here are some possible solutions:
- Try removing some content, combining multiple Widgets into a single App, or contacting our support team to ask for help optimizing your Layout or content.
- Add a passive heat sink. They are cheap. See a few examples on ebay. Note that our Players come pre-installed with a heat sink.
- Try using a metal case instead of a plastic one. If using a case with a cover ( like the Official Raspberry Pi case we ship with our Players), try removing the cover to allow the chip to cool.
- Place the Player in a well-ventilated space.
You can override standard behavior and disable both icons. However, you must understand the risks of doing so.
- Go to the “Screens” list and edit the screen in question.
- Click on the “Advanced” tab.
- Ensure the “Allow Raspberry config.txt Override” toggle is set to “ON.”
- In the “Raspberry config.txt Override Directives” text area, you will have to enter the following configuration line:
avoid_warnings=1
- After you are finished, click the “Save” button.
- The Player will reboot, and you are set to go.
Please keep in mind that we do not recommend removing the warning icons without troubleshooting. Rather than hiding the warnings, you should investigate and remedy the issue.
Recovering your Player through a USB flash drive
The Player is resilient to hardware and system failures. But, as with any device, there is a slight chance that the Player may fail. In the case of a software failure, you might be able to recover your Player by “reflashing” it with the latest software. Reflashing will erase the Player’s content (re-writing the whole SD card from scratch). Your settings will be retained, so your Player should reapply all settings in the system, re-download all content required and resume playback without you doing anything. If you are an advanced user, remember that the only content retained is the “SETTINGS.txt” file, which contains all settings. Any manual changes you made to the image via the command line will be lost (e.g., manually changing passwords, manually editing config.txt, adding other software, etc.).
The entire USB reflashing procedure is available here.
Security Notice
For the advanced IT security-aware readers: Yodeck Player Image files are digitally signed. The ZIP files contain information that verifies that Yodeck issued the specific SD card image. You cannot perform this procedure with an arbitrary image file, so an attacker cannot inject their code into the system just by plugging in a USB drive and rebooting.
Reset all Settings on your Player
Delete a file from the Player’s SD card to reset all Settings on your Player. This will force the system to apply the default settings.
IMPORTANT: If your Player requires some special network configuration to get online, you will lose Internet connectivity. This might render the Player unreachable, and you might go on-site and perform a manual configuration.
For Regular Users
- Power off your Player ( by removing the power cable).
- Remove the microSD card from your Player.
- Access the MicroSD card with your PC. You might need a microSD-to-SD card adapter or a USB memory card reader.
- You will see one or more storage filesystems. On the first one ( the smallest, around 100MB of space), you will find a file called “SETTINGS.txt.”
- Delete the “SETTINGS.txt” file.
- Remove the microSD card from your PC.
- Place the microSD card into your Player.
- Power up your Player.
Upon start-up, the Player will apply all default settings to the system. It may require up to 10 minutes, and a reboot might occur.
For Advanced Users
If you have remote ( SSH) or local shell access, just issue these two commands: sudo rm -f /boot/SETTINGS.* sudo reboot.
Upon start-up, the Player will apply all default settings to the system. It may require up to 10 minutes, and a reboot might occur.
The video seems a Bit Blocky/ Pixelated
Check the status tab on the portal to see the screen’s status. If the resolution is 640×480, the Player runs in VGA mode (640×480). This would appear as low-quality or even a 4:3 layout with black bars above/below or on the right/left (or even both). Try power-cycling the Player. If this fixes the situation, it’s just an issue of auto-detecting the screen’s resolution. The Yodeck Player (based on a Raspberry Pi) automatically detects the “preferred” resolution of the connected screen (usually its native resolution) at startup. In some cases, the preferred resolution is not detected correctly:
- Powering up your Player without a screen connected.
- Powering up your Player and screen simultaneously ( e.g., after a power failure). If your screen is slow on startup, it does not report its resolutions to the Player in time.
In this case, the standard VGA resolution of 640×480 is used. Rebooting your Player will resolve this issue ( temporarily). If you are having constant issues like this, then you have two options for a permanent solution:
- Set the player’s resolution to a standard one. Your Player will always use this resolution, regardless of whether you have attached a screen or not or if the attached screen supports it.
- Increase the time the Player waits to detect the screen. This delay is set to 3 seconds by default. You can increase it to allow your screen to start and the Player to detect it properly. To do this:
- Go to your Screen entry in the Yodeck Portal,
- Go to the “Advanced” tab,
- Make sure the ” Allow Raspberry config.txt Override” toggle is set to “ON”
- Add the following line to the “Raspberry config.txt Override Directives” using the number of seconds that works for you:
bootcode_delay=8
- Make sure you click the “Save” button to save the configuration you made.
The video is stretched/letterboxed
Check the status tab on the portal to see the screen’s status. If the resolution is 640×480, the Player runs in VGA mode (640×480). This would appear as low-quality or even a 4:3 layout with black bars above/below or on the right/left (or even both). If so, check the previous question. If the resolution differs from the Screen’s native resolution, you can adjust it to better fit the hardware. Sometimes, resolution auto-detection might not be optimal, so manually setting it will be required.
The video is being cut off at the edges
Check the status tab on the portal to see the screen’s status. If the resolution is 640×480, the Player runs in VGA mode (640×480). This would appear as low-quality or even a 4:3 layout with black bars above/below or on the right/left (or even both). If so, check the previous question. The most common case is overscan. Most TVs are set by default to enable overscan. What does this do? If the resolution differs from the Screen’s native resolution, you can adjust it to match the actual hardware better. Sometimes, resolution auto-detection might not be optimal, so manually setting it will be required. Try uploading this image to your account and setting it up to full-screen.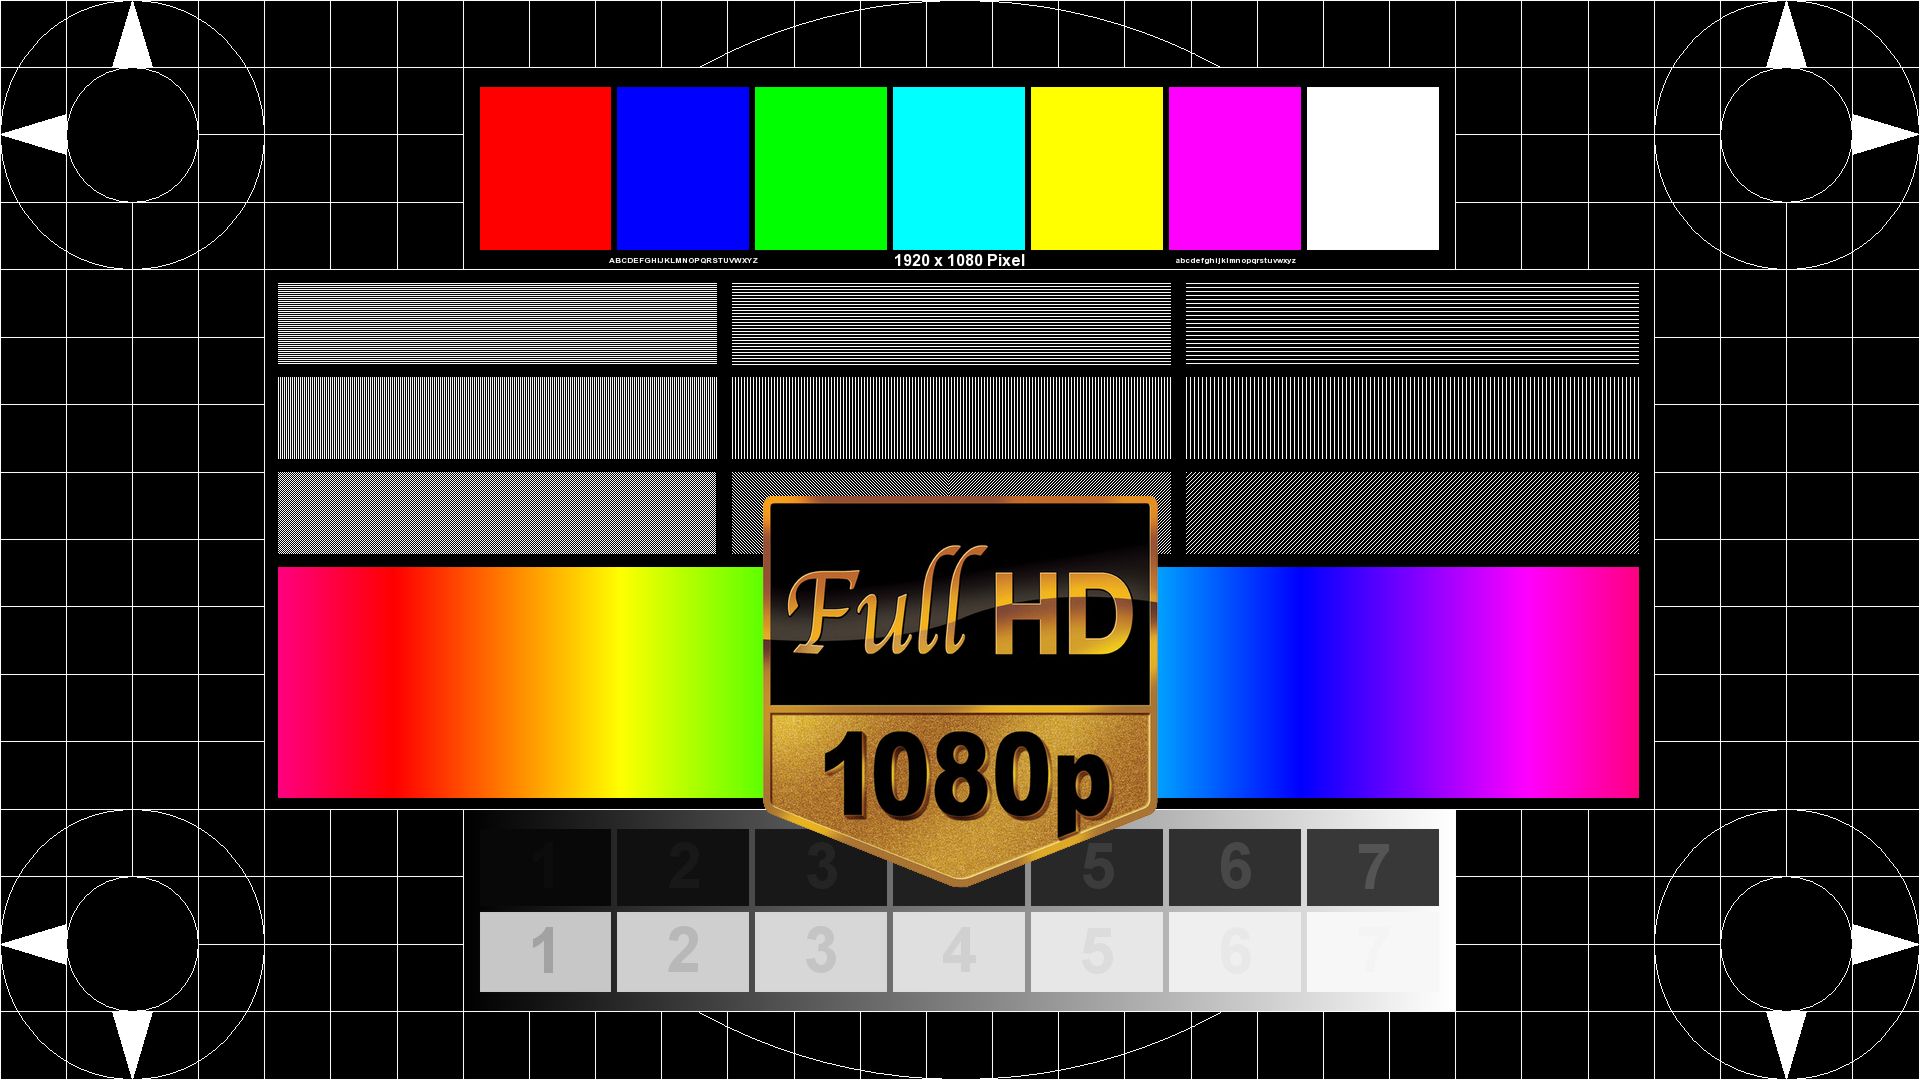
Here is what you should typically see in all 4 corners of each screen.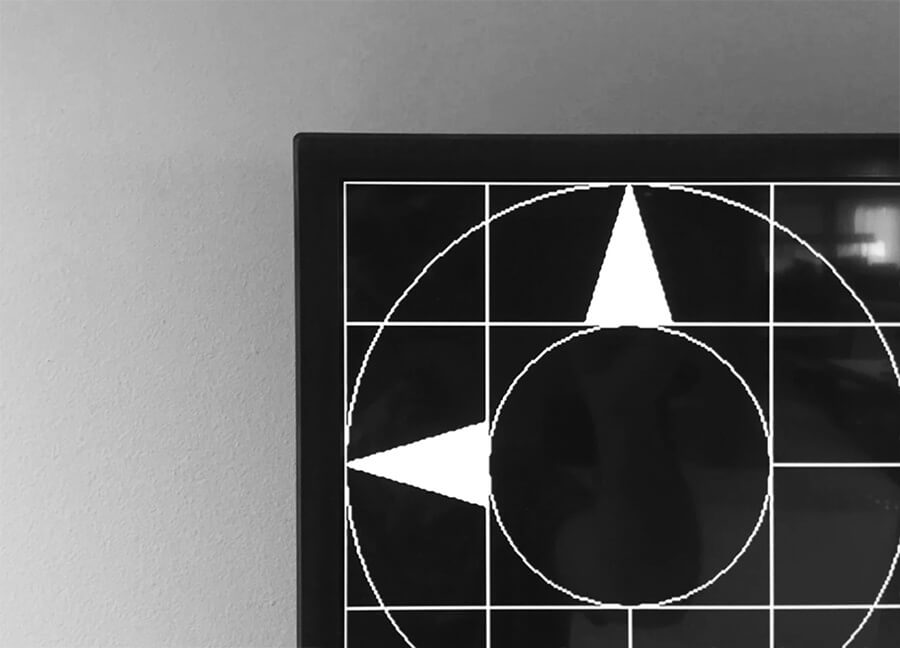
And here is what a screen doing overscan looks like.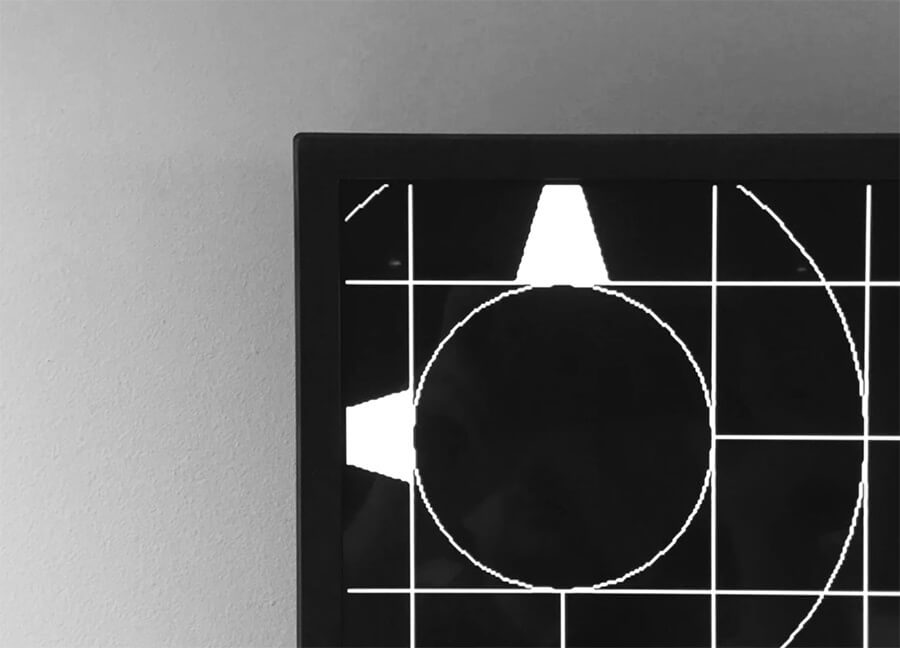
Overscan will interfere with Video-Wall alignments, so you need to remove it. Use the TV menu to adjust picture settings and change the options usually referenced as “P.SIZE,” “Aspect Ratio,” “Format,” or similar. These settings should have options like “16:9”, “4:3”, “ Widescreen,” “Pixel Scan,” and so on. Cycle through the options to find the correct one that eliminates overscan. Then, ensure the Players are configured with the proper orientation. If a screen in the Video Wall is mounted vertically like a portrait or upside-down, you need to set this in the configuration of the respective Screen in Yodeck’s Portal. Screens should then reconfigure and appear rotated after a few minutes.
Need Help?
The Yodeck Support Team can help you out! Log in to your Yodeck account and send us a message from the bottom right corner!