Table of Contents
The below procedure can be used if your player appears “Online” in your Yodeck account.
Please click here if you need to install the certificates before registering the player on your account.
Example Certificates
You can install any certificates (in a PEM format) directly on your player. For example, I have 2 CA in a PEM format, as shown below:
First Certificate
-----BEGIN CERTIFICATE-----
MIIF3jCCA8agAwIBAgIQAf1tMPyjylGoG7xkDjUDLTANBgkqhkiG9w0BAQwFADCBDAwWhcNMzgwMTE4MjM1OTU5WjCBiDE
LMAkGA1UEBhMCVVMxEzARBgNVBAgTCk5ldyBKZXJzZXkxFDASBgNVBAcTC0plcnNleSBDaXR5MR4wHAYDVQQKExVUaGUgV
VNFUlRSVVNUIE5ldHdvcmsxLjAsBgNVBAMTJVVTRVJUcnVzdCBSU0EgQ2VyuWih0hKWbt5DHDAff9Yk2dDLWKMGwsvgnEz
DHNb842m1R0aBL6KCq9NjRHDEjf8tM7qtj3u1cIiuPhnPQCjY/Miu12ZIvVS5ljFH4gxQ+6IHdfGjjxDah2nGN59PRbxYv
nKkKj9-----END CERTIFICATE-----
Second Certificate
-----BEGIN CERTIFICATE-----MIIGEzCCA/ugAwIBAgIQfVtRJrR2uhHbdBYLvFMNpzANBgkqhkiG9w0BALmNvbS9VU0VSVHJ1c3RSU0FDZXJ0aWZpY2F0aW
9uQXV0aG9yaXR5LmNybDB2BggrBgEFBQcBAQRqMGgwPwYIKwYBBQUHMAKGM2h0dHA6Ly9jcnQudXNlcnRydXN0LmNvbS9VU
0VSVHJ1c3RSU0FBZGRUcnVzdENBLmNydDAlBggrBgEFBQcwAYYZaHR0cDovL29jc3AudXNlcnRydXN0LmNvbTANBgkqhkiG
9w0BAQwFAAOCAgEAMr9hvQ5Iw0/HukdN+JxyOGBQMkKW+ESPMFgKuOXwIlCypTPRpgSabuY0MLTDXJLR27lk8QyKGOHQ+SwM
j4K00u/I5----END CERTIFICATE-----
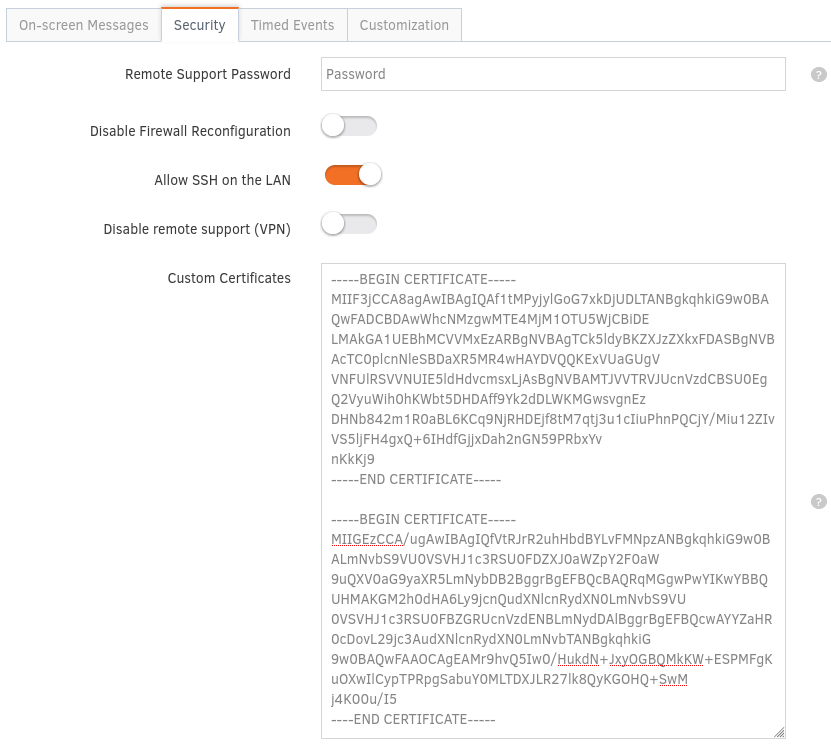
Copy and paste them in the relative field in your player’s security settings, as shown below. Click the ”Save” button, and the certificates will be installed on your player.
Proper Paste Format
Just bear in mind to include the —–BEGIN CERTIFICATE—– at the start of your certificate and the —–END CERTIFICATE—– at the end of your certificate.
Installing Custom Certificates by editing the SETTINGS.TXT file
- Copy your custom certificates and click the Save button on the Yodeck portal, as shown above
- Visit this site: https://www.base64encode.org/ and paste the 2 certificates one after the other. Click the “Encode” button and copy the generated text
- Power off the Player and remove the SD card
- Using an SD card reader, place the SD card in your Laptop or PC and go to the SETTINGS.TXT file that resides in the first partition of the SD card.
- In the SETTINGS.TXT file, find the [SECURITY] section, and paste the copied text from step 2 after the ‘=’ sign at the line custom_certificates =
- Ensure the copied text is a single line with no empty spaces or line breaks between the characters.
- Place the SD card back into the player and plug in the power cable.
- After powering on, a blinking message ”Configuring” will display at the bottom right of your screen. Please do not unplug or reboot the player at this stage. The player should connect to your network without issues if the custom certificates are correct.