Table of Contents

You can use a Yodeck Player for LED screens and LED billboards. We have users running large LED displays using Yodeck Players based on Raspberry Pi.
To properly use an LED display, you must perform some calculations and configurations.
Step 1: Setting the DVI resolution
First, you must identify what resolution your LED display (or LED board controller, or LED sender card) requires as input. This is usually called the “DVI resolution”.
To find out the resolutions supported, you have two options:
- You can connect your display to a PC or laptop and see the resolutions it supports through the menus of your computer.
- Check the manual or documentation of the LED display and find the supported DVI resolutions.
The Yodeck Player (Raspberry Pi) automatically detects the best possible resolution and uses that. If it cannot detect the preferred resolution, it will fall back to the safe VGA resolution of 640×480. If you need to force a specific resolution, see our article on “Changing the screen resolution” on Yodeck. Even if the resolution is detected properly, and you won’t be changing the connected display, it is best to set it as forced, to make sure it does not change.
We will use two examples:
- Case A : a LED display requiring a 1920×1080 DVI resolution input
- Case B : a LED display requiring a 1440×900 DVI resolution input
Step 2: Identify the content area resolution
Large LED displays usually have a low resolution, much lower than the DVI resolution expected as input. LED displays just use the top-left corner of the input for displaying content. For Yodeck to properly manage the LED display, we need to get the LED display resolution and use it to calculate configuration parameters.
For our two examples, let’s say that the content is in the top-left corner, and the input is:
- Case A : the LED display has a 320×240 resolution (aspect ratio: 4:3)
- Case B : the LED display has a 256×256 resolution (aspect ratio 1:1)
Step 3: Determining Layout size
Based on the content are resolution, you have to use a specific aspect ratio for your Layout in Yodeck. If this ratio does not exactly match your resolution, then you can define your own Custom Ratio.
So, for our two examples, let’s say that the content is in the top-left corner, then the best aspect ratio for the Layout would be:
- Case A : select the 4:3 aspect ratio for the Layout (perfect match with an aspect ratio of Case A LED display content area 320×240) — alternatively, you can create a new Custom Ratio 4:3 with 320×240 resolution
- Case B : create a new Custom Ratio 1:1 with 256×256 resolution
Step 4: Configuring the Player
First, you should calculate the dimensions of the DVI resolution that you must “disable”, relative to the Layout. Specifically:
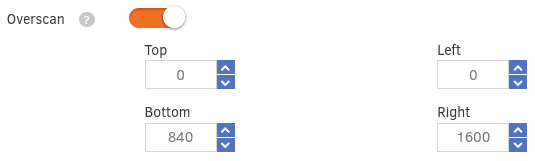
- Case A : you need to ” disable ” 1600 pixels (1920-320) on the right, and 840 pixels (1080-240) on the bottom
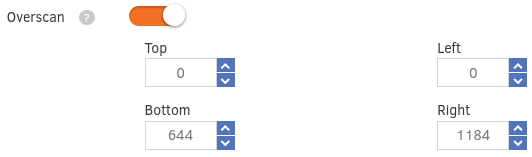
- Case B : you need to ” disable ” 1184 pixels (1440-256) on the right, and 644 pixels (900-256) on the bottom
This way, your usable resolution will be exactly the area used by the LED sender/controller. To properly configure the screen , follow these instructions:
- Go to the “Screens” list and edit the screen in question.
- Click on the “Sound/Display” tab.
- Click the ”Overscan” toggle and set it to ”ON“.
- In the “Overscan” text fields, you will have to add some parameters detailed after these steps.
- After you are finished, click the ”Save” button.
- The Player will reboot. If you can’t see anything for 5′ (not even the Yodeck startup logo), then you can contact our Support Team for help.
- The parameters described below should be entered.
For Case A, you would use the following advanced parameters:
For Case B, you would use the following advanced parameters: