Table of Contents
Introduction

You are in the right spot if you want to create your Digital Signage player
based on webOS using the Yodeck software.
Remember, though, that this process requires some basic IT skills.
Prerequisites & Compatibility
The Compatibility list for webOS devices is based on the firmware version. Here’s a full list of supported firmware versions!
Check the firmware version of any device to see if it is compatible with the Yodeck webOS Software. Here is a list of all the supported TV screens.
1. Turn on the display
2. Set display by “tutorial” (first option after display starts)
Important – Must Read
Please do not skip the LG tutorial. Set the display timezone, time, date, location, and internet connection. Otherwise, the system will not work correctly.
3. Once set, go to Settings -> Ez-settings
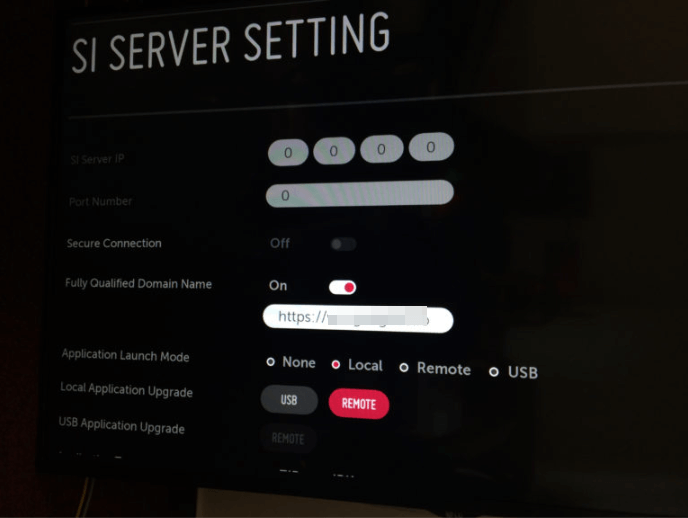
4. Select the SI Server Setting
- Fully qualified domain – ON
- Type the below link:
- yodeck.link/webos
Unbranded webOS app
Whitelabel partners can find the latest unbranded webOS app on the site’s control panel.
- Application Launch mode –
Local - Local Application Upgrade –
Remote - Application type –
IPK - Auto set –
OFF
Important
The Auto set – OFF is a mandatory setting. If you leave that to “On,” you cannot update the application remotely. Always keep this option OFF.
6. Go up to Local Application Upgrade
7. Select Remote
8. The app starts downloading and installing
9. Once done, restart the display by pressing the power off and power on buttons on the remote control
Once the display starts with the Yodeck App, a registration code will appear in the middle of the screen.
Registering a Yodeck webOS Player on your Account
After seeing the registration code on your LG TV screen, you must register the player to your Yodeck Account.
- Log in to your Yodeck Account and go to the “Screens” section.
- Create a new Screen entry by clicking the “+Add Screen” button.
- A new window will pop up. Choose the webOS Player option.
- In the “Registration Code” field, type in the 9-digit registration code you see on your TV screen and click the “Save” button.
- After a minute or so, your player should register with your Yodeck Account, and the assigned content should start showing on the screen.
LG Limitations
Yodeck for LG comes with some limitations compared to the Yodeck Raspberry Pi Player. See the full list of LG webOS limitations.
Configuring NTP Server(s) – Optional Feature for Advanced Users
LG webOS Yodeck Players use the platform’s native time services and can be configured with custom NTP servers through Yodeck. This helps maintain accurate playback timing across your digital signage network. For more information, please refer to this guide.
Need Help?
The Yodeck Support Team can help you out! Log in to your Yodeck account and send us a message from the bottom right corner!