Table of Contents
Overview
You can build an affordable and impressive digital signage video wall setup using Yodeck Players.
You need to configure each of your screens manually. It is easy to do that for simple matrix-like video walls, such as 1×3, 2×2, or 3×3.
Steps in Yodeck
Here are the steps you need to follow to configure a video wall in Yodeck.
Create 1 Video entry for each screen
- Go to the “Videos” section and click the “Add Video” button.
- In the pop-up that appears, select the “Video File” option and upload the video.
- Type in a Name, e.g., “TV 1 Top Left”.
- Activate the “Crop Video” toggle.
- Fill out the cropping required for each screen to display only the necessary part of the video. To test it out initially, you can leave all 4 fields at 0%.
- Click “Save.“
- Repeat this Video creation process for each screen on your video wall.
Create 1 Playlist for each screen
- Go to the “Playlists” section, click “Add Playlist,” and choose the “Classic” one.
- Type in a Name, e.g., “TV 1 Top Left”.
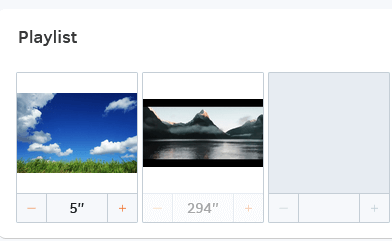
- Add any image inside the playlist with at least a 4-second duration.
- 💡If you want to have multiple videos on the playlist, you need to add an image after each video.
- 💡The image will act as a syncing point, helping the player perfectly sync the videos.
- Add the “TV 1 Top Left” video inside the playlist.
- Enable the Sync Playback option from the “Playback Options” dropdown list.
- Click Save.
- Repeat this playlist creation process for each screen on your video wall.
- Assign the Playlists to each Screen as the Default Content and click the “Push to players” button.
- 💡Ensure you remove any assigned schedule temporarily to test it out. Later on, you can do scheduling if you want to.
The final result should be something like this for each Playlist.
Matrix Setups (NxN)
Simple setups for matrix video walls (2×2, 3×3) are easy in Yodeck, especially if you do not consider the bezel compensation.
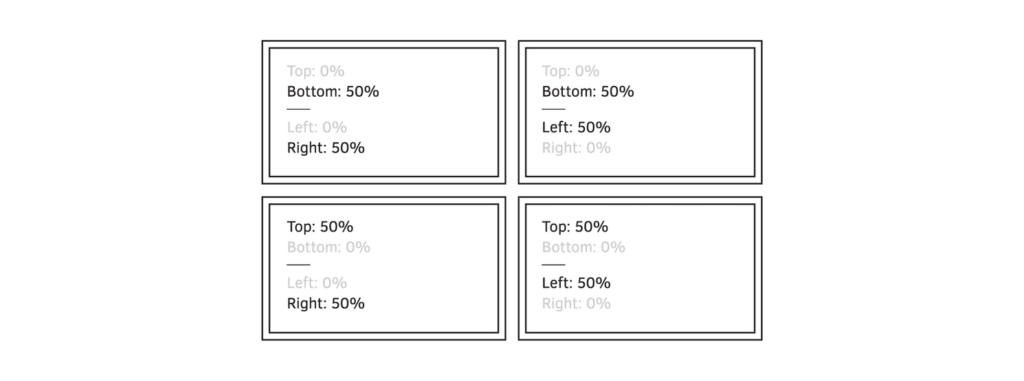
For example, for a 2×2 Video-Wall, you need to specify:
- Top-Left feed cropping: Top: 0%, Bottom: 50%, Left: 0%, Right: 50%
- Top-Right feed cropping: Top: 0%, Bottom: 50%, Left: 50%, Right: 0%
- Bottom-Left feed cropping: Top: 50%, Bottom: 0%, Left: 0%, Right: 50%
- Bottom-Right feed cropping: Top: 50%, Bottom: 0%, Left: 50%, Right: 0%
Here is a diagram for a 2×2 video wall:
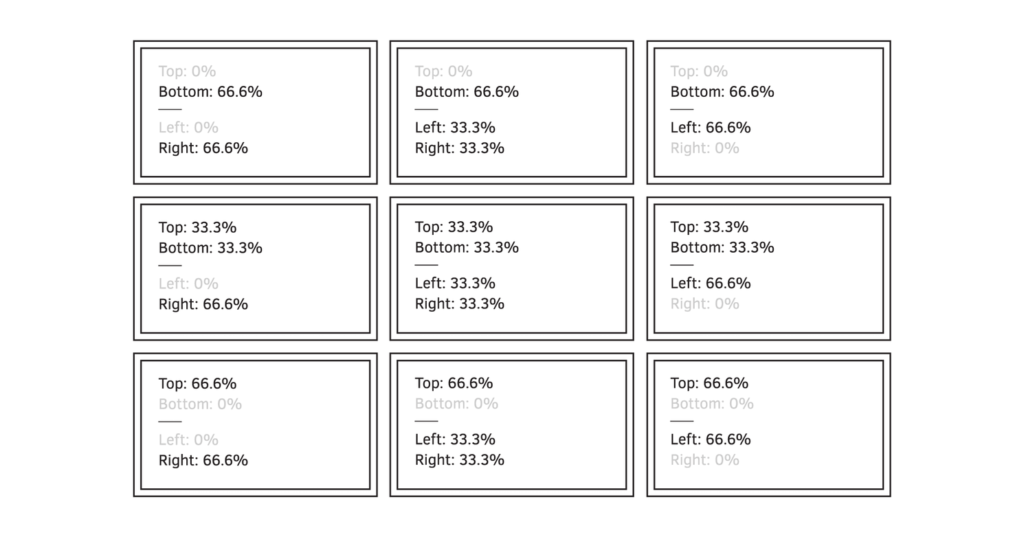
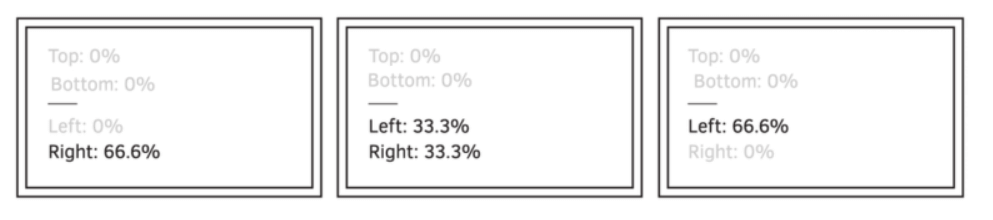
Here is the same for a 3×3 Video:
Tiled Setups (NxM)
By “tiled,” we mean matrix setups that are not NxN, e.g., a 3×1 “ribbon-like” setup:
Percentages are calculated in the same way as if the Video Wall was an NxN setup, including the missing screens. You need to place your content in the Layout editor’s right area since the rest will not be shown.
Limitations
Currently, the Syncing feature has some limitations.
- The syncing might not be perfect. We are using time sync to sync the players. You might have a delay between 0.1 to 0.5 seconds, especially if you use videos.
- You need to add a static image between consecutive videos for the videos to start in almost total sync.
- This video wall setup is not supported on Yodeck for Tizen. The setup requires the Crop Video option, which is currently not supported on Tizen Players.
Need Help?
The Yodeck Support Team can help you out! Log in to your Yodeck account and send us a message from the bottom right corner!