Help & Troubleshooting FAQs
Yodeck Pricing Update 2026
F.A.Q.s
Have questions about the pricing update? You’ll find answers to the most common ones below.
For anything more specific, please reach out to your account manager or the team at success@yodeck.com.
Υodeck Community Usage Policy (Terms of Use)
Last Updated: 10/03/2026
Υodeck Community
Welcome, and thanks for using our Yodeck Community.
These Terms explain how you may use the Yodeck Community and the services available through it (together, the “Yodeck Community”). By accessing or using the Yodeck Community, you agree to these Terms.
The Yodeck Community
The Yodeck Community provides access to a digital platform that allows users to manage and publish content and use related features offered through the Yodeck Community.
The Yodeck Community is operated by us and is powered by BetterMode (https://bettermode.com/)
Some technical components of the Yodeck Community may rely on third-party infrastructure.
We are responsible for operating the Yodeck Community and ensuring it complies with applicable laws.
Who Can Use the Yodeck Community
You may use the Yodeck Community if:
- you are at least 16 years old, or the minimum legal age in your country;
- the information you provide when creating an account is accurate and up to date;
- you keep your login details secure and take responsibility for all activity under your account.
You must not share your account or allow unauthorized access.
Acceptable Use
We expect the Yodeck Community to be used responsibly and lawfully.
You must not use the Yodeck Community to:
- upload or share illegal content;
- publish content that is abusive, hateful, discriminatory, or promotes violence;
- violate the intellectual property, privacy, or other rights of others;
- distribute false, misleading, or deceptive information;
- introduce malware, spam, or attempt to disrupt the Yodeck Community;
- impersonate another person or organization.
Your Content
4.1 Ownership and Responsibility
Any content you upload or make available through the Yodeck Community (“Customer Content”) remains yours.
You are responsible for that content and for ensuring that you have the right to use and publish it.
4.2 Permission to Operate the Yodeck Community
To provide the Yodeck Community, you give us permission to host, store, process, and display your Customer Content, only to the extent necessary to operate and improve the Yodeck Community.
This permission is non-exclusive, worldwide, and royalty-free.
Content Moderation and Legal Compliance
Where required, we moderate content in line with applicable laws, including the Digital Services Act (DSA).
This may involve reviewing reported content, using automated or human review processes, and taking action such as restricting access to content or suspending accounts when necessary to protect the Yodeck Community or meet legal obligations.
If the law requires it, we will explain the reasons behind moderation decisions that affect your content or account.
Reporting Content
If you believe that content available through the Yodeck Community is unlawful or violates these Terms, you can report it by:
- using the reporting tools available within the Yodeck Community; or
- community@yodeck.com
Please include enough information to allow us to review and respond appropriately.
Complaints and Dispute Resolution
If you disagree with a moderation decision, you may request a review by contacting us at community@yodeck.com.
In certain cases, you may also have the right to use certified out-of-court dispute resolution bodies, as provided under the DSA.
Suspension or Termination
We may suspend or terminate access to the Yodeck Community if:
- these Terms are seriously or repeatedly violated;
- use of the Yodeck Community creates legal, security, or operational risks; or
- we are required to do so by law.
Where required, we will explain the reason for our decision.
Transparency
When required under the DSA, we may publish information or reports describing how we handle content moderation.
Intellectual Property
All parts of the Yodeck Community, except for Customer Content, including software, design, and branding, are owned by or licensed to us and protected by applicable intellectual property laws.
Privacy and Personal Data
We process personal data in accordance with our Privacy Policy and applicable data protection laws, including the GDPR.
Disclaimer and Limitation of Liability
The Yodeck Community is provided on an “AS IS” and “AS AVAILABLE” basis.
To the extent permitted by law, we do not guarantee that the Yodeck Community will be uninterrupted or error-free, and our liability is limited to cases of willful misconduct or gross negligence.
Changes to These Terms
We may update these Terms from time to time.
If changes are significant, we will notify you, where required. Continued use of the Yodeck Community means you accept the updated Terms.
Governing Law
These Terms are governed by the laws of Yodeck Community, subject to any mandatory consumer protection laws that apply to you.
Contact
For legal, compliance, or DSA-related questions, please contact us at:
community@yodeck.com
Content Reporting (Notice & Action)
Last Updated: 10/3/2026
We want the Yodeck Community to remain safe, reliable, and lawful.
This page explains how you can report content that you believe is illegal under EU or national law, using our notice-and-action process in line with the Digital Services Act (Regulation (EU) 2022/2065).
What Can Be Reported
You may submit a notice if you believe that content available through the Yodeck Community is illegal. This may include, for example:
- hate speech or content that incites violence;
- defamation or false statements;
- infringement of intellectual property rights;
- illegal products or services;
- fraud or misleading practices;
- any other content prohibited under applicable EU or national law.
Information to Include in Your Notice
To help us review your report efficiently, please include the following information:
- the URL or exact location of the content;
- a clear explanation of why you believe the content is illegal;
- where possible, the relevant legal basis (for example, a specific law or right);
- your name and contact email address.
Please also include a good-faith statement, such as:
“I confirm that I have a good faith belief that the information provided in this notice is accurate and complete.”
Notices that are incomplete or unclear may delay our ability to take action.
How to Submit a Notice
You can submit a notice using one of the following methods:
Email: community@yodeck.com
Online form
Personal Data and Privacy
When submitting a notice, we process personal data such as your name, email address, and any information included in your submission. This processing is carried out for the purpose of handling notices in accordance with the Digital Services Act and applicable law.
For more information on how we process personal data, please refer to our Privacy Policy.
How We Handle Notices
Once we receive a complete notice:
- we will acknowledge receipt without undue delay;
- the reported content will be reviewed promptly and objectively;
- if the content is found to be illegal, we will remove it or restrict access to it.
Where required, the user who made the content available will be informed of the decision and the reasons behind it.
Possible Outcomes and Your Rights
Depending on the outcome of our review, we may:
- remove the content;
- restrict access or visibility;
- take no action if the content is lawful.
Where applicable, affected users may have access to:
- our internal complaint-handling process; and
- certified out-of-court dispute resolution mechanisms, in accordance with the DSA.
Misuse of the Reporting Process
The reporting mechanism must be used responsibly. Submitting notices that are clearly unfounded, abusive, or misleading is not permitted.
We may take appropriate action in cases of misuse, as allowed under the Digital Services Act.
Contact
If you have questions about this notice-and-action process or need assistance, you can contact us at:
Email: community@yodeck.com
Internal Complaints Handling Mechanism
Last Updated: 10/03/2026
If you believe that a content moderation decision affecting you was incorrect or unfair, this page explains how you can submit a complaint.
This internal complaints mechanism is provided in accordance with Article 20 of the Digital Services Act (DSA).
Who Can Submit a Complaint
You may submit a complaint if you are directly affected by one of the following moderation actions:
removal of content;
- restriction or limitation of content visibility;
- suspension or termination of an account;
- any other action taken following a Notice & Action report.
This process applies only to decisions related to user-generated content.
It does not cover commercial disputes, customer support issues, disagreements between users, or content that was not subject to moderation.
Decisions That Can Be Challenged
You may challenge a moderation decision if you believe it was:
- incorrect or unjustified;
- based on an inaccurate assessment of the facts;
- disproportionate;
- taken in error.
How to Submit a Complaint
Complaints must be submitted within six (6) months from the date you were informed of the moderation decision.
Please include:
- a reference to the moderation decision (for example, an email notification or case ID);
- the URL or clear identification of the affected content;
- a clear explanation of why you believe the decision was incorrect;
- any supporting information you consider relevant;
- your name and contact email address.
Providing complete and accurate information helps us review your complaint efficiently.
Submission Channels
You can submit your complaint through one of the following channels:
- Email: community@yodeck.com
- Online form
How We Handle Complaints
All complaints are reviewed in a manner that is timely, thorough, and objective.
Once we receive your complaint:
- we will acknowledge receipt without undue delay;
- the case will be reviewed by a human reviewer;
- we will inform you of the outcome and provide the reasons for our decision as soon as reasonably possible.
Possible Outcomes
Following our review, one of the following outcomes may apply:
- the content is reinstated;
- the original decision is revised;
- the original decision is confirmed.
Out-of-Court Dispute Resolution
If you disagree with the outcome of the internal review, you may choose to access a certified out-of-court dispute resolution body, in accordance with Article 21 of the DSA.
Participation in such procedures is voluntary, unless otherwise required by law.
Personal Data and Privacy
When submitting a complaint, we process personal data such as your name, email address, and any information you provide in connection with the complaint. This data is used solely for the purpose of reviewing and resolving complaints in accordance with the Digital Services Act and applicable law.
Further details about our data processing practices are available in our Privacy Policy.
Misuse of the Complaints Process
The complaints mechanism must be used responsibly. Complaints that are clearly unfounded, repetitive, or abusive are not permitted. In such cases, we may take appropriate measures, including limiting access to the complaints process, as allowed under the DSA.
Contact
If you have questions about this complaints process, you can contact us at:
Email: community@yodeck.com
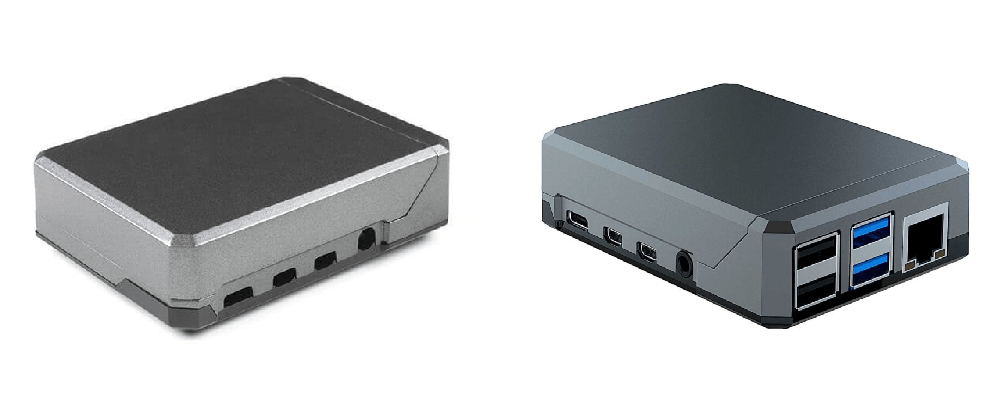
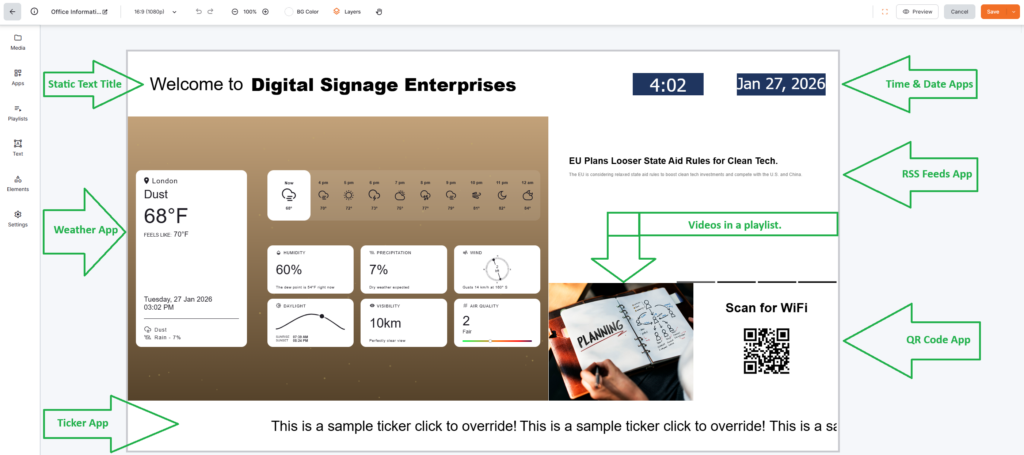
How Do I Choose Between the 1GB and 4GB Yodeck Players, and How Do I Upgrade?
Overview
Choosing between the 1GB and 4GB Yodeck Players mainly comes down to what kind of content you plan to display and how complex your layouts will be.Both players are reliable, Raspberry Pi–based devices designed for digital signage. The difference lies in how much content they can comfortably handle at the same time. This guide will help you decide which player fits your needs today and when it makes sense to upgrade.
1GB vs 4GB: What’s the difference?
The key difference between the two players is how well they handle multitasking, based on their RAM.
ℹ️Random Access Memory (RAM) is the player’s short-term working memory. It’s the space the player uses to actively load, update, and manage content while it’s playing.
💡A helpful way to think about RAM is to imagine it as a desk. A bigger desk lets you spread out more documents and work on more things at once.
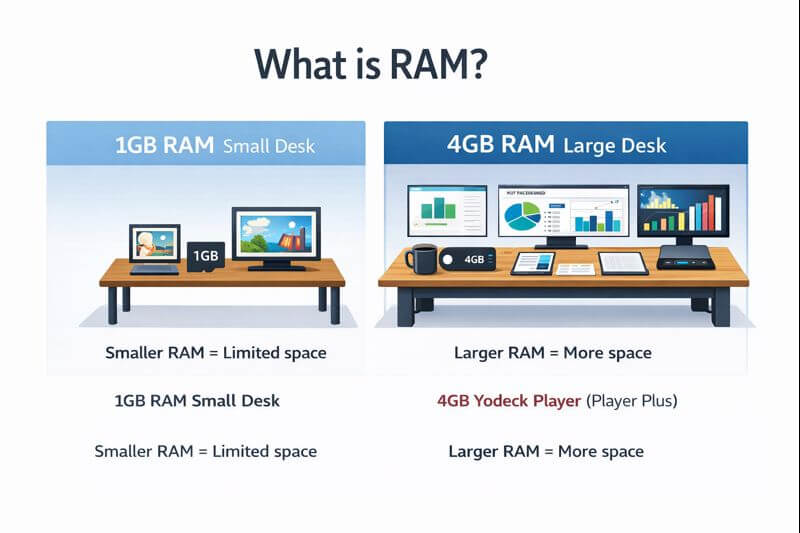
In digital signage terms, more RAM means smoother performance when multiple things are happening at once, such as apps updating, dashboards refreshing, or multiple regions playing content simultaneously.
1GB vs 4GB Yodeck Player — At a glance
| Feature / Use Case | 1GB Yodeck Player | 4GB Yodeck Player (Player Plus) |
|---|---|---|
| Best for | Static predictable signage: – Fullscreen images. – Fullscreen videos. – PDFs. – Simple playlists. | Dynamic, data-driven signage: – Real-time dashboards. – Web pages and web-based apps. – Layouts with many live apps updating simultaneously. – Complex layouts that benefit from extra memory headroom. |
| Typical content | Images, videos, PDFs | Dashboards, web apps, live data |
| Fullscreen media | ✅ Supported | ✅ Excellent |
| Simple layouts | ✅ Supported | ✅ Excellent |
| Complex layouts | ⚠️ Limited | ✅ Excellent |
| Dynamic regions (apps, live zones) | A few | Many |
| Dashboards | ❌ Not Supported | ✅ Excellent |
| Web pages/web apps | ❌ Not Supported | ✅ Excellent |
| 4K video playback | ❌ Not Supported | ✅ Excellent |
| Ideal growth path | Start simple | Built for expansion |
Quick decision guide
💡As a general rule, you should:
| Choose the 1GB player if: | Choose the 4GB player if: |
| A. Your layouts include simple (non-dynamically updated) elements such as text, shapes, and image(s). | A. You use dashboards or data that is frequently updated. |
| B. You only have a very small number of dynamic regions updating. | B. You display web pages or web-based tools. |
| C. Your layouts are simple and don’t rely heavily on live apps. | C. You use dashboards, reports, or data that is frequently updated. |
| D. You want extra performance headroom as your signage grows. |
When should I upgrade from 1GB to 4GB?
You should consider upgrading if:
- Your content is evolving from simple media to dashboards or web-based content.
- You’re adding more apps or dynamic regions to your layouts.
- You want smoother performance as layouts become more complex.
Upgrading is common as signage needs grow, especially when screens shift from passive content to live, data-driven displays.
How to upgrade from a 1GB to a 4GB Yodeck Player
We offer a straightforward upgrade process. All you have to do is contact our support team and request an upgrade today, either by logging in to your Yodeck platform account and clicking the help button in the bottom-right corner, or by sending an email to support@yodeck.com!
Note on Yodeck Player Upgrades & Replacements
We offer a straightforward upgrade process and a return-and-replace option. When it comes to player upgrades, the process is similar to that of replacements. If the player is still within the warranty period, it is eligible for an upgrade. You will need to return the 1GB player(s), and once we receive them, you will cover the price difference between the 1GB and 4GB models, along with any shipping fees and applicable taxes. Once that’s done, we’ll ship your 4GB player(s) to you in no time!
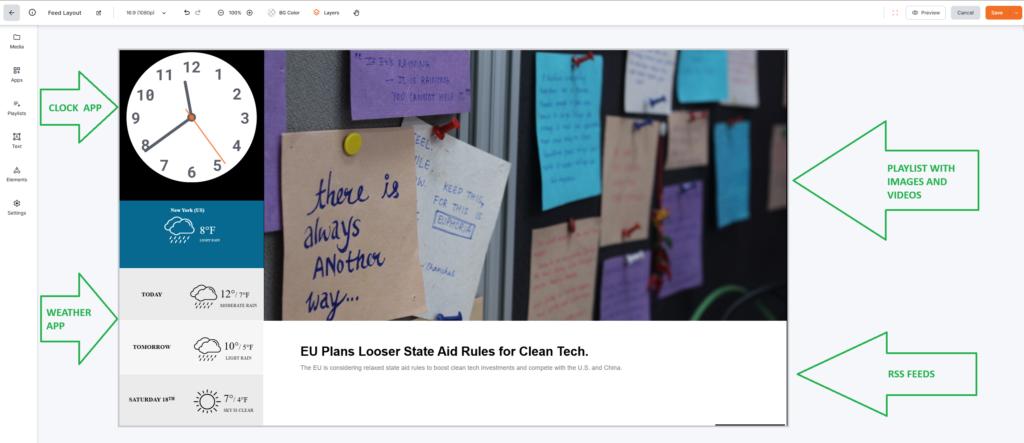
Real-world Use Cases
In real-world use cases, the key differences between the two players can be summed up with the following visualization:
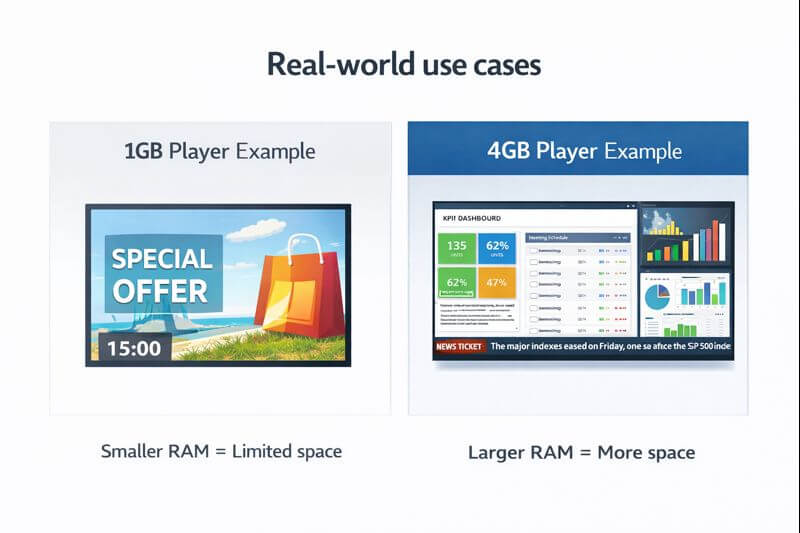
1GB Player – Real World Example
Three static elements and one simple yet dynamic element.
4GB Player- Real World Example
One static element and seven dynamic elements.
Typical use cases for the 1GB player and 4GB player
Please check the typical use cases provided in the following two tabs below:
Typical use cases for the 1GB player
These scenarios involve limited multitasking and predictable playback:
- Retail promotions
- Fullscreen image or video playlists.
- Simple offer rotations.
- Restaurant menu boards (simple)
- Static menus or looping videos.
- Occasional PDF updates.
- Office lobby signage
- Welcome slides.
- A clock or small ticker alongside media.
Typical use cases for the 4GB player
These players handle everything the 1GB player can handle as well as more “live” activity at once:
- Performance dashboards
- Real-time Dashboards
- Operational metrics
- Live status boards
- Information-rich corporate screens
- Calendars, announcements, and slides combined
- Multiple apps are updating simultaneously
- Web-driven signage
- Embedded web pages
- Internal tools or live data views
Layout complexity: Static vs Dynamic regions
When choosing a player, it’s not just how many regions your layout has. It’s what type of regions they are.
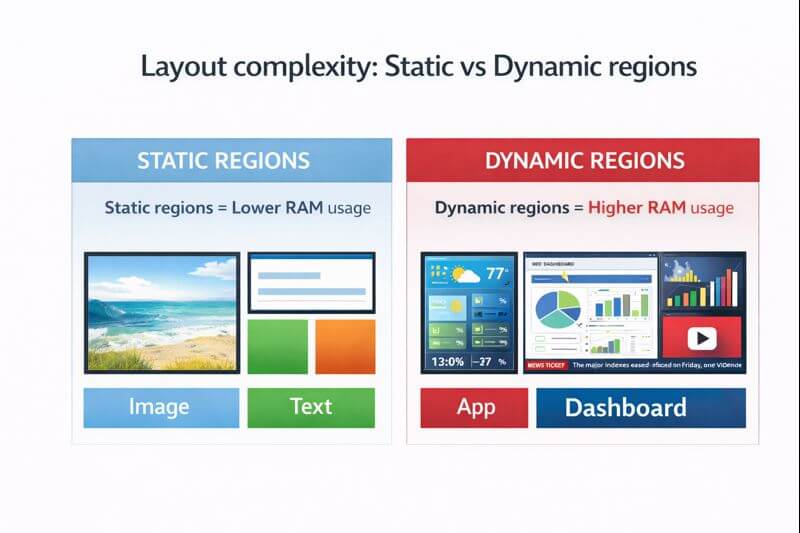
| Static Regions (lighter on resources) | Dynamic Regions (heavier on resources) |
| The following modules do not continuously update in the layout: | The following modules, may continuously update while the layout is playing: |
| – Images – Text – Shapes or backgrounds | – Apps (e.g., calendars, tickers, dashboards) – Videos and playlists – Date & Time – Web content |
Layout Example with Static Regions
Layout Example with Dynamic Regions
💡General Guidelines:
- Layouts with mostly static regions and only one or two dynamic elements usually run well on 1GB.
- Layouts with several dynamic regions updating simultaneously are better suited to 4GB.
ℹ️ Good to know:
Even small apps (like clocks or tickers) count as dynamic regions.
Multiple “small” dynamic regions can add up in complex layouts.
F.A.Q.s
Got questions? We’ve got answers! This section addresses common questions about choosing between the 1GB and 4GB Yodeck Players.
It’s more powerful, but not always necessary. For simple signage with limited dynamic content, the 1GB player remains a reliable and cost-effective choice.
Look at how many dynamic regions (apps, playlists, videos, web content) your layout uses. The more live elements updating at once, the more beneficial extra RAM becomes.
Yes. If your needs change, Yodeck supports upgrading through the return-and-replace process described above.
Ask yourself:
– Does my screen show mostly images or videos? → 1GB is usually enough
– Does my screen show live data, dashboards, or web content? → Choose 4GB
– Does my layout have several apps updating at the same time? → Choose 4GB
When in doubt, choosing 4GB gives you more flexibility as your content grows.
Related Topics
Need Help?
The Yodeck Support Team can help you out! Log in to your Yodeck account and send us a message from the bottom right corner!
How secure is Yodeck?
We designed Yodeck from the ground up with security in mind!
Some key points:
The Yodeck service is accessed over SSL, so access codes and other sensitive information are always encrypted and secured.
We use the Stripe payment gateway service, so no credit card info is stored. Stripe is as safe as PayPal, so worrying about that is unnecessary.
Yodeck Player software is always firewalled, even within your network.
Schedules and configuration data downloaded from the Yodeck service to your Yodeck Players are digitally signed, so no one can trick your monitors into playing something different.
In a few words, nobody will ever be able to mess with your monitors! If you are still worried about how secure Yodeck is, please get in touch with our support, and we will help you immediately!
How to quickly assign content to your Yodeck Player
Assigning content to my Player
To quickly display the content of your choice on your TV screen, please follow the steps below:
Log in to your Yodeck account, and on the left panel, click the Screen’s section or follow this link.
You may select any player you prefer.
Choose the Schedule of your choice.
Scheduled Content— If you do not have any or do not want to assign a schedule to your player, you can choose the “–no schedule–” option.
- After assigning the content to your player, click the Save button.
Do not forget to “push” the content to your player(s) by clicking the orange flashing button on your browser’s top right.
How will I get charged for my service renewal?
If you are on automated credit card payments, renewal fees are charged automatically on your set renewal date. You can check your detailed billing information by accessing the Subscription section under your account (https://app.yodeck.com/index.html#main/subscription).
The “Subscription” tab provides you with all the information on your Plan, billing cycle, next billing date (renewal date), any credit balance applied, and finally, the credit card on file. You can change the credit card by clicking on the “Change” option next to the Payment Method.
Subsequent Tabs provide the billing and shipping address you have completed in Yodeck Portal (which you can modify at any given point in time). Finally, you can access all your Invoices and check out all your previous orders with Yodeck.
Why do I lose my 1st Free screen when I upgrade my subscription?
With Yodeck, you have the opportunity to test on a single screen with your own built Yodeck Player (Raspberry Pi) or any other supported player completely free of charge for as long as needed.
We don’t offer limited-time trials, contrary to our competitors. Once you complete your PoC and are ready to launch additional screens, you get billed based on the total number of screens you will be using.
What are the supported browsers for the Yodeck Portal?
The Yodeck platform can work with some unsupported browsers. Yodeck checks browsers for the presence of methods that are required for the product to work correctly. If these browser methods aren’t detected, you receive an error message that the browser isn’t supported.
|
Desktop |
Version |
|
Microsoft Edge* |
Latest stable version |
|
Google Chrome (All platforms) |
Latest stable version |
|
Safari (Mac) |
Latest stable version |
|
Mozilla Firefox (All platforms) |
Latest stable version |
|
Opera (All platforms) |
Latest stable version |
Note: *Internet Explorer 11 is no longer supported.
Upgrading to the latest version
We recommend upgrading your browser and operating system to the latest versions as soon as upgraded versions are made available for your device. Later versions have higher levels of security. Most browsers/platforms will allow you to upgrade for free and may offer automatic upgrades as soon as they become available.
Do you provide SSO(SAML) authentication?
Of course, we do!
The Security Assertion Markup Language (SAML) is an XML-based standard used to exchange authentication and authorization information. It was developed by the security services technical committee of the Organization of the Advancement of Structured Information Standards (OASIS). SAML is designed to allow federated systems with different management systems to interact through simplified, single-sign-on exchanges. A technical overview is available from OASIS.
✅ Kindly check this article here for more details and how to setup and configure SSO with your IDP.
How can I enable 2FA on my account?
✅ Please click here to learn how to configure 2FA on your account!
Do you support emergency alerts?
Of course, we do!
✅ Please click here to learn how to configure your players with an emergency alert.
Do you support non-profit organizations (NPOs)?
Of course we do!
We do offer substantial NPO discounts, provided that you share documentation proving you are a tax-exempt organization (a 501 (c) (3) certificate or other relevant certificate) and that you supply your own hardware (OR you can purchase the Yodeck players directly from us, but separately from your subscriptions/licenses).
Additionally, eligibility for the nonprofit discount is determined on a case-by-case basis by Yodeck’s account or sales team. Organizations interested in applying should contact the sales team to initiate the review process.
Aren’t the players included in an annual plan?
The players are not included in the NPO discount; they are included only in the normal plan. On the NPO discount, they can be offered at a cost price.
This policy ensures the nonprofit discount applies only to subscription plans, while hardware is offered separately at cost to maintain transparency and fairness.
I am a Non-Profit Organisation. Do I also have a discount for the players?
Since you are an NPO, you can purchase the subscriptions with significant discounts, but you will need to purchase the Players separately at cost price. If you already own the Players, you can purchase only the subscriptions.
Eligibility for these discounts is reviewed by Yodeck’s account or sales team to ensure compliance with the necessary criteria. Nonprofits are encouraged to reach out to the sales team for more help.
Special Cases
Nonprofits that initially sign up for a full-price plan to receive free hardware may inquire about switching to a nonprofit plan after the first term. However, such requests are reviewed on a case-by-case basis by the account or sales team, and there is no universal policy guaranteeing approval for such switches.
✅ Please check this link here for more details!
Do your players support portrait mode?
Configuring a Yodeck Player for a portrait screen is straightforward and ensures optimal display quality..
Yodeck Players allow you to customize display settings to match your screen’s orientation and resolution. Proper configuration ensures that your content is displayed without distortion or borders, especially on portrait screens.
- Edit the player of your choice by clicking their name.
- In the Basic tab, set the screen orientation to Normal and save the changes.
- Push the changes to the screen and wait for the Player to come back online.
- You can change the orientation to Rotated Clockwise or Rotated Counterclockwise, depending on your screen’s physical mount, and save the changes again.
- Push the changes to the screen and wait for the Player to come back online.
- Enable Overscan in the screen’s Sound/Display settings and adjust the overscan values to align the content with the screen’s resolution.
- Use a portrait (9:16) layout in the Yodeck dashboard and set the Player’s output resolution to a 16:9 mode. When rotated, this becomes 9:16 for portrait screens.
- Please make sure your media or layout matches the screen’s aspect ratio to avoid borders or distortion.
- Save the changes and verify the adjustments once the Player is back online.

Do you support Samsung Tizen Players?
My organization is tax-exempt. How do I get my tax exemption form?
If your organization is tax-exempt, please follow the steps below:
-
First, send us an email at sales-tax@yodeck.com
-
Upload your tax-exempt certificate by clicking on the link we will share with you via email.
Upon confirmation on our end, we will notify you so you can then proceed with completing your online order without getting charged with tax fees.
Do you support Google Chromecast?
Of course, we do!
✅Please click here on how to install the Yodeck Software on your Chromecast player.
Does the Yodeck software image work on the Pi 400?
✅ Yes, the Pi 400 will work fine with the Yodeck software! Feel free to flash the SD card using this guide.
What are the requirements for using Yodeck?
Here are the minimum requirements for Yodeck:
- Yodeck is an online service, so you need an Internet connection to sign in and manage your monitors yourself.
- A Yodeck-supported playback device is required for each monitor. We currently support the following options:
- Our very own Yodeck Player (recommended) comes free with our Annual Plan
- A Raspberry Pi (preferably version 4), which you buy yourself and can set up yourself using this guide
- Android, BrightSign, Tizen, WebOS, Windows and Amazon Fire TV Stick. The complete list of the supported devices can be found here.
- Web Player: If your TV or monitor has a modern web browser, you can use the web-based player directly.
- For smart TVs, a Yodeck player is only required if the TV does not support the installation of the Yodeck app through its native app store (e.g., Google Play Store, Samsung app environment). Verify your TV’s compatibility before proceeding.
Internet connectivity for the Yodeck Player devices installed is usually wireless (WiFi) or wired (LAN).
If you operate multiple screens across various locations, each screen will require its own Yodeck player and license to display content. For co-located displays, you can utilize an HDMI splitter to connect multiple TVs to a single player.
✅Yodeck is completely FREE for one monitor! So you can easily check it out and see if it suits you!
Does Yodeck work offline?
Yodeck is an online service. So, Internet access is required for your Player to be managed properly. There are a few caveats, though. Here, we provide all the details on what works and what doesn’t.
If Internet access goes down, will my Player stop working?
No, it will not. Playback will continue as normal.
Players can withstand at least 30 days of no Internet access.
Since the Players use the Internet to sync their clocks, there will also be an issue with time scheduling, as the time can be off by a couple of hours.
What if there is no Internet access for more than 30 days?
Playback will stop. Your Player will start showing a warning message in the bottom-right corner 3 days before stopping. Eventually, between 30-40 days after losing internet access, your Player will stop playback, displaying an error message.
If no content changes are made, can I use Yodeck in a location with no Internet access?
Not entirely. If you can visit the location once every 30 days, providing Internet access through a WiFi hotspot on your cell phone, you will allow the Player to retrieve the latest info, and it will continue to work fine. And for sure, you must address the clock sync issue.
Does all content work while the Player is offline?
Yes. Videos (including YouTube videos) and Images are downloaded locally by the Players. Only web pages and live video streaming won’t work offline.
Can I change/update content using a USB flash drive?
No. Content and scheduling updates must be done through the Internet.
How can I upload a custom font?
You can upload your custom fonts or use a rare font that is unavailable in our apps.
The procedure is straightforward, and if you have already downloaded the custom font to your PC or laptop, it can be done in a few steps.
⚠️The Custom fonts are applied only to the existing Default Apps and Text Apps and not to the player’s font database. The player will not inherit any uploaded custom font to display your web pages with that font.
✅ Kindly check this article for more details and see how to upload a custom font to your account.
I accidentally deleted my screen. Do you know what I can do?
Sometimes, unfortunate things happen, but you do not need to worry—bringing your Yodeck player back online is straightforward!
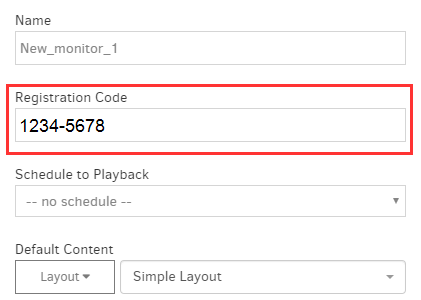
Upon deleting a Yodeck player from your account, an 8-digit registration code will appear on your TV screen. It will be an 8-digit code like this example: “1234-5678”.
If you don’t see the reg code on the screen, please ensure the player can access the internet. You can temporarily connect the player with an Ethernet cable (from the router/switch to the player).
Create a screen entry in your Yodeck account by clicking:
Screens-> +Add Screen
Type a Name for your screen and also type the Registration code displaying on your TV screen in the relative field as shown below:

After typing the Registration code, click the “Save” button.
The player will pair with your account within 1-2 minutes. After a while, you will see it online on your dashboard, displaying the assigned content.
How do I change the account ownership to another user?
Account Ownership
Only the account owner can change another user’s account ownership. An Admin or any other user role cannot accomplish the procedure below.
If you want to change/transfer the account ownership to another user, please follow the steps below:
-
Log in as the Account Owner, e.g., “owner@yodeck.com”
-
Click at the top right of your screen and select the “My User Profile” option.
-
Change the email from “owner@yodeck.com” to “new_owner@yodeck.com” and click the “Save” button.
What happens if the new_owner is already a user under that account?
If the user “new_owner@yodeck.com” already exists as a user on that account, please follow the steps below:
-
Click at the top right of your screen and select the “Users” option.
-
Find the “new_owner@yodeck.com” user and delete it.
-
Click at the top right of your screen and select the “My User Profile” option.
-
Change the email from “owner@yodeck.com” to “new_owner@yodeck.com” and click the “Save” button.
✅If you cannot access the initial owner’s account, don’t hesitate to contact our support for assistance with the ownership change.
What does Yodeck allow me to show on my screens?
Yodeck can display a composite layout of playlists and standalone content containing:
Video files (even 4K), which you upload to Yodeck from your computer
Videos from YouTube
Videos from Vimeo
Live Video Streams from YouTube, other popular video sites, and customer video sources (HLS, IP streamers, cams, etc.)
Images (even 4K), with editable menu boards, etc.
PDF Files
PowerPoint files, which get converted seamlessly to videos, retaining all transitions and animations
Video from any HDMI source (you will need an IP Video Streamer for that)
Online web pages (on the Internet or in the LAN)
Apps are a collection of ready-to-use components, including Scrolling Texts (ticker), Rich Text Editor, RSS Feed, Weather Info, and many others.
Audio files from your computer or YouTube, as well as Audio Stream
Microsoft Word, PowerPoint and Excel files, as well as PDF files
Audio stream
Audio from YouTube videos
Microsoft Word and Excel files
Microsoft PowerPoint files (both video and imported as slides)
You can upload whatever video, audio or image files you want to Yodeck and use them.
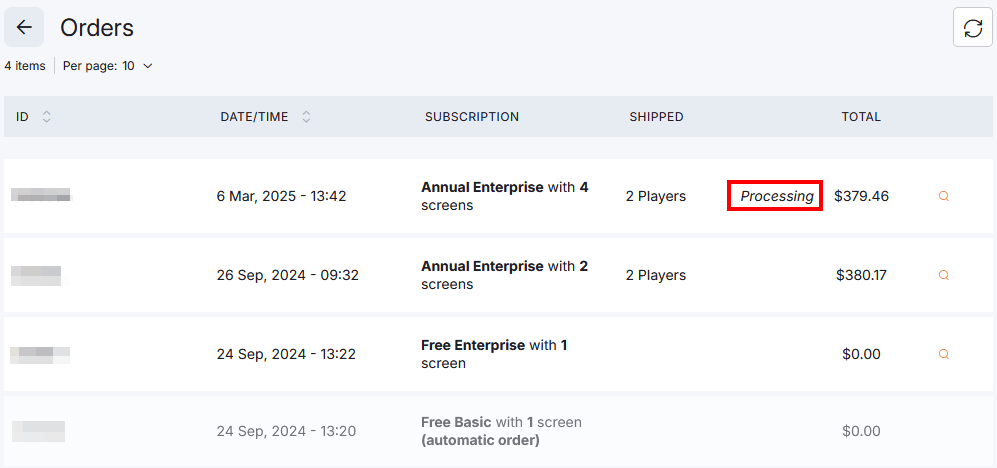
When will my players be shipped?
Finding your order inside your Yodeck Account
By clicking the link below, you can find the relative tracking number of your order. This tracking number is on your Yodeck account Subscription page, specifically in the Orders tab.
✅ Remember to check your spam/bin folder for the relevant info email!
If you see a “Processing” text instead of the Tracking number link, that means that the Tracking number has not yet been generated from our system.
Shipping Timeframe
Once you have placed your order, your item will be shipped within the business days that are mentioned here!
Do you ship worldwide? 🌎
Yes, we ship worldwide! There is no need to worry about shipping Yodeck players to your country!
📖 Read more details about our global shipping services here!
Are there any limits placed on Yodeck usage?
There are no limits to uploading content or making changes to it. You can do as much as you want without any restrictions.
However, the only limit is the number of monitors you subscribe to. As long as you have subscribed for the number of monitors you need, there are no other restrictions. This is truly unlimited!
⚠️ Disclaimer
Fair use is always implied. In case improper use is detected, we will contact you, and if you fail to conform, your account may be disabled abruptly.
Check out our Terms of Use or contact us for more information.
Do you provide TV sets or installation services?
No, we do not sell TV sets or installation services.
But, at Yodeck, we specialize in providing a comprehensive digital signage solution that includes our own Yodeck Player and accessories. We understand that creating a seamless and hassle-free experience is important to our customers, which is why we offer more than just hardware.
If you are looking for a complete, turn-key solution based on Yodeck, we have you covered. Our team can assist you in not only choosing the right Yodeck Player and accessories but also in selecting the perfect TVs for your digital signage needs. We can guide you through the installation process, ensuring that everything is set up correctly and functioning smoothly.
By contacting us, you gain access to our professional Yodeck Partner Network. This network is made up of trusted and experienced partners who are well-versed in the Yodeck platform. They can provide additional support and expertise, helping you get the most out of your digital signage solution.
Whether you need assistance with hardware selection, installation, or ongoing support, we are here to help. Our goal is to make the process as seamless as possible so you can focus on creating captivating content and engaging with your audience. Contact us today, and let us assist you in building the perfect digital signage solution for your business.
What type of Service Level Agreement (SLA) do you provide?
For detailed information about our Service and Tech Support Response SLAs, we invite you to click on the link provided here. This article will provide you with a comprehensive overview of our response time commitments and the level of support you can expect from our team.
By reviewing this article, you will gain a clear understanding of how we prioritize and address your service and technical support needs.
Why use Yodeck and not my TV’s USB media player feature or my Smart TV?
Are you tired of manually updating content on your monitors? Do you want to save time and money while creating engaging displays? Look no further than Yodeck! Our platform offers a variety of features that make digital signage management a breeze. In this article, we will discuss the top 5 reasons why Yodeck is the perfect solution for your digital signage needs.
Here are 5 reasons why:
-
Yodeck automates the playback process. It can turn the TV on (and off), change the channel to the proper HDMI input, and ensure everything goes smoothly without glitches.
-
You can continuously update content over the Internet without using USB sticks or DVDs. And you can do it easily for all your monitors.
-
Yodeck provides a scheduling feature. You can set up your monitors to show different things at different times and power off your monitor to save power.
-
You can use a computer monitor, which is much cheaper than a regular TV set (let alone a Smart TV).
-
Smart TVs cannot show a composition of different media files. With Yodeck, you can set your monitor to concurrently show a combination of video, photos, websites, widgets, and other supported media we will add.
In conclusion, Yodeck offers a comprehensive and user-friendly solution for managing your digital signage. With our platform, you can save time and money and create engaging displays that captivate your audience.
✅ Sign up for Yodeck today and see the difference it can make for your business!
How many screens does Yodeck support per account?
You can have as many screens as you need!
Yodeck uses scalable technologies that can support tens of thousands of screens under a single Yodeck account. Really!
Do you support LG webOS Players?
Of course, we do!
✅ Please click here on how to install the Yodeck Software to your LG webOS player.
How do I add background audio?
Learn how to add background audio to your digital signage using Yodeck. This feature allows you to play continuous music or audio on your screens while visual content such as images, videos, playlists, or layouts is displayed.
In the full article, you’ll see how to add background audio from within the Layout editor, choose an audio file or playlist to play in the background, and assign the layout to your screens. The guide also explains important behavior and limitations, such as how background audio interacts with video sound.
Does Yodeck support monitors mounted vertically?
Supporting Horizontal and Vertical Monitors
Yodeck supports both horizontal and vertical monitors!
You can specify multiple layouts for different monitor aspect ratios and orientations in each layout. Each Player will pick the layout version that better fits the specific monitor connected to the Player. This way, you can have one layout that can be managed and assigned to monitors of different sizes and orientations.
The standard aspect ratio is 16:9 (used by “Ultra HD”, “4K”, “Full HD,” and “HD Ready” screens), which is a horizontal layout. You can add the 9:16 layout (the same monitor sizes, but rotated). You can also add other aspect ratios to fit different monitor sizes, like the older standard of 4:3 monitors.
What’s great is that we also support customizable aspect ratios and resolutions. It’s an especially helpful feature if you’ve got non-standard-sized screens and LED matrix displays.

Which Raspberry Pi does Yodeck support?
Yodeck works on all Raspberry Pi versions, from the first release 2012 until the very latest. Each hardware version has its restrictions. Below, we provide a detailed matrix to show features and compatibility.
More details can be found below
Yodeck Manual Configuration Guide for Raspberry Pi
Introduction
With Yodeck, you have two options for configuring a Player:
Though the web
Though the “SETTINGS.txt” configuration file on the SD Card of the Player
If you choose the first option, you have to get your Player online so that it can connect to the Internet and fetch the new settings you specify.
There are cases where you need to configure the Player manually through the “SETTINGS.txt” configuration file:
You’d like to connect through a WiFi network, but a cable cannot connect it temporarily.
You want to configure a Proxy server through which the Player can connect to the Internet.
Please make sure to specify static IP configuration (Static IP Address, Netmask, Gateway, or DNS) for your connection.
You need to specify some other configuration parameter besides networking, but you’d like to do it offline.
Step-by-Step Guide
To manually configure the Player, do the following:
V E R Y I M P O R T A N T: Login to your Yodeck account, navigate to the Screen in question and specify all settings. If you skip this step, when the Player registers, it will fetch the default settings from your Yodeck account and revert back to the wrong settings, possibly getting the Player offline again! So make sure you do it before manually changing the settings on the Player!
If the Player is currently powered on, disconnect all networks (any WiFi USB adapters or Ethernet cable) and wait 1 minute. Then, disconnect it from power.
Remove the SD Card. There is a small slot right next to the Powered On indicator LED. With your fingernail (or a thin, not sharp, object), push the card. It should pop out so that you can pull it off. Make sure you do not use excessive force.
Put the SD Card into your computer. You might need a MicroSD-to-SD adapter (usually, computers have standard SD Card slots, not MicroSD). An adapter like that should be included with your SD Card or Player.
Navigate to the SD Card. Open the “SETTINGS.txt” file in the SD Card.
Change the settings you need. You change the value of a setting by specifying it right after the equals (“=”) sign. Settings are described in detail in the next section.
Save the “SETTINGS.txt” file, overwriting the existing file.
Use the “Safely Remove SD Card” feature of Windows (or Linux) and, after being notified that you can safely remove the SD Card, wait 10″ and remove the SD Card.
Put the SD Card back in your Player. With your fingernail (or a thin, not sharp, object), push the card inwards. When you release it, it should lock into place. If it pops back out, try pushing the SD Card further inwards before releasing it. Make sure you do not use excessive force.
Connect the network you require (WiFi or Ethernet, never both). Note that in order for the WiFi adapter to be properly configured, it must be connected to the Player.
Power up the Player. Upon starting up, the Player will re-apply all settings found in the “SETTINGS.txt”. It might take a while to apply all the settings, so be patient. The Player should be up and running within 3-4 minutes.
Settings Reference for “SETTINGS.txt”
Here is a detailed reference for all the available settings. Note that the section names (denoted by square brackets, e.g., “[SECTIONNAME]”) are essential and must be present for the settings below to be recognized and used.
A complete example for “SETTINGS.txt” is also provided further down.
WiFi Network Settings [WIFI]
Example section with dummy settings:
[WIFI]
ipaddress = 192.168.1.200
netmask = 255.255.255.0
gateway = 192.168.1.1
dns = 8.8.8.8
ssid = YourWiFiNetworkName
key = ThisIsTheWiFiPassword
mode = WPA
Configuring the Wireless Network connection
[WIFI]
ssid = YourWiFiNetworkName
key = ThisIsTheWiFiPassword
mode = WPA
Settings
ssid: This is the SSID of the Wireless Network, essentially the network’s name. The Player will search for and try to connect to the SSID you specified here. If you do not specify an SSID and a WiFi adapter is present, then the Player will try to connect to any open wireless network (“open” means that it does not need a passphrase) it can detect nearby. If it can find multiple networks, it will connect to the one with the strongest signal.
key: This is the wireless network passphrase or key you must use to secure the network. If you do not specify a key, the player will assume that the SSID you specified above is an open wireless network (does not need a passphrase).
mode: This specifies the encryption used by the WiFi network. Valid values are: “WPA” for WPA/WPA2-PSK, or “WEP” for WEP64/WEP128 encryption. If you do not specify a mode, then the default value is “WPA”.
Configuring the Wireless Network Static Networking
[WIFI]
ipaddress = 192.168.1.200
netmask = 255.255.255.0
gateway = 192.168.1.1
dns = 8.8.8.8
Settings
ipaddress: This is the static IP Address for the Wireless Network. If you do not specify a static IP, then automatic IP Address assignment through DHCP is used. If you set this setting, then you must also set the “netmask” setting, or else it is ignored.
netmask: This is the netmask for the Wireless Network. If you have not specified the “ipaddress” setting, this setting is ignored.
gateway: This is the network gateway for the Wireless Network. If you have not specified the “ipaddress” setting, this setting is ignored.
dns: This is the Name Server (DNS Server) for the Wireless Network. If you have not specified the “ipaddress” setting, this setting is ignored. By default, Google’s Public DNS Service is always included in the system’s configuration, to ensure reliability.
LAN Network Settings [LAN]
Configuring the (wired) Ethernet Static connection
Example section with dummy settings:
[LAN]
ipaddress = 192.168.1.200
netmask = 255.255.255.0
gateway = 192.168.1.1
dns = 8.8.8.8
Settings
ipaddress: This is the static IP Address for the Local Network. If you do not specify a static IP, then automatic IP Address assignment through DHCP is used. If you set this setting, then you must also set the “netmask” setting, or else it is ignored.
netmask: This is the netmask for the Local Network. If you have not specified the “ipaddress” setting, this setting is ignored.
gateway: This is the network gateway for the Local Network. If you have not specified the “ipaddress” setting, this setting is ignored.
dns: This is the Name Server (DNS Server) for the Local Network. If you have not specified the “ipaddress” setting, this setting is ignored. By default, Google’s Public DNS Service is always included in the system’s configuration, to ensure reliability.
LAN Network Settings [LAN]
Configuring the (wired) Ethernet Proxy connection
Example section with dummy settings:
PROXY]
proxy = 192.168.1.253
port = 3128
username = myproxyusername
password = myproxypassword
Settings
proxy: This is the Proxy Server IP address (or hostname, but it’s better to use an IP address to be safe). If you specify a Proxy Server using this setting, then all HTTP and HTTPS communications from the Player will go through the Proxy server. Remember that to use HTTPS, the Proxy must allow the “CONNECT” method.
port: This is the TCP port number for the Proxy. If omitted, it defaults to 3128. This setting is ignored if you have not specified the “proxy” setting.
username: This is the username to be used against the Proxy with HTTP Proxy Authentication. If omitted, no authentication info is sent to the Proxy. This setting is ignored if you have not specified the “proxy” setting.
password: This is the password to be used against the proxy using HTTP proxy authentication. If omitted, no password is sent to the Proxy. This setting is ignored if you have not specified the “proxy” or “username” settings.
Yodeck Registration Information [REGISTRATION]
WARNING: This section is used by Yodeck’s pre-provisioning mechanism. You should not change this information unless you really know what you are doing.
Preconfiguring Device Registration
Example section with dummy settings:
[REGISTRATION]
deviceid = 21518947298065749230657432
Settings
deviceid: This is the Device ID (also called as the “Screen ID”) which identifies this Player on Yodeck central systems. When the Player is registered with Yodeck (using the on-screen Registration Code), this setting is set. To allow for pre-provisioning, you can create the screen in your account in Yodeck and copy the Screen ID value into this setting. When the Player starts, it will attempt to Register with this Device ID, and thus automatically register without using the Registration Code.
Yodeck Internal Information [INTERNAL]
WARNING: This section is used by the software inside the Yodeck Player. You should not change this information unless you really know what you are doing. So, we only provide a little info on these settings to avoid erroneous configuration. You can safely delete this whole section; nothing will be affected.
Security and Shell Access Settings [SECURITY]
Configuring system security settings and system shell access
Example section with dummy settings:
[SECURITY]
disable_password_policy = false
remote_password_password= $6$sAIskWuRBgQRJHfS$x0Jycz1FpFbD84QzfeDbcHaOKgf0YHn9q6p0anOSx/ax5cgiYOtZ5LqyBYxK8.z4IjoVhDM2Ft29Ku5lp3N3V
disable_firewall_policy = false
Please note that it is recommended not to modify these settings since doing so might degrade your Player’s security or it will prevent the Yodeck Support Team from helping you out in case of a serious problem. After you get your Player online, you can change these settings through Yodeck.
disable_password_policy: This is a security check. Every time the Yodeck Player starts, the system passwords for a system user account
root,piandyodeckare checked against the default passwords for Raspbian and the 100 most common passwords. If a weak password is discovered, this issue is logged and (in the near future) will appear in your Yodeck account as a potential security issue. Valid values for enabling this option aretrue,yes, andon(all case-insensitive), any other value (including empty) disables this option.
remote)support_password: This is the password that should be set for a system user account
yodeck. By setting this password, you can log in as user “yodeck” and then use thesudocommand to perform privileged actions. The value can be plaintext or can be a standard crypt hash value. To generate a hash value, you can use the following command – on Linux/Mac:openssl passwd -1 -salt ARandomValue– on Windows, just use this online tool.
Warning: It is strongly recommended NOT to change theuser’s password. This password is used to provide remote support. Resetting it won’t affect Yodeck in any way; we just won’t be able to support you remotely by connecting to your Player. If the password is not specified, no changes are made to the system.
disable_firewall_policy: This specifies whether Yodeck should disable re-configuring the embedded firewall on the Player. If you want to disable the firewall re-configuration, you must set this option to
true. Valid values for enabling this option aretrue,yes, andon(all case-insensitive), any other value (including empty) disables this option.
Raspberry Pi Specific Settings [RASPBERRY]
Configuring settings for the Yodeck Player or the Raspberry Pi
Example section with dummy settings:
[RASPBERRY]
config_overwrite = false
config_content = Z3B1X21lbT0xMjgNCg==
Please keep in mind that it is recommended not to modify these settings since doing so might disable several functions of your Player or could even damage it. Also, note that it is recommended not to modify these settings manually. After you get your Player online, you can change these settings through Yodeck.
config_overwrite: If this option is enabled, then the
/boot/config.txtfile is overwritten with the contents of theconfig_contentoption detailed below. Valid values for enabling this option aretrue,yes, andon(all case-insensitive), any other value (including empty) disables this option.
config_content: This is the content to be written to the
/boot/config.txtfile, if the aboveconfig_overwriteoption detailed above is enabled. The content is Base64-encoded, without any newlines (all the resulting Base64 string is on a single line. Warning: Setting wrong values to these settings may result in a number of negative repercussions, e.g., voiding the warranty on your Raspberry Pi or Yodeck Player, preventing it from booting, losing network connectivity or HDMI/TV-out signal, and many other horrible things. Please just change it if you really know what you are doing.
Example for “SETTINGS.txt”
[WIFI]
ipaddress =
netmask =
gateway =
dns =
ssid =
key =
mode = WPA
[LAN]
ipaddress =
netmask =
gateway =
dns =
[PROXY]
proxy =
port =
username =
password =
[REGISTRATION]
deviceid =
[INTERNAL]
settings_file_timestamp = 1447771170.0
log_level =
remote_log_level =
disable_error_monitoring =
[TIME]
zone = Europe
subzone = Athens
[SECURITY]
disable_password_policy = false
set_yodeck_user_password = $6$sAIskWuRBgQRJHfS$x0Jycz1FpFbD84QzfeDbcHaOKgf0YHn9q6p0anOSx/ax5cgiYOtZ5LqyBYxK8.z4IjoVhDM2Ft29Ku5lp3N3V.
disable_firewall_policy = false
[RASPBERRY]
config_overwrite = false
config_content =
How do I change the TV’s HDMI source?
Change the TV Source from your Media Player to another HDMI input. Similar to changing the source from your TV controller. Typical use case: Changing content between live TV from the cable box and Digital Signage content.
⚠️It works only with a Yodeck Player based on Raspberry Pi.
✅ Please take a look at this guide here for more details.
Is there a bandwidth limit for media uploaded or downloaded on Yodeck?
No, there is no limit whatsoever. You can upload or download as many videos and images as you want.
✅ Note that Yodeck is not a file storage service nor a streaming service. You should always keep copies of the content you create outside of Yodeck. Always. We will not be held liable for failing to store and back up your content safely.
⚠️Disclaimer
Fair use is always implied, okay. In case improper use is detected, we will contact you, and if you fail to conform, your account may be disabled abruptly. Check out our Terms of Use or contact us for more information.
What about Internet outages? What will happen to my players?
What Happens to Your Content During an Internet Outage?
One of the biggest concerns when it comes to digital signage is the possibility of an Internet outage. After all, without an Internet connection, how can your content be displayed on your screens?
At Yodeck, we understand the importance of uninterrupted playback for your digital signage. That’s why we have designed our system to ensure that your content continues to be showcased even during an Internet outage.
Local Playback for Uninterrupted Display
When you use Yodeck-enabled screens, your content is downloaded and played locally. This means that even if your Internet connection goes down, your content will still be displayed on your screens without any interruptions. This is especially useful for businesses that rely on digital signage for important announcements or advertisements.
With Yodeck, you can feel confident that your content will continue to be showcased for at least 30-35 days without any disruption.
Limitations During an Internet Outage
During an Internet outage, you may be unable to change the content displayed until Internet access is restored. However, rest assured that your screens will continue to function flawlessly, showcasing the pre-downloaded content without any interruptions.
Built-in Fail-Safe Mechanism
In the rare event of a prolonged Internet outage (more than 30 days), Yodeck-enabled players have a built-in fail-safe mechanism. In such cases, the screens will temporarily black out and display a discreet but informative message to keep your audience informed about the situation. This ensures that even during extended periods without Internet access, your screens will remain active and provide valuable information to your viewers.
Reliable Solution for Your Digital Signage Needs
Yodeck’s reliable and robust system allows you to confidently deploy your content on screens , knowing that they will continue to operate seamlessly even in the face of unexpected Internet outages. With the assurance of continuous playback and the ability to communicate important messages during prolonged outages, Yodeck provides you with a reliable solution for your digital signage needs.
Don’t let an Internet outage disrupt your digital signage. Choose Yodeck for uninterrupted playback and peace of mind.
Do you support LED board screens and billboards?
You can use a Yodeck Player for LED screens and LED billboards. We have users running large LED displays using Yodeck Players based on Raspberry Pi.
You must perform some calculations and configurations to use an LED display properly.
More details can be found below
Is the Yodeck service manageable through a mobile phone? Do you provide an app?
Using Yodeck on Mobile Devices
Yodeck’s Platform is designed to be mobile-compatible, making it easy to access and manage your digital signage displays from your mobile device. Whether you use a smartphone or tablet, you can easily access your Yodeck account and make changes on the go.
Accessing Yodeck on Mobile
To access Yodeck on your mobile device, open your preferred web browser and navigate to our website. You can log in to your account using your usual credentials and access all of the features and settings available on the desktop version.
Our website is optimized for mobile use, so you can easily navigate your playlists, schedules, and media library. You can also make changes to your displays, such as adding or removing content, changing the display order, and adjusting the display settings.
Mobile Application
Currently, we do not offer a mobile application to manage Yodeck. However, we are working on developing one in the future. This application will primarily be used for receiving push notifications about the status of your monitors.
With the mobile application, you will be able to receive real-time updates on the status of your displays, such as when they are offline or when there are any issues with playback. This will allow you to quickly address any problems and ensure that your digital signage is always running smoothly.
Bypassing Video Re-encoding (As-Is Upload)
All video files you upload to Yodeck go through re-encoding (“transcoding”) to ensure the video is playable on the player. Our Players only support the industry-standard H.264 video format (codec), so we ensure all videos are delivered to Players in this format.
Re-encoding the Video files may result in a slight loss of clarity. Usually, video quality is preserved just fine. But in cases where you want the best possible result, you should use the original file you uploaded instead of the re-encoded one.
⚠️IMPORTANT
Your file must be encoded in the H.264 format (codec), up to High Profile, Level 4.1 – translating to 1920×1080 resolution at 30 FPS or even 60 FPS. You can try even higher levels, but that depends on the file. Make sure you test a sample of your content first before deploying it.
We support almost all containers, including MP4, TS, MKV, etc. Audio is handled by software, so any codec should be fine.
If you need to enable this option, send us a message, and we will do so for you!
How does Yodeck support powering monitors and TVs on and off?
The Yodeck Player (or Raspberry Pi) generally includes a CEC adapter on its HDMI monitor port. CEC is a standard communication protocol supported by most major TV manufacturers. It allows for a playback device (the Yodeck Playbox) to power on, power off, and switch video inputs on a CEC-enabled TV. Check out the CEC compatibility chart.
Are all monitors and TVs compatible with this feature?
If your monitor does not support CEC (e.g., you have a computer monitor), the Yodeck Player turns off the HDMI port to allow the monitor to power down by itself. This function is supported by all current computer monitors, even some TVs.
ℹ️ Kindly take a look here for further details on how to create the script for that.
If you use an HDMI-to-VGA adapter on the Yodeck Player, the software will attempt to turn off the HDMI/VGA port, which this hardware might not support.
In the future, we will support using infrared LEDs to switch the monitor on or off through IR, just like standard TV remotes do. We can support custom solutions, like the above, or custom serial connections to monitors for large installations. Also, we will be providing programming hooks that will allow you to create custom scripts to power the monitor on/off.
Can I have root/SSH access to the Yodeck Player?
Why do Yodeck Players download everything locally?
Internet access could be smoother everywhere. We could stream content, but that would mean that your Internet connection must be stable. The same goes for your WiFi network. If anything between your monitor and our server is slow, it will not work correctly.
That is why everything is downloaded locally on the SD card and played from there. Also, the player can withstand without an internet connection for more than 30 days.
What can’t be downloaded locally:
-
Video & Audio Streams
-
YouTube & Vimeo Live Streams
-
Web pages
-
Apps such as Power Bi, Grafana
Does Yodeck support monitors of all sizes?
The Yodeck software supports any resolution, thus any monitor size. From 640×480 VGA monitors up to the latest 4K TVs, all monitors will work fine. It is best to choose a widescreen monitor with an aspect ratio of 16:9 (like “HD Ready”, “Full HD,” or “4K” monitors and TV sets) since most content out there is made for this aspect ratio.
Our Yodeck Player (and Raspberry Pi in general) should also work fine with 99.9% of all monitors and TVs out there, so no worries! In case you have a problem with a specific monitor and need help, reach out, and we will help.
How much bandwidth does Yodeck use?
Yodeck is an online service! So, Internet access is required for your Player to be managed properly.
When a player is connected to the internet, a continuous connection between the player and our servers is established. That connection is responsible for managing the player and updating the player’s status in the Yodeck dashboard. It requires 300MB/month at maximum.
What happens when I push content to a player?
The media content videos(not the streams), images, documents, sound files(not the streams), and a few static apps are downloaded locally to the player. So, the data usage will be related to how many and the size of the files you plan to use.
If, for example, you have video files, images, and documents that you would like to display and their total size is 2 GB, the players will download these data once (2GB) and nothing else (except, of course, the 300MB/month that mentioned in the beginning).
If the content that will be pushed contains streams, web pages, and dynamic widgets, then the total bandwidth needed is related to that content and cannot be clarified.
⚠️IMPORTANT
If you are on a metered/limited Internet connection (e.g., mobile carrier or per-traffic / per-hour access), please contact us to ensure you can use our service over those Internet connections.
Can I use Yodeck for my customers without being a Reseller?
Short answer
Of course, but not on the Free Plan!
Here are the relevant quotes from our Terms of Service:
One person or legal entity may not maintain or use more than one Free Account. You must use a single Account for all monitors you manage through the Service. Using multiple Free Accounts (which allow only one monitor to be managed) to manage multiple monitors is not allowed.
If you use the Service to serve your own customers, you are obliged to inform Flipnode about the services you provide using the Service and to whom you provide them, along with any other information Flipnode may request. You may be asked to sign a partnership agreement to continue your business as above.
The Terms of Service apply in whole to (i) the Account Holder, (ii) users the Account Holder has provided access to the Account, and (iii) end-customers and end-users that may receive services through the Service indirectly by a 3rd Party acting as a Reseller or Partner.
Essentially, what that means is that you are very welcome to provide Yodeck-based services to your customers, but they must be on a paid account, even if they only use 1 Monitor. To do that, there are two options:
You (or your customer) should subscribe to the Monthly or Annual Plan for 1 (or more) screens using a credit card, as if the customer were buying directly from us.
You can contact us and get a Reseller Account (or White Label), which will allow you to resell the service to your customers. We will bill you (through an invoice), and you will bill your customers.
What TVs or monitors does Yodeck support?
Yodeck supports any monitor with any resolution (4K, Full-HD, HD-Ready, or any other). The service was designed based on the primary resolution of 1920×1080 (dubbed “Full HD” or “1080p” in the TV industry).
The content is automatically adapted during playback for any resolution and any monitor up to 4K, even non-widescreen monitors. You can also specify alternative layouts to match different monitors and orientations.
If you want Yodeck to power on and power off your monitor, then there are two options:
Deactivating HDMI Port: This option is supported on the Yodeck Player (Raspberry Pi), but this usually works only on computer monitors (not TV sets)
HDMI-CEC Signaling: This option is supported on the Yodeck Player (Raspberry Pi), but this usually works only on TV sets (not computer monitors) (compatibility chart)
Yodeck uses both methods when trying to power on/off your monitor. The combination that likely causes trouble is when you are using a PC connected to a TV set. So, make sure that your installation does not use this combination, or the power on/off feature will not work (the TV will stay on, showing its own “No Signal” message).
Does Yodeck support outdoor LED billboards?
Can I Use Yodeck for LED Billboards?
Yes, absolutely! Yodeck is not just for traditional digital signage screens; it can also be used for LED billboards. We have already deployed hundreds of production-grade LED billboards using Yodeck!
Using Yodeck for LED billboards offers many benefits for our customers. With Yodeck, you can easily manage your content on LED billboards with even the most unusual resolutions. This means you can use the same system for traditional digital signage screens and LED billboards, making it a convenient and efficient solution for all your display needs.
For more technical information on configuring your LED billboard with Yodeck, check out our help center article. We provide step-by-step instructions and tips to ensure a smooth and successful setup.
If you have any more questions or need help, please don’t hesitate to contact us. Our team is always happy to help and provide more details on using Yodeck for LED billboards.
What hardware players does Yodeck support for playback?
Choosing the Right Digital Signage Player for Your Business
Regarding digital signage, having the right player is crucial for delivering your content effectively. With so many options available, choosing the right one for your business can be overwhelming. This article will explore the different digital signage players and help you find the perfect solution for your needs.
Supported hardware
You can find the supported hardware below
Android
Android is popular for digital signage players due to its flexibility and customization options. With Android, you can access a wide range of apps and tools to enhance your digital signage experience. It also offers a user-friendly interface and is compatible with various devices, making it a versatile option for businesses of all sizes.
Tizen
Tizen is another popular choice for digital signage players, and it is known for its reliability and security. It is a Linux-based operating system that offers a stable and secure platform for displaying your content. Tizen is also highly compatible with various devices and offers a user-friendly interface, making it a great option for businesses prioritizing security.
Windows
For those familiar with Windows, using it as a digital signage player can be a convenient option. Windows offers a familiar interface and is compatible with various devices. It also offers advanced features and customization options, making it a popular choice for businesses that require a high level of control over their digital signage.
FireOS
FireOS is a simple and user-friendly option for digital signage players. It is based on the Android operating system and offers a streamlined interface that is easy to navigate. FireOS is also highly compatible with various devices and offers a range of features that can enhance your digital signage experience.
Choosing the Right Player
With so many options available, choosing the right digital signage player for your business can be challenging. To make an informed decision, we recommend visiting the link: https://www.yodeck.com/yodeck-digital-signage-player/. Here, you will find detailed information about each platform, including their features, compatibility, and performance.
By exploring these options, you can determine which player best aligns with your objectives and requirements. When deciding, it is essential to consider factors such as budget, compatibility, and features.
Conclusion
Choosing the right digital signage player is crucial for delivering content effectively and engaging your audience. With the wide range of options available, exploring and comparing different platforms is essential to find the perfect solution for your business. Feel free to explore the possibilities and find the perfect player for your digital signage needs.
How to reflash your Yodeck player
Raspberry Pi
⚠️The below guide applies only to the Yodeck Player based on Raspberry Pi.
The player is resilient to hardware and system failures. But, as with any device, there is a slight chance that the player may fail. In the case of a software failure, you might be able to recover your player by “reflashing” it with the latest software.
Reflashing will erase the player’s content (re-writing the whole SD card from scratch). Your settings will be retained, so your player should reapply all settings in the system, re-download all required content, and resume playback without you doing anything.
There are two recommended methods to reflash a Yodeck player. Please check them below!
What will happen if I cancel my subscription?
How to Cancel Your Subscription on Yodeck
First of all, we will be sad to see you go 😢. We understand that sometimes things change, and you may no longer need our services. If that’s the case, we want to make the cancellation process easy for you.
To cancel your subscription, follow these steps:
-
Follow this link: https://app.yodeck.com/index.html#main/subscription
-
Click the Reduce Screens button
-
Set the counter to 1
-
Complete the Purchase Wizard’s steps
And that’s it! Your subscription will now be canceled, and you will no longer be charged for our services.
However, if you want us to remove your account and media from our servers completely, we are happy to do so. Drop us a line, and we will take care of it for you.
We hope you have enjoyed your time with Yodeck, and we wish you all the best in your future endeavors. Thank you for being a part of our community!
What happens if a charge for my subscription fails?
What to Do When a Charge Fails
At Yodeck, we understand the importance of keeping your deployment running smoothly. We have implemented measures to ensure that charge failures do not disrupt your display screens. We want you to know that our goal is to be discreet and respectful of your public view.
In the event that a charge fails, an automated email will be sent to your designated email address.
If the charge cannot be completed within 5 days, we will immediately let you know of the problem. Every 2 hours, a flashing red image (without any text) will be displayed on your screens for 2 minutes. This will serve as a visual reminder to address the issue.
If the charge cannot be completed within 2 weeks, we will automatically downgrade your account to a free account. This means all your screens will be deactivated, and only 1 will remain active (the first added one).
To prevent this from happening, you can easily update your billing details by logging into our website at https://app.yodeck.com/index.html#main/subscription/invoices. Please follow the prompts to update your payment information and avoid disruptions to your deployment.
We hope this article has helped you better understand our process for handling charge failures. If you have any more questions or concerns, please don’t hesitate to contact our support team.
What happens if I want to reduce my active screens/players?
If you find yourself with too many screens on your Yodeck account, don’t worry! It’s easy to delete the ones you no longer need. In this article, we’ll walk you through the steps to delete screens and explain what happens to them after they are deleted.
First, talk about why you might want to delete a screen. Perhaps you have a screen that is no longer in use, or you have reached your subscription limit and need to make room for new screens. Whatever the reason, deleting screens is a simple process that can help keep your account organized and efficient.
When you delete a screen, any players associated with that screen will be de-registered. This means the players will no longer be connected to your Yodeck account, and a message on the screen will be displayed prompting registration. This is important to note, as it may affect the functionality of your screens if you have not properly deleted them.
If you downgrade your subscription without first deleting any extra screens, Yodeck will automatically deactivate the last screens you added in order to match your new subscription limit. This means the screens will no longer be active and display a message prompting registration. However, you can easily reactivate these screens by going back and deleting the ones you no longer need. Once the inactive screens are deleted, they will automatically come back online.
It’s important to remember that your Yodeck subscription charges are fully automated. This means that if you downgrade your plan, you will be billed or credited the difference in cost. So, if you delete screens and downgrade your subscription, you will not lose any service credit.
How is Yodeck priced?
Pricing Model Summary
Yodeck pricing is based only on the maximum number of screens registered in your account. There are no additional fees based on usage, content, or features beyond the plan you choose.
- Billing is calculated per screen, per month
- Charges depend on the selected plan and the number of screens
- Subscription fees are billed monthly or annually
Free 30‑day Unlimited Access Period and Five-Screen Usage
After the 2nd of March 2026, new Accounts enjoy a 30-day unlimited access period to the platform’s apps and features with up to five registered screen, free of charge.
- No credit card is required
- The five free screens can use any plan:
- Basic
- Premium
- Enterprise
- The platform’s apps and features are available across all aforementioned plans.
This free plan allows users to thoroughly test Yodeck for 30 consecutive days before deciding on their preferred plan.
Free Plan with Basic Features and Single-Screen Usage
Accounts with one registered screen and Basic features and apps are free of charge.
- No credit card is required
- The one free screen can use the Basic plan:
This free Basic plan allows users to continue testing Yodeck after their first Free 30 Day Unlimited Access Period, mentioned above, and access full Basic plan features and apps, as well as a single free screen before adding more screens.
Free One-Screen Policy Clarification
The free single screen remains free only while the account has exactly one registered screen. Once an account is upgraded to include two or more screens, the free screen benefit no longer applies. In this case, all registered screens are billed, not just the additional ones.
For example:
- An account with 1 screen is free
- An account upgraded from 1 to 5 screens is billed for 5 screens, not 4
This ensures consistent and predictable pricing as accounts scale.
Per-Screen Pricing by Plan
Once an account includes two or more screens, billing applies based on the selected plan.
| Plan | Price per Screen / Month |
|---|---|
| Basic | $8 |
| Premium | $11 |
| Enterprise | $15 |
Pricing Examples
Example 1: Free 30‑day Unlimited Access Period and Five-Screen Usage
| Screens | Calculation | Monthly Cost |
|---|---|---|
| 1-5 | Free | $0 |
Example 2: Basic Plan
| Screens | Calculation | Monthly Cost |
|---|---|---|
| 1 | Free | $0 |
| 5 | 5 × $8 | $40 |
| 10 | 10 × $8 | $80 |
Example 3: Premium Plan
| Screens | Calculation | Monthly Cost |
|---|---|---|
| 1 | Free | $0 |
| 5 | 5 × $11 | $55 |
| 10 | 10 × $11 | $110 |
Example 4: Enterprise Plan
| Screens | Calculation | Monthly Cost |
|---|---|---|
| 1 | Free | $0 |
| 5 | 5 × $15 | $75 |
| 10 | 10 × $15 | $150 |
Scaling Beyond 50 Screens
For deployments requiring more than 50 screens, customers should contact the Sales team at sales@yodeck.com to request a custom quote.
Yodeck is built for scale and can reliably support hundreds or thousands of screens across large deployments.
Do I have access to my account if SSO authenticator is down?
If the SSO authenticator (Okta, Microsoft, etc) is down and you cannot access your account at Yodeck via SSO, the account owner or the account administrator can send us a request at support@yodeck.com, and we will deactivate the SSO for your account.
After the deactivation, the authentication process will be executed via the Yodeck.
*All users should ask for new passwords via the password reminder process.
Do you have an on-premise solution?
We are seeking an on-premises digital signage solution. Can yodeck support an on-premise server?
Can we host your software in our own data center?
Unfortunately, we do not currently support an on-premise solution, and it is not part of our immediate plans to offer such support within the next five years. Our Content Management System (CMS) is hosted exclusively on our servers, and it cannot be installed or operated on any other server infrastructure. This means that all media assets must be uploaded to our servers, which are securely hosted in Amazon Web Services (AWS) data centers located in Ireland (eu-west-1 region).
Amazon AWS is renowned for having some of the industry’s highest security standards and robust firewall protections. Therefore, you can rest assured that your or your client’s media will be securely stored and protected on our servers.
However, if your client operates under a very strict security policy that mandates all media and data remain within the confines of the organization’s local network and prohibits any external data transfer, our solution may not be suitable for their needs. Our platform requires media to be uploaded to our cloud servers, which is a fundamental aspect of our system’s operation.
Also, I’d like to point out that a purely on-premise solution without internet connectivity is not feasible with our current setup. Our CMS is inherently cloud-based, and the digital signage players we support require an active internet connection to function properly. They need to connect to our cloud servers to download content and display it on the TV screens. Therefore, any environment that does not allow internet connectivity would be incompatible with our system.
We understand this may be a limitation for some clients with stringent security requirements, and we regret any inconvenience this may cause. If you have any more questions or need help exploring other potential solutions, please do not hesitate to contact us!
I have a restricted network. Which ports do I need to whitelist for the Yodeck players?
Firewall Exceptions for Restricted Networks
If your network is restricted, you may need to make some exceptions in your firewall settings to ensure that your players have unrestricted access to certain domains and ports.
Below is a list of the domains and ports you will need to allow access to.
Firewall Exceptions Required for restricted networks
Hostname |
Ports |
Usage & Comments |
|
hub.dsbackend.com |
443/TCP |
[Required] IoT hub used for communication with Players from the Yodeck Platform |
|
repo.dsbackend.com |
80/TCP |
[Required]Software Updates repository – no HTTPS required since packages are digitally signed |
|
443/TCP |
[Required] Scheduling Information and Media Downloads |
|
|
assets.dsbackend.com |
443/TCP |
[Required] Scheduling Information and Media Downloads |
|
remote.dsbackend.com |
1194/TCP |
[Optional] Used by our Support Team for advanced remote troubleshooting |
|
widgets.dsbackend.com |
443/TCP |
[Optional] Used by some of our Apps requiring online info (Weather, etc.) |
IMPORTANT NOTES
-
All ports are Outbound.
-
The repo.dsbackend.com and AWS domains will resolve to multiple IP addresses.
-
You can find those IP addresses using this guide:
-
IP-based firewalls
If you are using IP-based firewalls, you must add the following IPs to your firewall exceptions: 108.128.247.33 and 52.210.76.69.
I bought the players from you. How do I pre-configure them with WiFi credentials?
Pre-configuring my newly bought Yodeck players
First, we would like to thank you so much for your business. We are very happy to have you on board! After you place and finalize your order, you have 5 hours to preconfigure your player(s) with the WiFi credentials. It is a very simple task!
When you check out the purchase wizard, you will notice that the system automatically creates monitor entries based on the number of players you have bought. You can find these entries on the Screens list or by following this link.
How to preconfigure a player with WiFi credentials
Click your player’s name.
Go to the Network tab.
Type the relative WiFi credentials.
Save the form.
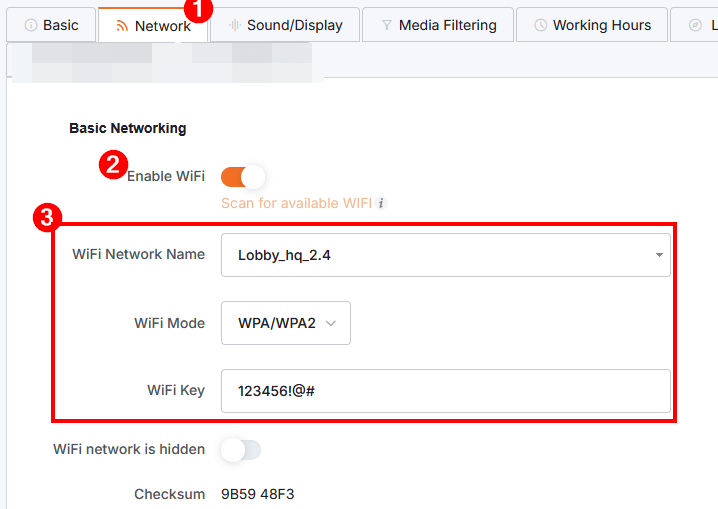
That’s it! The player(s) are now preconfigured with the WiFi credentials you typed. Of course, you can change them as many times as you want in that 5-hour window.
⚠️5-hour Window
Bear in mind that after the 5-hour window, any changes you make to the WiFi credentials won’t be reflected in the player(s).
⚠️Case-sensitive
Bear in mind that the WiFi names and passwords are case-sensitive. If you have typed at least one letter wrong, the player cannot connect.
Pre-configuring more than one player at once
Of course, if you want to configure multiple players at once, follow the steps below:
Select the players of your choice.
Click the Actions button.
Then select the Edit option.
Go to the Network tab.
Enable the relative fields.
Type the WiFi credentials.
Save the form.
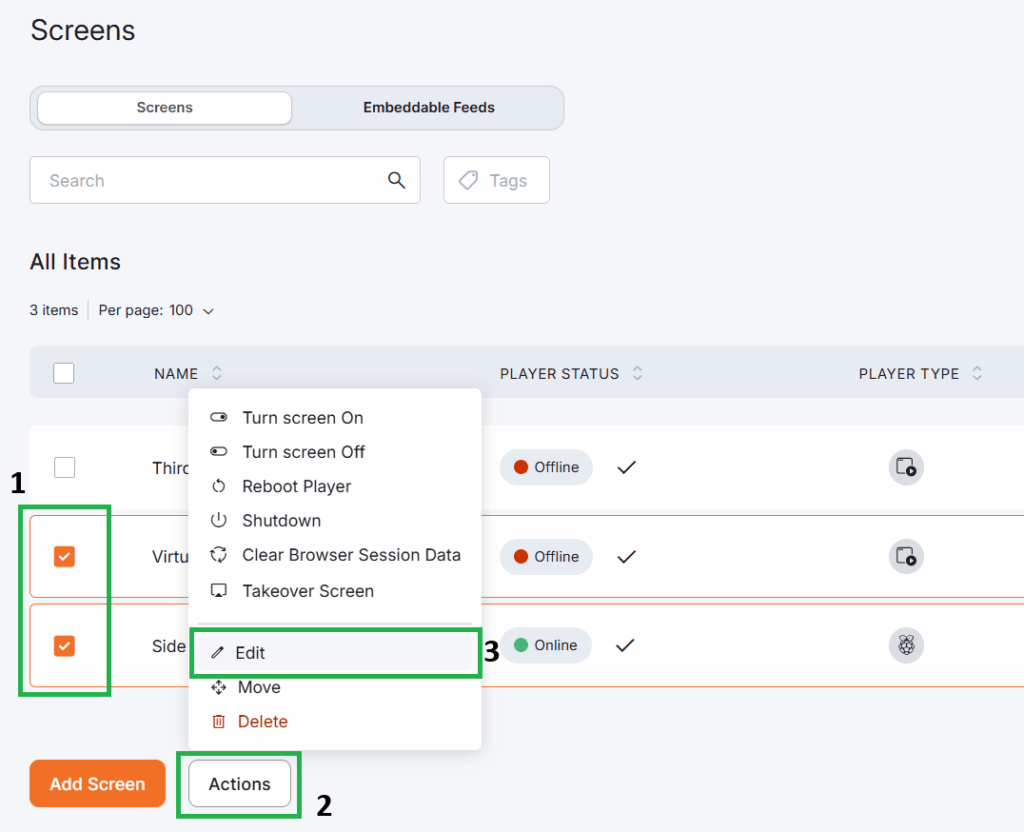
How do I preview what’s displayed on the TV before pushing the content?
Intro
With a few simple clicks, you can preview the content on your browser before pushing it live to your players. There are many ways to preview the content on your end. Below you can find a detailed way to quickly preview your content on your PC/Laptop’s browser.
Single media preview
On each media, you can see content in Full-screen mode by clicking the magnifying glass icon, as shown below.

Playlist Preview
You can see how your playlist will display on the TV screen without needing a Yodeck player or any hardware. You only have to fill the playlist with the media of your choice and then click the Preview button. The preview will follow the playlist’s media sequence. You cannot skip or fast forward/backward the content. In other words, you will be able to see exactly what is being shown on your TV screen in the same way you would view that content if you had a Yodeck Player connected to your screen.
Layout Preview
You can see how your playlist will display on the TV screen without the need for a Yodeck player or any hardware. The only thing you have to do is finalize your layout with the media of your choice and then click the Preview button.
Allowing pop-ups
Your browser might block the pop-up when you click the Preview button. Please click the ” Options” button and click ” Allow pop-ups for app.yodeck.com.”
Live Screenshots
If you have already registered a Yodeck player to your account, the Yodeck player will send a fresh screenshot to your account every 30-40 seconds. In that way, you can check what is actually being displayed on the TV screen.
Bear in mind that when you log out of your account, the player will send one screenshot per hour to save some bandwidth! When you log in again and navigate to the monitor’s view, as shown below, the player will start generating screenshots again every 30-40 seconds.
How do I create a digital signage player?
Yodeck needs a device that will handle your media’s playback, even in 4K, onto your monitor. We designed our own plug-and-play device, which we call the “Yodeck Player”.
✅ To convert your Raspberry Pi (any version) to a Digital Signage player, follow this detailed guide here.
✅Plug ‘n Play
Yodeck comes with all the Yodeck Players you need for FREE. You don’t need to install software, manage PC units, ensure compatibility, and so on. For each screen you manage under any annual plan, you will receive a free plug ‘n-play Yodeck Player. And it will come preconfigured, with network settings, WiFi, etc., all ready to be used!
How can I test-drive Yodeck without buying a Yodeck Player or Raspberry Pi?
Learn how to turn a compatible browser-based device into a Yodeck digital signage screen using the Yodeck Web Player. This option is ideal if you want to get started quickly with minimal setup, or if you want to test Yodeck without using dedicated signage hardware.
In the full article, you’ll see how to access the Web Player, register it to your Yodeck account using a registration code, and start displaying content on your screen. The guide also explains browser compatibility requirements, optional enhancements such as the Chrome extension and PWA, and important limitations to consider when using the Web Player instead of a hardware-based Yodeck Player.
ℹ️ You can also check out the Yodeck Academy channel and witness how Yodeck actually performs.
📩 If you are still not convinced, contact us, and we might convince you, so you can skip the no-cost test-drive mess!
What about Customer Support?
A few words about us
Yodeck takes pride in providing reliable, continuous online support to all our users. Whenever you encounter any issues or have questions, please log in to your account and let us know. Our dedicated support team is committed to helping you quickly and efficiently. Rest assured, whether you have a free or paid account, we are here to support you!
How can I reach Yodeck Support?
👋 Get in Touch
The fastest way to reach us is through our in-app messenger.
- In-App Chat: Log in to app.yodeck.com and click the orange icon in the bottom-right corner.
- Email: Drop us a line at support@yodeck.com.
- Phone (Toll-Free): *
- US: +1 888 970 8756
- UK: +44 808 502 2830
When is Support Available?
🕒 When are we online?
We provide Live Support 24/5. We start early Monday morning and stay with you until the weekend begins.
- Standard Hours: Monday 06:00 AM EET → Saturday 06:00 AM EET.
- 24 hours a day, 5 days a week
- *Note: Phone support is currently available Mon-Fri, 10 AM – 1 AM EET. (24/5 phone support is coming soon!)
What does that mean for your time zone?
Here are some quick examples:
|
🌎 Location |
🕒 Start (Monday) |
🕒 End (Saturday) |
|
🇺🇸 New York (ET) |
Sunday 11:00 PM |
Friday 11:00 PM |
|
🇺🇸 California (PT) |
Sunday 8:00 PM |
Friday 8:00 PM |
|
🇬🇧 London (BST) |
Monday 4:00 AM |
Saturday 4:00 AM |
|
🇮🇳 India (IST) |
Monday 8:30 AM |
Saturday 8:30 AM |
|
🇯🇵 Tokyo (JST) |
Monday 12:00 PM |
Saturday 12:00 PM |
|
🇦🇺 Sydney (AEST) |
Monday 1:00 PM |
Saturday 1:00 PM |
📌 EET = Eastern European Time.
Please note that during daylight saving time, we observe EEST (UTC+2).
What if I message you during the weekend?
No worries! Even outside our live support hours, Yobot, our virtual AI assistant, is available 24/7 to help you.
Yobot is our AI-powered support bot, designed to help you quickly find answers and resolve common issues, any time of the day!
But don’t let the “bot” label fool you. Yobot isn’t static or generic; it’s constantly evolving. We train and improve it every single week based on:
- Real user questions 🧠
- Product updates 🛠️
- Feedback from our support team 🎯
While Yobot excels at guiding you through frequently asked questions, setup steps, and troubleshooting workflows, it may also surprise you with just how helpful and insightful it can be.
Give it a try — it’s constantly learning and getting better at helping you!
And of course, if Yobot can’t fully solve your issue, a real human is always nearby to step in.
If you want to reach us on weekends, please:
- Log in to your Yodeck account at app.yodeck.com, then use the messenger in the bottom-right corner of your screen to contact us.
- Or, send an email to support@yodeck.com
- Or, check our Help Center for instant answers.
We’ll reply as soon as support resumes on Monday at 06:00 EET.
Support for Everyone — Tailored Assistance for Every Need
While we prioritize requests from paid account holders, we remain committed to supporting our free account users as well. At Yodeck, we believe in delivering reliable, high-quality assistance to all users, regardless of their subscription level. Our team is here to ensure that everyone gets the help they need.
Planning a large-scale project?
If you’re working on a major deployment or have special requirements — including on-site assistance or custom rollout support — don’t hesitate to reach out. Our experienced team is ready to partner with you to ensure your project’s success.
Can I use an HDMI-to-VGA adapter for VGA monitors?
Yes, you can. But be careful!
First, you have to use an active adapter, which converts the HDMI’s digital signal to a VGA analog signal.
Second, your HDMI-VGA adapter needs to be externally powered. We have conducted tests with several HDMI-to-VGA adapters. Adapters that are not powered by some other power source besides the HDMI port behave erratically on the Yodeck Playbox (or Raspberry Pi). They either don’t work at all or work for a while and then go on and off constantly. This is because the HDMI port on the Raspberry Pi does not provide enough power to the adapter. Adapters that are externally powered work fine.
For example, this adapter type does not work correctly, but powered adapters have been tested and work. If you are having trouble, try powering the adapter on its own PSU, not from the Yodeck Playbox (or Raspberry Pi) or the TV set. Note that we have not thoroughly tested this type of hardware, and we have no recommendations.
Does Yodeck support connecting through an HTTP Proxy?
Yes! You can set the HTTP Proxy and Username/Password through Yodeck. You can also set it through the configuration file on the SD Card, which you can edit through your PC and an SD card reader.
For our Yodeck Players, all Network Settings can be configured when you place your order, so it works great as soon as you plug it in!
Reset all Settings on your Yodeck Player
To reset all Settings on your Player, you need to delete a file from its SD card. This will force the system to apply the default settings.
⚠️IMPORTANT
Remember that if your Player requires some special network configuration to get online, you will lose Internet connectivity. This might render the Player unreachable, and you might go on-site and perform manual configuration.
For Regular Users
-
Power off your Player (by removing the power cable).
-
Remove the microSD card from your Player.
-
You can access the microSD card with your PC. You might need a microSD-to-SD card adapter or a USB memory card reader.
-
You will see one or more storage filesystems. The first one (the smallest, with around 100MB of space) contains a file called “SETTINGS.txt.”
-
Delete the “SETTINGS.txt” file.
-
Remove the microSD card from your PC.
-
Place the microSD card into your Player.
-
Power on your Player.
Upon start-up, the Player will apply all default settings to the system. This may take up to 10 minutes, and a reboot might occur.
For Advanced Users
If you have remote (SSH) or local shell access, issue these two commands:
In order to SSH your player follow this guide here.
-
sudo rm -f /boot/SETTINGS.*
-
sudo reboot
Upon start-up, the Player will apply all default settings to the system. This may take up to 10 minutes, and a reboot might occur.
What are the Yodeck Player specs?
What if Yodeck Player fails?
⚠️ There is a limited worldwide warranty of 1 year on a Yodeck Player.
If your Yodeck Player is eligible for replacement, you can ship the failed Yodeck Player back to us, and we will send you the replacement unit as soon as possible. You will cover the shipping costs for returning Yodeck Players, while we will cover the shipping costs of the replacement unit.
In order for you not to incur unnecessary shipping costs, please contact our support team first. You might get a local part replacement, like for a failed SD card, which might be cheaper than shipping it back to us.
Software support for Raspberry Pi 5
We are thrilled to share some exciting news based on your interest in Raspberry Pi 5.
Our Raspberry Pi 5 (RPi5) image is now available in Beta! Click the link below for more details.
We’ve put together a detailed article about Raspberry Pi 5 and Digital Signage, in which we also discuss why we have continued to use the Raspberry Pi 4 as the default Yodeck Player. Click the link below for more details.
➡️ https://www.yodeck.com/news/yodeck-and-raspberry-pi-5/
This Beta phase is the perfect time to test your use case with the Raspberry Pi 5 and share your feedback with us.
You can find all the current limitations of the Raspberry Pi 5 below.
➡️ https://www.yodeck.com/docs/creating-a-yodeck-player/raspberry-pi-5-limitations
We are excited to hear your feedback!
How to Turn your TV On and Off
Learn how to automatically control when your TV turns on and off using Yodeck’s Turned Off option. This feature allows you to schedule screen downtime, reduce energy usage, and ensure displays are active only when needed.
In the full article, you’ll learn how to schedule the Turned Off option alongside your regular content, choose between different scheduling approaches, and test whether your TV supports HDMI-CEC power control. The guide also covers compatibility considerations, required TV settings, and common troubleshooting steps to ensure reliable power control.
Does the Yodeck player support Power over Ethernet (PoE)?
Yes, the Yodeck player supports Power Over Ethernet (PoE). But a separate PoE HAT is required.
We strongly recommend using the official PoE hat.
Introducing Yodeck’s REST API: Seamless Integration for Your Digital Signage Needs
We are excited to announce that Yodeck has released a robust REST API. This API seamlessly integrates Yodeck’s digital signage solutions with your existing systems, offering you greater flexibility and control over your displays.
With the Yodeck REST API, you can:
Automate content scheduling and deployment across multiple screens.
Manage media files, playlists, and layouts programmatically.
Control your digital signage network remotely with custom scripts.
Integrate with third-party applications to enhance your workflows.
To get started, visit our API documentation, which contains detailed information on endpoints, request parameters, and example responses. This comprehensive guide will help you understand how to leverage the API to meet your needs.
If you have any questions or need further assistance, our support team is here to help.
How to use the Takeover Feature
What is the Screen Takeover?
Screen Takeover is an option that allows you to temporarily override your screen’s content for special, one-off events or announcements. You can do this in multiple ways:
You can use the “Set to Screen” shortcut on any of your Media, Apps, Playlists, or Layouts.
Directly through each single Screen view or the Screen listing.
In both scenarios, you’ll instantly push your specified content on the selected screens as Takeover content for the time period that you’ve chosen.
Where can I find the Screen Takeover feature?
Set to Screen as Takeover
Navigate to the “Set to Screen” shortcut on any of your assets. There you will see 2 “Set to Screen” types:
Set as default content
Takeover
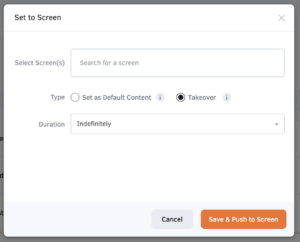
Single Screen View
Provided that your screen has been registered, you will see the “Takeover Screen” button on the left side.
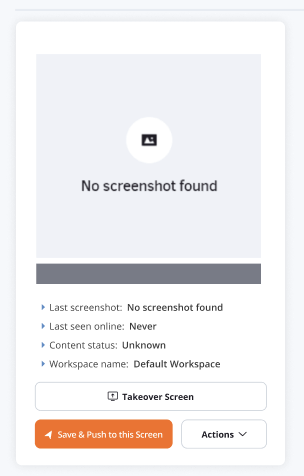
Screen Listing
Takeover Screen can be found as an option in “Actions”.
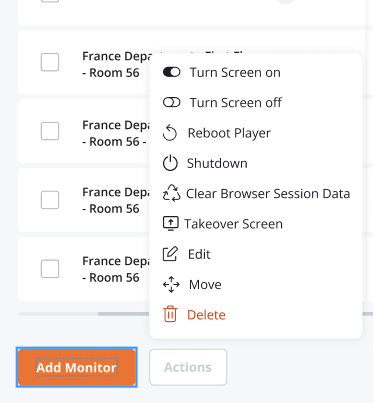
How do I push a certain content piece as Takeover?
In the Screens section, you can either take over your screen while viewing a single screen or by selecting the relevant “Action” on the screen listing.
Any content piece uploaded to Yodeck can be used to “Takeover” your screens. This includes Media, Apps, Playlists, and Layouts.
Every time you set a Takeover, you need to specify the duration of it between the following options:
Indefinitely (your Takeover will continue until you manually stop it)
30 minutes
1 hour
Custom duration (in minutes)
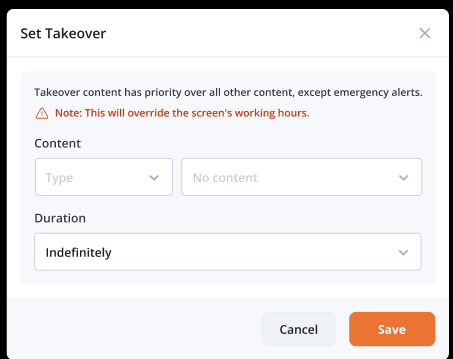
How do I know that a screen has a live Takeover?
Live Takeover in Single Screen View
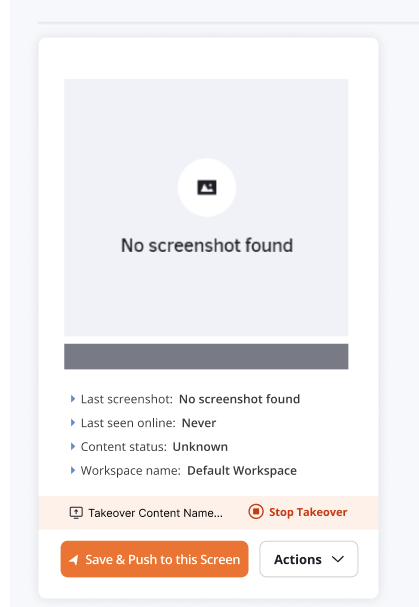
Live Takeover in Screen Listing
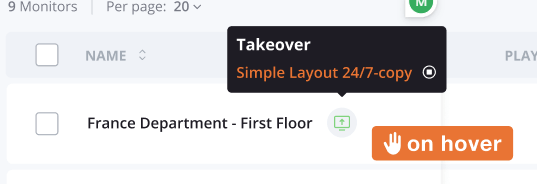
Notifications
After you push a takeover to your screens, push notifications are displayed, depending on whether your push succeeded or failed.
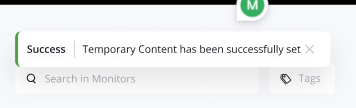

How do I stop the Takeover?
Any Takeover can be stopped by clicking the relevant “Stop Takeover” button in the single-screen view or the screen listing. After that, the screen will return to its assigned content.

Important Notes
Permissions
If a user is not authorized to change device (screen) content → the takeover action is disabled.
The note about the screen’s working hours is displayed only when working hours have been set on the selected screen(s).
You can override the takeover by setting a new takeover for your screens.
Takeover cannot be applied to unregistered screens, so they are disabled in the relevant dropdown.
When creating a new media (where the media has not been uploaded yet), the takeover is disabled.
When will my Yodeck player be here?
Shipping Information
Thank you for your interest in our products! We strive to provide the best shopping experience for our customers, including timely shipping of your orders.
Shipping Timeframe
Once you have placed your order, the warehouse requires approximately 3–5 business days to prepare your item for shipment. After preparation, delivery typically takes an additional 3–5 business days, depending on the distance to the destination. In total, customers can expect their items to arrive within 6–10 business days of placing the order. This timeline accounts for both preparation and shipping times, ensuring your item is packaged and shipped with care.
Tracking Your Order
Once your item has been shipped,
You will receive a tracking number via email. This will allow you to track your order and see its estimated delivery date.
You can track your order using this link: https://app.yodeck.com/index.html#main/subscription/orders
Shipping Methods
We offer a variety of shipping methods to best suit your needs. Our standard shipping method is through UPS, but we also offer expedited shipping options for an additional fee.
Orders to US locations are shipped from our California warehouse, helping ensure timely delivery.
International Shipping
We currently offer worldwide shipping.
For US locations, the 6–10 business-day timeline applies, while international shipping times may vary.
Shipping Costs
Shipping costs will vary depending on the number of players. You can view the shipping costs for your order at checkout.
Additional Questions
If you have any additional questions or concerns about shipping, please don’t hesitate to contact our customer support team. We are always happy to assist you!
Thank you for choosing our products. We hope you enjoy your purchase!
How do you factory reset the Yodeck device/player?
How to Factory Reset Your Player
Factory resetting your player is a great way to troubleshoot any issues you may be having with your device. This process will restore your player to its original settings, erasing any changes you have made since setting it up. If you are experiencing any technical difficulties, a factory reset may be your solution.
⚠️ Remember that this method is available only for the Yodeck player based on Raspberry Pi.
For the other players (Android, Tizen, LG, etc.), reach out to the relevant vendor.
Step 1: Access the Factory Reset Link
To factory reset the player, use the below link:
https://www.yodeck.com/docs/how-to-articles/how-to-flash-an-sd-card-using-pi-imager/This link will take you to the factory reset page, where you can begin the process.
Step 2: Wait for the Reset to Complete
The factory reset process may take up to 20 minutes to complete. During this time, your player will restart, and all data will be erased. Please do not turn off your player or unplug it from the power source.
Step 3: Set Up Your Player
Once the reset is complete, your player will restart, and you will be prompted to set it up again. You can follow the on-screen instructions to complete the setup process.
Additional Tips
If you are still having problems with your player after the factory reset, you may need to contact customer support for more help. It is also recommended that any important data be backed up before performing a factory reset.
Congratulations, you have successfully factory reset your player! Your device should now be functioning properly.
How to make your Yodeck account secure
Intro
At Yodeck, we take the security of your account very seriously. We understand that your account contains sensitive information, and we want to ensure it is always protected. In this article, we will go over some important steps you can take to ensure the security of your Yodeck account.
Strong Passwords
First and foremost, it is crucial to have a strong password for your account. This means using a combination of letters, numbers, and special characters. Avoid using easily guessable information such as your name or birthdate. We also recommend regularly changing your password to further enhance your account’s security.
Never use a password that you have used on another platform or service.
Two Factor Authentication 2FA
Another important security feature we offer is two-factor authentication (2FA). This adds an extra layer of protection to your account by requiring a code from your phone in addition to your password when logging in. We highly recommend enabling 2FA for your Yodeck account. You can do that by following the link below:
Rotate Passwords
In addition to having a strong password and enabling 2FA, it is important to change your passwords regularly. This is a good practice to prevent potential security breaches. We recommend changing your password at least every three months.
Never use a password that you have used on another platform or service.
If you suspect that your account or the password that you have used to create the Yodeck account has been hacked or compromised in any way, it is important to take immediate action.
The first step is to change your password immediately. This will prevent any further unauthorized access to your account. We also recommend that you contact our support team for more help.
Conclusion
In conclusion, by following these steps, you can make sure your Yodeck account is safe. Remember to have a strong password, enable 2FA, regularly change your passwords, and take immediate action if you suspect any security issues.
Thank you for choosing Yodeck for your digital signage needs!
Which OS are the Yodeck Players (Raspberry Pi4) are running?
The Raspberry Pi devices, including the Raspberry Pi 4, typically run the Raspberry Pi OS (formerly Raspbian), which is a Debian-based Linux distribution.
At the moment, the Yodeck Players are running Debian version 10 (Buster).
We are working to update our current software to the latest Debian version which is the 12 (Bookworm).
If I purchase a Yodeck player and try the service but decide it’s not for me, can I return the player for a full refund? If so, how long do I have to make the return?
30-Day Money Back Guarantee!
At Yodeck, we want to make sure our customers are completely satisfied with our service. That’s why we offer a 30-day money-back guarantee!
If you purchase a Yodeck player and decide within 30 days that the service isn’t for you, you can return the player for a full refund. The 30-day period starts from the date of purchase, so you’ll need to initiate the return within that time frame to receive the refund.
To initiate a return, please contact our customer support team at support@yodeck.com. They will provide you with instructions on returning the player and receiving your refund.
Additionally, Yodeck provides a prepaid return label to simplify the return process. This label will be sent to you as a PDF attachment. Ensure you securely package the Yodeck Player and its SD card in a box, wrapping the items to protect them during transit. Affix the prepaid return label to the package and arrange for pickup or drop-off with your local postal service.
Please note that:
- The player must be returned in its original packaging and good condition.
- Any damages or missing components may result in a partial or no refund.
- Ensure the SD card is included in the return package to avoid delays in processing your refund.
Once we receive the returned player, our team will inspect it and process your refund within 5-7 business days. The refund will be issued using the original form of payment used for the purchase.
We are confident that you will love using Yodeck, and we strive to provide the best service possible. However, if for any reason you are not satisfied, our 30-day money-back guarantee lets you try our service risk-free. Thank you for choosing Yodeck!
How can I schedule a demo call?
Scheduling a Demo Call with Our Sales Team
Thank you for your interest in our product!
We understand that sometimes it’s helpful to have a one-on-one conversation with our sales team to learn more about our features and pricing. That’s why we offer the option to schedule a demo call with our team.
How to Schedule a Demo Call
Scheduling a demo call is quick and easy. Simply click the button below:
What to Expect During the Demo Call
During the demo call, our sales team will explain our product and its features and answer any questions you may have about pricing, customization options, and more.
We recommend setting aside at least 30 minutes for the demo call to ensure that you have enough time to ask any questions and fully understand our product.
Multicurrency
Yodeck Now Supports Multiple Currencies
We are excited to announce that Yodeck now supports transactions using multiple currencies. This new feature allows our users to select their preferred currency, making conducting business with us easier and more convenient. We understand that our global clientele may have different currency preferences, and we want to ensure everyone can easily access and use our services.
Supported Currencies
Our multi-currency support includes the following currencies:
- USD
- EUR
- GBP
- CAD
- AUD
With this enchantment, our global clientele can now transact in their local currencies, simplifying purchasing and reducing conversion fees.
Pricing Plans
Yodeck offers a range of pricing plans to accommodate various business needs. The prices for our plans in different currencies are as follows.
Subscribing to an annual plan may result in a discounted rate per screen. Additionally, opting out of the hardware players included with the annual plans can lead to further cost savings.
|
Plan |
USD (per screen/month) |
EUR (per screen/month) |
GBP (per screen/month) |
CAD (per screen/month) |
AUD (per screen/month) |
|
Basic |
$8.00 |
€8.00 |
£7.00 |
CA$12.00 |
AU$13.00 |
|
Premium |
$12.00 |
€11.00 |
£10.00 |
CA$18.00 |
AU$18.50 |
|
Enterprise |
$16.00 |
€15.00 |
£13.00 |
CA$24.00 |
AU$25 |
⚠️Note: Prices are based on annual billing. Monthly billing may incur slightly higher rates. Additional discounts may apply if hardware players are excluded from the plan. Please refer to Yodeck’s official pricing page for the most current pricing details, or check your Yodeck dashboard for specific pricing tailored to your needs.
Free Plan and Additional Benefits
We also offer a free plan with up to five free screens and unlimited access to all apps and features of the platform, allowing users to explore our platform’s features without any commitment. Additionally, subscribing to an annual plan includes a free Yodeck player for each screen, enhancing the value of our service. Each account is entitled to one screen free of charge, providing an easy entry point to explore our features without any financial obligation.
By pricing in multiple currencies, Yodeck aims to cater to a global audience, making it easier for businesses worldwide to implement effective digital signage solutions. We are committed to continuously improving our services to better serve our diverse clientele.
For the most accurate and up-to-date pricing, users are encouraged to consult Yodeck’s pricing page (https://www.yodeck.com/pricing/), ensuring that can tailor their investment to their exact requirements.
Pricing Plans & Screens
Can a group of screens on the Basic plan and another group of screens on the Premium/Enterprise Plans be under the same account?
At this time, it is not possible to combine screens from different plans into a single Yodeck account. This means that if you have screens on the Basic plan and on the Premium or Enterprise plans, they cannot be managed under a single account.
✅ All the screens will need to be on the same plan.
Scheduling content is universally available on all Yodeck plans. You can assign schedules to individual players, providing flexible control over displayed content without requiring an upgrade to premium plans.
If you wish to use a feature available only on a different plan, you will need to upgrade your account to that plan. This will allow you to access the plan’s features and capabilities for all of your screens. Alternatively, if only one or a few screens require Premium features such as advanced widgets or integrations, you can either upgrade the entire account to the Premium plan or create a separate Yodeck account for those screens. Keep in mind that managing multiple accounts may require additional effort.
File size limitation on the Yodeck portal
All files you upload to the Yodeck portal undergo re-encoding (“transcoding”) to ensure the resulting file format is playable by the players.
Our encoding service can handle single files of up to 5GB. Uploading a single file with a size above 5GB is not supported at the moment!
Do you support an 8K resolution?
Do you support 8K resolution?
We do not currently support 8K resolution. However, we are constantly working to improve our services and may offer 8K resolution in the future.
If you are looking for the highest resolution possible, we currently offer 4K resolution. This provides a stunning viewing experience with crisp, clear images and vibrant colors. We also offer a variety of other resolutions to fit your needs.
If you have any further questions or concerns, please don’t hesitate to reach out to our customer support team. We are always happy to assist you and provide any information you may need.
Volume Discounts
Clarifying Discount Policy for Screen Orders
As our pricing guidelines state, no discounts are provided for orders of 50 screens or fewer. This means that if you are looking to purchase 50 screens or fewer, the price will remain the same as listed on our website.
However, we do offer discounts for larger orders. Discounts are only available for inquiries or orders exceeding 50 screens. This means that if you want to purchase more than 50 screens, you may be eligible for a discount.
Contact our Sales team for more information at sales@yodeck.com. This is because we want to ensure that you know all potential discounts that may apply to your order.
Introducing Yodeck’s REST API: Seamless Integration for Your Digital Signage Needs
We are excited to announce that Yodeck has released a robust REST API. This API seamlessly integrates Yodeck’s digital signage solutions with your existing systems, offering greater flexibility and control over your displays.
With the Yodeck REST API, you can:
- Automate content scheduling and deployment across multiple screens.
- Manage media files, playlists, and layouts programmatically.
- Control your digital signage network remotely with custom scripts.
- Integrate with third-party applications to enhance your workflows.
To get started, visit our API documentation, which contains detailed information on endpoints, request parameters, and example responses. This comprehensive guide will help you understand how to leverage the API to meet your needs.
If you have any questions or need further assistance, our support team is here to help.
How to display Euro 2024 stats on your TV screen
Intro
Follow these simple steps to display Euro 2024 stats on your screen
Step 1: Follow the Link
Copy the following link to access the Euro 2024 stats embed page on ScoreBat:
Step 2: Log in to your Yodeck account
Login to your Yodeck account and create a new web page. Inside the web page form, paste the above URL link.
Step 3: Save the Form
Paste the code below into the “Run Custom Script” section. Ensure the code is correctly placed within the code section.
pause(4)
runScript("""
setInterval( () => {if (j(window).scrollTop() + j(window).height() == j(document).height()){
j('html, body').animate({ scrollTop: 0 }, 1000);
}
else{
j('html, body').animate({
scrollTop: '+=100'
}, 1000);
}
}, 1000)
""")
Step 3B: Display the Tables
If you want to display the Tables section from the above URL link, use the below code instead.
pause(4)
runScript("""document.querySelector('#root > div > div > div > div.WidgetBody > div > div > div > div > div:nth-child(2)').click()
""")
pause(1)
runScript("""
setInterval( () => {if (j(window).scrollTop() + j(window).height() == j(document).height()){
j('html, body').animate({ scrollTop: 0 }, 1000);
}
else{
j('html, body').animate({
scrollTop: '+=100'
}, 1000);
}
}, 1000)
""")
Step 4: Assign to Players
After saving the form with the embed code, assign this content to the screens or players where you want the Euro 2024 stats displayed. Follow this guide on how to assign content on your screens.
Final Steps
- Verify that the Euro 2024 stats are displaying correctly on your screens.
- Make any necessary adjustments to the size or positioning of the embed code to fit your display requirements.
Following these steps will display the Euro 2024 stats on your screens, keeping your audience updated with the latest information. If you encounter any issues or need further assistance, please check below.
Need Help?
The Yodeck Support Team can help you out! Log in to your Yodeck account and send us a message from the bottom right corner!
Scheduled Maintenance
Your Yodeck experience is being upgraded!

Sorry for the inconvenience, but our platform is currently undergoing scheduled maintenance.
We apologize for any disruption this may cause, and thank you for your patience as we work to improve our services!
Scheduled Maintenance Details
- Every six weeks, the Yodeck portal (https://app.yodeck.com/) undergoes scheduled maintenance to improve products and add new features.
- The expected downtime is around 30 minutes.
- The Maintenance of the portal doesn’t impact the Digital Signage devices. They will keep on working 24/7 as expected.
- We display a “Scheduled Maintenance” notice in the portal 48 hours before the maintenance.
- You can check the future scheduled maintenance windows at this link.
Thank you so much for your understanding!
Read our blog posts
Read our articles
Share your ideas
Configure RTC DS3231
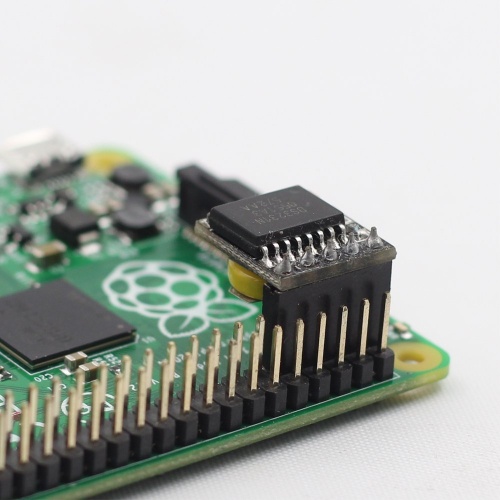

Yodeck Players do not include an onboard real-time clock. What does that mean? It means that if your Player is offline for a prolonged period of time, it might lose track of time, and scheduling features might not behave correctly.
The Problem
The Players (based on Raspberry Pi) do not have an RTC (Real Time Clock) module on board.
The cost of the RTC is fairly low (you can find them on eBay), but it needs to be considered if your deployment is time-critical.
The Technical Details
Two clocks are important in Linux: the ‘hardware clock,’ also known as RTC (Real Time Clock), CMOS or BIOS clock, and the ‘system clock.’
- The RTC is a battery-backed clock module connected to the Player’s GPIO ports (Raspberry Pi) that keeps time even when the Player is shut down (or has no power).
- The second clock is called the ‘system clock,’ maintained by the operating system, Linux in our case.
At boot time, the hardware clock is used to set the system clock, and from that point onwards, the system clock is used to track time. At regular intervals and shutdowns, the system time is used to set the hardware clock to ‘save’ the time between reboots.
Without an RTC, the Player saves the current time on the SD card every hour. If there is a power failure, it will load the last time recorded on the SD card when the Player boots. It will then sync its time from the Internet NTP (Network Time) servers or our servers as a backup. But if there is no Internet access, the Pi will not sync time, so its clock might be off (from minutes to hours, depending on how long the power failure lasted). This will affect Scheduling, not content playback.
Configuring the RTC clock on a Yodeck player
To use the RTC module with Yodeck, in the screen settings:
- Enable the “Allow Raspberry config.txt Override” toggle.
- In the “Raspberry config.txt Override Directives” field, enter the following directive:
dtoverlay=i2c-rtc,ds3231 - In the “Advanced Player Directives” field, enter the script (this is a single line of text):
yodeck_run_custom_script=IyEvYmluL2Jhc2gKaWYgISBncmVwICdeaHdjbG9jayAtcycgL2V0Yy9yYy5sb2NhbDsgdGhlbgogICAgc2VkIC1pICdzL15leGl0IDAvaHdjbG9jayAtc1xuZXhpdCAwL2cnIC9ldGMvcmMubG9jYWwKZmkK
⚠️Make sure it is a single line without spaces or line breaks.
After clicking the “Save” button, the player will automatically pick up the new configuration, apply it, and automatically reboot. After the reboot, the RTC module will be available on the system, and the time will be automatically set on boot. In any case, if the network is available, the time will sync with the default Debian NTP servers and our service.
The custom script essentially is a software hook that allows for custom configuration scripts to be used on the player. It just adds the command hwclock -s in /etc/rc.local, which will read the time from the RTC and set the boot system time.
You might need to check that the RTC module has the correct time by running sudo hwclock -r (the command should return the correct time). Otherwise, you can run sudo hwclock -w to update the saved time of the RTC using the system time. Here is how you can SSH the player.
Connection Diagram
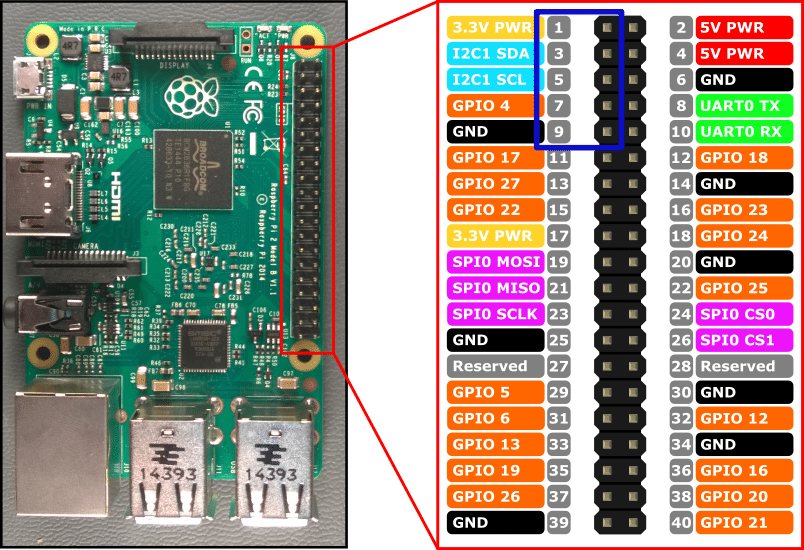
How to configure the Yodeck player with an Argon ONE case
Fan and Power Button installation
- Hardware Installation
- Software Installation
- Argon ONE Power Button Functions
- Argon ONE Fan Speed and Temperatures (Default values)
- Configuring the Argon’s case fan and temperature values.
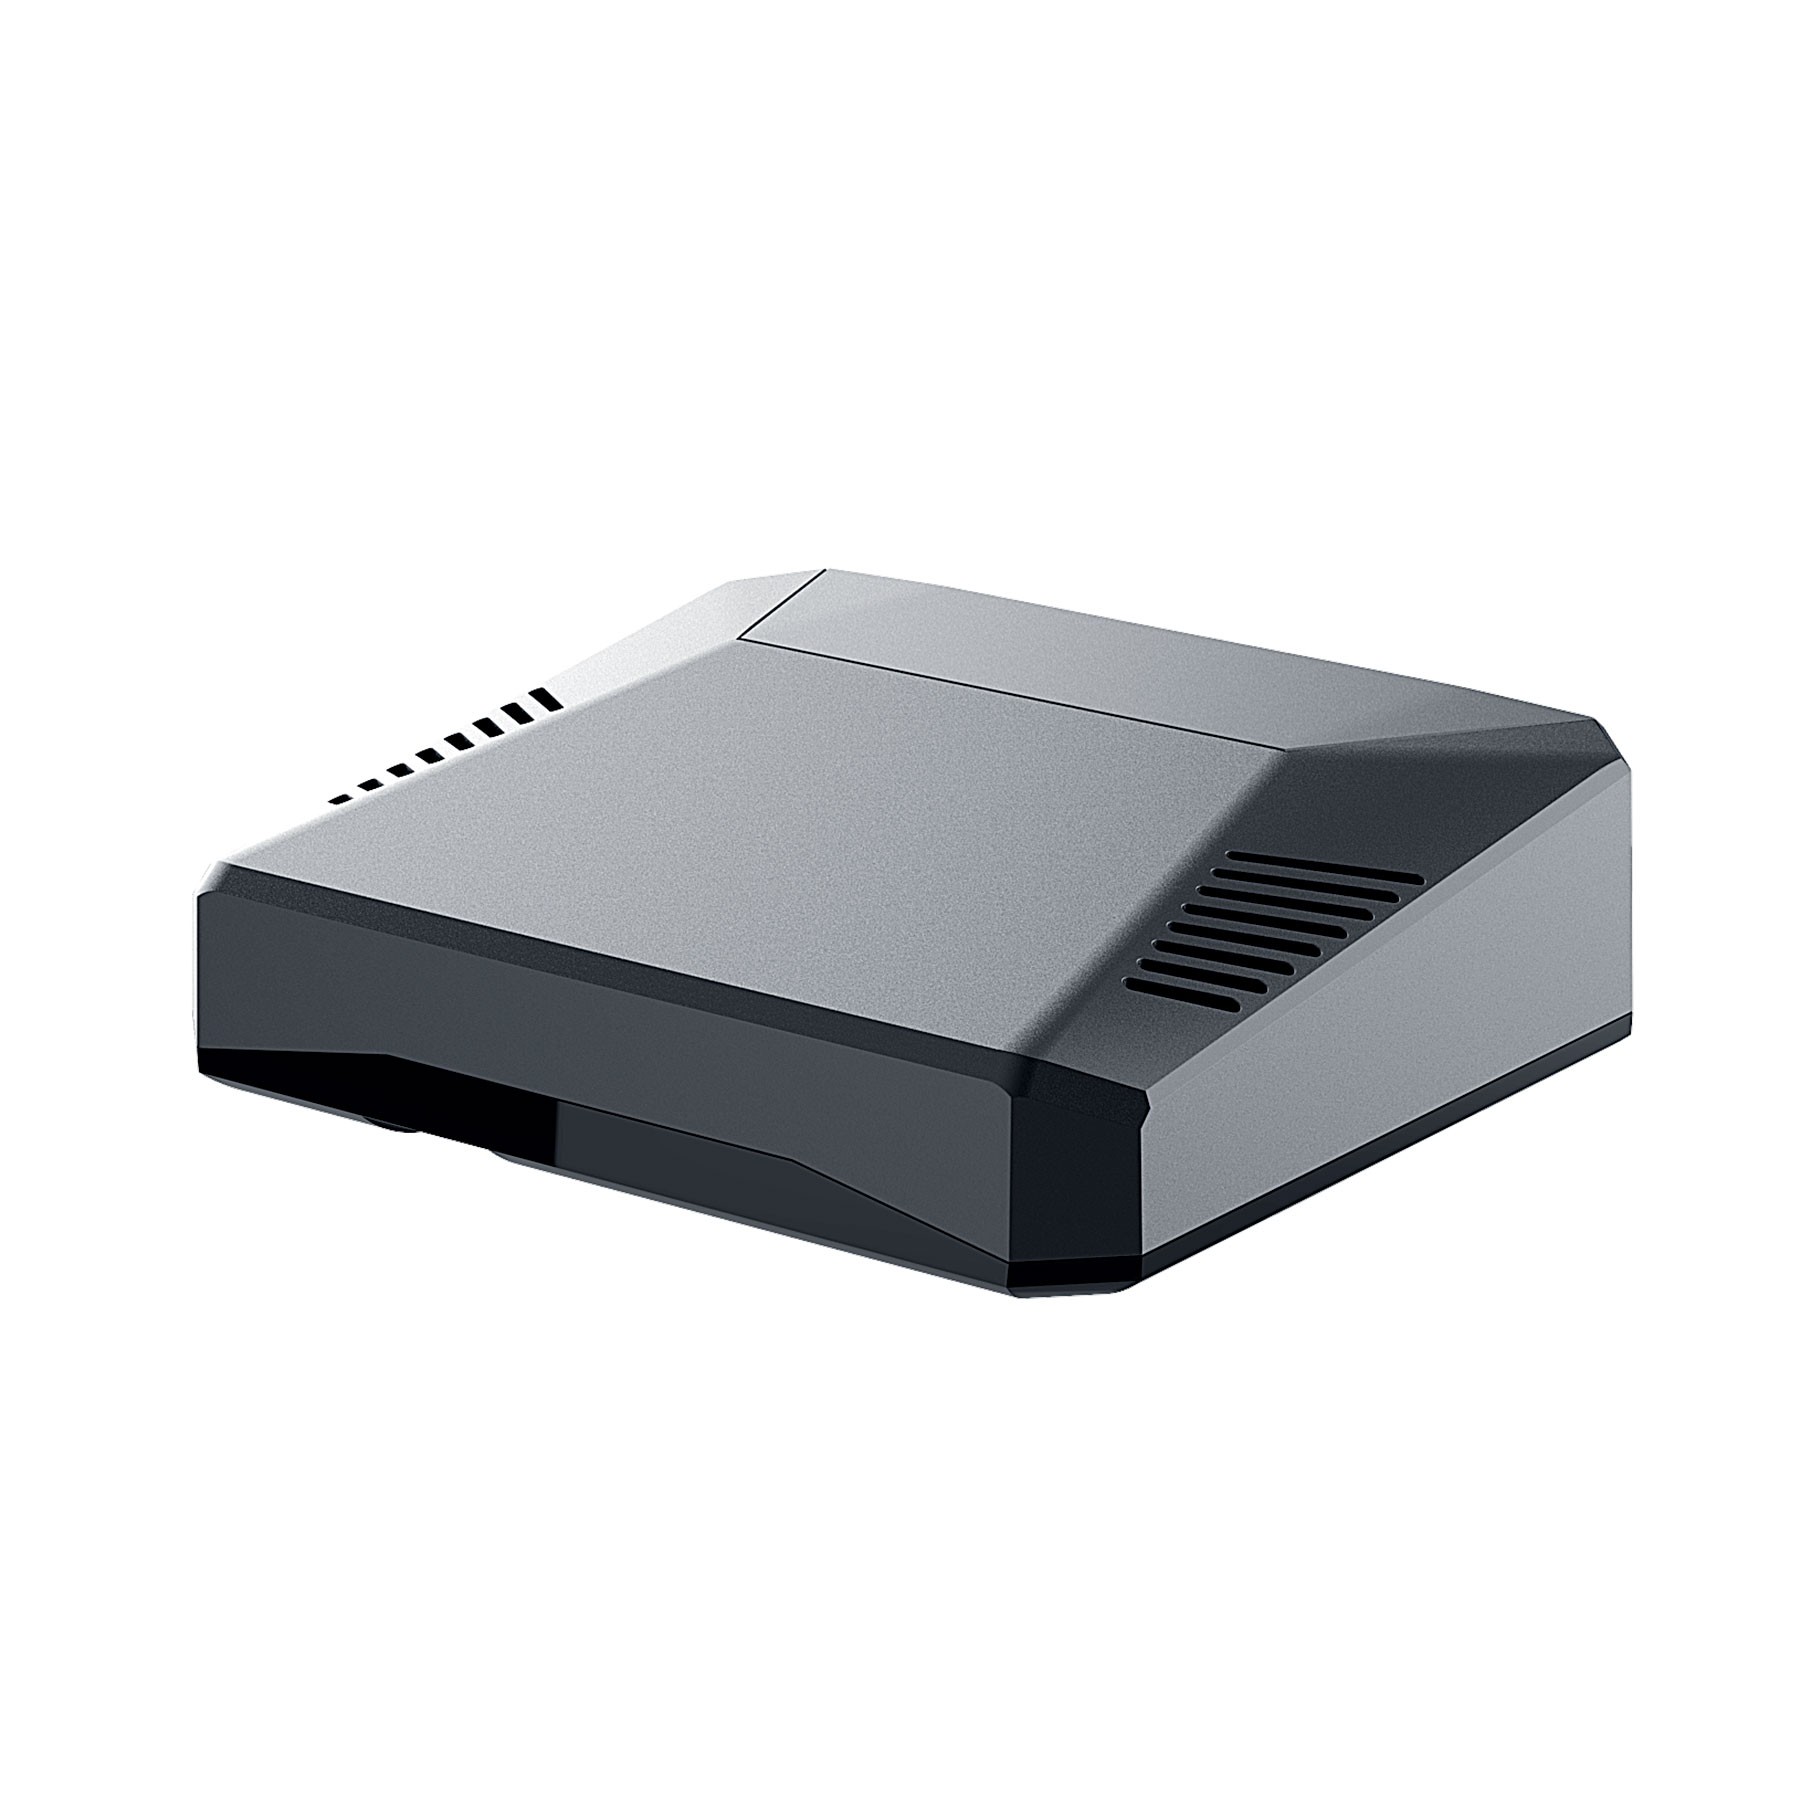
Hardware Installation
Software Installation
- Follow our guide to SSH the Yodeck player.
- Run the command below, and exit the player’s command line when the installation finishes.
curl https://download.argon40.com/argon1.sh | bash
- Login to your Yodeck account, go to Screens→Edit Screen→ Advanced→ Customization and type the below 2 options on the “Raspberry config.txt Override Directives“.
dtparam=i2c_arm=on
enable_uart=1

- Click the Save button and wait for the player to finish the configuration.
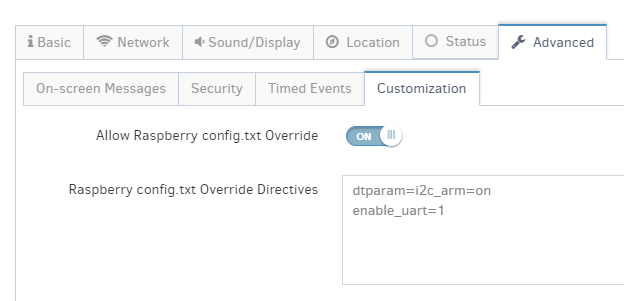
Argon ONE Power Button Functions
The process above will automatically install the configuration that will activate the Argon ONE Power Button with the following functions:
- Pressing the power button while the Pi is off will turn on the Pi.
- Pressing the power button for at least 3 seconds while the Pi is on will safely shut down the Pi and turn it off . This is indicated by the green LED blinking.
- Pressing the power button for less than 3 seconds while the Pi is on will do nothing .
- Pressing the power button twice while the Pi is on will reboot the Pi. This is indicated by the green LED blinking.
- Pressing the power button for at least 5 seconds while the Pi is on will force shut down the Pi. This is indicated by the sudden stopping of the Pi.

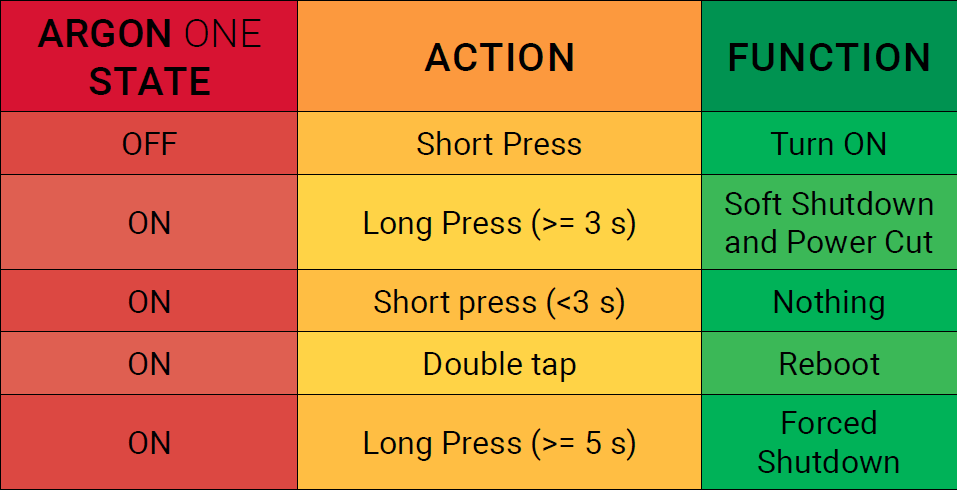
Argon ONE Fan Speed and Temperatures (Default values)
Upon installation of the Argon ONE script by default, the settings of the Argon ONE cooling system are as follows:
- When the CPU temperature is at 55 C , the fan will run at 10% of its maximum speed
- When the CPU temperature is at 60 C , the fan will run at 55% of its maximum speed
- When the CPU temperature is at 65 C , the fan will run at 100% of its maximum speed

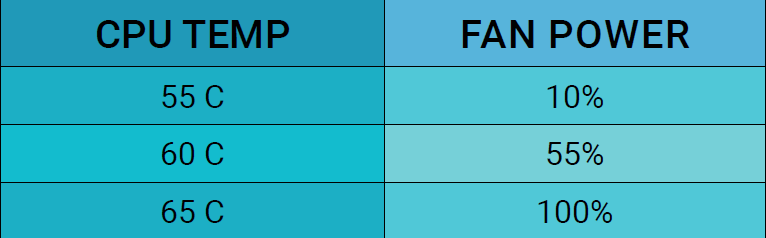
Configuring the Argon’s case fan and temperature values.
Customizing when the fan changes temperature and what speed the fan runs at is possible. To do that, follow the below steps:
- Follow our guide to SSH the Yodeck player
- Run the command below with admin privileges. The Password you will need is the same as you used to SSH the player.
nano /etc/argononed.conf
- After finishing the configuration, save the file and run the below command.
systemctl restart argononed.service
- The fan should start using the new temperature thresholds now.
How Content Transitions Work
In order to provide seamless transitions, the Player performs preloading of the content that follows. Every time a content item is shown on screen, the next item in the Playlist is loaded, so that the transition is as fast as possible.
Think of a Playlist with the following contents:
- Video1
- Widget1
- Widget2
- Image1
- Widget3
Let’s say that Widget1 is on screen. For each transition between two content items (e.g. Widget1 and Widget2, in this case), the Player performs the following steps:
- Widget2 is shown on-screen.
- Widget1 is hidden off-screen.
- Widget2 is started.
- Widget1 is stopped.
- Widget1 is destroyed (resources released).
- Image1 is preloaded off-screen.
For the next transition, the same sequence will occur.
- Image1 is shown on-screen.
- Widget2 is hidden off-screen.
- Image1 is started.
- Widget2 is stopped.
- Widget2 is destroyed (resources released).
- Widget3 is preloaded off-screen.
Content transitions work (almost) the same for all content types, so you should follow these guidelines whenever you create custom Content Viewers or Custom Widgets.