What are the available plug types for the Yodeck Player?
US Plug Type
UK Plug Type
EU Plug Type
AU Plug Type
Last updated on July 31st, 2025
How can I export my screen details?
Learn how to export a CSV report containing information about the screens registered under your Yodeck account. This feature is useful if you need an overview of your screens for auditing, reporting, inventory tracking, or sharing screen data with other teams.
In the full article, you’ll see where to export screen data from within the Yodeck Portal, how workspace selection affects the exported results, and how to include all registered screens by selecting the All Workspaces option. The guide also explains what type of screen information is included in the export and how the report can be used outside of Yodeck.
Think of the Web Player as a way to get Yodeck digital signage on your screens. Specifically, if a device, such as a tablet or PC, has a Chrome-based web browser, including Chrome, Chromium, and Edge, then the Web Player can turn it into a Yodeck-powered digital signage screen.
The Yodeck Web Player offers a valuable option for clients who want a solution that requires almost no setup. Since no hardware or cables are involved, they have to copy the registration number on the screen and paste it into the Yodeck Portal.
✅ More details about the latest Yodeck web player can be found here, and how to set it up.
Last updated on July 31st, 2025
Does the Yodeck player support connecting through an HTTP Proxy?
⚠️ Remember that the guide below refers to the Yodeck players based on Raspberry Pi. More details about what a Raspberry Pi is can be found here.
Yes! You can set the HTTP Proxy and Username/Password through Yodeck. You can also set it through the configuration file on the SD Card, which you can edit through your PC and an SD card reader.
For our Yodeck Players, all Network Settings can be configured when you place your order, so it works great as soon as you plug it in!
Reach out if you need help setting up an HTTP Proxy.
Last updated on July 31st, 2025
Does the Yodeck player support static IP?
⚠️ Remember that the guide below refers to the Yodeck players based on Raspberry Pi. More details about what a Raspberry Pi is can be found here.
Yes! You can set the static network information through Yodeck and the SD Card configuration file. You can edit this configuration file through your PC and an SD card reader.
For our Yodeck Players, all Network Settings can be configured when you place your order, so it works great as soon as you plug it in!
Please feel free to reach out if you need help configuring a Static IP address.
Last updated on July 31st, 2025
Why is my Player running in VGA resolution (640×480 or 1024×768)?
The Yodeck Player (based on Raspberry Pi) automatically detects on start-up the “preferred” resolution of the connected monitor (usually, its native resolution). In some cases, the preferred resolution is not detected properly:
Powering up your Player without a screen connected.
Powering up your Player and screen at the same time (e.g. after a power failure). If your screen is slow on startup, it does not report its resolutions in time to the Player.
In this case, the standard VGA resolution of 640×480 or 1024×768 is used. Rebooting your Player will resolve this issue (temporarily).
If you are having constant issues like this, then you have two options for a permanent solution:
Set the resolution of the Player to a standard one. Your Player will always use this resolution, regardless if you have attached a screen or not, or if the attached screen supports it or not.
Increase the time the Player waits for detecting the screen. This delay is set by default to 3 seconds. You can increase it, to allow your screen to properly start and allow the Player to detect it. To do this:
Go to your Monitor entry in the Yodeck Portal,
Go to the “Advanced” tab, and then click the “Customization” tab
Make sure the “Allow Raspberry config.txt Override” toggle is set to “ON”,
Add the following line to the “Raspberry config.txt Override Directives“, using the number of seconds that works for you: bootcode_delay=8
Make sure you click the “Save” button, so that the configuration you did is saved.
Reach out if you are still having problems!
Last updated on July 31st, 2025
Does Yodeck Player support connecting through a WiFi network?
Yes! You can set the WiFi network name and key through Yodeck. You can also set it using the configuration file on the SD Card, and Yodeck will try to connect. You can edit this configuration file through your PC and an SD card reader.
Seven WiFi modes are supported
“Disabled” deactivates support for wireless networking.
“Find Any Open Network” scans the available wireless networks and connects to the open (unencrypted, without a passphrase or key) with the strongest signal reception.
“No Encryption” connects to the specified open (unencrypted, without a passphrase or key) wireless network.
“Hidden Network” connects to a hidden WiFi network.
“WPA Encryption” connects to the specified wireless network, encrypted using WPA or WPA2, with the specified passphrase or key (PSK).
“WEP Encryption” connects to the specified wireless network, encrypted using WEP (64 or 128 bits), with the specified passphrase or key.
“EAP Encryption” connects to the specified wireless network with the specific username and password.
✅For our Yodeck Players, all Network Settings can be configured when you place your order, so it works great as soon as you plug it in!
⚠️IMPORTANT
Remember that WiFi is slower and less reliable than a wired connection. So, if you have an option between WiFi and wired Ethernet, we recommend using Ethernet.
Last updated on July 31st, 2025
Changing the screen resolution on a Yodeck Player
Yodeck Player Resolution Help
The Yodeck Player (based on Raspberry Pi) is designed to automatically detect the “preferred” resolution of the connected monitor upon start-up. This is usually the native resolution of the monitor. However, there may be instances where the resolution is not detected correctly. This can happen if the Player is powered on without a screen connected or if there is a power failure and the Player starts before the screen has had time to power up and report correctly. The standard VGA resolution of 640×480 or 1024×768 will be used in these cases.
If you are experiencing issues with the resolution on your Yodeck Player, you can take a few steps to resolve the issue. First, try rebooting your Player. This will often solve any resolution issues, and the Player will start displaying content using the TV’s maximum supported resolution.
If the issue persists, you can also try selecting your player’s desired resolution automatically on boot. To do this, edit the option in your player’s Sound/Display tab.
4K Support
It is important to note that the latest Yodeck player supports a 4K resolution. If your TV screen supports 4K resolution, it will automatically start displaying content in that resolution.
We hope this article has helped you understand how to troubleshoot and adjust the resolution on your Yodeck Player. If you continue to experience issues, please don’t hesitate to contact our support team for more help.
Last updated on July 31st, 2025
Warning Icons on the Yodeck Player
Warning Icons on the Yodeck Player based on Raspberry Pi
Two types of warning icons can appear in the right-hand corner of the screen when the Yodeck Player based on Raspberry Pi is not functioning optimally.
Let’s have a look at their significance and how you can troubleshoot.
Lightning / Thunderbolt / Thunder Icon
This indicates that the power supply is unstable, the player is underpowered, and this situation could lead to corruption of the SD card and overall instability.
Switching to a new power adapter is best as soon as possible.
Raspberry Pi 2 needs a 5V/2A power adapter
Raspberry Pi 3B and 3B+ needs a 5V/2.5A power adapter
Raspberry Pi 4 needs a 5V/3A power adapter
Temperature / Thermometer Icons
The thermometer icons mean the Player’s main chip is hotter than usual.
The half-red thermometer icon means that the Player’s chip temperature is between 80 and 85℃, and the Player will throttle the CPU (decreasing performance) in an effort to keep the temperature below 80℃.
The completely red thermometer icon means that the Player’s chip temperature is above 85’C and the Player will throttle both the CPU and GPU (decreasing performance even further) in an effort to keep the temperature below 85℃.
Why the overheating?
Most probably, content pushed to players is somehow too “heavy”. You might not realize it, but adding too many Playlists or transparent content might put too much of a burden on the Player.
What can you do?
Here are some possible remedies:
Try removing some content, combining multiple Widgets into single Apps, or contacting our support team and asking for help to optimize your Layout or content.
Add a passive heat sink. They are cheap. Note that our Players come pre-installed with an aluminum case, which provides better heat anticipation.
Try using a metal case instead of a plastic one. If using a case with a cover (like the Official Raspberry Pi case we ship over with our Players), try removing the cover to allow the chip to cool.
Place the Player in a well-ventilated space.
How to disable both icons
You can override standard behavior and disable both icons. Make sure that you understand the risks of doing so.
Go to the “Monitors” list and edit the monitor in question.
Click on the “Advanced” tab.
Ensure the “Allow Raspberry config.txt Override” toggle is set to “ON“.
In the “Raspberry config.txt Override Directives” text area, you will have to enter the following configuration line:
avoid_warnings=1
After you are finished, click the “Save” button.
The Player will reboot, and you are set to go.
Keep this in mind!
We do not recommend that you remove the warning icons without troubleshooting. You should investigate this and fix the issue rather than ignore the warnings.
Last updated on July 31st, 2025
Why does my screen show the message “No Space Left”?
All players use local storage to download and store the media you push.
This avoids constant streaming and allows players to maintain playback despite losing internet access.
To find out the amount of storage your player uses, look at the “Status” tab, the line that reads “Storage.”
The “Status” tab is on the right side of your screen’s details page. Click the screen name in the “Screens” listing to go to the screen’s details page.
If you push several media simultaneously with their total size larger than the available storage, your player will fail to download the new media.
In such case, your screen will display a red text message at the bottom right corner: “No Space Left.”
The status on the Yodeck portal will be “Downloading.” The player will not change its playback and will keep playing the old media.
Last updated on July 31st, 2025
Can I use the Composite output instead of the HDMI?
Yes, you can!
For the Raspberry Pi 4, please follow the steps below.
You can use the composite (analog) video format on the Raspberry Pi 4 by plugging an RCA cable into the audio jack.
Beyond that, you will also have to type the following settings in the “Raspberry config.txt Override Directives” text box:
disable_fkms=1
hdmi_force_hotplug=0
hdmi_enable_4k=0
hdmi_enable_4kp60=0
enable_tvout=1
To do that, follow these steps:
Log in to the Yodeck portal.
Go to “Screens” and edit the Screen in question.
Go to the “Advanced” tab.
Enable the “Allow Raspberry config.txt Override” toggle button.
Click “Save”.
Wait for the player to finish the configuration, and after a couple of minutes, you should now see the output on the composite port of your Raspberry Pi 4.
Last updated on April 3rd, 2026
Do the Yodeck players support touch screens?
Intro
Touchscreen technology has advanced greatly since its inception, and it is safe to say that it has revolutionized the way we interact with our devices. Today, we are proud to announce that we have finally caught up with this technology and are now offering support for touchscreen devices.
The ever-increasing demand for more intuitive and user-friendly devices drove the decision to support touchscreen technology. With touchscreens, users can easily interact with their devices through simple gestures, swipes, and taps, making using them more natural and intuitive.
In addition, touchscreen devices are becoming more ubiquitous in our daily lives. Touchscreen technology is everywhere, from smartphones to tablets, laptops, and even digital kiosks. Supporting this technology makes it easier for users to interact with our products and services.
Which Yodeck players support the Touch Functionality?
Currently, ALL Players support this functionality.
Where do I enable this option?
Edit the Web Player or the Android player you want to have Touch capabilities
In the Interactivity Tab, enable the TouchScreen option
Save the player’s form
⚠️ Bear in mind that this will work only for Web Pages and Apps. Images, Videos and Documents are not supported yet. For example, if you have a Playlist, you cannot go back, forward or skip a media. We will work on and release this in the near future.
Last updated on July 31st, 2025
Does Yodeck support dual screens/monitors using the two HDMI ports on the Player?
Currently, we do not support using both HDMI ports on the Yodeck 4K Player (Raspberry Pi 4).
Why?
If you want to show identical content on two screens, then you can always use a $5 HDMI splitter. This way, you can even drive more screens using larger 1-to-10 HDMI splitters. The real question is for driving 2 screens with different content on each. The latest version of our hardware platform, the Raspberry Pi 4, provides two micro-HDMI ports for connecting two screens. However, the hardware has several restrictions when it comes to supporting a dual-screen setup.
Here are the most important restrictions
The dual 4K screen setup is limited to a refresh rate of 30Hz. Normally, a refresh rate of 60Hz is supported for 4K screens, but adding a second screen limits output to 30Hz. While this is not a significant restriction, it does affect playback quality.
There is only 1 hardware decoder for video, making it difficult to show two different videos on the two screens.
Actually, there is 1 hardware decoder for video encoded in the H.265 format (supporting up to 4K video) and 1 hardware decoder for video encoded in the H.264 format (supporting up to 1080p video). However, this means that we need to have videos in multiple formats just to allow playback of different videos on the two screens.
The Player cannot turn both screens on and off.
The Player uses the HDMI-CEC protocol for turning screens on and off. Unfortunately, CEC support is only provided for the primary screen, so the second screen cannot be turned off and on based on a schedule.
The hardware cannot handle Layouts on two screens, especially if one is running at 4K.
The Player has a hardware component called “compositor”. The compositor takes the different layered content (e.g., video, overlayed images, RSS tickers, etc.) and combines them in a single output. If the compositor is overloaded, then the output turns black. And this is out of our control. Currently, the compositor may be overloaded at 4K, even with a single screen.
Besides the hardware restrictions, building support for dual screens also has several implications on the software side. Not all of our users are tech-savvy; we have HR and marketing departments purchasing Yodeck, and we cannot explain all the above restrictions in a clear way during their (short) evaluation of what we provide. It is much better to leave out the dual-screen option and keep it simple for everyone.
Special Project
For special projects over 1000 units that might need dual-screen support, we can investigate it as a special customization. As a mainstream feature for all customers, dual-screen support is not a priority right now. We might provide it down the road, but not in the near future.
Supported HDMI port (Raspberry Pi4)
Last updated on April 3rd, 2026
List of compatible USB WiFi antennas for the Yodeck player
If you’re using a Yodeck player (based on Raspberry Pi) with insufficient WiFi signal strength, you could buy a USB WiFi antenna to increase the signal strength.
Here is a list of models that are known to work well based on their chipsets and driver support:
⚠️Note: The list is indicative and not exhaustive.
✅ The models listed below are plug-and-play and don’t require additional configuration.
Chipsets
Models
Chipset
Realtek
TP-Link TL-WN822N v3
rtl8192cu
MediaTek
Panda AC600 Dual Band Wireless (PAU0B)
mt7610u
MediaTek
Panda AC1200 Dual Band Wireless (PAU0D)
mt7612u
Atheros
TP-Link TL-WN722N
TP-Link TL-WN725N
ath9k_htc
Panda
Panda Ultra Wireless-N Adapter (PAU03)
rt2800usb
1. Realtek Chipsets
rtl8192cu
Models: TP-Link TL-WN822N v3
2. MediaTek Chipsets
mt7612u
Models: Panda AC1200 Dual Band Wireless (PAU0D)
mt7610u
Models: Panda AC600 Dual Band Wireless (PAU0B)
3. Atheros Chipsets
ath9k_htc
Models: TP-Link TL-WN722N, TP-Link TL-WN725N
4. Panda Wireless Chipsets
rt2800usb
Models: Panda Ultra Wireless-N Adapter (PAU03)
Last updated on July 31st, 2025
List of compatible 3G/4G USB dongles for the Yodeck player
If you’re using a Yodeck player (based on Raspberry Pi) at a location without Ethernet or WiFi, you could buy a 3G/4G USB dongle for internet connectivity.
Here is a list of models that are known to work well based on their chipsets and driver support:
⚠️Note: The list is indicative and not exhaustive.
✅ The models listed below are plug-and-play and don’t require additional configuration.
Brand
Model
Huawei
E398
Huawei
E3372-325
Huawei
E173
D-Link
DWM-222
ZTE
MF833U1
ZTE
MF190S
Last updated on July 31st, 2025
How can I set up my Yodeck devices/players?
How to Set Up Your Yodeck Devices
Setting up your Yodeck devices is quick and easy. Follow the steps below to get started.
How-to Video
Step 1: Gather Your Materials
Before you set up your Yodeck devices, please make sure you have all the necessary materials. You will need:
Yodeck Player
HDMI cable
Power Adapter
All the above are included inside the delivery box.
You might also need the following to connect the player to the internet if you did not preconfigure your players to connect to a wireless network upon making your order.
Ethernet cable (a.k.a LAN cable or RJ45)
Wired Windows keyboard
Once you have all of these materials, you are ready to begin the setup process.
Step 2: Connect Your Yodeck Device
Start by connecting your Yodeck device to your display screen using the HDMI cable. Then, plug the power adapter into the device and connect it to a power source. Your device should power on automatically.
Step 3: Connect to the Internet
Next, you will need to connect your Yodeck device to the internet. You can do this by connecting an Ethernet cable from your device to your router, or by connecting to a Wi-Fi network. If you are using Wi-Fi, have the network name and password handy.
Step 4: Log in to Your Yodeck Account
Once your device is connected to the internet, you can log in to your Yodeck account.
Step 5: Configure Your Device
After logging in, you will be prompted to configure your device. This includes setting up your content, time zone, and other settings. Make sure to review and adjust these settings as needed.
Step 6: Start Displaying Content
Congratulations! Your Yodeck device is now set up and ready to display your content. You can start uploading and scheduling content to be displayed on your device immediately.
If you encounter any issues during the setup process, please don’t hesitate to refer to our documentation for troubleshooting tips or contact our support team for assistance.
Thank you for choosing Yodeck for your digital signage needs. We hope you enjoy using our platform!
Last updated on December 2nd, 2025
What does the “Preparing Content” message mean?
Upon completion of the initial download of your content on your Player, a “Preparing Content” message will appear in the bottom right corner of your screen. This message signals that your content is undergoing encoding and rendering processes to transform it into a continuous stream optimized for your specific settings and screen resolution. During this stage, various elements such as video quality, audio synchronization, and playback settings are fine-tuned to ensure an optimal viewing experience on your Player.
💡Do not reboot the player at this stage. If the Preparing content appears for more than 30 minutes and the player is not displaying anything other than a black screen, please contact our Support team!
Last updated on July 31st, 2025
What is the true voltage operating range for a Yodeck Player (Raspberry Pi 4)
To function properly, the Raspberry Pi 4 typically requires a power supply that provides 5V with a current of at least 3A, totaling a minimum power of about 15.3W. It is crucial to use a reliable power source to avoid issues like under-voltage warnings or unexpected shutdowns, especially when using peripherals or running demanding processes.
You can get a 5ft (1.5m) Official Power supply USB-C from this link.
Last updated on July 31st, 2025
Yodeck Players and Captive Portals
What is a Captive Portal?
A Captive Portal is a web page displayed to users when they connect to a public Wi-Fi network. It typically requires users to agree to terms of service, log in, or enter credentials before they can access the internet. Captive portals are commonly used in places like cafes, airports, hotels, and other public areas to control network access and authenticate users.
Yodeck Players and Captive Portals
Currently, Yodeck players do not support captive portals. This means that if your network requires users to access the internet through a captive portal, the Yodeck player won’t be able to connect. The device cannot interact with these login or authentication pages, which can prevent it from accessing the necessary network resources to operate.
Workaround: Whitelisting the Player’s MAC Address
There is a workaround if your network supports MAC address whitelisting. You can ask your IT team to whitelist the Yodeck player’s MAC address. This will allow the player to bypass the captive portal and connect directly to the internet without needing to authenticate. Here’s how to proceed:
1. Locate the Yodeck Player’s WiFi MAC Address: You can find this information on the Yodeck dashboard or the device itself.
2. Contact the IT Team: Provide the MAC address to the IT team and request that they add it to the whitelist.
3. Verify the Connection: Once whitelisted, the player should be able to connect to the network without encountering the captive portal, allowing it to function as intended.
This approach ensures your Yodeck player maintains a stable network connection with captive portals.
Last updated on July 31st, 2025
Why am I getting the “The registration code given does not match the player type” error message?
Yodeck Player Types
Yodeck supports a wide range of player types, giving you the flexibility to choose the best option for your digital signage needs. With more than 8 different player types available, you can easily find the perfect fit for your business.
Here are the player types currently supported by Yodeck:
Yodeck Player (Raspberry PI 4B)
Web Player
Brightsign
Android
WebOS (LG)
FireOS
Tizen (Samsung)
Windows
Each player type has a unique first digit on the registration code that appears on the TV screen. This code is used to connect your player to your Yodeck account and start displaying your content.
When creating a new Screen entry on your Yodeck account, it is important to select the correct player type that matches the registration code displayed on the TV screen.
For example, if your registration code starts with 8-XXX-XXXX, you must select the FireOS Player type when creating your Screen entry. Trying to use a different player type with this registration code will result in an error.
It is also worth noting that each player type has its own unique features and capabilities.
In conclusion, Yodeck offers a variety of player types to suit your specific needs and preferences. Make sure to select the correct player type when creating your Screen entry to ensure a smooth and seamless experience with your digital signage.
Last updated on July 31st, 2025
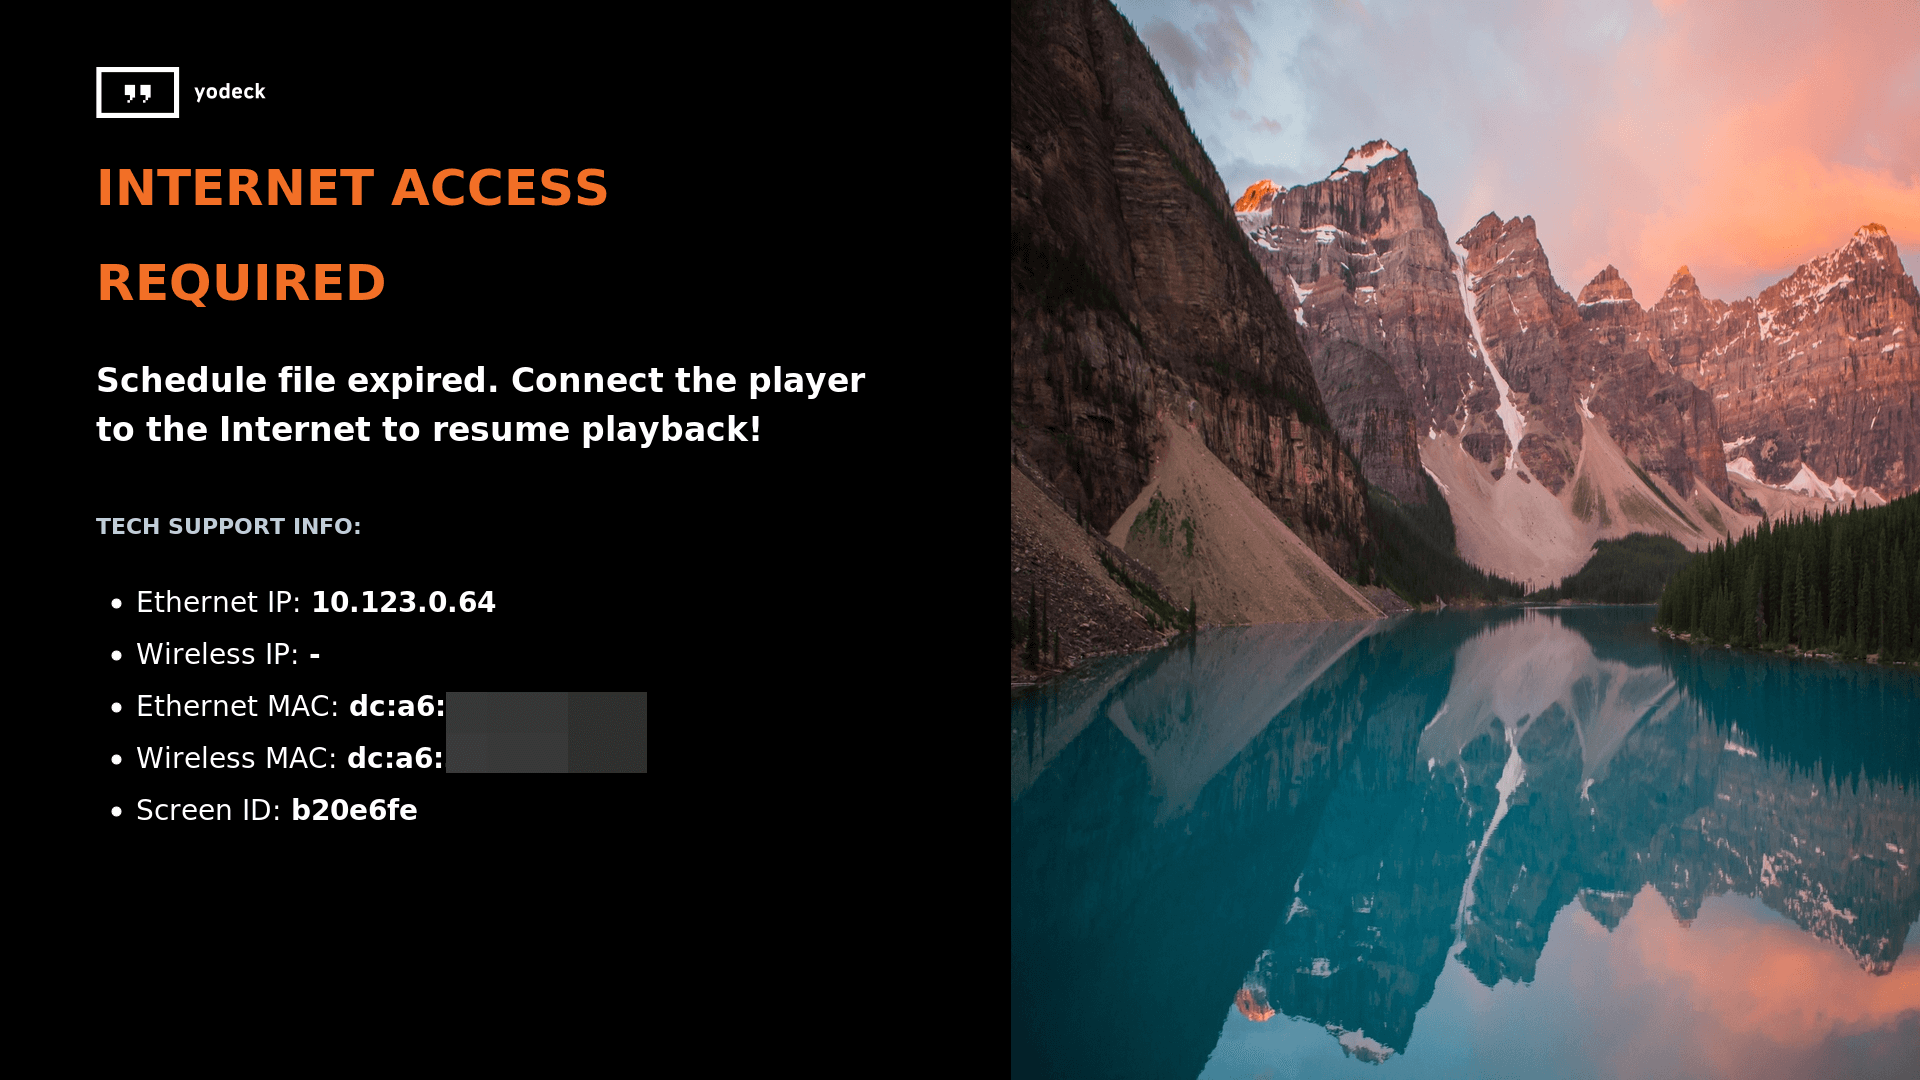
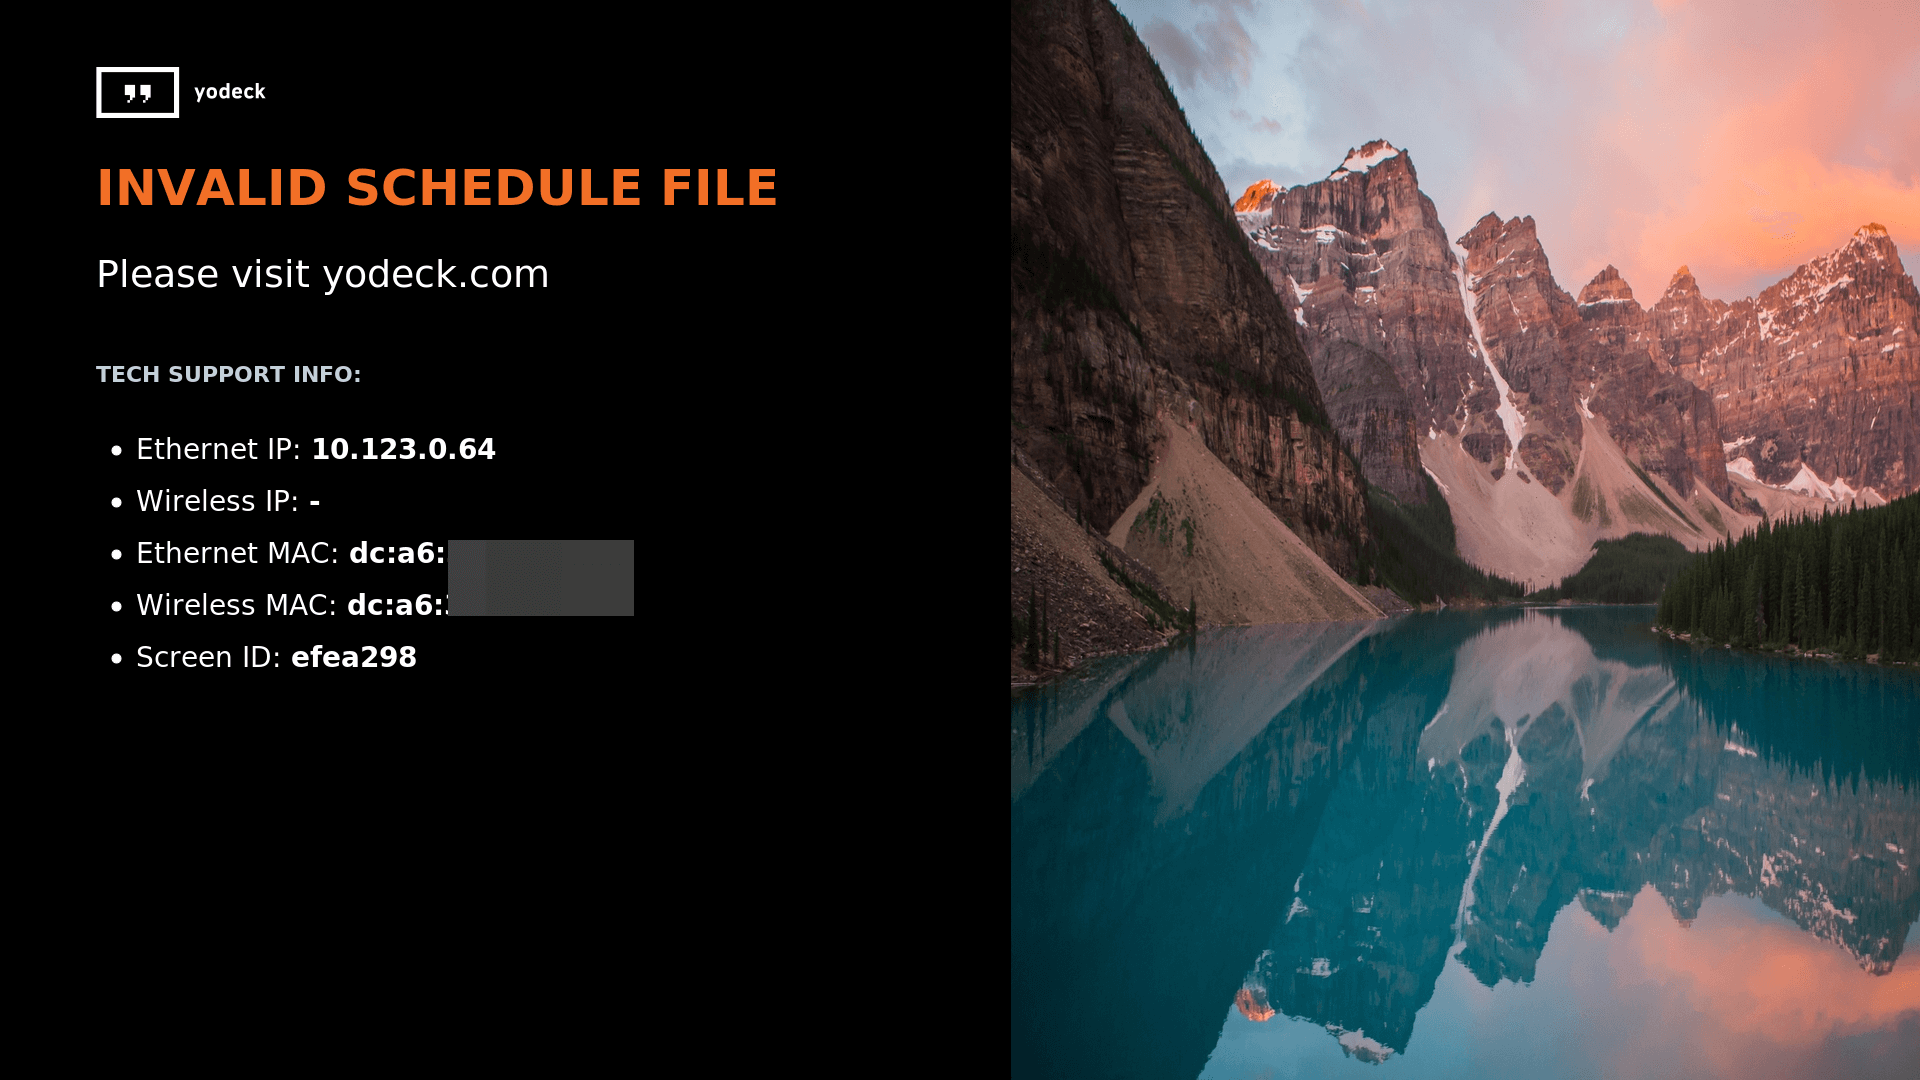
What is the “Internet Access Required” or the Invalid Schedule File” error message?
Player Cannot Access Our Servers
When you power on the player and see the message below, the player cannot access our servers. This is a network issue, and a few actions will need to be performed on your end to bring the player back Online.
As shown below, your local network might block the player’s connection with the Yodeck servers if you see an IP on the Ethernet or the Wireless section.
The player doesn’t acquire an IP address
To solve the issue, please follow the below quick steps.
Please temporarily connect the Yodeck player to your router/switch using an Ethernet cable. After that, you can follow this article to pair the player to a wireless network.
Please make sure that the Ethernet cable has access to the internet. You can quickly test that the Ethernet cable is fully functional by plugging one end into your laptop and the other into your router/switch to see if you can surf the internet.
If an Ethernet cable is not an option, please use the WiFi wizard to connect the Yodeck player to your Access Point (router) again.
The player has acquired an IP address
To solve this case, please ensure that the below ports have been enabled on your network. For more details, please click this article here.
Last updated on December 2nd, 2025
What is the “Player Already Registered” error message?
Player Already Registered to Another Account
If you see the below message, it means that the player is already registered to another account.
If you are trying to register a player to your account and receive this message, it means that the player is already registered to a different account. This could be due to a previous registration or a mistake during the registration process.
To resolve this issue, please contact our tech support team. They can further investigate the specific issue and guide you on how to solve it.
Our tech support team can be reached through various channels, such as email or live chat. Please provide them with the necessary information, such as the player’s name and any relevant details about the issue.
Once our tech support team has identified the issue, they will guide you accordingly on how to solve it. This may involve transferring the player’s registration to your account or resolving any technical issues that may be causing the problem.
Last updated on July 31st, 2025
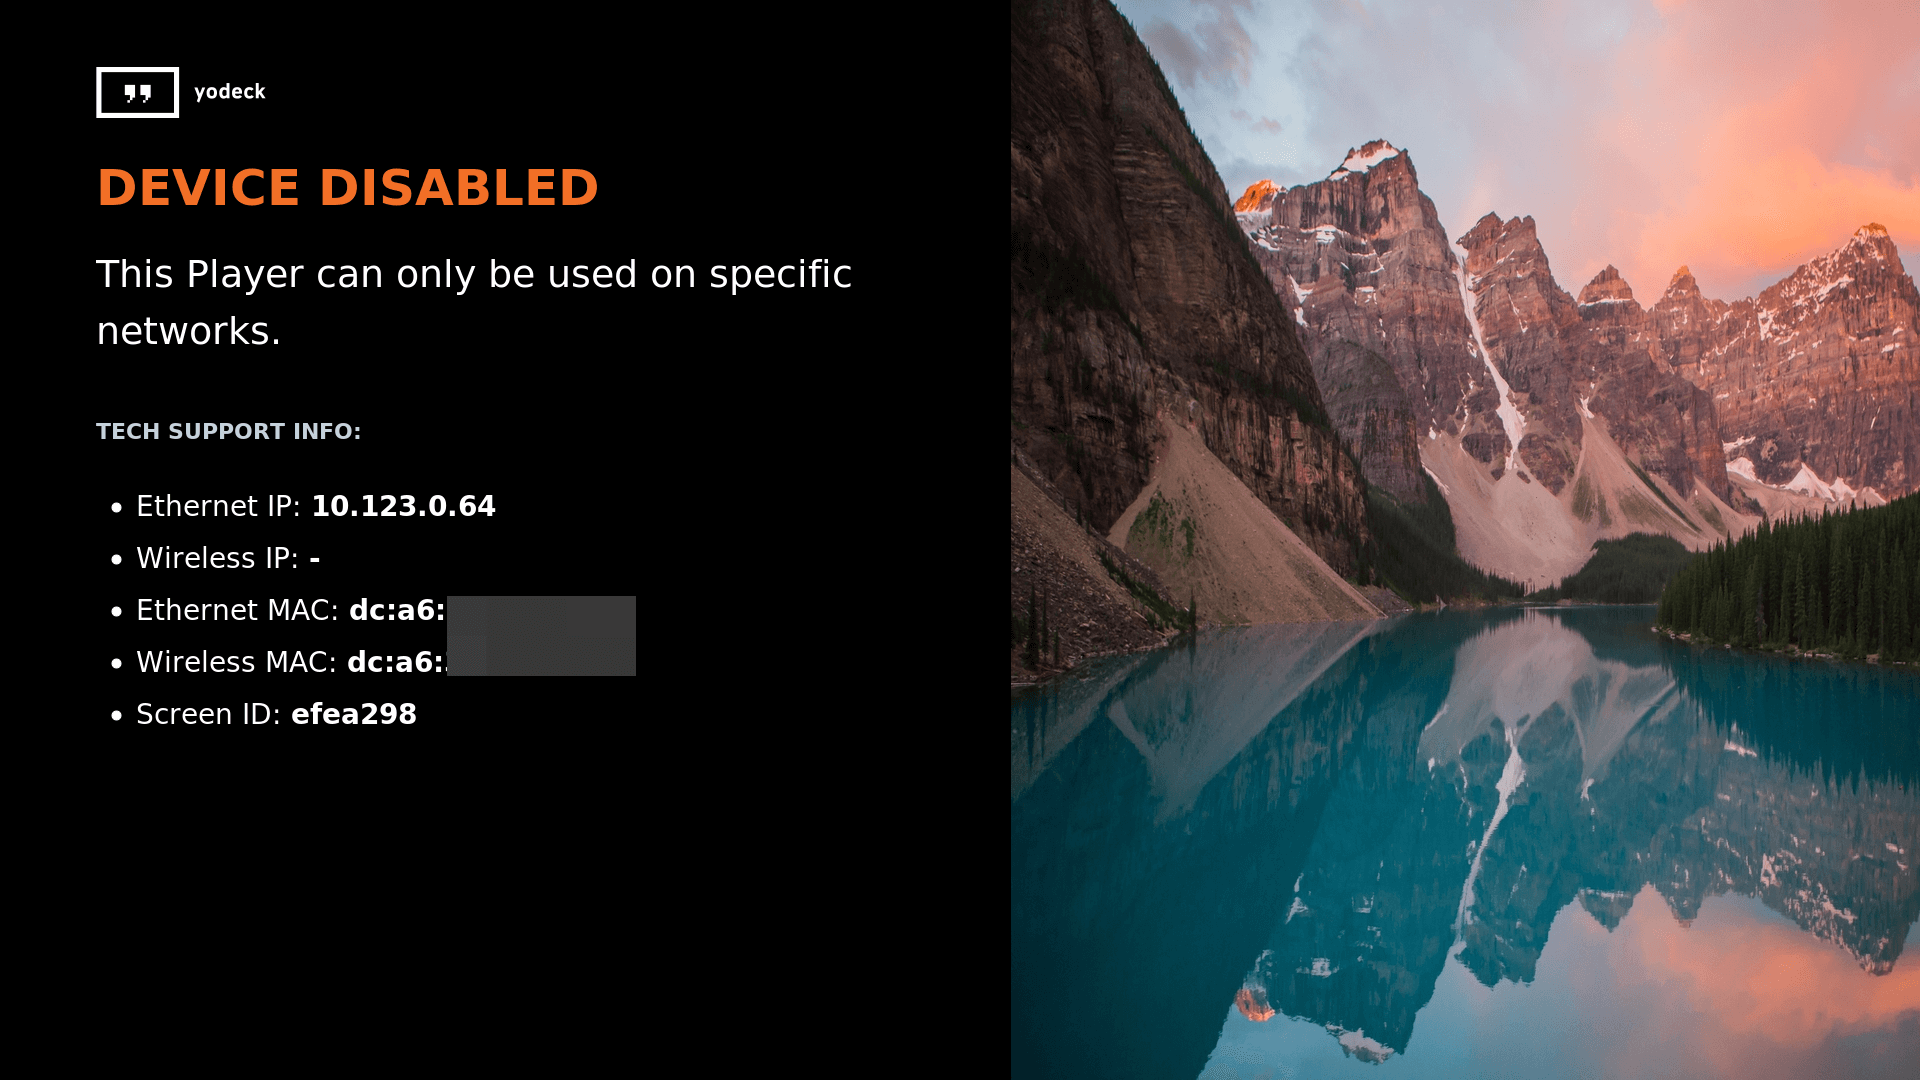
What is the “Device Disabled” error message?
Device Disabled Due to Subscription Reasons
If you see this error message, it means that your device has been disabled due to subscription reasons. This can happen if your subscription has expired or if there is an issue with your payment method.
To resolve this issue, please reach out to our Success team at success@yodeck.com. Our team will guide you on how to reactivate your player and get it up and running again.
In order to ensure uninterrupted service, it is important to keep your subscription up to date and ensure that your payment method is valid. If you are experiencing any issues with your subscription or payment, our Success team will be happy to assist you.
If you have any other questions or concerns, please don’t hesitate to reach out to us. We are here to help and ensure that your experience with Yodeck is smooth and hassle-free.
Last updated on July 31st, 2025
What is the “No Content Assigned to Player” error message?
No Content Assigned to Player
This message is informative. It says that your player has already been registered under your account. The only thing you have to do now is assign content to that player and display it on the TV screen. To do that, please follow the steps provided below.
Login to your Yodeck account, and on the left panel, click the Screen’s section or follow this link.
You can choose the Screen of your choice.
Choose the Schedule of your choice.
Choose the Default Content (Layout, Playlist, App or Media).
After assigning the content to your Screen, click the Save button.
Remember to “push” the content to your Screen(s) by clicking the orange flashing button on your browser’s top right.
Last updated on March 3rd, 2026
Comprehensive Tech Guide for Installing and Setting Up Yodeck/Unbranded App on Windows via ZIP file
If you want to display digital signage content on your Windows device, you must download and install the Yodeck app. This article will guide you through the process of downloading and installing the app on your Windows device.
⚠️This guide is an alternative option if the .exe installation process fails for some reason. We strongly recommend trying the .exe guide first, as mentioned here:
The first step is to download the latest package zip for the Yodeck app. Depending on whether you are using Yodeck or Unbranded, you can download the package zip from two different sources.
This command will allow the app to run on your device.
Step 6: Follow the Readme File
The readme file, located in the unzipped installation package folder, describes all app installation and uninstallation scripts. To complete the installation process, make sure to follow the instructions in the readme file.
Step 7: Navigate to Your Folder
Once you have completed the installation process, navigate to your folder using the following command:
cd ../..
Step 8: Execute the Command
Once you are in your directory, execute the following command:
.Install-SignageOS.ps1
This will complete the installation process and prompt you to input your password for the Kiosk account.
Step 9: Restart Your Computer
After the installation is finished, you can close the PowerShell window and restart your computer. This will ensure that the app is installed correctly and ready to use.
Step 10: Display the Registration Code
Once your device has restarted, it should display the 9-digit code ready for registration. This means that the app has been successfully installed and is ready for digital signage.
Congratulations, you have successfully downloaded and installed the Yodeck app on your Windows device. If you encounter any issues during the installation process, please take a look at the readme file or contact our support team for help.
Last updated on July 31st, 2025
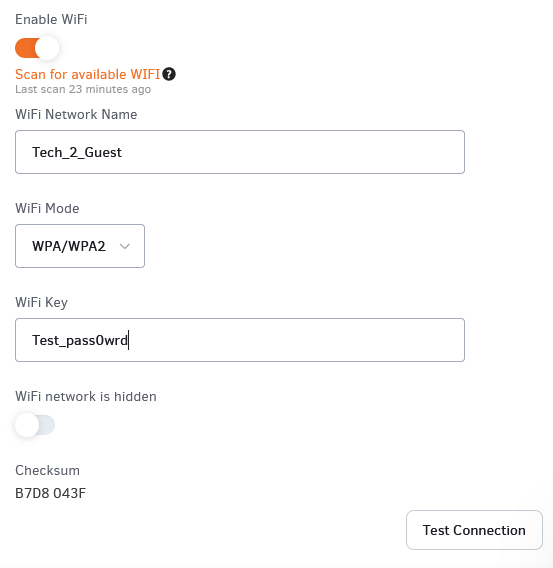
Scan for available WiFi
⚠️ The below option is available only for the Yodeck Players based on Raspberry Pi.
The “Scan for Available Wi-Fi” feature detects nearby Wi-Fi networks and provides a list of accessible connections for your device. If the player cannot initiate a scan, it indicates that Wi-Fi networks are currently out of reach.
To connect, select the desired network (SSID), enter the password, and click “Test Connection.” The player will then attempt to connect. A successful connection will display a green checkmark on the test connection button, while an incorrect SSID or password will result in a red cross.
When you see the green mark, you are ready to save the screen’s form!
Why are these actions disabled?
This is an action that can be performed only if the player is Online.
If your player doesn’t have internet access and therefore reports as offline, this option will be “greyed out” (disabled), meaning you won’t be able to use it until the player is back online.
To bring the player back Online, please follow one of the following methods:
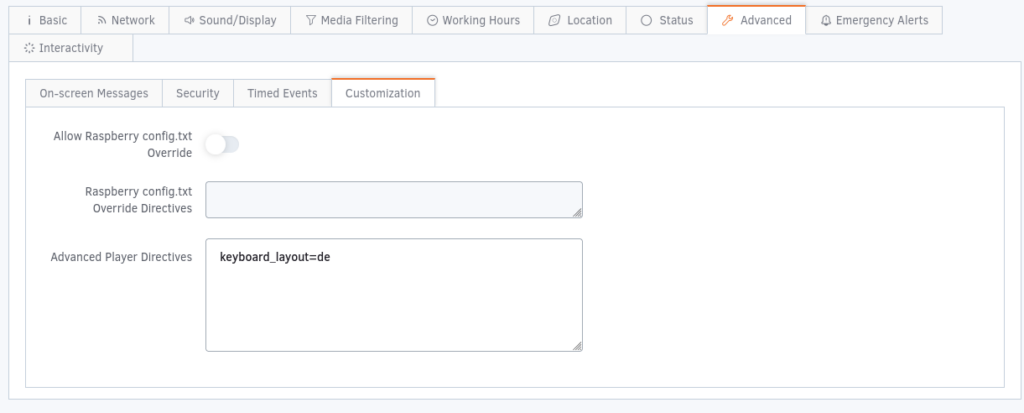
How to change the keyboard layout for Yodeck players
You can use the following directive to change the layout of a keyboard connected to your Yodeck player based on the Raspberry Pi board.
In this example, the layout will be changed to German.
keyboard_layout=de
The directive must be applied in the Advanced Player Directives on the Yodeck portal, as shown in the image below.
The Advanced Player Directives box can be found in the Customization tab under the Advanced tab.
After applying the configuration, press the Save button once. As long as your screen is online, your player will update its local settings.
It is recommended that your player be rebooted after a few minutes using the Actions button on the portal.
Note: the above applies to physical keyboards
Last updated on January 31st, 2025
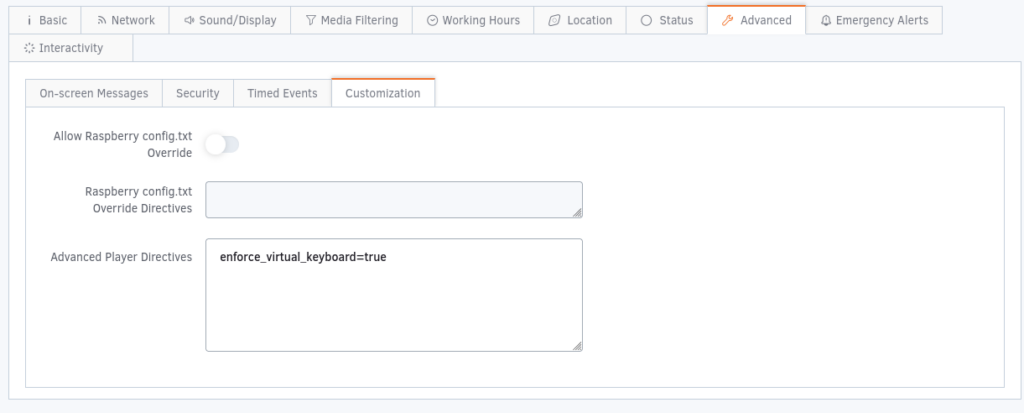
How to enforce the virtual keyboard on Yodeck players
You can override any current restrictions on the virtual keyboard on your Yodeck players based on the Raspberry Pi board, with the following configuration directive.
enforce_virtual_keyboard=true
Setting it to true ensures that the virtual keyboard will function regardless of the type of screen, layout, etc.
The directive must be applied in the Advanced Player Directives on the Yodeck portal, as shown in the image below. Ensure that the virtual keyboard is enabled in the Interactivity tab.
The Advanced Player Directives box can be found in the Customization tab under the Advanced tab.
Requirements:
1) Your media must contain web content displayed with Chromium
2) The virtual keyboard must be enabled in the Interactivity tab
3) Either enable the Always on toggle button in the Interactivity tab or touch on an input field on the web content loaded with Chromium
Important: Ensure it does not overlap with videos or the Ticker app, which may cause unexpected behavior.
Last updated on January 31st, 2025
How to Reduce Your Screen Brightness with Layouts and Schedules in Yodeck
Intro
Managing your screen brightness at specific times can enhance visibility and energy efficiency.
In this guide, we’ll show you how to use Yodeck’s Layouts and Schedules to dim your screens based on time.
Step 1: Duplicate Your Layout
Open your Yodeck dashboard and navigate to the Layouts section.
Select the layout you want to dim.
Duplicate the layout to create a copy.
The original layout will remain unchanged, and the duplicated one will be used for dimming.
Step 2: Add a Clipart for Dimming
In the duplicated layout, click the Elements button at the left toolbar of the editor.
Select a Clipart from the menu.
Choose a square shape and add it to the layout.
Resize the square clipart to cover the entire layout area.
Drag the edges of the clipart until it fully overlays the content.
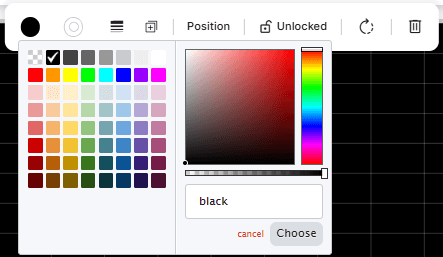
Step 3: Adjust the Clipart Transparency
Select the clipart you added.
In the Clipart Settings contextual toolbar on the right, adjust the following:
Set the Outline Thickness to 0.
Fill Color: Click the More button in the color picker.
Use the transparency slider to reduce the brightness by adjusting the opacity.
Move the slider to the left until you achieve the desired level of dimming.
Save the Layout:
Once the dimmed layout is ready, click Save to ensure the changes are stored.
Note
The more you move the transparency slider to the left, the dimmer your screen will appear.
Step 4: Schedule Your Layouts
Navigate to the Schedules section in Yodeck.
Create a new schedule or edit an existing one.
Add the original layout to the schedule for the time periods you want (e.g., daytime hours).
Add the dimmed layout to the schedule for the time periods you want reduced brightness (e.g., evening or nighttime hours).
Save the schedule.
Step 5: Assign and Push the Schedule to Your Screen
Assign the schedule to your screen(s) in the Yodeck dashboard.
Push the updated schedule to your screen(s) by clicking Push to Screens.
The changes will be applied to your screen(s) immediately.
Visual Reference
Before Dimmed Layout
.
After Dimmed Layout
Following these steps, you can effectively manage your screen brightness at specific times.
Last updated on October 21st, 2025
How to create content for your Yodeck Screens – A comprehensive guide
If you’re looking for guidance and inspiration on how to create the content you want to show on your yodeck screens, you’ve come to the right place. Let’s dive in!
Content Τypes
In Yodeck, you have multiple content types to choose from and display on your screens:
Media: Ranging from simple images and PDFs to videos and web pages. It includes files that you can upload from your local computer and links from the web.
Apps: Dynamic content that gets updated automatically based on your preferences. It ranges from simple apps like clocks or weather apps to more complex ones like Power BI dashboards, birthday celebrations, and calendars.
Layouts: Custom screen compositions, where you can combine multiple assets (media, apps, playlists) to create a unique display according to your needs.
Playlists: A sequence of different assets looping constantly on your screen, like a slideshow. Again, each slide can be any of the above content types.
Uploading Content
You can start by uploading some content in the form of your own media files. Simply navigate to the Media section, click “Add Media” and start uploading images, videos, documents and more. Most of the available media types are supported.
Linking Content
Alternatively, yodeck lets you link web content and add it as media in your library. Youtube videos, links to web images, online documents, and most importantly, web pages can be added and then displayed on your screens. You’ll find all of these options in the Media section as well.
Note
For most web links, the screen needs to be connected to the internet for them to work.
Creating Content
After you’ve added your content, either in the form of files or links, you can now start creating. The content type that you choose will depend on your specific needs and desires. Let’s take a closer look.
Do you need to integrate yodeck with your existing systems or apps?
Then, you need to create a yodeck app. Navigate to the Apps section and browse the App Gallery, where you’ll find dozens of integrations with popular apps, along with the ability to create dynamic content updated automatically (e.g., weather reports, news feeds, or social media).
Do you want to combine multiple assets and showcase them sequentially on your screen?
In that case, a playlist is the perfect fit for you. Navigate to the Playlists section, start with a Classic Playlist, and simply drag and drop your assets on the film strip, to create the perfect sequence for your screens. You can easily control the duration of each slide, and even preview your playlist before saving.
Do you want to create a screen composition with different regions of your screen showing different content?
Well, Layouts are your best friend. Go to the Layouts section and click “Add Layout”. Start with a template (we have over 1000 pre-made templates to help you get started), or if you feel creative, you can create your own from scratch.
Building a layout means adding all the different assets you’ve already created and then arranging them on your screen as you like. Each asset is a layer that you can move, resize, crop or even overlap above other layers. The possibilities are endless.
Again, don’t forget that you can preview your creation before saving.
You can combine all of the above
Apps can be added to Playlists or Layouts. Playlists can also take up part of a Layout, where some content continuously loops while the rest of the screen remains static. And vice versa, any layout you create can be added to a playlist.
Assigning Content to Screens
So, you’ve created your content, but now you need to assign it to one or multiple screens. No content will be shown on your screens if it hasn’t been assigned to a screen. Think of all of your assets as a repository. You can pick anything from that repository and assign it to your screen, which will eventually be displayed.
Navigate to the Screens section, select the screen you want to update, and check the “Screen Content” field. This is what will be displayed when no “Scheduled Content” has been added (learn more about Schedules). Choose the content piece you want (Media, App, Playlist, Layout) and save your screen.
Pushing to Screens
You’re almost there! The final step to show your content on the screen is to click “Push to Screens”. You can think of this as a “Publish” button, where all of your screens are updated based on what you’ve assigned to them.
Video Tutorial
Need Help?
The Yodeck Support Team can help you out! Log in to your Yodeck account and send us a message from the bottom right corner!
Last updated on October 3rd, 2024
How to Flash an SD Card with Raspberry Pi Imager for Yodeck
Overview
In this guide, you’ll learn how to flash a Yodeck image to an SD card using Raspberry Pi Imager2.0 and prepare your Raspberry Pi for setup. We’ll walk you through the full process, from selecting your device and storage to writing the image and starting the player for the first time. Once the SD card is ready, you can insert it into your Raspberry Pi, power it on, and register it in your Yodeck account.
What is Raspberry Pi Imager?
Raspberry Pi Imager is the official tool from Raspberry Pi for writing operating system images to SD cards and other storage devices.
In this guide, you’ll use it to flash a Yodeck image to an SD card, so your Raspberry Pi can boot as a Yodeck player. The app guides you through selecting your device, choosing the image, picking the storage media, and writing everything to the card.
Before You Start
Before you begin, make sure you have the following:
A stable internet connection
A Windows 10/11, macOS, or Linux computer
A microSD card with at least 8GB storage space for the Yodeck image
A compatible SD card reader or adapter (or any SD card adapter compatible with your computer)
This tutorial uses both our custom Raspberry Pi 4 image file and our official Yodeck Digital Signage Software that is available inside the Imager’s list of Digital Signage OSs.
Your Raspberry Pi device
A Yodeck account to register the player after first boot
⚙️Backup: Flashing an SD card will erase all data currently stored on it. Remember to back up any important files before continuing.
ℹ️Good to know: Depending on your setup, you may either select Yodeck from the available OS list in Raspberry Pi Imager or load a Yodeck image file manually.
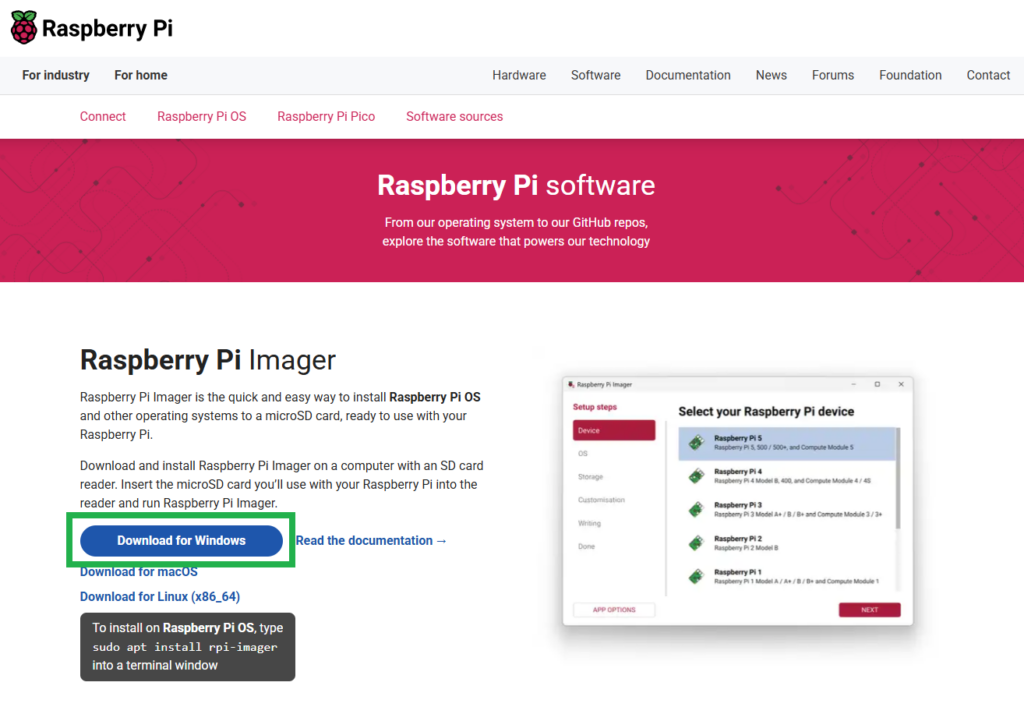
Next, click “Download for Windows” to download the Raspberry Pi Imager installer.
Run the installer and complete the setup.
Open Raspberry Pi Imager.
ℹ️Note: The exact installation steps may vary slightly depending on your operating system (Windows, Mac, Linux), but the setup process is straightforward on all supported platforms.
Flash a Yodeck Image to an SD Card
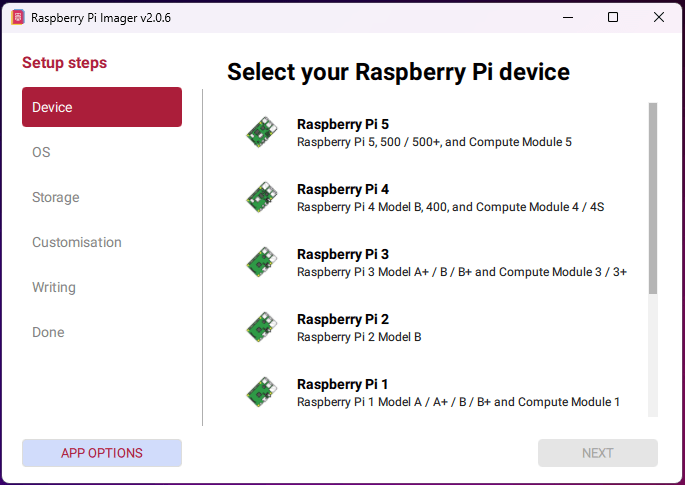
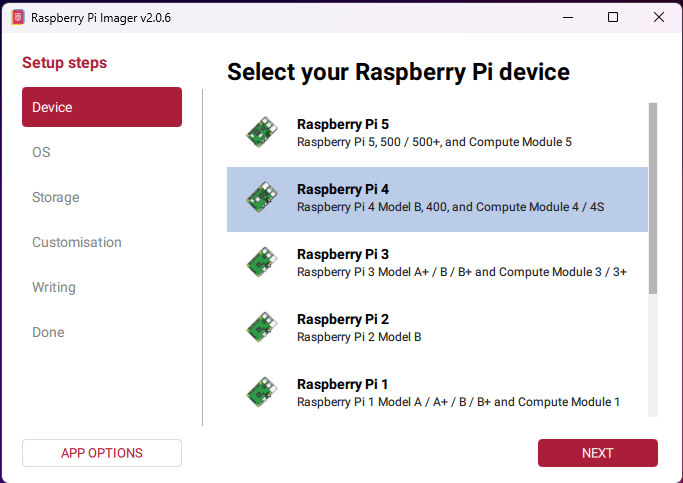
Step 1: Select Your Raspberry Pi Device
When Raspberry Pi Imager opens, the first step is to select your Raspberry Pi model.
Choose the device you want to use for your Yodeck player. This helps the app present the most relevant options for your hardware.
💡Tip: Select the Raspberry Pi 4 model you plan to use.
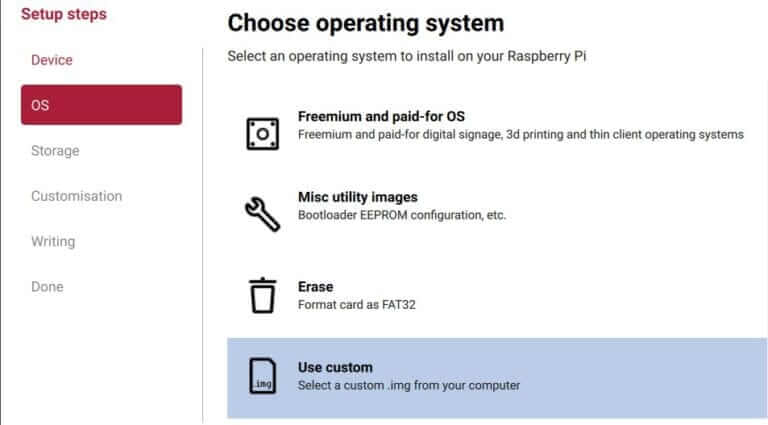
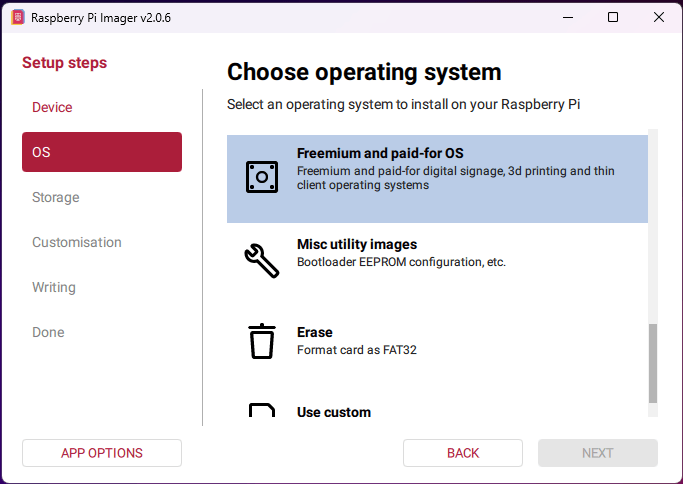
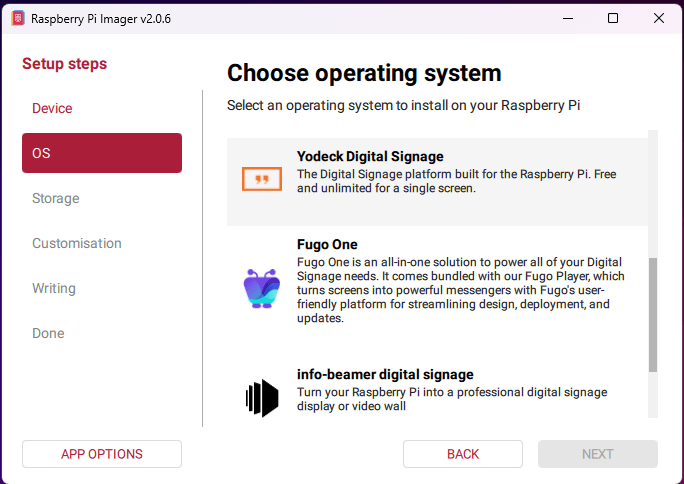
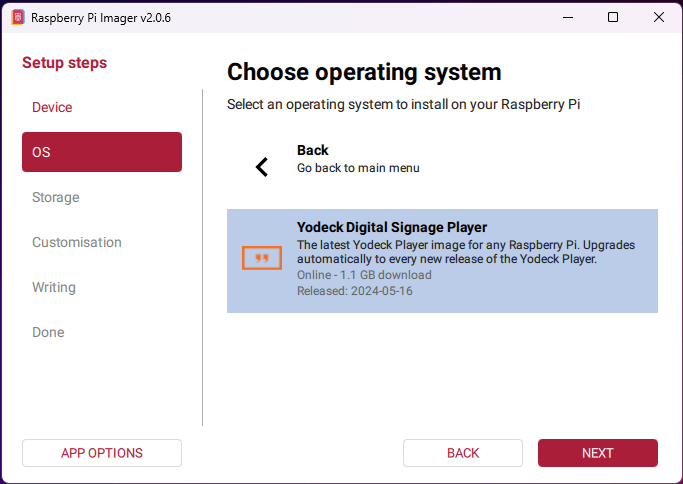
Step 2: Choose the Operating System
Next, move to the OS step. At this point, you can either select Yodeck from the available operating system options or load a Yodeck image file from your computer.
Option A: Use a custom Yodeck image file
If you have downloaded the Yodeck image file mentioned earlier, select the option to load a custom image and browse to the image file on your computer after unzipping it.
ℹ️Important: Make sure you use the correct Yodeck image for your Raspberry Pi model.
Option B: Select Yodeck from the available OS list
Since Yodeck appears in the list of available operating systems, select it by complete all four of the following operating system sub-steps in order from Freemium and paid-for OS (B1) to Yodeck Digital Signage Player (B4):
Select: “Freemium and paid-for OS” > “Digital signage OS” > “Yodeck Digital Signage” > “Yodeck Digital Signage Player“.
B1
B2
B3
B4
Afterwards, you can continue to the next step (#3).
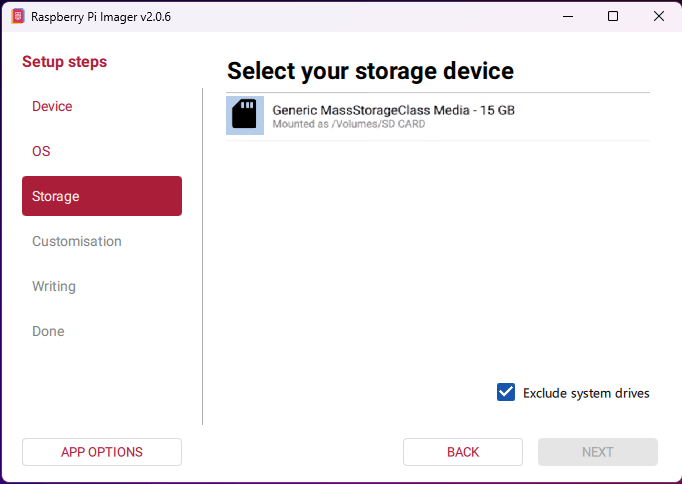
Step 3: Select the Storage Device
Insert your microSD card into your computer.
In the Storage step, choose the correct SD card from the list of available devices.
Before continuing, double-check that you selected the correct storage device, and that the checkbox option “Exclude system drives” is enabled (this option prevents you from accidentally selecting one of your operating system drives and formatting it).
⚠️Warning: All data on the selected storage device will be erased during the flashing process.
Step 4: Review the Customisation Step (Optional)
Before writing the image, Raspberry Pi Imager may show a Customisation step.
This section can include options such as:
Hostname
Localisation
Username and password
Wi-Fi settings
Remote access settings
Raspberry Pi Connect (API)
ℹ️Depending on the image you are using, some of these settings may be available, limited, or unavailable.
Do you need to change anything here?
In most Yodeck setups, you can keep this step simple. If you are preparing a player for a standard deployment, you usually do not need to change anything unless your setup requires specific network or device settings. You may want to review these options if:
you are preparing multiple players in advance,
you need to preconfigure Wi-Fi,
the player will be installed in a hard-to-reach location,
or your environment has specific networking requirements.
ℹ️Best practice: Only change settings you actually need. Keeping the setup simple reduces the chance of errors.
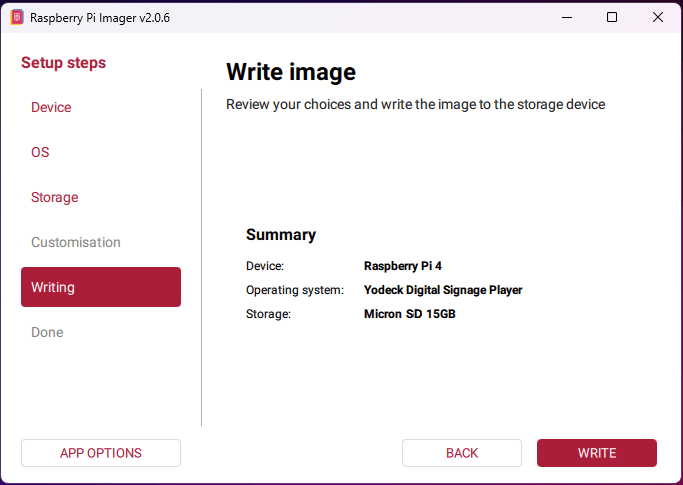
Step 5: Write the Image
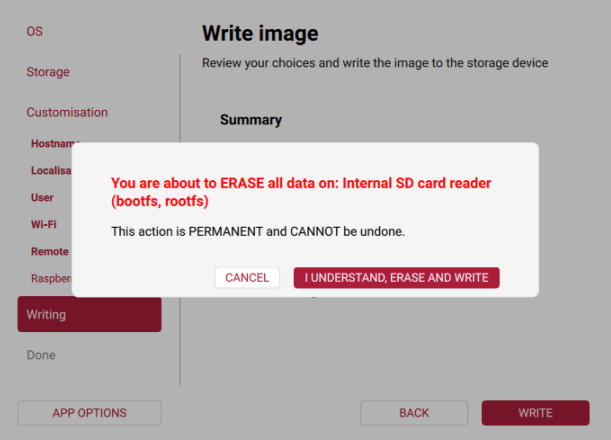
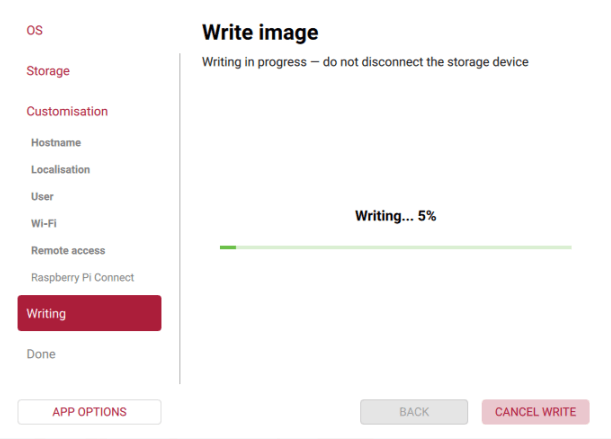
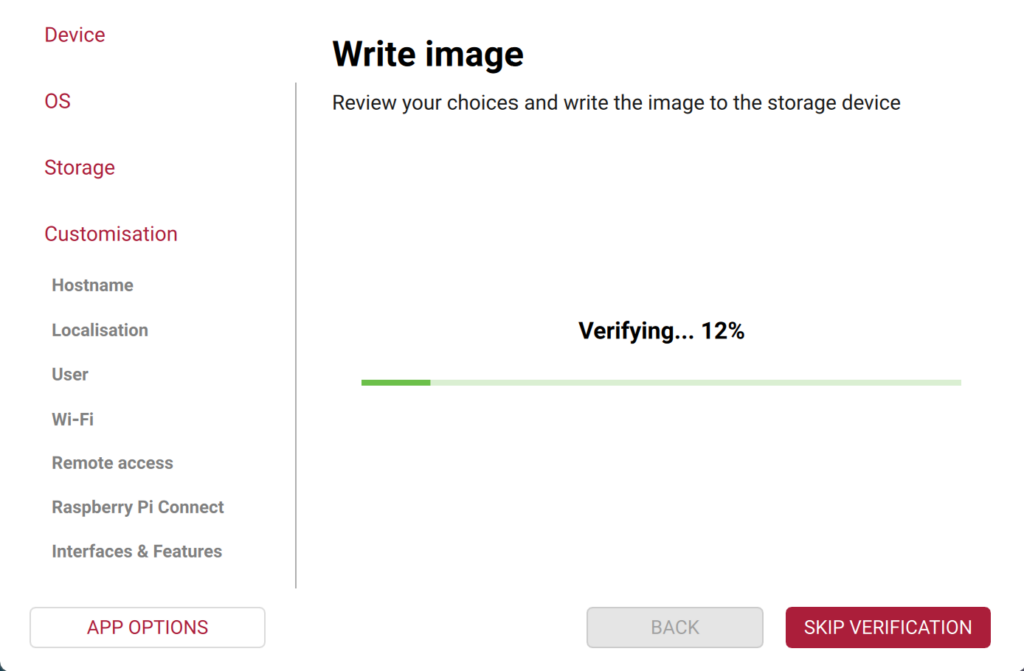
After reviewing your selections, continue to the final step and start the write process. Raspberry Pi Imager will write the Yodeck image to the SD card. Here, there are five sub-steps to the write process:
5.1: Visual verification of the Imager’s summary, prior to the writing.
5.2: Accepting the warning message on the SD card’s total erasure.
5.3: Initialization of writing the image to the SD card.
5.4: Automatic verification of the written data to the SD card.
5.5: Completion of the writing process with a success message.
5.1
5.2
5.3
5.4
5.5
⚠️Note: Wait until the process is fully complete before physically removing the SD card from the SD card reader. Do not remove the SD card while the write process is still running, since data corruption can occur.
Boot Your Raspberry Pi
Once the flashing/writing process is complete:
Safely eject the microSD card from your computer.
Physically remove it from the SD card reader device.
Insert it into your Raspberry Pi.
Connect the Raspberry Pi to your display using HDMI.
Connect the device to the network via a LAN cable if possible.
Finally, connect the power plug on the Raspberry Pi to power it on.
ℹ️The Raspberry Pi will begin its first boot and initialization process. This may take a few minutes, depending on the device, image, and network conditions.
⚠️Important: Do not unplug the Raspberry Pi while it is booting, configuring itself, or downloading required files.
✅If everything goes as expected, the player should eventually show a registration code on screen.
Register Your Raspberry Pi in Yodeck
Once the player finishes booting, you should see a registration code on the connected screen.
To register the Raspberry Pi player in your Yodeck account:
Log in to your Yodeck account.
Open the Screens section.
Click + Add Screen.
Enter the registration code shown on your display.
Click Save.
✅After a short while, your Raspberry Pi player should appear in your account and begin receiving content.
💡Tip: If you see a connectivity-related error instead of a registration code, check the player’s network connection first. Using Ethernet is often the fastest way to rule out local Wi-Fi issues.
F.A.Q.s
Got questions? We’ve got answers! This section addresses common questions about flashing an SD card with the Yodeck software via the Raspberry Pi Imager.
Can I use Raspberry Pi Imager with a downloaded Yodeck image?
Yes. You can load a custom Yodeck image file directly from your computer during the setup process.
Do I need to change anything in the Customisation step?
Not always. Most Yodeck setups can proceed without changing anything there. Only adjust the settings if your deployment requires it.
What should I do if I do not see a registration code on screen?
First, check the player’s network connection and make sure the Raspberry Pi has completed its first boot process.
Can I use Raspberry Pi Imager on macOS or Linux?
Yes. Raspberry Pi Imager is available for Windows, macOS, and Linux.
What happens if I select the wrong storage device?
The selected device will be erased during flashing, so always double-check the storage device before you continue.
Need Help?
The Yodeck Support Team can help you out! Log in to your Yodeck account and send us a message from the bottom right corner!
Last updated on April 3rd, 2026
How to reflash your Yodeck player
Ways to reflash a Yodeck Player
There are two different ways to reflash a Yodeck player: The Etcher method The USB method (Recommended)
Unzip the zip file you downloaded and save the unzipped image file on your hard drive.
💡It should be a single IMG file of about 3.2GB.
Download Etcher and install it. Etcher is an SD card image writing/verification tool that works on Windows, Mac, and Linux.
💡If Etcher, for some reason, fails, you can use the Pi Imager instead.
Power off the player, remove the SD card from the Yodeck Player, insert it into your SD card reader, and then into your PC or laptop.
💡If any windows pop up on your screen upon placing the SD card on your PC or laptop, ignore and close all of them.
Run Etcher, select the unzipped Yodeck image file from your hard drive, select the SD card to write the image to, and then click the “Flash!” button.
After completing Etcher, you will be prompted to remove the SD card. Remove the SD card and place it back into the Yodeck player.
Connect your Yodeck Player via HDMI to your TV/Monitor and connect it with an Ethernet cable.
💡If you don’t have an Ethernet cable and want to use a WiFi connection, please follow this guide.
Power up the Yodeck Player and wait for the initialization process to complete. It may take up to 5′ to finish.
Upon completion, you should see a message on the screen connected to the Pi, showing either a Registration Code or a message with a connectivity error (in case there is no Internet access).
Ensure you do not remove the Yodeck player’s power plug until you see one of these message screens. At all times, if the player is showing a blinking message in the bottom-right corner of the screen (“Loading,” “Configuring,” “Downloading,” etc.), you should not remove power to minimize the risk of interrupting a critical procedure.
After completing the above procedure, your player should recover, connect to the Internet, and download content. Eventually, it will begin to play back!
Reflashing the SD card using the USB method (Recommended)
The player is resilient to hardware and system failures. But, as with any device, there is a slight chance that the player may fail. In the case of a software failure, you might be able to recover your player by “reflashing” it with the latest software. Reflashing will erase the player’s content (re-writing the whole SD card from scratch). Your settings will be retained, so your player should re-apply all settings in the system, re-download all required content, and resume playback without you doing anything.
If you are an advanced user, remember that the only thing retained from the existing content is the “SETTINGS.txt” file containing all settings. Any manual changes you made to the image through the command line will be lost ( e.g., manually changing passwords, config.txt manually, adding other software, etc.).
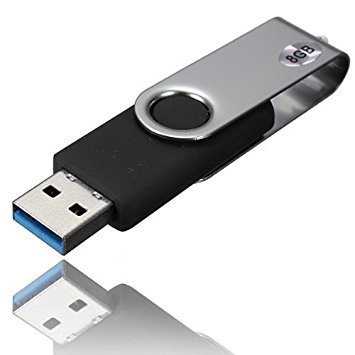
Preparing the USB flash drive
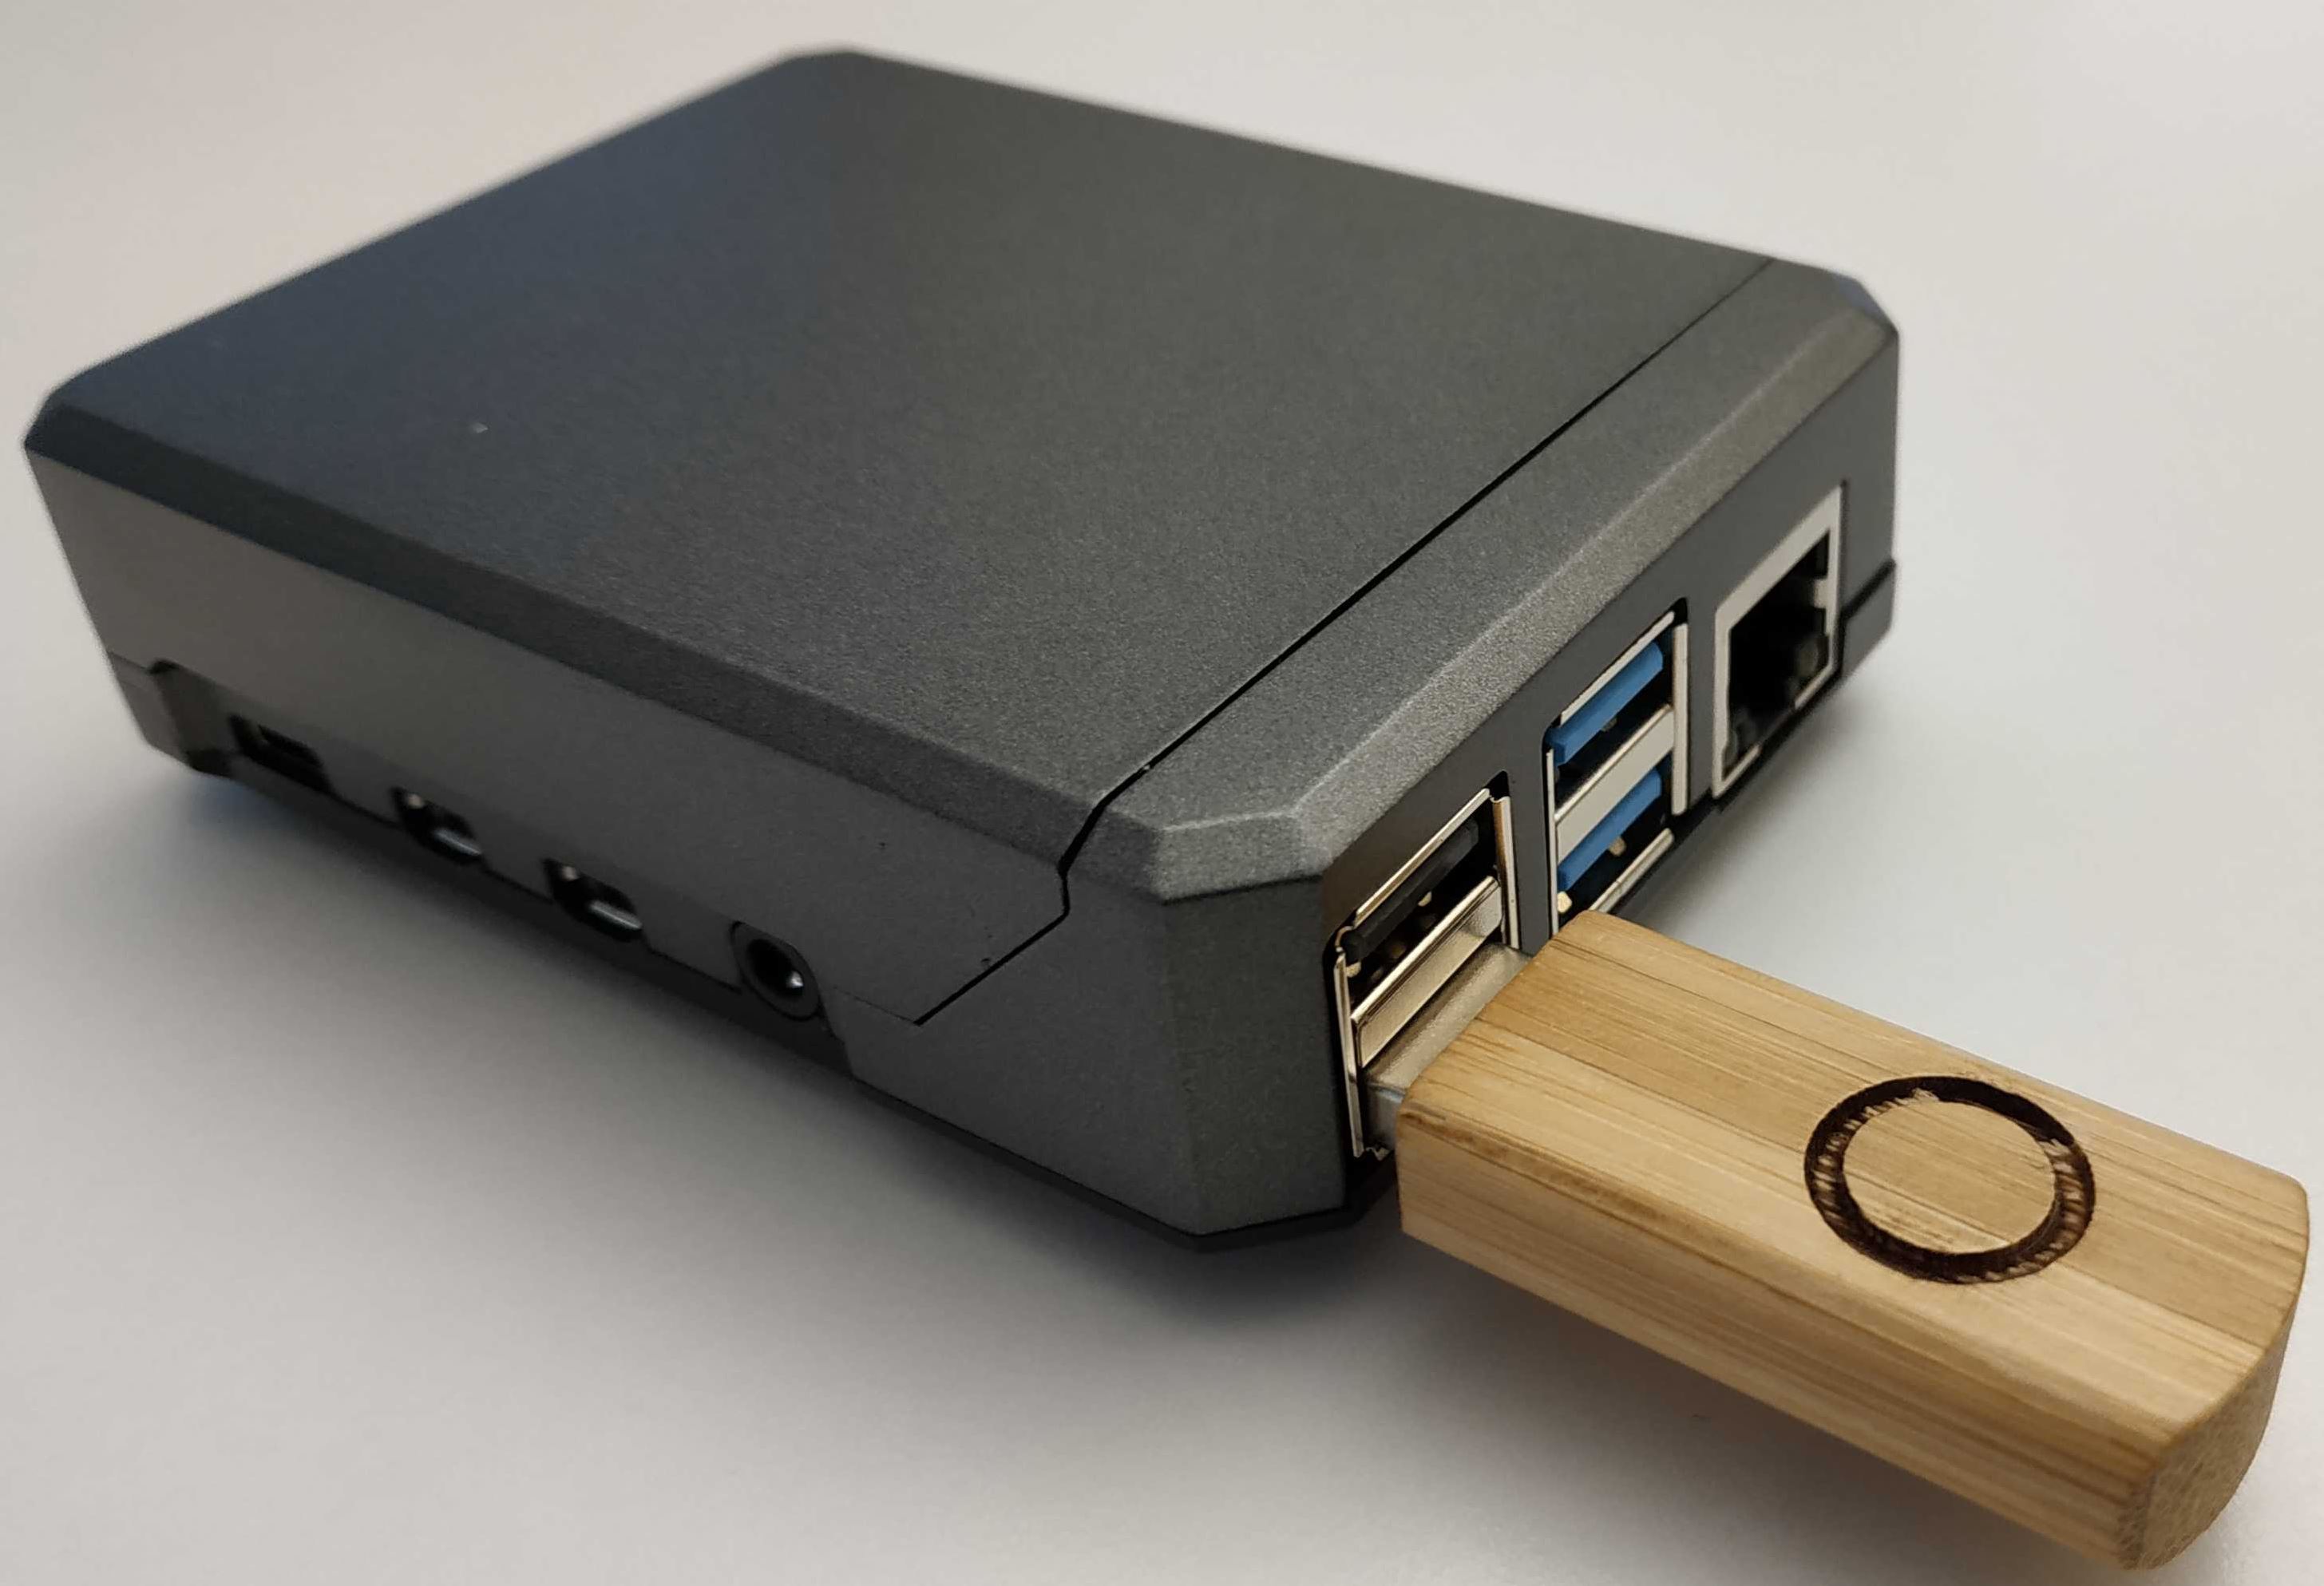
To perform this procedure, you will need a USB flash drive.
Here are the requirements and some info on this:
It would be best to use a FAT32-formatted flash drive (most USB flash drives are, by default, formatted as FAT32).
💡ext2/3/4 also works, and NTFS might also work.
💡The Yodeck Player does not change anything on the flash drive, so you can leave any other files on the stick.
⚠️DO NOT RENAME OR EXTRACT THE ZIP FILE!Copyit (asis) into the base folder of the USB flash drive, as shown below.
IMPORTANT
Some flash drives may not work correctly. During startup, the USB flash drive might not start quickly enough, so it might not be functional within the first seconds of the startup procedure, so Yodeck cannot detect it. This case is detailed below. If that is the case with your flash drive, try a flash drive of a different make/model and find one that works.
Reflashing your Player
After you have prepared a USB flash drive, follow these instructions to recover your player:
Plug the USB flash drive you prepared using the above steps into any of the player’s 4 USB ports.
Power up (or reboot) the Player.
Upon startup and before showing the Yodeck logo, the player always displays a message saying “Searching for USB drives…” while searching for the flash drive.
The player will find the flash drive, which should display a message saying, “USB drive detected.”
If the player does not show the “USB drive detected” message, you must use a different USB flash drive because it cannot detect the flash drive you used.
The verification and writing procedure should start if you have prepared the USB flash drive correctly. If you get error messages, check that you have properly prepared the drive.
At this point,
⚠️DO NOT REMOVE POWER FROM YOUR PLAYER!
⚠️DO NOT REMOVE THE USB DRIVE! Allow the procedure to be completed in at least 30 minutes.
When the procedure has been completed, you will be prompted to remove the USB drive. Once you remove it, the player will automatically reboot. After reboot, the player will re-apply all retained settings in the system.
The software might also need to be updated online, so do not unplug the player to ensure everything is completed smoothly.
Please allow enough time for it to perform all the necessary initialization procedures. Allow at least 15-20 minutes before worrying if nothing comes up.
After completing the procedure, your player should recover, connect to the Internet, and download content. Eventually, it will begin to play back!
How-To Video
Security Notice
For the advanced IT security-aware readers: Yodeck Player Image files are digitally signed. The ZIP files contain information that verifies that Yodeck issued the specific SD card image. You cannot perform this procedure with an arbitrary image file, so an attacker cannot inject their code into the system just by plugging in a USB drive and rebooting.
Last updated on September 17th, 2021
Install Yodeck on NEC Compute Module by using Yodeck bootloader
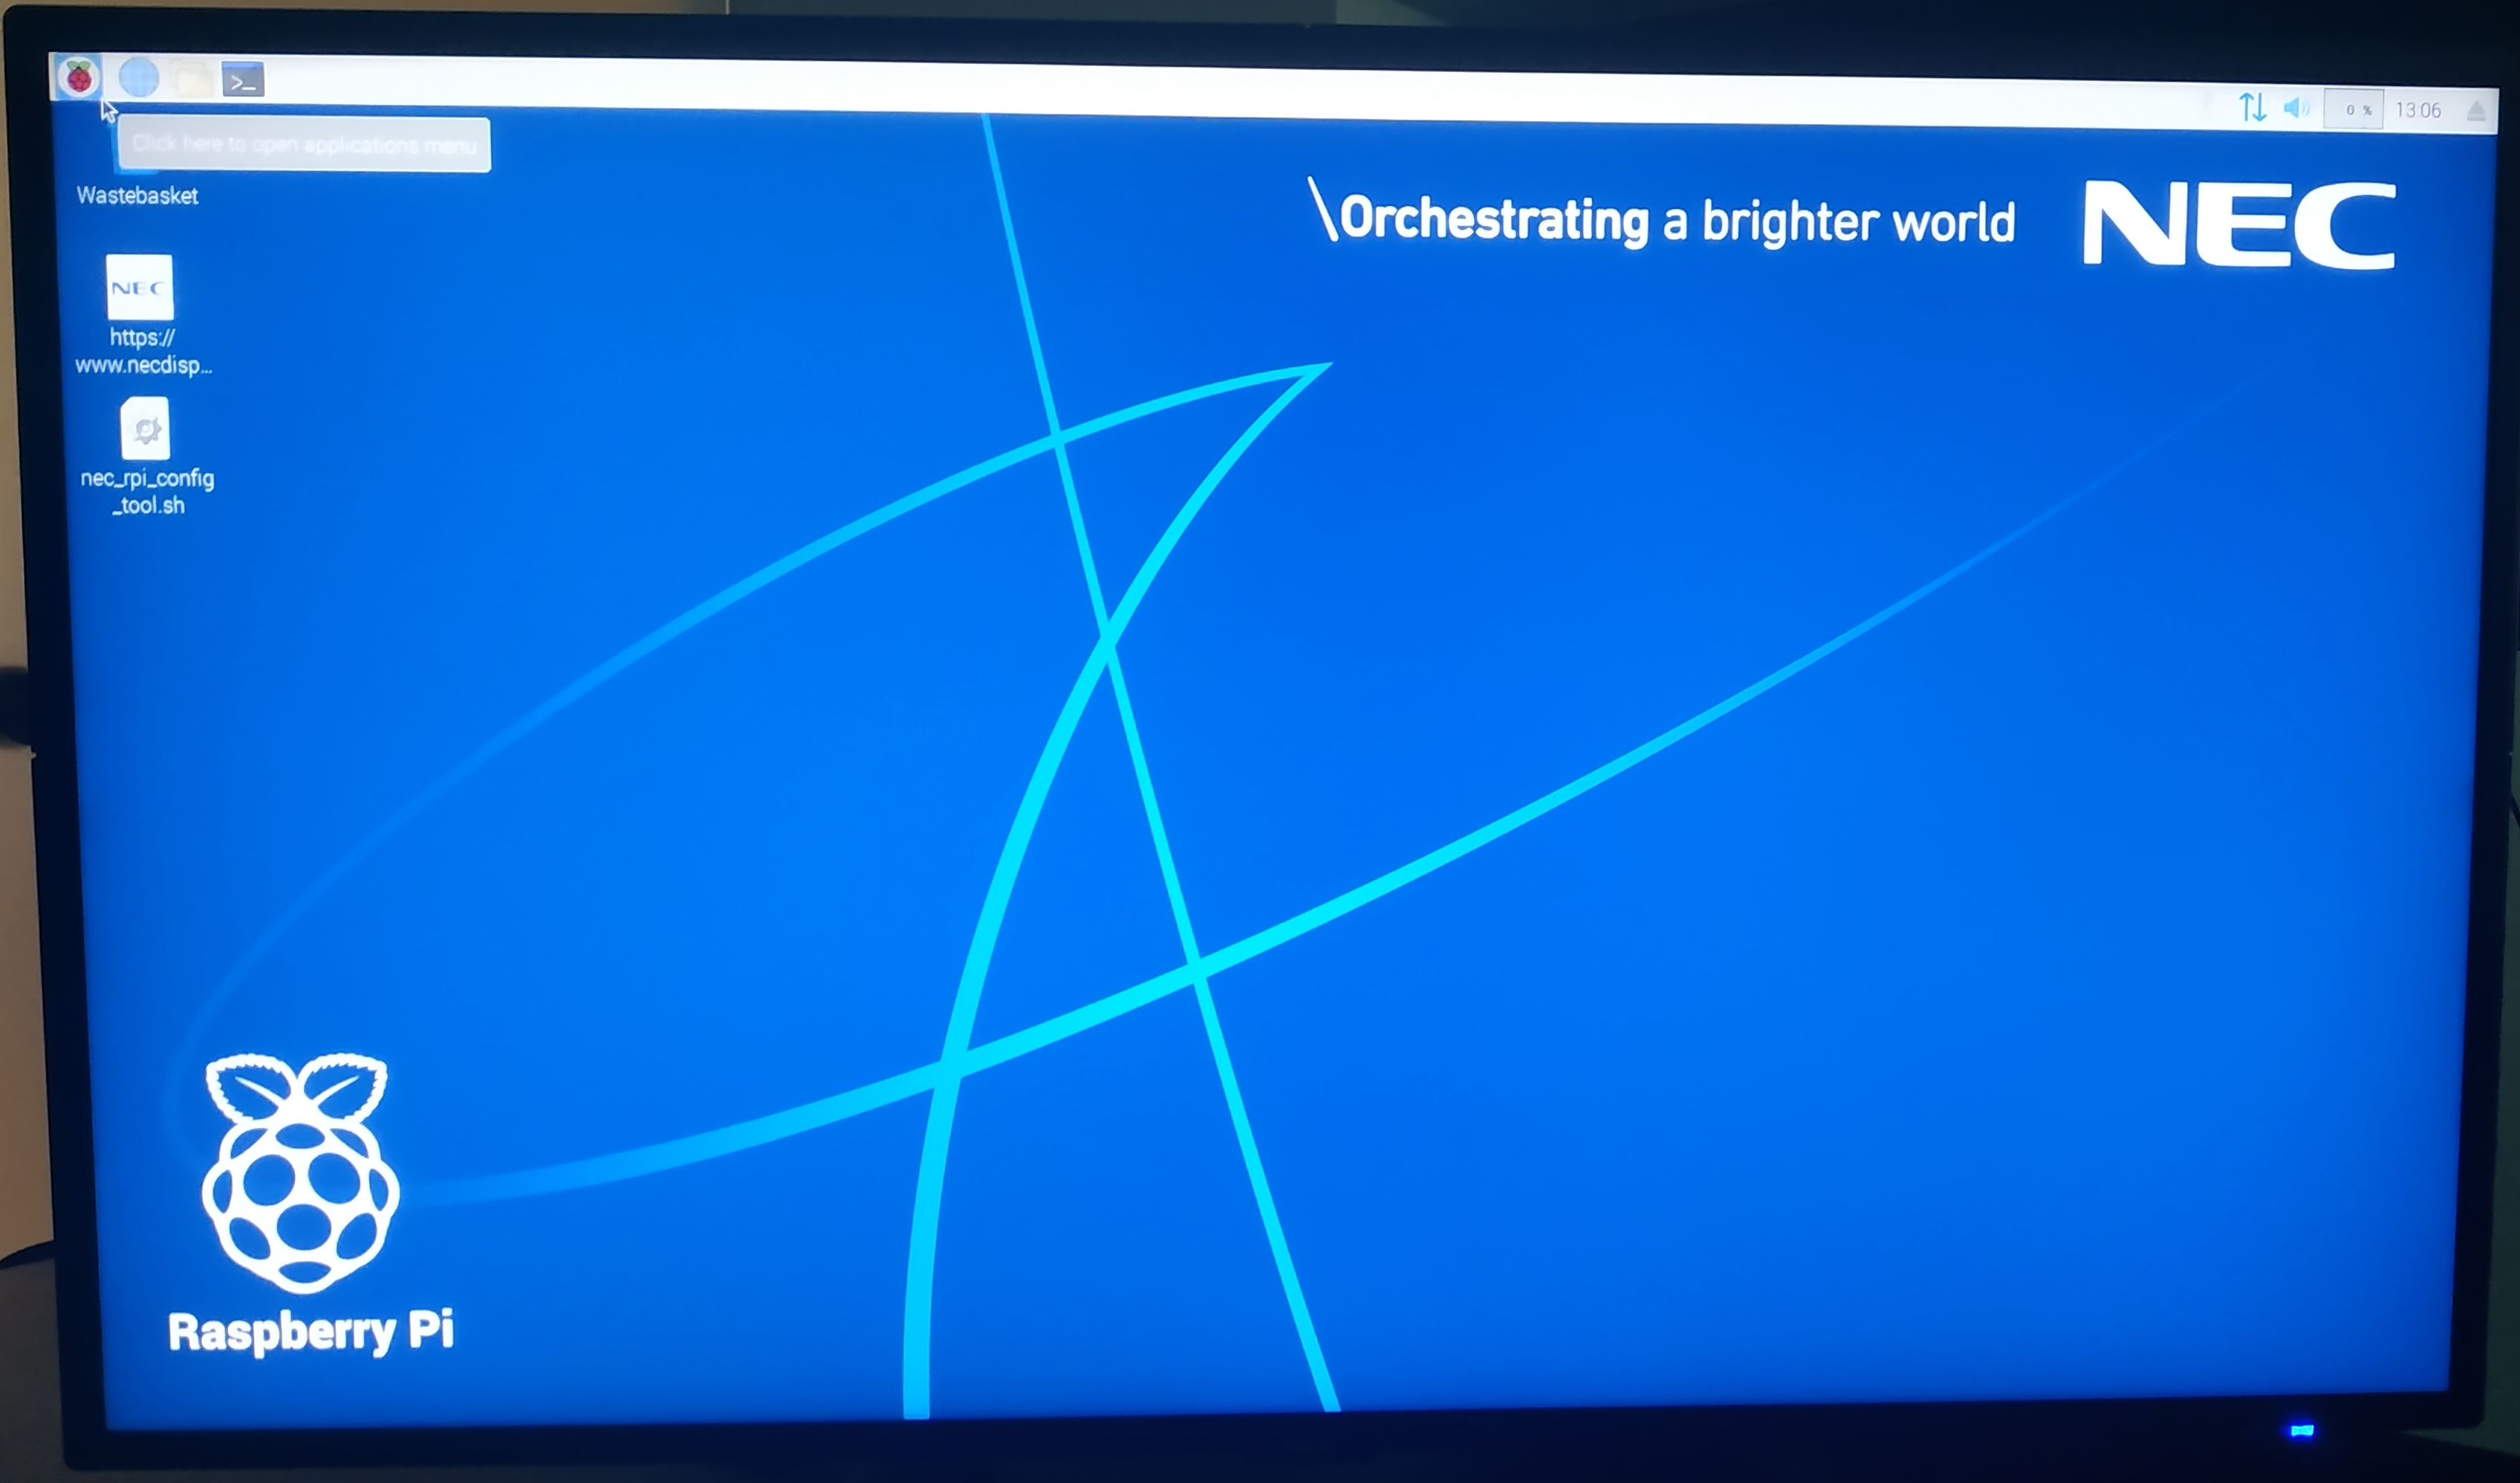
NEC with Yodeck’s Bootloader
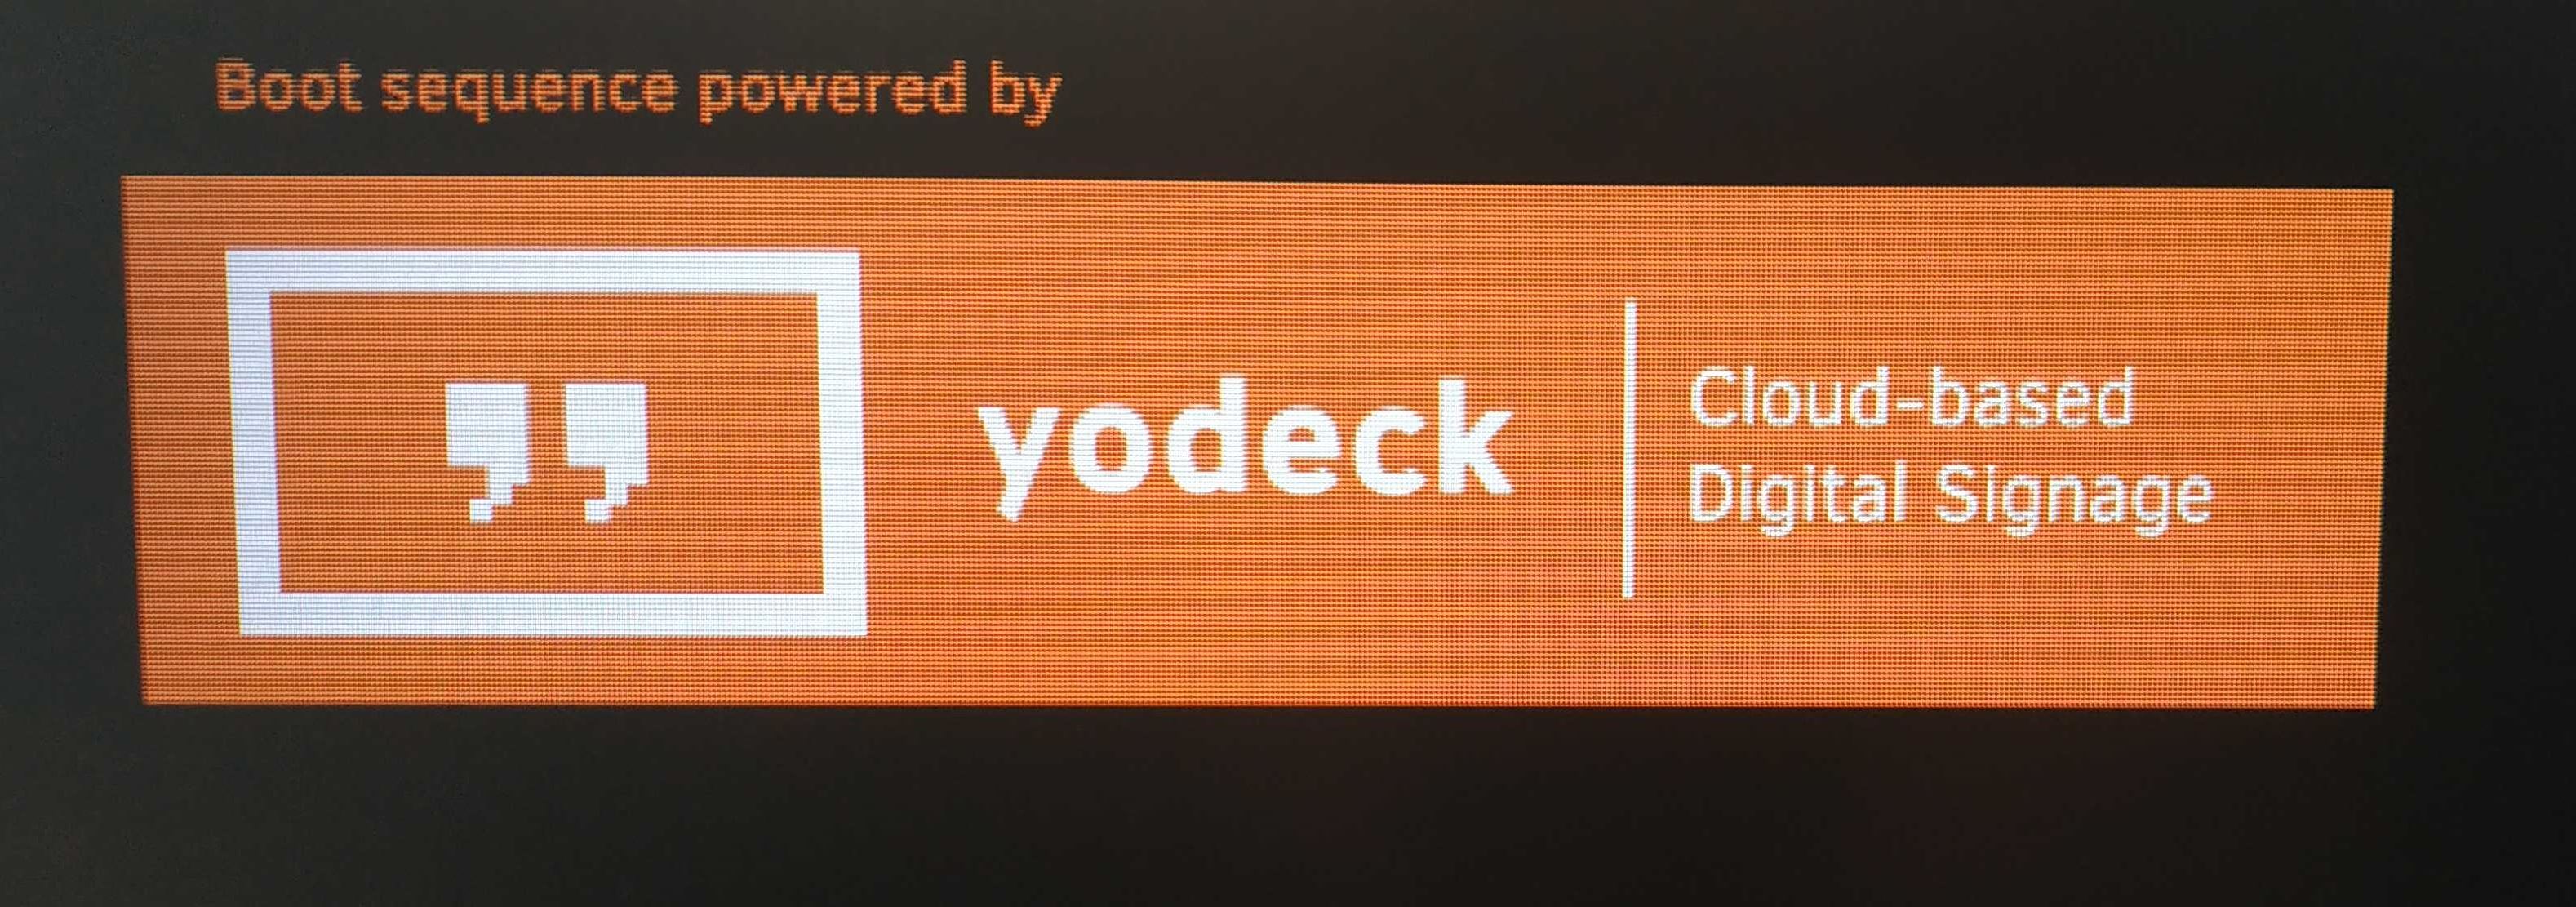
This procedure will only work if your NEC Raspberry Pi Compute Module uses the Yodeck-powered bootloader.
In other words, this process will only work if you see this logo when your NEC powers On:
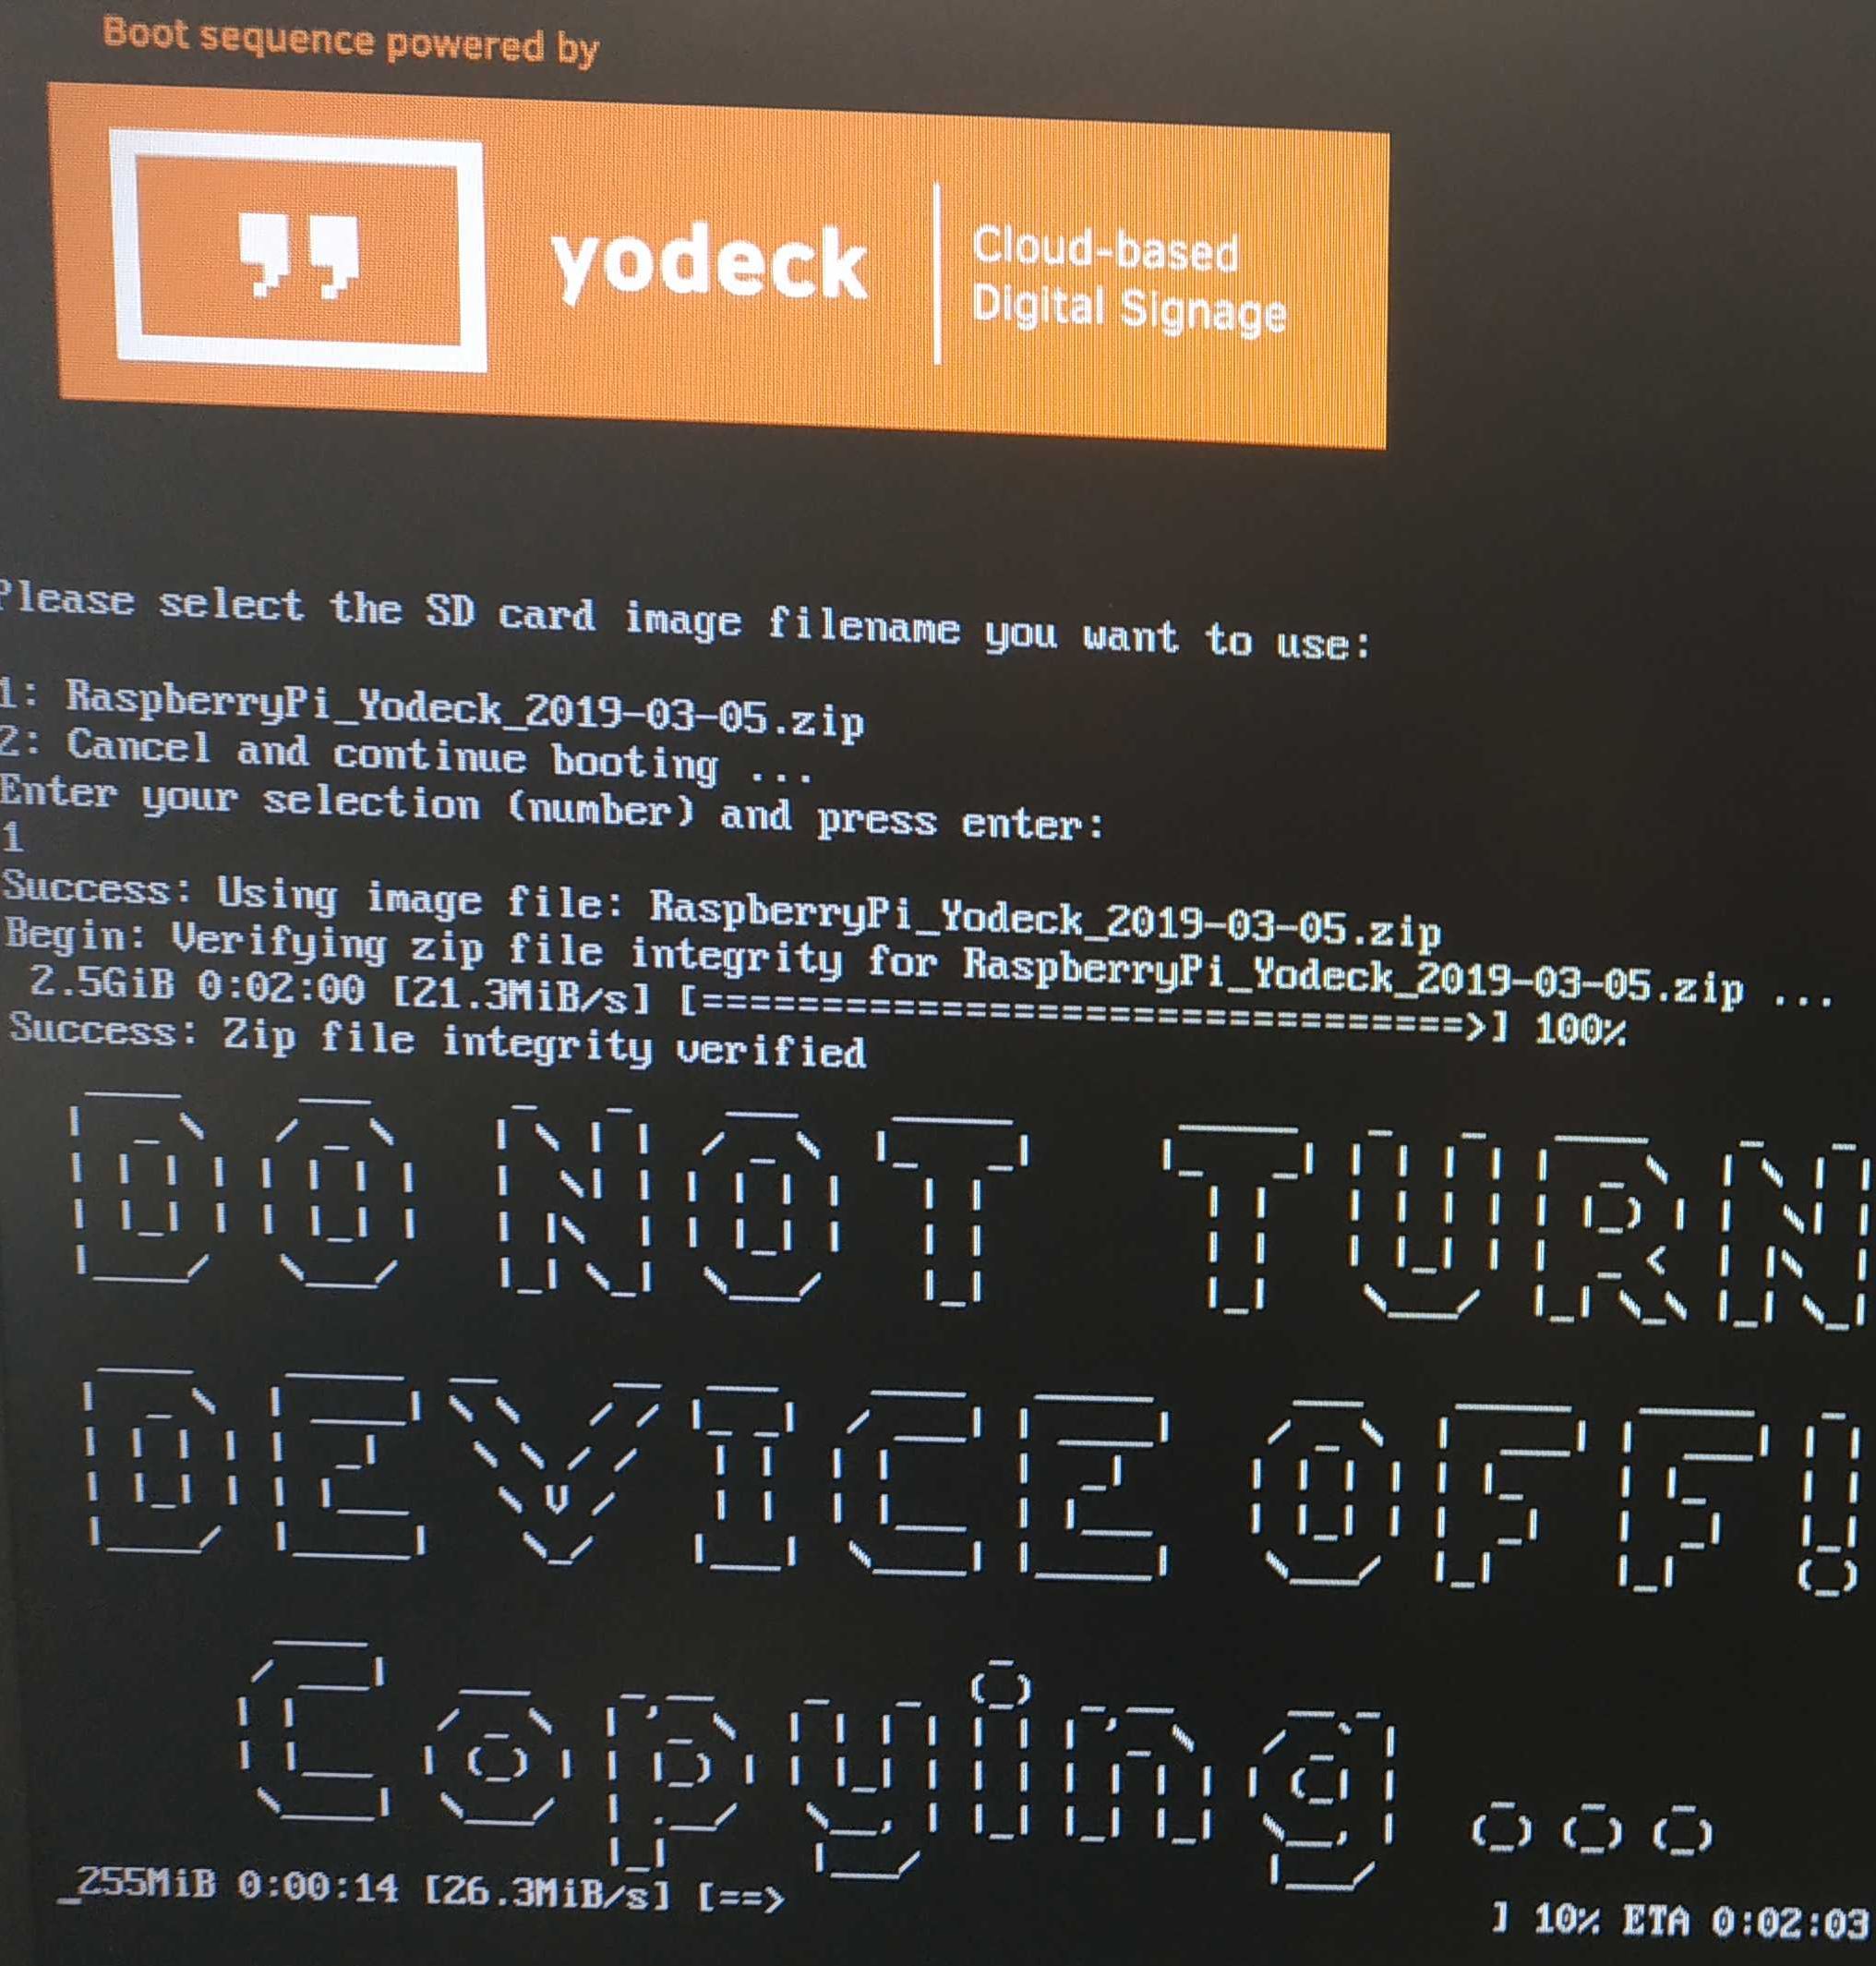
Do not rename or extract the zip file! Copy it ( as is) into the base folder of the USB flash drive.
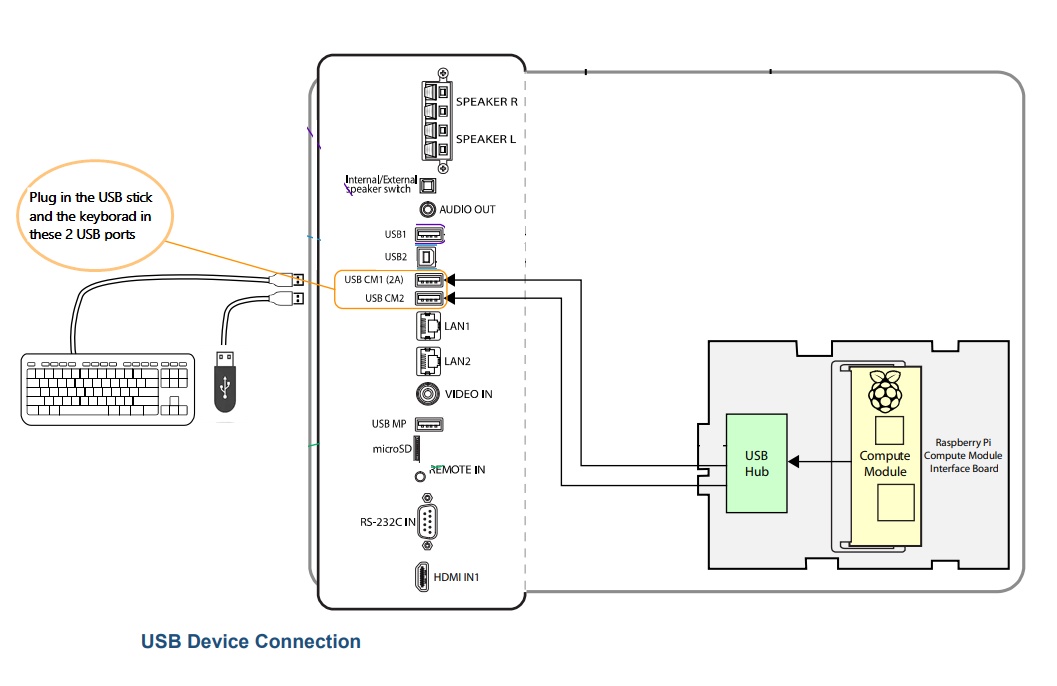
Plug in a keyboard and the USB stick to the NEC screen
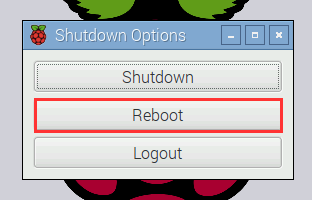
Reboot the Compute Module using the Raspbian menu.
Yodeck Bootloader
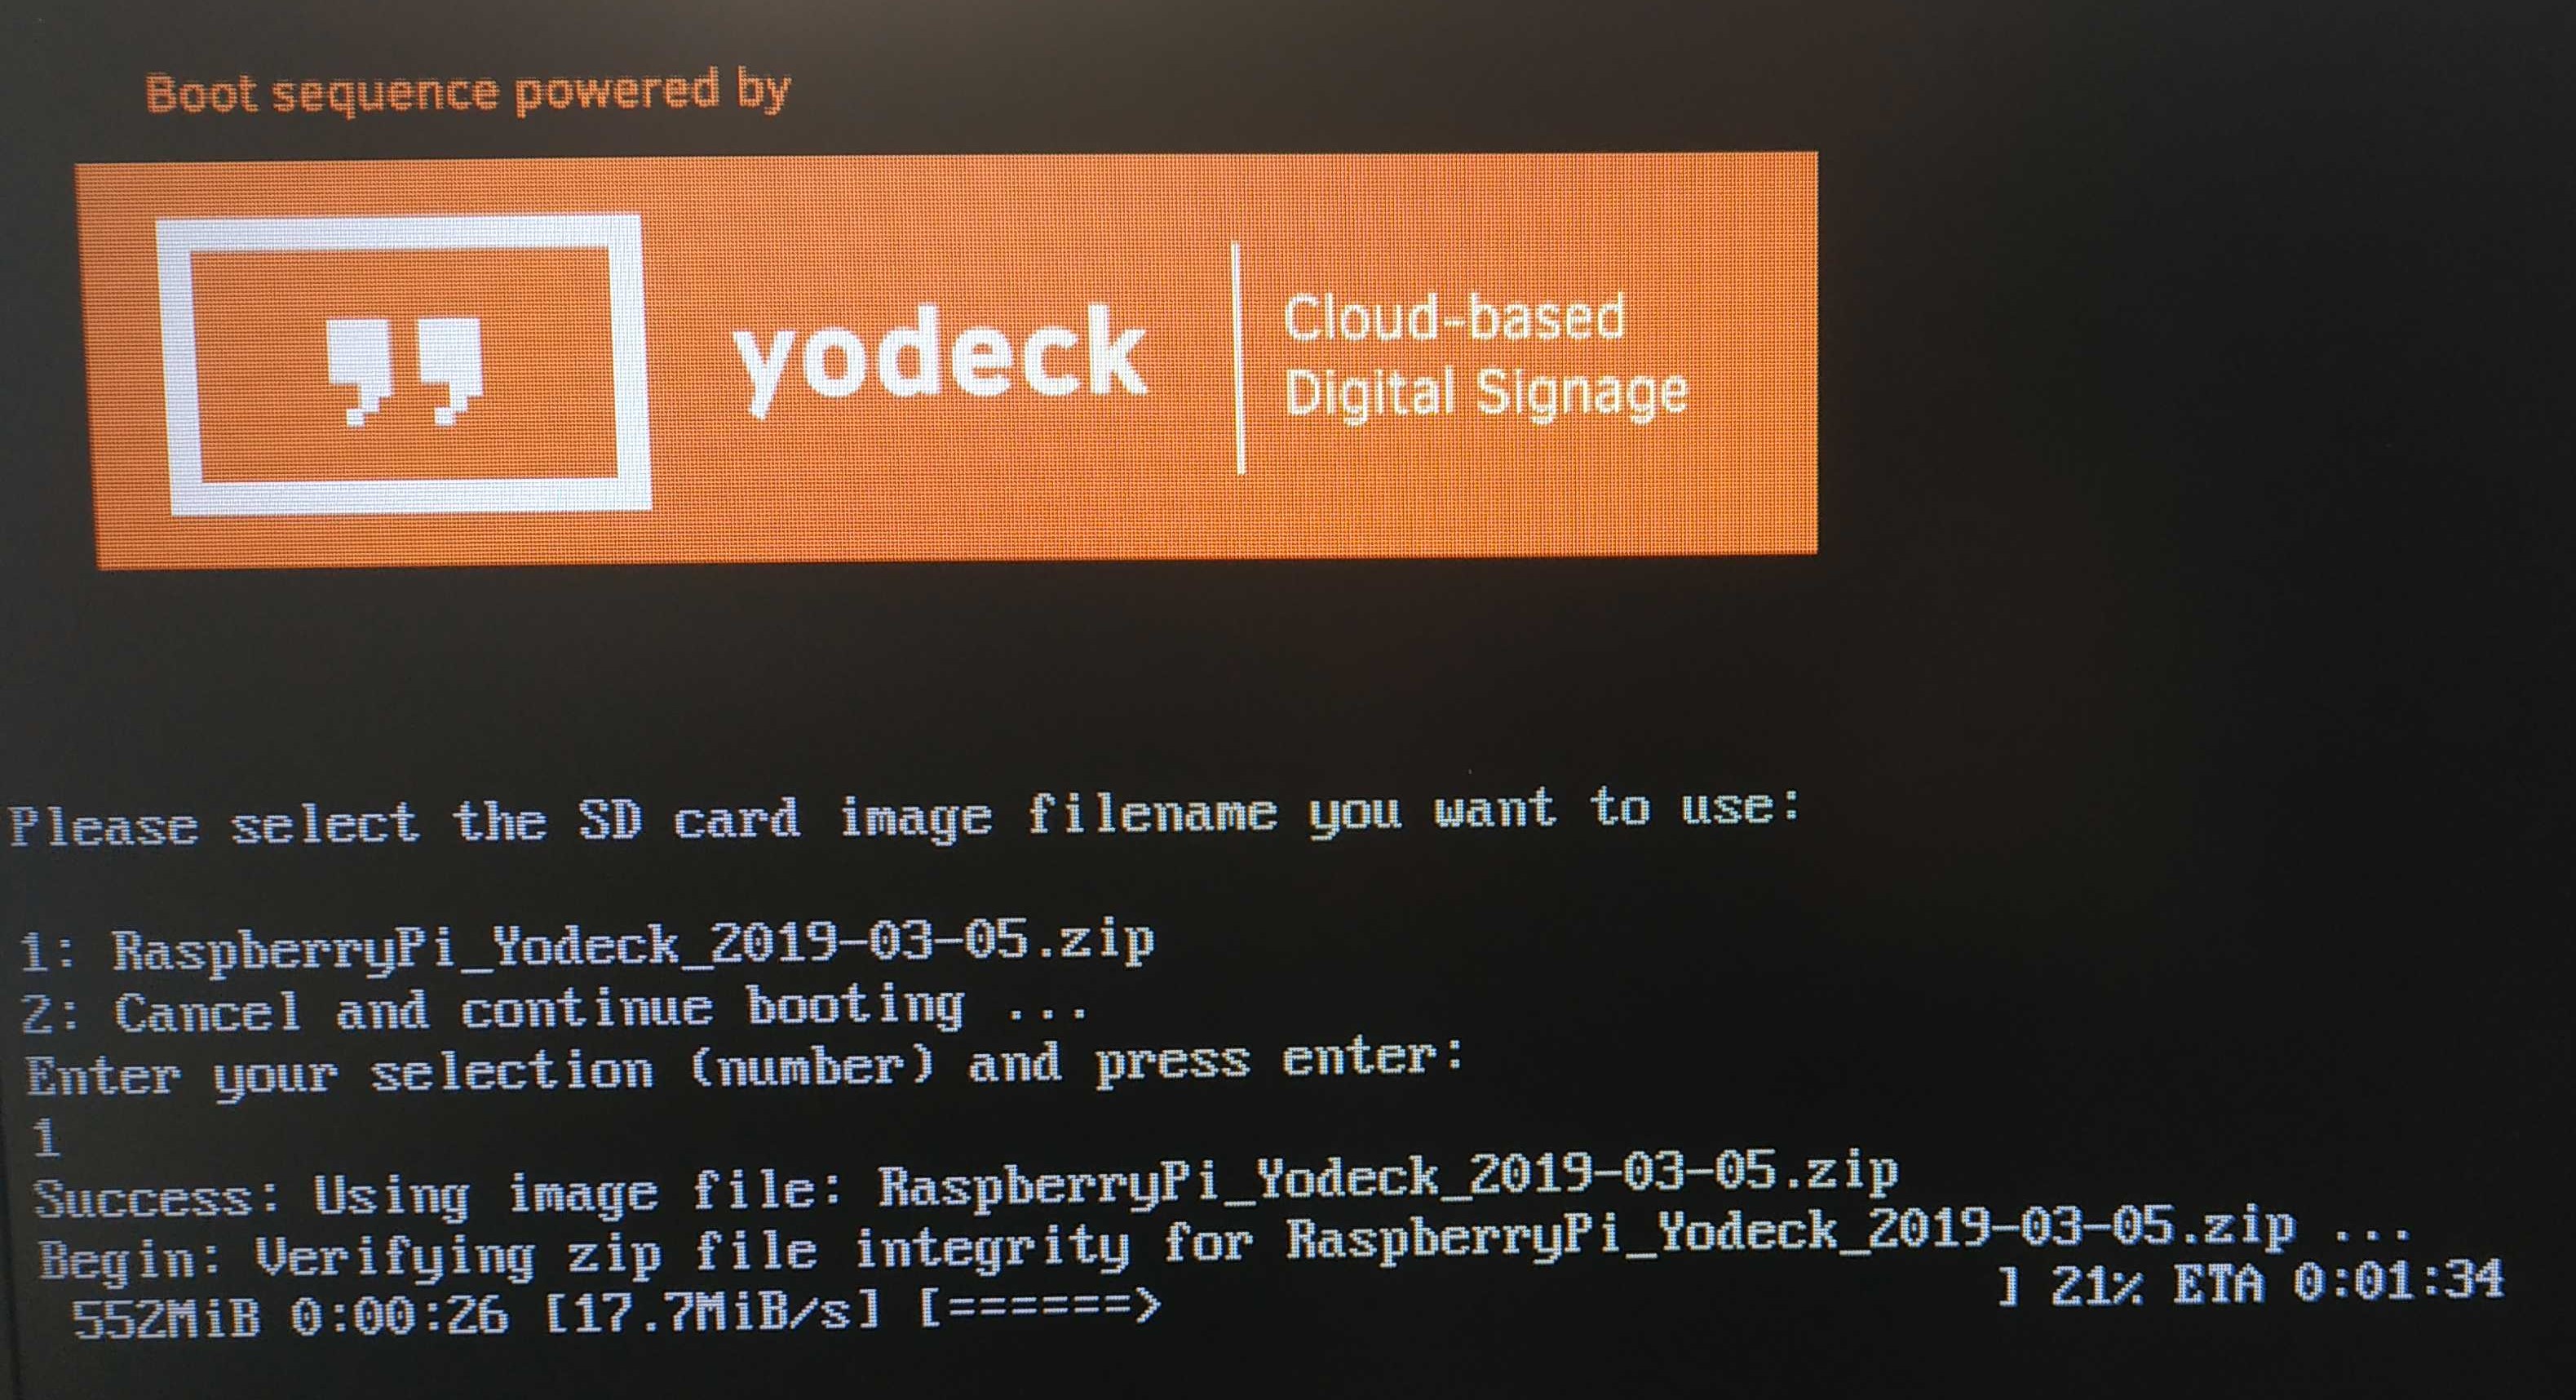
Yodeck bootloader comes pre-installed with Raspberry Pi-enabled NEC screens. It’s there to make it easier to flash a new image to the Compute Module using just a regular USB flash drive. No extra cables are required. The bootloader runs automatically at an early boot stage of the Compute Module.
After the reboot, the bootloader will detect the connected USB drive with the Yodeck image copied.
You will be prompted to select the image you want to flash on your Compute Module or Continue booting to the standard Raspbian Desktop.
To continue flashing the Yodeck image, type 1 and press the Enter key on your keyboard:
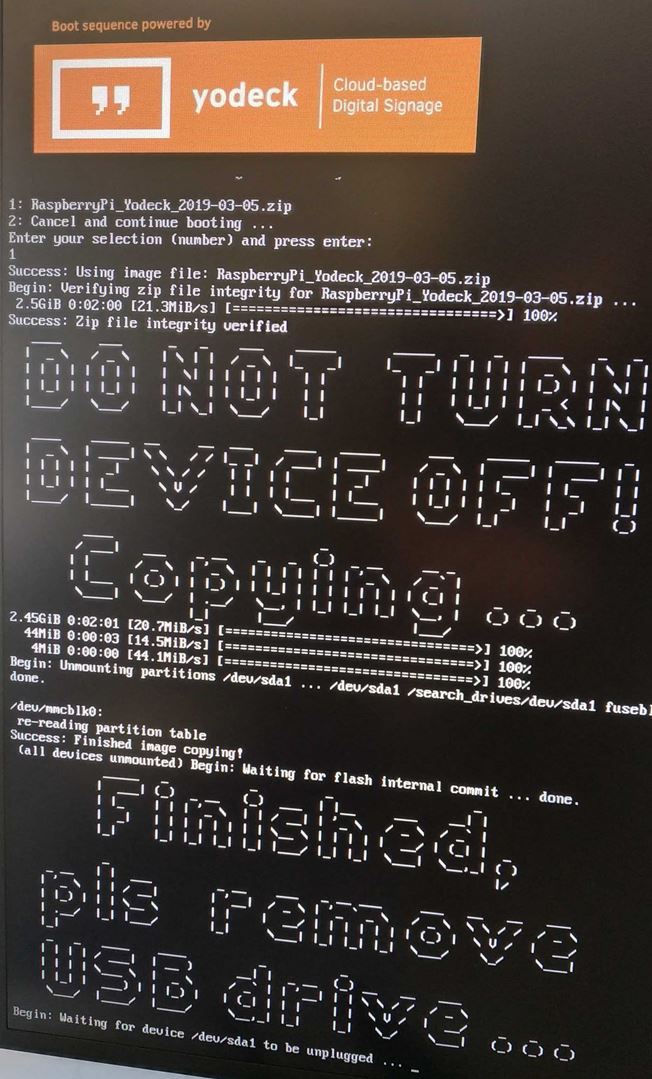
The flash process will begin. The bootloader will first check the integrity of the zip file and then proceed with flashing the Yodeck image:
You will be prompted to remove the USB flash drive when the process is complete. The screen will automatically reboot and boot the newly flashed Yodeck image.
Need Help?
The Yodeck Support Team can help you out! Log in to your Yodeck account and send us a message from the bottom right corner!
Last updated on March 30th, 2021
Install Yodeck on NEC Compute Model by using an external OS host
NEC’s Yodeck Bootloader
If you do not see the Yodeck logo when your NEC powers On, please reach out to our support by following this link and we will guide you accordingly.
Last updated on March 30th, 2021
Remotely access your Yodeck player by using SSH
Step-by-step procedure
Yodeck player based on Raspberry Pi
⚠️This section is available only for players based on Raspberry Pi. For other player types, this section won’t be displayed at all. Learn about the Raspberry Pi-based Yodeck Player.
Download and Install Putty or a similar SSH program.
Wait for the player to finish the Configuration first. An active message, “Configuring,” will be displayed on the bottom right side of your screen.
When this message disappears, continue with the steps below.
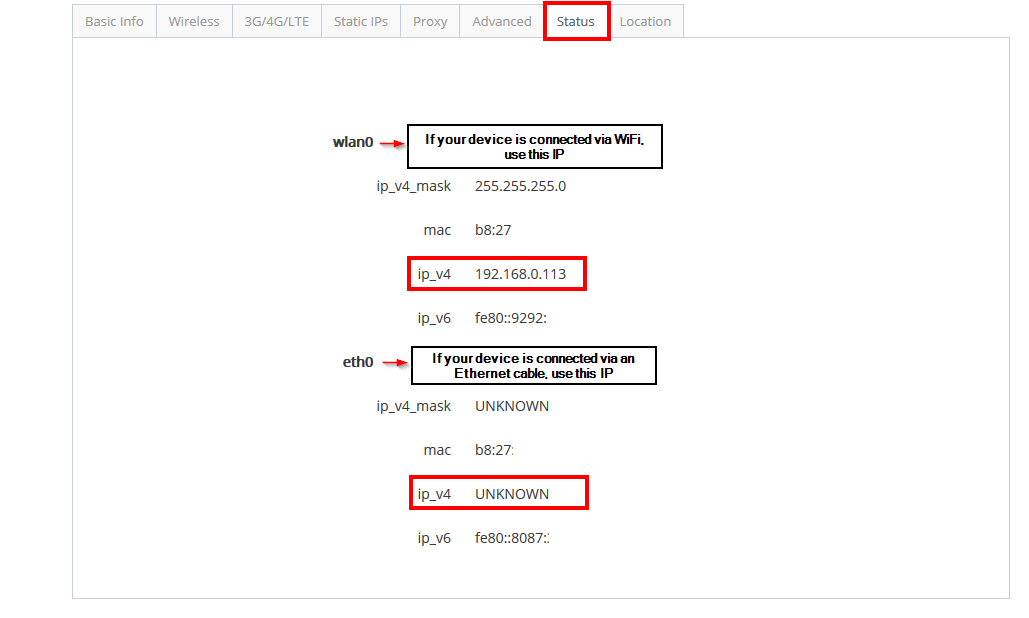
To find the IP of your Yodeck device:
Log in to your Yodeck Account.
Go to the Screens Section and click on the “edit” button.
Go to the “Status” tab and locate the IP of your Yodeck device.
Example Image with dummy settings:
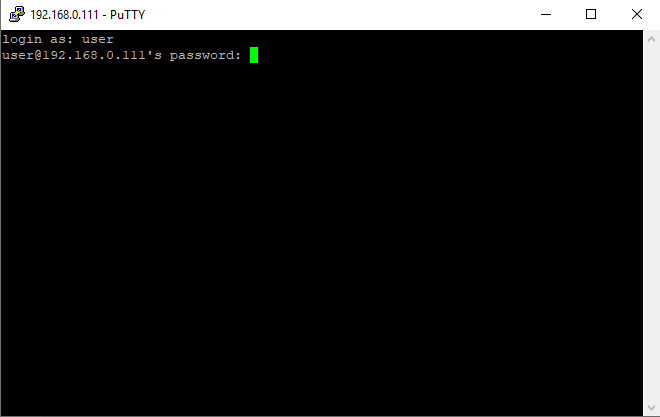
We use the Putty program, a free and open-source terminal emulator, serial console, and network file transfer application for this example. It supports several network protocols, including SCP, SSH, and Telnet.
Type the IP of your Yodeck device, as shown below.
Click Open to gain remote access.
Then, in the request, login as “user” and press Enter on your keyboard.
The Player’s SSH password will be requested. The password can be found in the Yodeck Portal, under the Screens Section, by clicking the “Advanced –> Security tab”.
Type the password prompted as “Wifi Wizard / Remote Support Password”. Hashed password If the password is of this form “*****”, the password is hashed for security reasons. Do not copy-paste this text. You have to type the not-hashed password that you set earlier.
⚠️If you do not remember the password you have set, retype it and click “Save.” The player needs to be Online to get the new password. You will notice a Configuring message at the bottom of your screen. After that message disappears, try to SSH the device again with your new password.
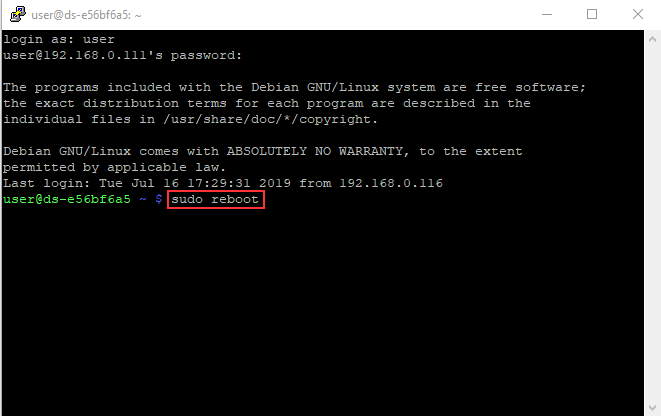
Upon completing this, you should see the image below.
Type sudo and any command and fill out the same password again.
Last updated on January 22nd, 2021
How to change the hostname for your Yodeck Player
Introduction
If you have more than one Yodeck Player (based on Raspberry Pi) on your network, giving each one a unique name is a good idea. The Yodeck Player has the name ‘ds-12345asd’ by default. It is really easy to change that name to (almost) whatever you like. This name is known as the ‘ hostname ‘. First, log onto your Raspberry Pi and open a terminal window.
SSH Yodeck player
If you do not know how to connect to your Yodeck player remotely, please check this step-by-step guide.
Your Yodeck Player’s name is in a file called ‘hostname’ in the /etc. directory.
Edit that file as superuser with:
sudo nano /etc/hostname
This file contains only one line – the name of your Yodeck Player. Change the name to whatever you like, but only use the letters ‘a’ to ‘z’ (upper or lower), digits ‘0’ to ‘9’, and the dash ‘-‘.
Please save the file using Ctrl+x, then Y followed by Enter.
Optional Hostname Change
A second file contains the hostname, but it is only there as a workaround for some software. Therefore you should also edit that file:
sudo nano /etc/hosts
Find the line starting with 127.0.1.1, and change the name following it to your new hostname. Please save the file using Ctrl+x, then Y followed by Enter.
Once you have rebooted your Yodeck Player, all other computers on your network should see it with the new hostname. On the Yodeck Player itself, you can check your hostname by issuing the following command in a terminal window:
hostname
Last updated on January 22nd, 2021
Custom Script for TV Power On/Off
In the Yodeck Portal, the “Turned Off” option provides an easy way to turn off the connected TV screen.
How does it work?
The Yodeck Player (or Raspberry Pi) generally includes a CEC adapter on its HDMI screen/monitor port. If your screen supports HDMI-CEC, then the Player issues a CEC “standby” (or “power on”) command to turn your screen off (or on).
Suppose your TV screen/monitor does not support CEC (e.g., you have a computer monitor. Check out the CEC compatibility chart). In that case, the Player deactivates the HDMI port to allow the TV screen/monitor to power down by itself. This function is supported by all current computer screens/monitors, even some TVs.
How should the custom script behave?
The script should take 1 command-line argument.
This argument will always be present.
It will only have one of two possible values: on and off
The script should be idempotent. (That is, if it is called twice with the same argument (e.g., on), it should not cause trouble.)
That’s it.
The “standard” script
The script below simulates the standard behavior provided by the Yodeck Player. You can customize this script, add anything you need, and use it.
yodeck_custom_power_script
#!/bin/bash

echo 'on 0' | cec-client -s | grep 'not present' > /dev/null
NOT_CEC_COMPATIBLE=$?
tvservice -s | grep -i 'tv is off' > /dev/null
TV_IS_OFF=$?

if [ "$1" == "off" ]; then
    if [ $TV_IS_OFF -eq 0 ]; then
        echo 'Screen already off, aborting...'
        exit 0
    fi
    echo 'Turning off screen'
    if [ $NOT_CEC_COMPATIBLE -ne 0 ]; then
        echo 'standby 0' | cec-client -s > /dev/null
    fi
    tvservice -o
elif [ "$1" == "on" ]; then
    if [ $TV_IS_OFF -ne 0 ]; then
        echo 'Screen already on, aborting...'
        exit 0
    fi
    echo 'Turning on screen'
    FB_DEPTH=$(/bin/fbset | grep 'geometry' | awk '{ print $6 }')
    tvservice -p
    fbset -depth 8
    fbset -depth $FB_DEPTH
    xrefresh
    if [ $NOT_CEC_COMPATIBLE -ne 0 ]; then
        echo 'on 0' | cec-client -s > /dev/null
    fi
else
    # Just for debugging, not required or used
    echo "Screens supports HDMI-CEC: $NOT_CEC_COMPATIBLE"
    echo "Screens current status: $TV_IS_OFF"
    echo 'You must specify "on" or "off"'
fi
It does not HAVE to be a bash script. You can always provide an executable file or a script in any other language, like Python or Perl. Yodeck will use the contents you provide in Base64 (details below), will write the file to the filesystem, make it executable ( chmod +x ) and call it every time it is required.
Changing the standard script
In your Linux command line, you can use the yodeck_custom_power_script directive to provide your own custom TV on/off script. To create the custom script entry, run:
You should get a player directive (directive_name=base64_encoded_data) ready to be pasted in the Advanced Player Directive field. For the above standard script, that would be: