Tech FAQs
How secure is Yodeck?
We designed Yodeck from the ground up with security in mind!
Some key points:
The Yodeck service is accessed over SSL, so access codes and other sensitive information are always encrypted and secured.
We use the Stripe payment gateway service, so no credit card info is stored. Stripe is as safe as PayPal, so worrying about that is unnecessary.
Yodeck Player software is always firewalled, even within your network.
Schedules and configuration data downloaded from the Yodeck service to your Yodeck Players are digitally signed, so no one can trick your monitors into playing something different.
In a few words, nobody will ever be able to mess with your monitors! If you are still worried about how secure Yodeck is, please get in touch with our support, and we will help you immediately!
What are the supported browsers for the Yodeck Portal?
The Yodeck platform can work with some unsupported browsers. Yodeck checks browsers for the presence of methods that are required for the product to work correctly. If these browser methods aren’t detected, you receive an error message that the browser isn’t supported.
|
Desktop |
Version |
|
Microsoft Edge* |
Latest stable version |
|
Google Chrome (All platforms) |
Latest stable version |
|
Safari (Mac) |
Latest stable version |
|
Mozilla Firefox (All platforms) |
Latest stable version |
|
Opera (All platforms) |
Latest stable version |
Note: *Internet Explorer 11 is no longer supported.
Upgrading to the latest version
We recommend upgrading your browser and operating system to the latest versions as soon as upgraded versions are made available for your device. Later versions have higher levels of security. Most browsers/platforms will allow you to upgrade for free and may offer automatic upgrades as soon as they become available.
Do you support Samsung Tizen Players?
Do you support Google Chromecast?
Of course, we do!
✅Please click here on how to install the Yodeck Software on your Chromecast player.
Does the Yodeck software image work on the Pi 400?
✅ Yes, the Pi 400 will work fine with the Yodeck software! Feel free to flash the SD card using this guide.
How do I change the account ownership to another user?
Account Ownership
Only the account owner can change another user’s account ownership. An Admin or any other user role cannot accomplish the procedure below.
If you want to change/transfer the account ownership to another user, please follow the steps below:
-
Log in as the Account Owner, e.g., “owner@yodeck.com”
-
Click at the top right of your screen and select the “My User Profile” option.
-
Change the email from “owner@yodeck.com” to “new_owner@yodeck.com” and click the “Save” button.
What happens if the new_owner is already a user under that account?
If the user “new_owner@yodeck.com” already exists as a user on that account, please follow the steps below:
-
Click at the top right of your screen and select the “Users” option.
-
Find the “new_owner@yodeck.com” user and delete it.
-
Click at the top right of your screen and select the “My User Profile” option.
-
Change the email from “owner@yodeck.com” to “new_owner@yodeck.com” and click the “Save” button.
✅If you cannot access the initial owner’s account, don’t hesitate to contact our support for assistance with the ownership change.
Do you support LG webOS Players?
Of course, we do!
✅ Please click here on how to install the Yodeck Software to your LG webOS player.
How do I add background audio?
Learn how to add background audio to your digital signage using Yodeck. This feature allows you to play continuous music or audio on your screens while visual content such as images, videos, playlists, or layouts is displayed.
In the full article, you’ll see how to add background audio from within the Layout editor, choose an audio file or playlist to play in the background, and assign the layout to your screens. The guide also explains important behavior and limitations, such as how background audio interacts with video sound.
Which Raspberry Pi does Yodeck support?
Yodeck works on all Raspberry Pi versions, from the first release 2012 until the very latest. Each hardware version has its restrictions. Below, we provide a detailed matrix to show features and compatibility.
More details can be found below
Yodeck Manual Configuration Guide for Raspberry Pi
Introduction
With Yodeck, you have two options for configuring a Player:
Though the web
Though the “SETTINGS.txt” configuration file on the SD Card of the Player
If you choose the first option, you have to get your Player online so that it can connect to the Internet and fetch the new settings you specify.
There are cases where you need to configure the Player manually through the “SETTINGS.txt” configuration file:
You’d like to connect through a WiFi network, but a cable cannot connect it temporarily.
You want to configure a Proxy server through which the Player can connect to the Internet.
Please make sure to specify static IP configuration (Static IP Address, Netmask, Gateway, or DNS) for your connection.
You need to specify some other configuration parameter besides networking, but you’d like to do it offline.
Step-by-Step Guide
To manually configure the Player, do the following:
V E R Y I M P O R T A N T: Login to your Yodeck account, navigate to the Screen in question and specify all settings. If you skip this step, when the Player registers, it will fetch the default settings from your Yodeck account and revert back to the wrong settings, possibly getting the Player offline again! So make sure you do it before manually changing the settings on the Player!
If the Player is currently powered on, disconnect all networks (any WiFi USB adapters or Ethernet cable) and wait 1 minute. Then, disconnect it from power.
Remove the SD Card. There is a small slot right next to the Powered On indicator LED. With your fingernail (or a thin, not sharp, object), push the card. It should pop out so that you can pull it off. Make sure you do not use excessive force.
Put the SD Card into your computer. You might need a MicroSD-to-SD adapter (usually, computers have standard SD Card slots, not MicroSD). An adapter like that should be included with your SD Card or Player.
Navigate to the SD Card. Open the “SETTINGS.txt” file in the SD Card.
Change the settings you need. You change the value of a setting by specifying it right after the equals (“=”) sign. Settings are described in detail in the next section.
Save the “SETTINGS.txt” file, overwriting the existing file.
Use the “Safely Remove SD Card” feature of Windows (or Linux) and, after being notified that you can safely remove the SD Card, wait 10″ and remove the SD Card.
Put the SD Card back in your Player. With your fingernail (or a thin, not sharp, object), push the card inwards. When you release it, it should lock into place. If it pops back out, try pushing the SD Card further inwards before releasing it. Make sure you do not use excessive force.
Connect the network you require (WiFi or Ethernet, never both). Note that in order for the WiFi adapter to be properly configured, it must be connected to the Player.
Power up the Player. Upon starting up, the Player will re-apply all settings found in the “SETTINGS.txt”. It might take a while to apply all the settings, so be patient. The Player should be up and running within 3-4 minutes.
Settings Reference for “SETTINGS.txt”
Here is a detailed reference for all the available settings. Note that the section names (denoted by square brackets, e.g., “[SECTIONNAME]”) are essential and must be present for the settings below to be recognized and used.
A complete example for “SETTINGS.txt” is also provided further down.
WiFi Network Settings [WIFI]
Example section with dummy settings:
[WIFI]
ipaddress = 192.168.1.200
netmask = 255.255.255.0
gateway = 192.168.1.1
dns = 8.8.8.8
ssid = YourWiFiNetworkName
key = ThisIsTheWiFiPassword
mode = WPA
Configuring the Wireless Network connection
[WIFI]
ssid = YourWiFiNetworkName
key = ThisIsTheWiFiPassword
mode = WPA
Settings
ssid: This is the SSID of the Wireless Network, essentially the network’s name. The Player will search for and try to connect to the SSID you specified here. If you do not specify an SSID and a WiFi adapter is present, then the Player will try to connect to any open wireless network (“open” means that it does not need a passphrase) it can detect nearby. If it can find multiple networks, it will connect to the one with the strongest signal.
key: This is the wireless network passphrase or key you must use to secure the network. If you do not specify a key, the player will assume that the SSID you specified above is an open wireless network (does not need a passphrase).
mode: This specifies the encryption used by the WiFi network. Valid values are: “WPA” for WPA/WPA2-PSK, or “WEP” for WEP64/WEP128 encryption. If you do not specify a mode, then the default value is “WPA”.
Configuring the Wireless Network Static Networking
[WIFI]
ipaddress = 192.168.1.200
netmask = 255.255.255.0
gateway = 192.168.1.1
dns = 8.8.8.8
Settings
ipaddress: This is the static IP Address for the Wireless Network. If you do not specify a static IP, then automatic IP Address assignment through DHCP is used. If you set this setting, then you must also set the “netmask” setting, or else it is ignored.
netmask: This is the netmask for the Wireless Network. If you have not specified the “ipaddress” setting, this setting is ignored.
gateway: This is the network gateway for the Wireless Network. If you have not specified the “ipaddress” setting, this setting is ignored.
dns: This is the Name Server (DNS Server) for the Wireless Network. If you have not specified the “ipaddress” setting, this setting is ignored. By default, Google’s Public DNS Service is always included in the system’s configuration, to ensure reliability.
LAN Network Settings [LAN]
Configuring the (wired) Ethernet Static connection
Example section with dummy settings:
[LAN]
ipaddress = 192.168.1.200
netmask = 255.255.255.0
gateway = 192.168.1.1
dns = 8.8.8.8
Settings
ipaddress: This is the static IP Address for the Local Network. If you do not specify a static IP, then automatic IP Address assignment through DHCP is used. If you set this setting, then you must also set the “netmask” setting, or else it is ignored.
netmask: This is the netmask for the Local Network. If you have not specified the “ipaddress” setting, this setting is ignored.
gateway: This is the network gateway for the Local Network. If you have not specified the “ipaddress” setting, this setting is ignored.
dns: This is the Name Server (DNS Server) for the Local Network. If you have not specified the “ipaddress” setting, this setting is ignored. By default, Google’s Public DNS Service is always included in the system’s configuration, to ensure reliability.
LAN Network Settings [LAN]
Configuring the (wired) Ethernet Proxy connection
Example section with dummy settings:
PROXY]
proxy = 192.168.1.253
port = 3128
username = myproxyusername
password = myproxypassword
Settings
proxy: This is the Proxy Server IP address (or hostname, but it’s better to use an IP address to be safe). If you specify a Proxy Server using this setting, then all HTTP and HTTPS communications from the Player will go through the Proxy server. Remember that to use HTTPS, the Proxy must allow the “CONNECT” method.
port: This is the TCP port number for the Proxy. If omitted, it defaults to 3128. This setting is ignored if you have not specified the “proxy” setting.
username: This is the username to be used against the Proxy with HTTP Proxy Authentication. If omitted, no authentication info is sent to the Proxy. This setting is ignored if you have not specified the “proxy” setting.
password: This is the password to be used against the proxy using HTTP proxy authentication. If omitted, no password is sent to the Proxy. This setting is ignored if you have not specified the “proxy” or “username” settings.
Yodeck Registration Information [REGISTRATION]
WARNING: This section is used by Yodeck’s pre-provisioning mechanism. You should not change this information unless you really know what you are doing.
Preconfiguring Device Registration
Example section with dummy settings:
[REGISTRATION]
deviceid = 21518947298065749230657432
Settings
deviceid: This is the Device ID (also called as the “Screen ID”) which identifies this Player on Yodeck central systems. When the Player is registered with Yodeck (using the on-screen Registration Code), this setting is set. To allow for pre-provisioning, you can create the screen in your account in Yodeck and copy the Screen ID value into this setting. When the Player starts, it will attempt to Register with this Device ID, and thus automatically register without using the Registration Code.
Yodeck Internal Information [INTERNAL]
WARNING: This section is used by the software inside the Yodeck Player. You should not change this information unless you really know what you are doing. So, we only provide a little info on these settings to avoid erroneous configuration. You can safely delete this whole section; nothing will be affected.
Security and Shell Access Settings [SECURITY]
Configuring system security settings and system shell access
Example section with dummy settings:
[SECURITY]
disable_password_policy = false
remote_password_password= $6$sAIskWuRBgQRJHfS$x0Jycz1FpFbD84QzfeDbcHaOKgf0YHn9q6p0anOSx/ax5cgiYOtZ5LqyBYxK8.z4IjoVhDM2Ft29Ku5lp3N3V
disable_firewall_policy = false
Please note that it is recommended not to modify these settings since doing so might degrade your Player’s security or it will prevent the Yodeck Support Team from helping you out in case of a serious problem. After you get your Player online, you can change these settings through Yodeck.
disable_password_policy: This is a security check. Every time the Yodeck Player starts, the system passwords for a system user account
root,piandyodeckare checked against the default passwords for Raspbian and the 100 most common passwords. If a weak password is discovered, this issue is logged and (in the near future) will appear in your Yodeck account as a potential security issue. Valid values for enabling this option aretrue,yes, andon(all case-insensitive), any other value (including empty) disables this option.
remote)support_password: This is the password that should be set for a system user account
yodeck. By setting this password, you can log in as user “yodeck” and then use thesudocommand to perform privileged actions. The value can be plaintext or can be a standard crypt hash value. To generate a hash value, you can use the following command – on Linux/Mac:openssl passwd -1 -salt ARandomValue– on Windows, just use this online tool.
Warning: It is strongly recommended NOT to change theuser’s password. This password is used to provide remote support. Resetting it won’t affect Yodeck in any way; we just won’t be able to support you remotely by connecting to your Player. If the password is not specified, no changes are made to the system.
disable_firewall_policy: This specifies whether Yodeck should disable re-configuring the embedded firewall on the Player. If you want to disable the firewall re-configuration, you must set this option to
true. Valid values for enabling this option aretrue,yes, andon(all case-insensitive), any other value (including empty) disables this option.
Raspberry Pi Specific Settings [RASPBERRY]
Configuring settings for the Yodeck Player or the Raspberry Pi
Example section with dummy settings:
[RASPBERRY]
config_overwrite = false
config_content = Z3B1X21lbT0xMjgNCg==
Please keep in mind that it is recommended not to modify these settings since doing so might disable several functions of your Player or could even damage it. Also, note that it is recommended not to modify these settings manually. After you get your Player online, you can change these settings through Yodeck.
config_overwrite: If this option is enabled, then the
/boot/config.txtfile is overwritten with the contents of theconfig_contentoption detailed below. Valid values for enabling this option aretrue,yes, andon(all case-insensitive), any other value (including empty) disables this option.
config_content: This is the content to be written to the
/boot/config.txtfile, if the aboveconfig_overwriteoption detailed above is enabled. The content is Base64-encoded, without any newlines (all the resulting Base64 string is on a single line. Warning: Setting wrong values to these settings may result in a number of negative repercussions, e.g., voiding the warranty on your Raspberry Pi or Yodeck Player, preventing it from booting, losing network connectivity or HDMI/TV-out signal, and many other horrible things. Please just change it if you really know what you are doing.
Example for “SETTINGS.txt”
[WIFI]
ipaddress =
netmask =
gateway =
dns =
ssid =
key =
mode = WPA
[LAN]
ipaddress =
netmask =
gateway =
dns =
[PROXY]
proxy =
port =
username =
password =
[REGISTRATION]
deviceid =
[INTERNAL]
settings_file_timestamp = 1447771170.0
log_level =
remote_log_level =
disable_error_monitoring =
[TIME]
zone = Europe
subzone = Athens
[SECURITY]
disable_password_policy = false
set_yodeck_user_password = $6$sAIskWuRBgQRJHfS$x0Jycz1FpFbD84QzfeDbcHaOKgf0YHn9q6p0anOSx/ax5cgiYOtZ5LqyBYxK8.z4IjoVhDM2Ft29Ku5lp3N3V.
disable_firewall_policy = false
[RASPBERRY]
config_overwrite = false
config_content =
How do I change the TV’s HDMI source?
Change the TV Source from your Media Player to another HDMI input. Similar to changing the source from your TV controller. Typical use case: Changing content between live TV from the cable box and Digital Signage content.
⚠️It works only with a Yodeck Player based on Raspberry Pi.
✅ Please take a look at this guide here for more details.
Is there a bandwidth limit for media uploaded or downloaded on Yodeck?
No, there is no limit whatsoever. You can upload or download as many videos and images as you want.
✅ Note that Yodeck is not a file storage service nor a streaming service. You should always keep copies of the content you create outside of Yodeck. Always. We will not be held liable for failing to store and back up your content safely.
⚠️Disclaimer
Fair use is always implied, okay. In case improper use is detected, we will contact you, and if you fail to conform, your account may be disabled abruptly. Check out our Terms of Use or contact us for more information.
What about Internet outages? What will happen to my players?
What Happens to Your Content During an Internet Outage?
One of the biggest concerns when it comes to digital signage is the possibility of an Internet outage. After all, without an Internet connection, how can your content be displayed on your screens?
At Yodeck, we understand the importance of uninterrupted playback for your digital signage. That’s why we have designed our system to ensure that your content continues to be showcased even during an Internet outage.
Local Playback for Uninterrupted Display
When you use Yodeck-enabled screens, your content is downloaded and played locally. This means that even if your Internet connection goes down, your content will still be displayed on your screens without any interruptions. This is especially useful for businesses that rely on digital signage for important announcements or advertisements.
With Yodeck, you can feel confident that your content will continue to be showcased for at least 30-35 days without any disruption.
Limitations During an Internet Outage
During an Internet outage, you may be unable to change the content displayed until Internet access is restored. However, rest assured that your screens will continue to function flawlessly, showcasing the pre-downloaded content without any interruptions.
Built-in Fail-Safe Mechanism
In the rare event of a prolonged Internet outage (more than 30 days), Yodeck-enabled players have a built-in fail-safe mechanism. In such cases, the screens will temporarily black out and display a discreet but informative message to keep your audience informed about the situation. This ensures that even during extended periods without Internet access, your screens will remain active and provide valuable information to your viewers.
Reliable Solution for Your Digital Signage Needs
Yodeck’s reliable and robust system allows you to confidently deploy your content on screens , knowing that they will continue to operate seamlessly even in the face of unexpected Internet outages. With the assurance of continuous playback and the ability to communicate important messages during prolonged outages, Yodeck provides you with a reliable solution for your digital signage needs.
Don’t let an Internet outage disrupt your digital signage. Choose Yodeck for uninterrupted playback and peace of mind.
Bypassing Video Re-encoding (As-Is Upload)
All video files you upload to Yodeck go through re-encoding (“transcoding”) to ensure the video is playable on the player. Our Players only support the industry-standard H.264 video format (codec), so we ensure all videos are delivered to Players in this format.
Re-encoding the Video files may result in a slight loss of clarity. Usually, video quality is preserved just fine. But in cases where you want the best possible result, you should use the original file you uploaded instead of the re-encoded one.
⚠️IMPORTANT
Your file must be encoded in the H.264 format (codec), up to High Profile, Level 4.1 – translating to 1920×1080 resolution at 30 FPS or even 60 FPS. You can try even higher levels, but that depends on the file. Make sure you test a sample of your content first before deploying it.
We support almost all containers, including MP4, TS, MKV, etc. Audio is handled by software, so any codec should be fine.
If you need to enable this option, send us a message, and we will do so for you!
How does Yodeck support powering monitors and TVs on and off?
The Yodeck Player (or Raspberry Pi) generally includes a CEC adapter on its HDMI monitor port. CEC is a standard communication protocol supported by most major TV manufacturers. It allows for a playback device (the Yodeck Playbox) to power on, power off, and switch video inputs on a CEC-enabled TV. Check out the CEC compatibility chart.
Are all monitors and TVs compatible with this feature?
If your monitor does not support CEC (e.g., you have a computer monitor), the Yodeck Player turns off the HDMI port to allow the monitor to power down by itself. This function is supported by all current computer monitors, even some TVs.
ℹ️ Kindly take a look here for further details on how to create the script for that.
If you use an HDMI-to-VGA adapter on the Yodeck Player, the software will attempt to turn off the HDMI/VGA port, which this hardware might not support.
In the future, we will support using infrared LEDs to switch the monitor on or off through IR, just like standard TV remotes do. We can support custom solutions, like the above, or custom serial connections to monitors for large installations. Also, we will be providing programming hooks that will allow you to create custom scripts to power the monitor on/off.
Can I have root/SSH access to the Yodeck Player?
How much bandwidth does Yodeck use?
Yodeck is an online service! So, Internet access is required for your Player to be managed properly.
When a player is connected to the internet, a continuous connection between the player and our servers is established. That connection is responsible for managing the player and updating the player’s status in the Yodeck dashboard. It requires 300MB/month at maximum.
What happens when I push content to a player?
The media content videos(not the streams), images, documents, sound files(not the streams), and a few static apps are downloaded locally to the player. So, the data usage will be related to how many and the size of the files you plan to use.
If, for example, you have video files, images, and documents that you would like to display and their total size is 2 GB, the players will download these data once (2GB) and nothing else (except, of course, the 300MB/month that mentioned in the beginning).
If the content that will be pushed contains streams, web pages, and dynamic widgets, then the total bandwidth needed is related to that content and cannot be clarified.
⚠️IMPORTANT
If you are on a metered/limited Internet connection (e.g., mobile carrier or per-traffic / per-hour access), please contact us to ensure you can use our service over those Internet connections.
How to reflash your Yodeck player
Raspberry Pi
⚠️The below guide applies only to the Yodeck Player based on Raspberry Pi.
The player is resilient to hardware and system failures. But, as with any device, there is a slight chance that the player may fail. In the case of a software failure, you might be able to recover your player by “reflashing” it with the latest software.
Reflashing will erase the player’s content (re-writing the whole SD card from scratch). Your settings will be retained, so your player should reapply all settings in the system, re-download all required content, and resume playback without you doing anything.
There are two recommended methods to reflash a Yodeck player. Please check them below!
Do I have access to my account if SSO authenticator is down?
If the SSO authenticator (Okta, Microsoft, etc) is down and you cannot access your account at Yodeck via SSO, the account owner or the account administrator can send us a request at support@yodeck.com, and we will deactivate the SSO for your account.
After the deactivation, the authentication process will be executed via the Yodeck.
*All users should ask for new passwords via the password reminder process.
Do you have an on-premise solution?
We are seeking an on-premises digital signage solution. Can yodeck support an on-premise server?
Can we host your software in our own data center?
Unfortunately, we do not currently support an on-premise solution, and it is not part of our immediate plans to offer such support within the next five years. Our Content Management System (CMS) is hosted exclusively on our servers, and it cannot be installed or operated on any other server infrastructure. This means that all media assets must be uploaded to our servers, which are securely hosted in Amazon Web Services (AWS) data centers located in Ireland (eu-west-1 region).
Amazon AWS is renowned for having some of the industry’s highest security standards and robust firewall protections. Therefore, you can rest assured that your or your client’s media will be securely stored and protected on our servers.
However, if your client operates under a very strict security policy that mandates all media and data remain within the confines of the organization’s local network and prohibits any external data transfer, our solution may not be suitable for their needs. Our platform requires media to be uploaded to our cloud servers, which is a fundamental aspect of our system’s operation.
Also, I’d like to point out that a purely on-premise solution without internet connectivity is not feasible with our current setup. Our CMS is inherently cloud-based, and the digital signage players we support require an active internet connection to function properly. They need to connect to our cloud servers to download content and display it on the TV screens. Therefore, any environment that does not allow internet connectivity would be incompatible with our system.
We understand this may be a limitation for some clients with stringent security requirements, and we regret any inconvenience this may cause. If you have any more questions or need help exploring other potential solutions, please do not hesitate to contact us!
I have a restricted network. Which ports do I need to whitelist for the Yodeck players?
Firewall Exceptions for Restricted Networks
If your network is restricted, you may need to make some exceptions in your firewall settings to ensure that your players have unrestricted access to certain domains and ports.
Below is a list of the domains and ports you will need to allow access to.
Firewall Exceptions Required for restricted networks
Hostname |
Ports |
Usage & Comments |
|
hub.dsbackend.com |
443/TCP |
[Required] IoT hub used for communication with Players from the Yodeck Platform |
|
repo.dsbackend.com |
80/TCP |
[Required]Software Updates repository – no HTTPS required since packages are digitally signed |
|
443/TCP |
[Required] Scheduling Information and Media Downloads |
|
|
assets.dsbackend.com |
443/TCP |
[Required] Scheduling Information and Media Downloads |
|
remote.dsbackend.com |
1194/TCP |
[Optional] Used by our Support Team for advanced remote troubleshooting |
|
widgets.dsbackend.com |
443/TCP |
[Optional] Used by some of our Apps requiring online info (Weather, etc.) |
IMPORTANT NOTES
-
All ports are Outbound.
-
The repo.dsbackend.com and AWS domains will resolve to multiple IP addresses.
-
You can find those IP addresses using this guide:
-
IP-based firewalls
If you are using IP-based firewalls, you must add the following IPs to your firewall exceptions: 108.128.247.33 and 52.210.76.69.
Can I use an HDMI-to-VGA adapter for VGA monitors?
Yes, you can. But be careful!
First, you have to use an active adapter, which converts the HDMI’s digital signal to a VGA analog signal.
Second, your HDMI-VGA adapter needs to be externally powered. We have conducted tests with several HDMI-to-VGA adapters. Adapters that are not powered by some other power source besides the HDMI port behave erratically on the Yodeck Playbox (or Raspberry Pi). They either don’t work at all or work for a while and then go on and off constantly. This is because the HDMI port on the Raspberry Pi does not provide enough power to the adapter. Adapters that are externally powered work fine.
For example, this adapter type does not work correctly, but powered adapters have been tested and work. If you are having trouble, try powering the adapter on its own PSU, not from the Yodeck Playbox (or Raspberry Pi) or the TV set. Note that we have not thoroughly tested this type of hardware, and we have no recommendations.
Does Yodeck support connecting through an HTTP Proxy?
Yes! You can set the HTTP Proxy and Username/Password through Yodeck. You can also set it through the configuration file on the SD Card, which you can edit through your PC and an SD card reader.
For our Yodeck Players, all Network Settings can be configured when you place your order, so it works great as soon as you plug it in!
Reset all Settings on your Yodeck Player
To reset all Settings on your Player, you need to delete a file from its SD card. This will force the system to apply the default settings.
⚠️IMPORTANT
Remember that if your Player requires some special network configuration to get online, you will lose Internet connectivity. This might render the Player unreachable, and you might go on-site and perform manual configuration.
For Regular Users
-
Power off your Player (by removing the power cable).
-
Remove the microSD card from your Player.
-
You can access the microSD card with your PC. You might need a microSD-to-SD card adapter or a USB memory card reader.
-
You will see one or more storage filesystems. The first one (the smallest, with around 100MB of space) contains a file called “SETTINGS.txt.”
-
Delete the “SETTINGS.txt” file.
-
Remove the microSD card from your PC.
-
Place the microSD card into your Player.
-
Power on your Player.
Upon start-up, the Player will apply all default settings to the system. This may take up to 10 minutes, and a reboot might occur.
For Advanced Users
If you have remote (SSH) or local shell access, issue these two commands:
In order to SSH your player follow this guide here.
-
sudo rm -f /boot/SETTINGS.*
-
sudo reboot
Upon start-up, the Player will apply all default settings to the system. This may take up to 10 minutes, and a reboot might occur.
What are the Yodeck Player specs?
Software support for Raspberry Pi 5
We are thrilled to share some exciting news based on your interest in Raspberry Pi 5.
Our Raspberry Pi 5 (RPi5) image is now available in Beta! Click the link below for more details.
We’ve put together a detailed article about Raspberry Pi 5 and Digital Signage, in which we also discuss why we have continued to use the Raspberry Pi 4 as the default Yodeck Player. Click the link below for more details.
➡️ https://www.yodeck.com/news/yodeck-and-raspberry-pi-5/
This Beta phase is the perfect time to test your use case with the Raspberry Pi 5 and share your feedback with us.
You can find all the current limitations of the Raspberry Pi 5 below.
➡️ https://www.yodeck.com/docs/creating-a-yodeck-player/raspberry-pi-5-limitations
We are excited to hear your feedback!
How to Turn your TV On and Off
Learn how to automatically control when your TV turns on and off using Yodeck’s Turned Off option. This feature allows you to schedule screen downtime, reduce energy usage, and ensure displays are active only when needed.
In the full article, you’ll learn how to schedule the Turned Off option alongside your regular content, choose between different scheduling approaches, and test whether your TV supports HDMI-CEC power control. The guide also covers compatibility considerations, required TV settings, and common troubleshooting steps to ensure reliable power control.
Does the Yodeck player support Power over Ethernet (PoE)?
Yes, the Yodeck player supports Power Over Ethernet (PoE). But a separate PoE HAT is required.
We strongly recommend using the official PoE hat.
Introducing Yodeck’s REST API: Seamless Integration for Your Digital Signage Needs
We are excited to announce that Yodeck has released a robust REST API. This API seamlessly integrates Yodeck’s digital signage solutions with your existing systems, offering you greater flexibility and control over your displays.
With the Yodeck REST API, you can:
Automate content scheduling and deployment across multiple screens.
Manage media files, playlists, and layouts programmatically.
Control your digital signage network remotely with custom scripts.
Integrate with third-party applications to enhance your workflows.
To get started, visit our API documentation, which contains detailed information on endpoints, request parameters, and example responses. This comprehensive guide will help you understand how to leverage the API to meet your needs.
If you have any questions or need further assistance, our support team is here to help.
How do you factory reset the Yodeck device/player?
How to Factory Reset Your Player
Factory resetting your player is a great way to troubleshoot any issues you may be having with your device. This process will restore your player to its original settings, erasing any changes you have made since setting it up. If you are experiencing any technical difficulties, a factory reset may be your solution.
⚠️ Remember that this method is available only for the Yodeck player based on Raspberry Pi.
For the other players (Android, Tizen, LG, etc.), reach out to the relevant vendor.
Step 1: Access the Factory Reset Link
To factory reset the player, use the below link:
https://www.yodeck.com/docs/how-to-articles/how-to-flash-an-sd-card-using-pi-imager/This link will take you to the factory reset page, where you can begin the process.
Step 2: Wait for the Reset to Complete
The factory reset process may take up to 20 minutes to complete. During this time, your player will restart, and all data will be erased. Please do not turn off your player or unplug it from the power source.
Step 3: Set Up Your Player
Once the reset is complete, your player will restart, and you will be prompted to set it up again. You can follow the on-screen instructions to complete the setup process.
Additional Tips
If you are still having problems with your player after the factory reset, you may need to contact customer support for more help. It is also recommended that any important data be backed up before performing a factory reset.
Congratulations, you have successfully factory reset your player! Your device should now be functioning properly.
Which OS are the Yodeck Players (Raspberry Pi4) are running?
The Raspberry Pi devices, including the Raspberry Pi 4, typically run the Raspberry Pi OS (formerly Raspbian), which is a Debian-based Linux distribution.
At the moment, the Yodeck Players are running Debian version 10 (Buster).
We are working to update our current software to the latest Debian version which is the 12 (Bookworm).
File size limitation on the Yodeck portal
All files you upload to the Yodeck portal undergo re-encoding (“transcoding”) to ensure the resulting file format is playable by the players.
Our encoding service can handle single files of up to 5GB. Uploading a single file with a size above 5GB is not supported at the moment!
Introducing Yodeck’s REST API: Seamless Integration for Your Digital Signage Needs
We are excited to announce that Yodeck has released a robust REST API. This API seamlessly integrates Yodeck’s digital signage solutions with your existing systems, offering greater flexibility and control over your displays.
With the Yodeck REST API, you can:
- Automate content scheduling and deployment across multiple screens.
- Manage media files, playlists, and layouts programmatically.
- Control your digital signage network remotely with custom scripts.
- Integrate with third-party applications to enhance your workflows.
To get started, visit our API documentation, which contains detailed information on endpoints, request parameters, and example responses. This comprehensive guide will help you understand how to leverage the API to meet your needs.
If you have any questions or need further assistance, our support team is here to help.
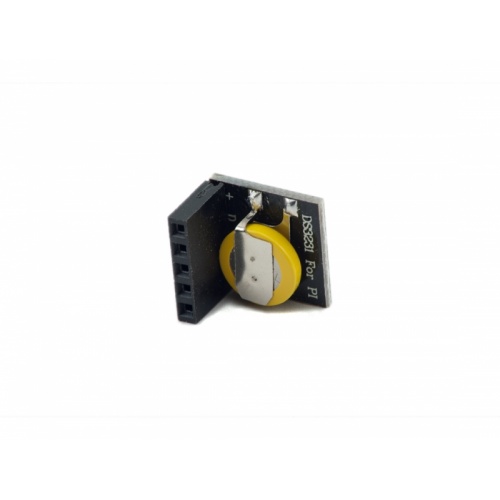
Configure RTC DS3231
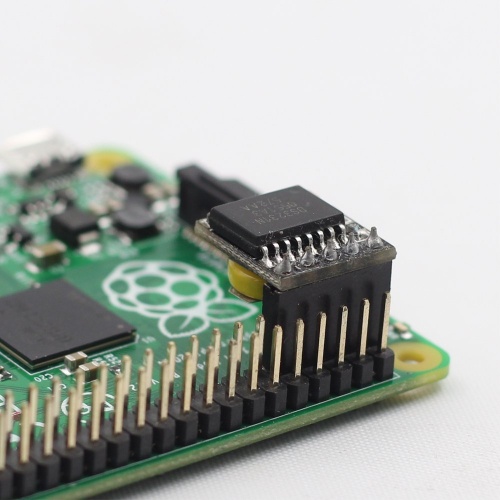

Yodeck Players do not include an onboard real-time clock. What does that mean? It means that if your Player is offline for a prolonged period of time, it might lose track of time, and scheduling features might not behave correctly.
The Problem
The Players (based on Raspberry Pi) do not have an RTC (Real Time Clock) module on board.
The cost of the RTC is fairly low (you can find them on eBay), but it needs to be considered if your deployment is time-critical.
The Technical Details
Two clocks are important in Linux: the ‘hardware clock,’ also known as RTC (Real Time Clock), CMOS or BIOS clock, and the ‘system clock.’
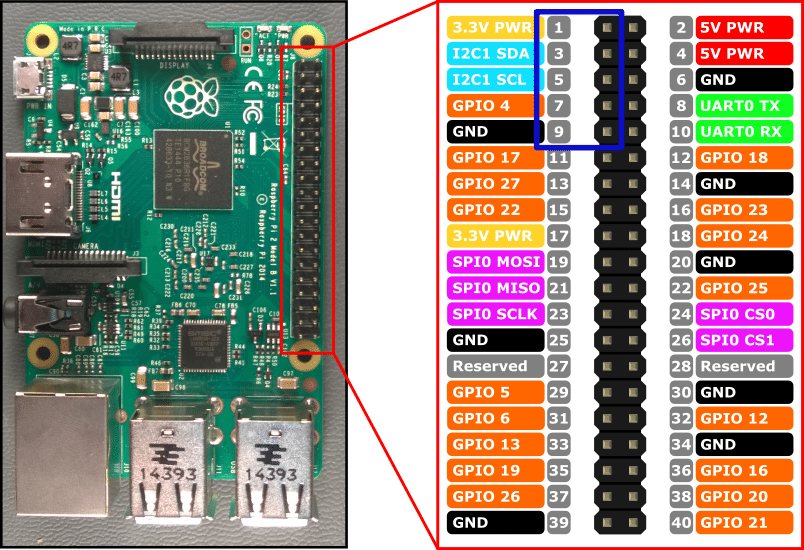
- The RTC is a battery-backed clock module connected to the Player’s GPIO ports (Raspberry Pi) that keeps time even when the Player is shut down (or has no power).
- The second clock is called the ‘system clock,’ maintained by the operating system, Linux in our case.
At boot time, the hardware clock is used to set the system clock, and from that point onwards, the system clock is used to track time. At regular intervals and shutdowns, the system time is used to set the hardware clock to ‘save’ the time between reboots.
Without an RTC, the Player saves the current time on the SD card every hour. If there is a power failure, it will load the last time recorded on the SD card when the Player boots. It will then sync its time from the Internet NTP (Network Time) servers or our servers as a backup. But if there is no Internet access, the Pi will not sync time, so its clock might be off (from minutes to hours, depending on how long the power failure lasted). This will affect Scheduling, not content playback.
Configuring the RTC clock on a Yodeck player
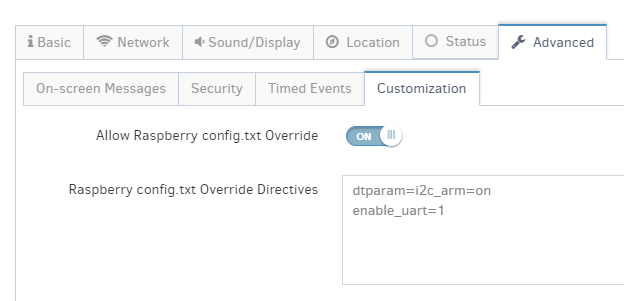
To use the RTC module with Yodeck, in the screen settings:
- Enable the “Allow Raspberry config.txt Override” toggle.
- In the “Raspberry config.txt Override Directives” field, enter the following directive:
dtoverlay=i2c-rtc,ds3231 - In the “Advanced Player Directives” field, enter the script (this is a single line of text):
yodeck_run_custom_script=IyEvYmluL2Jhc2gKaWYgISBncmVwICdeaHdjbG9jayAtcycgL2V0Yy9yYy5sb2NhbDsgdGhlbgogICAgc2VkIC1pICdzL15leGl0IDAvaHdjbG9jayAtc1xuZXhpdCAwL2cnIC9ldGMvcmMubG9jYWwKZmkK
⚠️Make sure it is a single line without spaces or line breaks.
After clicking the “Save” button, the player will automatically pick up the new configuration, apply it, and automatically reboot. After the reboot, the RTC module will be available on the system, and the time will be automatically set on boot. In any case, if the network is available, the time will sync with the default Debian NTP servers and our service.
The custom script essentially is a software hook that allows for custom configuration scripts to be used on the player. It just adds the command hwclock -s in /etc/rc.local, which will read the time from the RTC and set the boot system time.
You might need to check that the RTC module has the correct time by running sudo hwclock -r (the command should return the correct time). Otherwise, you can run sudo hwclock -w to update the saved time of the RTC using the system time. Here is how you can SSH the player.
Connection Diagram
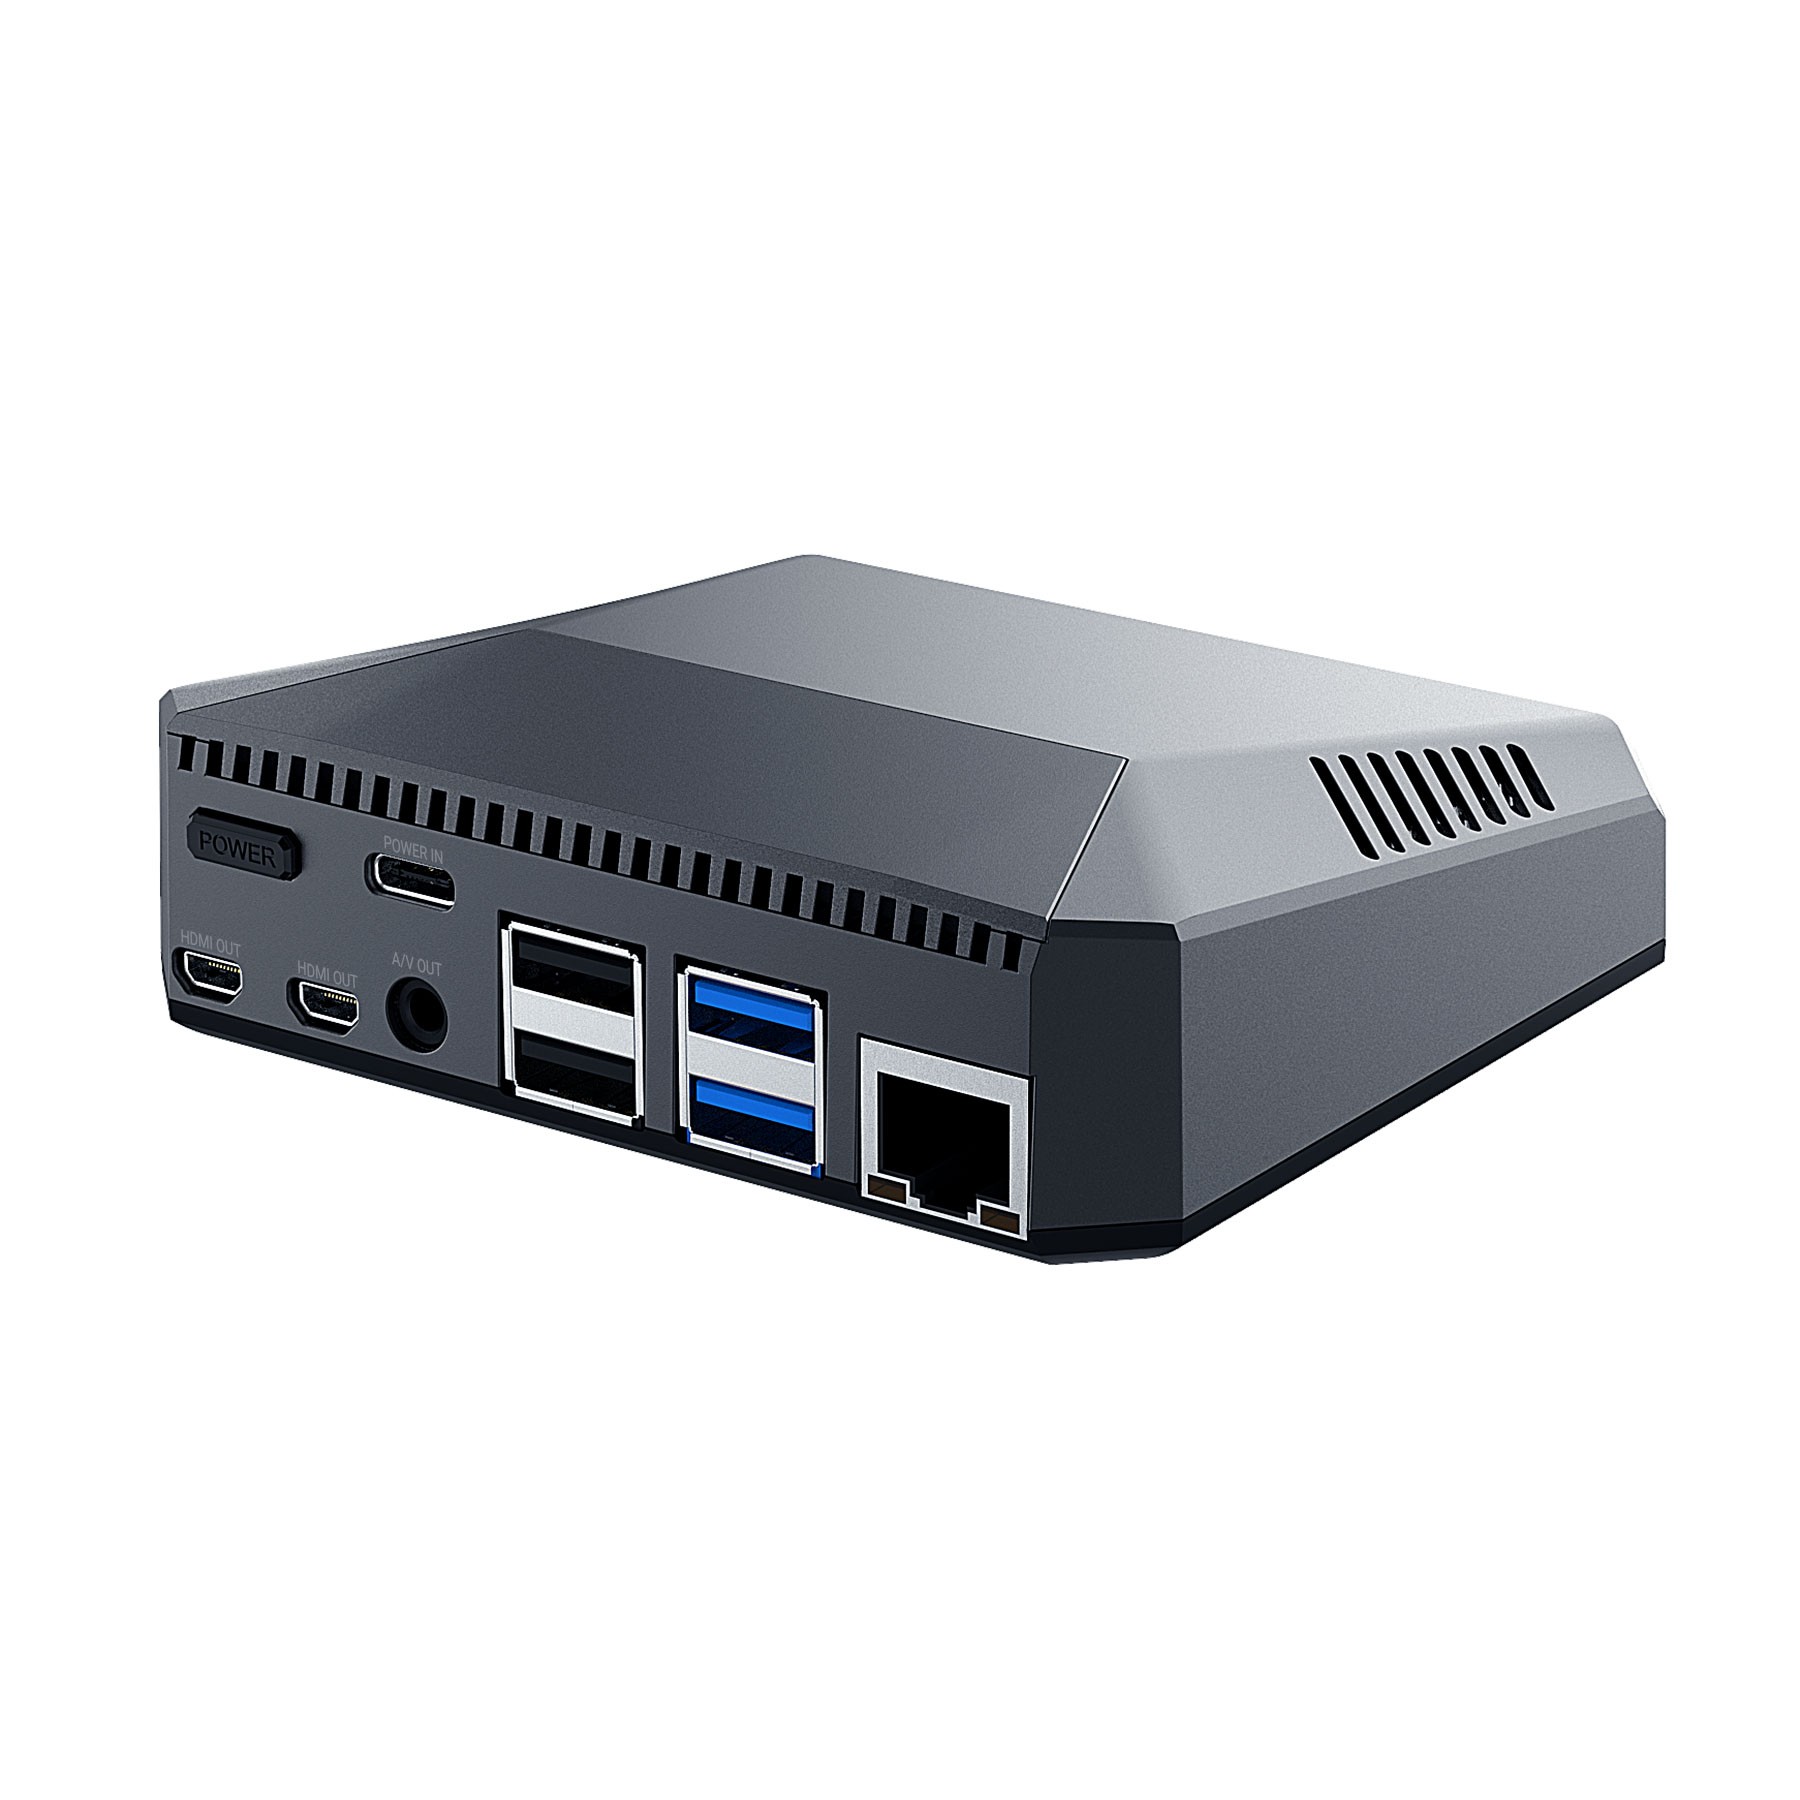
How to configure the Yodeck player with an Argon ONE case
Fan and Power Button installation
- Hardware Installation
- Software Installation
- Argon ONE Power Button Functions
- Argon ONE Fan Speed and Temperatures (Default values)
- Configuring the Argon’s case fan and temperature values.
Hardware Installation
Software Installation
- Follow our guide to SSH the Yodeck player.
- Run the command below, and exit the player’s command line when the installation finishes.
curl https://download.argon40.com/argon1.sh | bash
- Login to your Yodeck account, go to Screens→Edit Screen→ Advanced→ Customization and type the below 2 options on the “Raspberry config.txt Override Directives“.
dtparam=i2c_arm=on
enable_uart=1

- Click the Save button and wait for the player to finish the configuration.
Argon ONE Power Button Functions
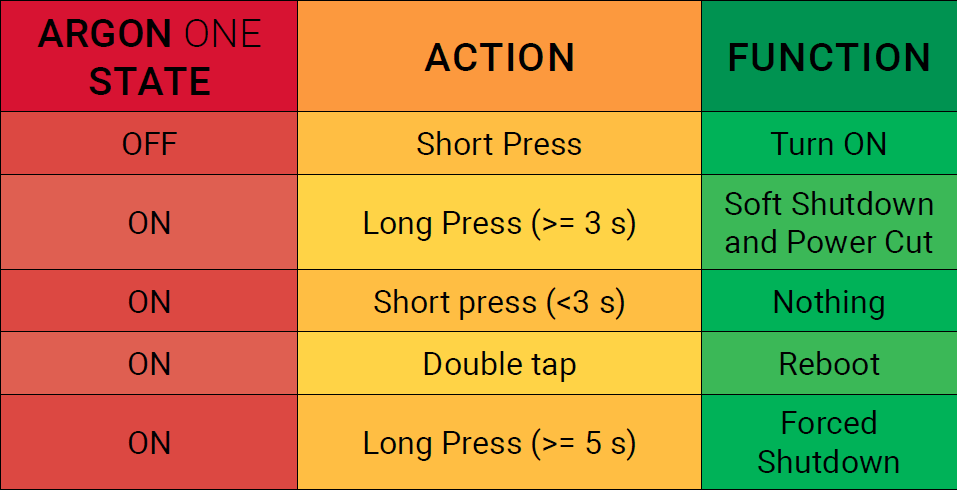
The process above will automatically install the configuration that will activate the Argon ONE Power Button with the following functions:
- Pressing the power button while the Pi is off will turn on the Pi.
- Pressing the power button for at least 3 seconds while the Pi is on will safely shut down the Pi and turn it off . This is indicated by the green LED blinking.
- Pressing the power button for less than 3 seconds while the Pi is on will do nothing .
- Pressing the power button twice while the Pi is on will reboot the Pi. This is indicated by the green LED blinking.
- Pressing the power button for at least 5 seconds while the Pi is on will force shut down the Pi. This is indicated by the sudden stopping of the Pi.

Argon ONE Fan Speed and Temperatures (Default values)
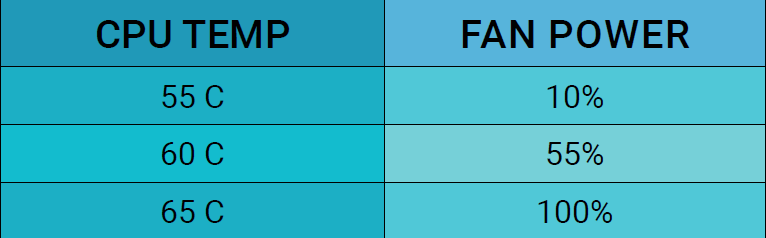
Upon installation of the Argon ONE script by default, the settings of the Argon ONE cooling system are as follows:
- When the CPU temperature is at 55 C , the fan will run at 10% of its maximum speed
- When the CPU temperature is at 60 C , the fan will run at 55% of its maximum speed
- When the CPU temperature is at 65 C , the fan will run at 100% of its maximum speed

Configuring the Argon’s case fan and temperature values.
Customizing when the fan changes temperature and what speed the fan runs at is possible. To do that, follow the below steps:
- Follow our guide to SSH the Yodeck player
- Run the command below with admin privileges. The Password you will need is the same as you used to SSH the player.
nano /etc/argononed.conf
- After finishing the configuration, save the file and run the below command.
systemctl restart argononed.service
- The fan should start using the new temperature thresholds now.
How Content Transitions Work
In order to provide seamless transitions, the Player performs preloading of the content that follows. Every time a content item is shown on screen, the next item in the Playlist is loaded, so that the transition is as fast as possible.
Think of a Playlist with the following contents:
- Video1
- Widget1
- Widget2
- Image1
- Widget3
Let’s say that Widget1 is on screen. For each transition between two content items (e.g. Widget1 and Widget2, in this case), the Player performs the following steps:
- Widget2 is shown on-screen.
- Widget1 is hidden off-screen.
- Widget2 is started.
- Widget1 is stopped.
- Widget1 is destroyed (resources released).
- Image1 is preloaded off-screen.
For the next transition, the same sequence will occur.
- Image1 is shown on-screen.
- Widget2 is hidden off-screen.
- Image1 is started.
- Widget2 is stopped.
- Widget2 is destroyed (resources released).
- Widget3 is preloaded off-screen.
Content transitions work (almost) the same for all content types, so you should follow these guidelines whenever you create custom Content Viewers or Custom Widgets.