Table of Contents
Overview
With Yodeck’s SharePoint Playlist, you can display images, videos, and documents directly from a SharePoint folder on your screens using a Yodeck Player. Once you link your SharePoint account, simply upload or update content inside the selected folder. The Yodeck Player will automatically sync and update your screens. There is no need to log into Yodeck or manually push changes.
Limitations
Before setting up a SharePoint Playlist, please review the following:
- The SharePoint Playlist supports only Business/Work/School (Entra ID) Microsoft accounts, not Personal Microsoft Accounts.
- Basic & Premium plans can connect only one third-party storage account (Dropbox, OneDrive, Google Drive, or SharePoint) per Yodeck account.
- Enterprise plans can connect multiple third-party storage accounts, including multiple SharePoint accounts.
- Each SharePoint account can be linked to only one Yodeck account.
- Screen content preview is not available for third-party storage playlists.
- Only one SharePoint account can be linked per playlist.
- The sync interval is fixed (up to 5 minutes after inactivity) and cannot be customized.
Supported File Formats
Yodeck supports a wide range of file formats, including image, video, and document types. Microsoft Office files stored in SharePoint are supported as long as they are compatible with the aforementioned Yodeck-supported file formats.
Linking Your SharePoint with Yodeck
You can link your SharePoint account directly from the Playlists section of your Yodeck dashboard.
Steps for Linking a SharePoint Account
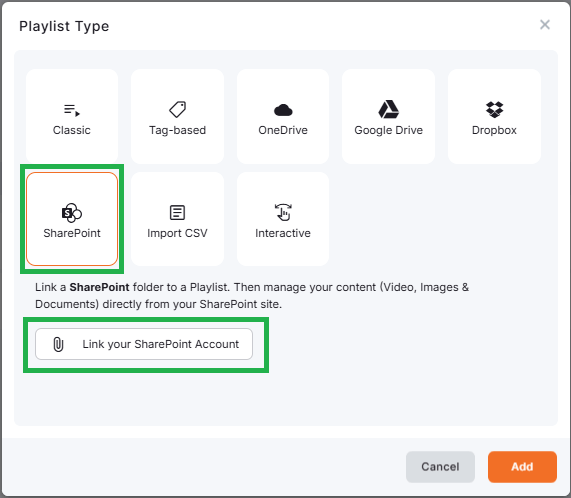
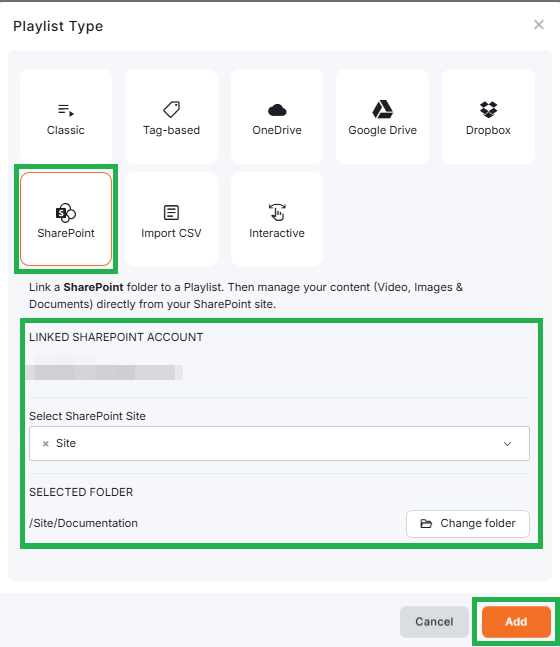
- Navigate to the Playlists section in your Yodeck dashboard.
- Click Add Playlist.
- Select SharePoint.
- Click Link your SharePoint Account.
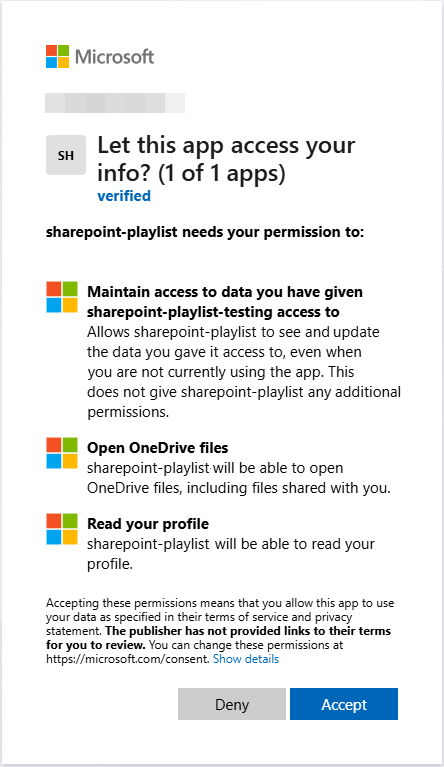
- A Microsoft login window will open.
- Sign in with your SharePoint / Microsoft account.
- Authorize Yodeck to access your SharePoint site and files.
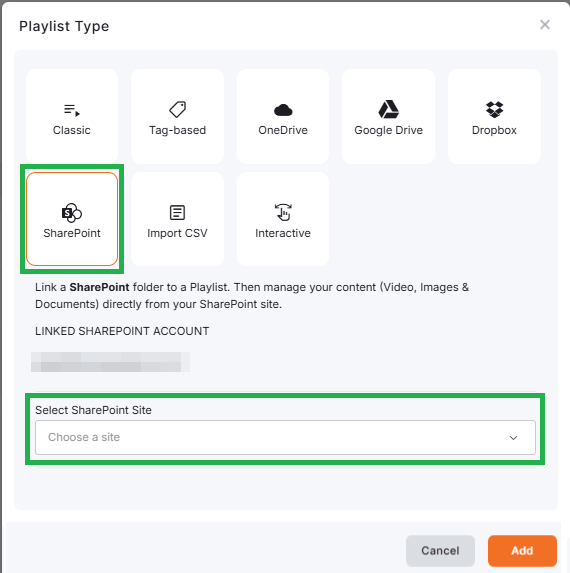
- Browse and select the desired SharePoint site.
- Then, browse and select the desired SharePoint folder.
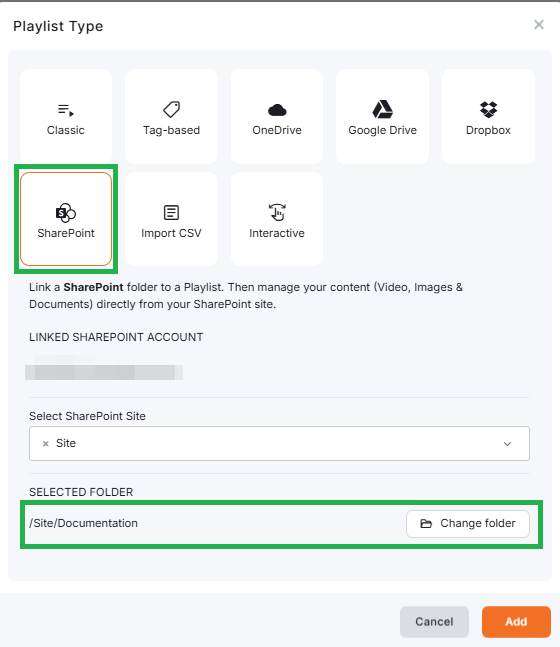
- Finally, click the Add button to complete the playlist creation.
- You will be transferred to the Playlist’s Details (settings) page.
💡After the setup, the playlist will appear in your Playlists list with the SharePoint media type indication.
SharePoint Playlist Settings
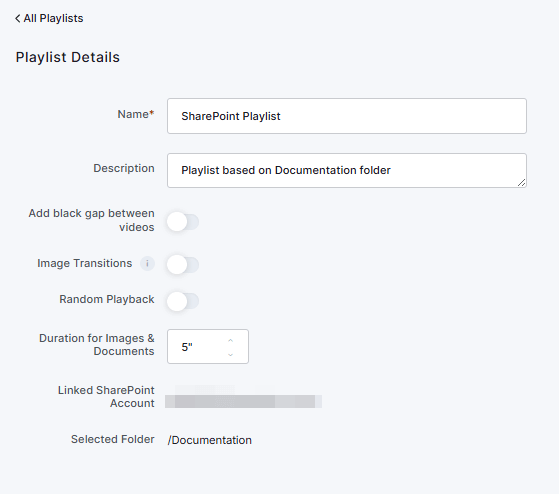
After creating your playlist, you can configure the following options under the Playlist Details page:
- Name (required): Enter a clear name for your playlist.
- Description (optional): Add internal notes.
- Add black gap between videos: Inserts a 0.5-second black screen between videos. If disabled, videos transition seamlessly.
- Enable Image Transitions: Adds smooth visual effects between image slides.
- Enable Random Playback: Shuffles the playback order.
- Default Duration for Images & Documents: Sets (in seconds) how long non-video content is displayed.
- Linked SharePoint Account: Shows the email address of the linked Microsoft account.
- Selected Folder: Displays the SharePoint folder currently synced with the playlist.
ℹ️Remember that the Preview is not available for SharePoint playlists.
How to Add Content to Your SharePoint Playlist
- You can upload your media files, images, videos, and documents, into the selected folder from your Microsoft SharePoint portal.
- You can use any folder you’ve selected during the playlist’s setup.
Files will play in alphabetical order, as long as the option of Random Playback (from within the “Playlist Details” [settings] page) is not enabled.
After uploading the content to your SharePoint folder, you do not need to log into your Yodeck account or make any further changes, as the player will handle everything.
Removing Content from Your SharePoint Folder
If you delete a file from the linked SharePoint folder, it will automatically be removed from your screens after the next sync cycle. No additional action is required in the Yodeck platform.
Syncing Files
The player will sync updates automatically after adding, removing or updating (changing a folder’s or item’s name, uploading a new version, or moving a folder to a different location) content in SharePoint.
ℹ️ Syncing takes up to 5 minutes, but only after the folder has been inactive (no file changes) for at least 5 minutes.
Moreover, updates made through the Microsoft account on the SharePoint Playlist will automatically appear on the screen(s). You do not need to select “Push to screens,” as the changes are automatically pushed, similar to how it works with OneDrive, Dropbox, and Google Drive Playlists.
Limit Rapid File Changes
Avoid making rapid file changes if you want the player to update quickly.
Assigning a SharePoint Playlist to Screens
Once created, you can assign your SharePoint Playlist to one or more screens.
Assignment to a Single Screen
You can assign a SharePoint playlist to a specific screen in two ways:
Option 1:
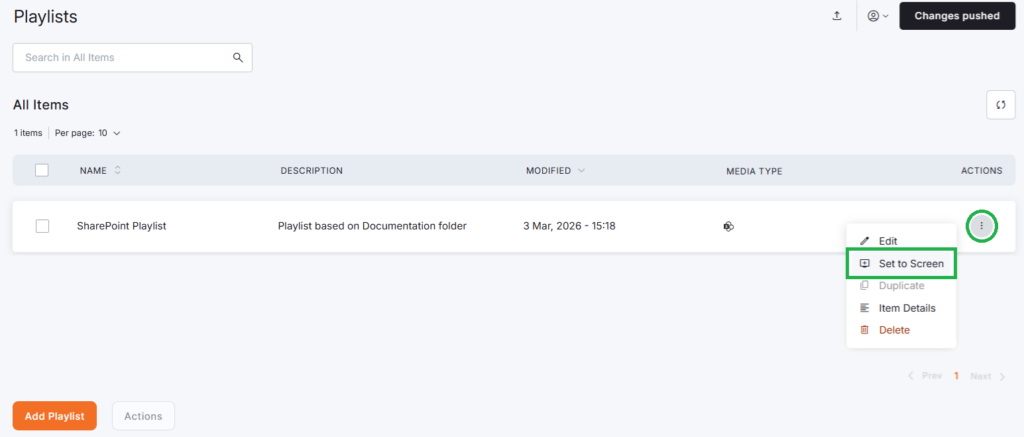
- Go to Playlists.
- Click the three-dot icon next to your SharePoint Playlist.
- Select Set to Screen.
Option 2:
- Navigate to Screens from the left main menu.
- Select your desired screen.
- Locate the Screen Content field.
- Choose Playlist.
- Search and select your SharePoint Playlist.
- Choose the screen fitting option:
- Fit – Maintains aspect ratio (may add black bars)
- Crop – Fills the area (may crop edges)
- Stretch – Fills the area (may distort content)
- Click OK.
- Click Save.
You can push changes to the Screen for immediate effect if desired.

Assignment to Multiple Screens
To assign a SharePoint Playlist to multiple screens:
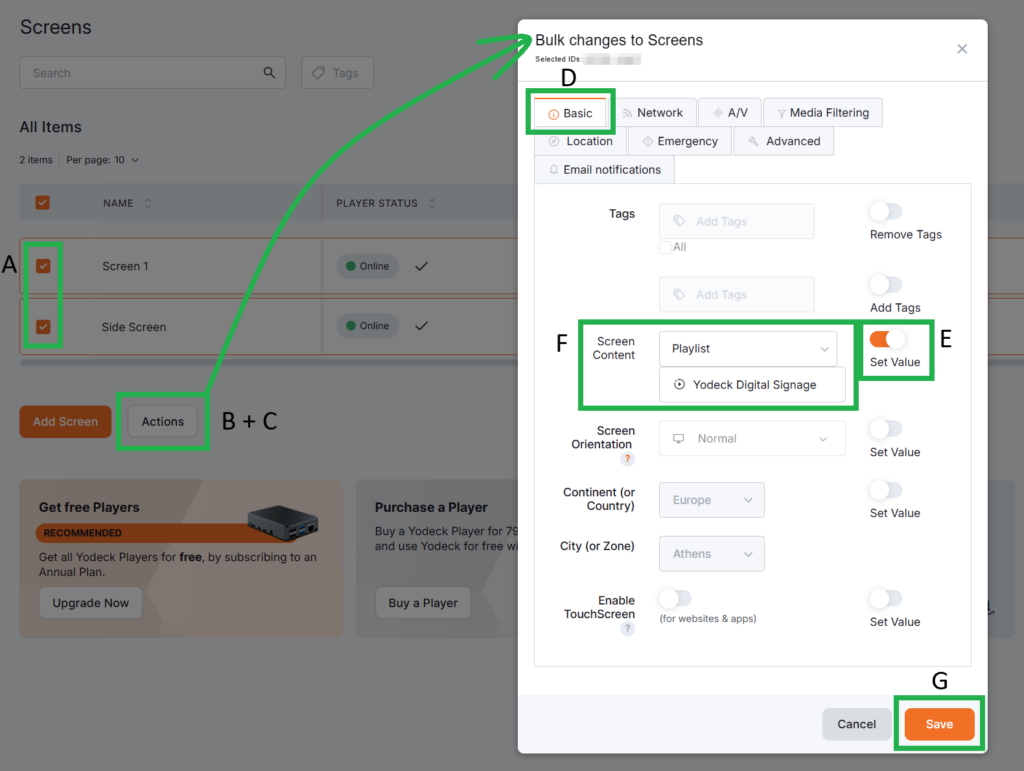
- Navigate to Screens.
- Select two or more screens.
- Click Actions.
- Select Edit.
- In the Bulk Changes to Screens window, open the Basic tab.
- Enable the Set Value toggle for Screen Content.
- Select your SharePoint Playlist.
- Click Save.
You may push changes for immediate effect.
How to Quickly Assign Content to Your Screens
For more information on how you can quickly assign content to your Screens, please check the related page here.
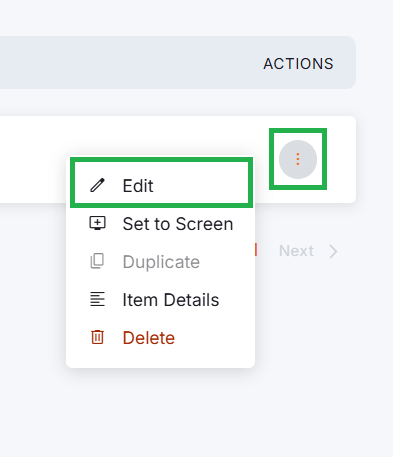
Editing a SharePoint Playlist
To edit an existing SharePoint Playlist:
- Locate the playlist in the Playlists section.
- Click the three-dot icon.
- Select Edit.
- Modify your desired settings.
- Click Save.
F.A.Q.s
Got questions? We’ve got answers! This section addresses common questions about the SharePoint Playlist.
You can select any folder available within your authorized SharePoint account during setup. The playlist will sync content from the selected folder.
The file will automatically disappear from your screens after the next sync cycle (up to 5 minutes after inactivity).
If you unlink your SharePoint account, any playlists using files from that Folder will stop working and display an error. Make sure to re-link the account or replace the content with local files or another source before removing access.
Yes, but only if you’re on the Enterprise Plan. This allows you to manage content from multiple SharePoint accounts, alongside other storage integrations like Dropbox and OneDrive.
Need Help?
The Yodeck Support Team can help you out! Log in to your Yodeck account and send us a message from the bottom right corner!