User & Account FAQs
Transfer Your Free Account to Your Company’s Paid Yodeck Plan
How to Transfer from a Free Yodeck Account to Your Organization’s Paid Account
Follow this quick step-by-step guide to transfer your free Yodeck account under your company’s paid-plan account, with clear instructions for both new users and admins/account owners.
Steps for Newly Signed-Up Users
You can sign up by utilizing your Google or Microsoft credentials or by providing an email and a password. In any case, the steps below address all scenarios.
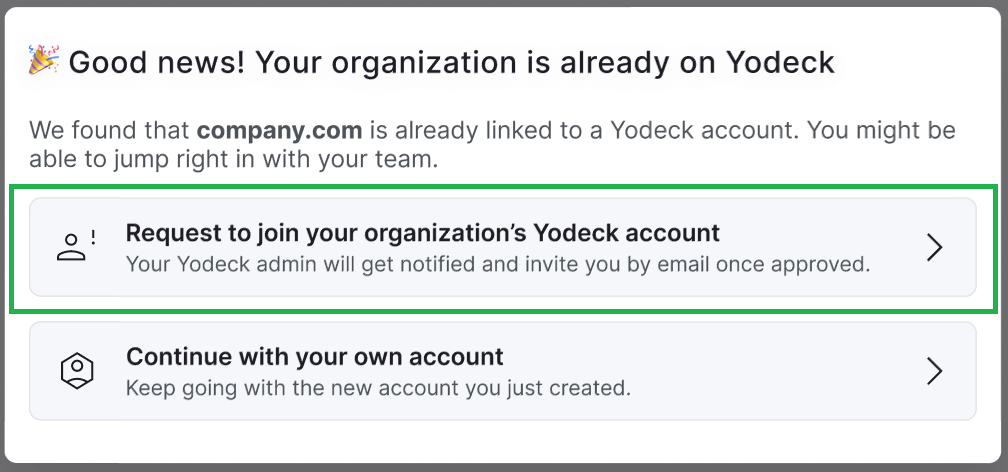
- After completing sign-up and making sure to verify your email address, Yodeck automatically detects that your organization already has a paid account and shows a pop-up message:
“Good news! Your organization is already on Yodeck.” - Click on the first option, Request to join your organization’s Yodeck account.
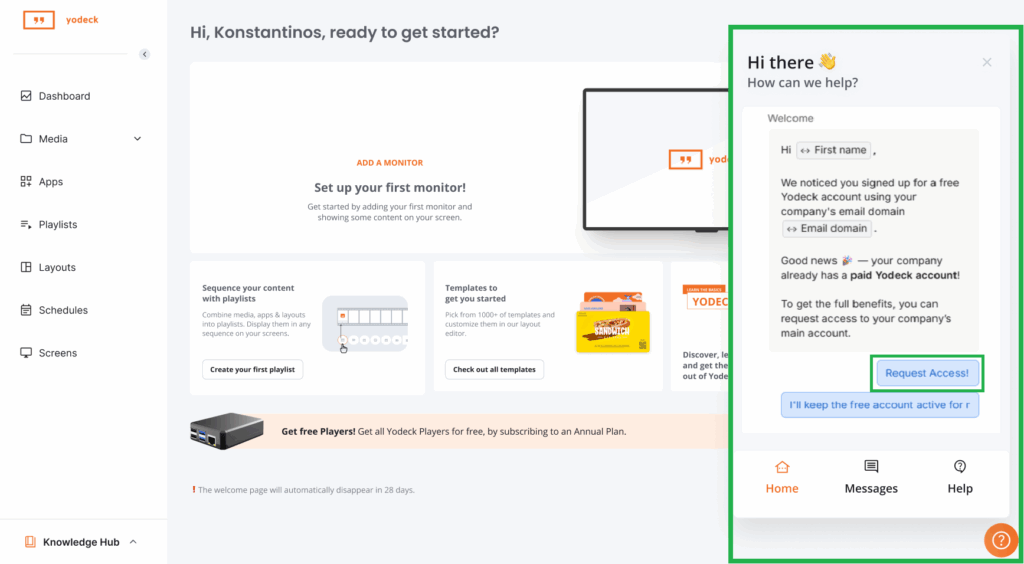
o This action begins the first steps of the transfer process and sends an informative join request notification to your company’s account administrator - You will then be redirected to the Yodeck Dashboard, where the in-app support chat opens automatically with further instructions for completing the transfer, as analyzed below.
Steps for Administrators / Account Owners
When a user from your organization requests to join your paid account, Yodeck notifies you.
How Admin/Account Owner Notifications Work
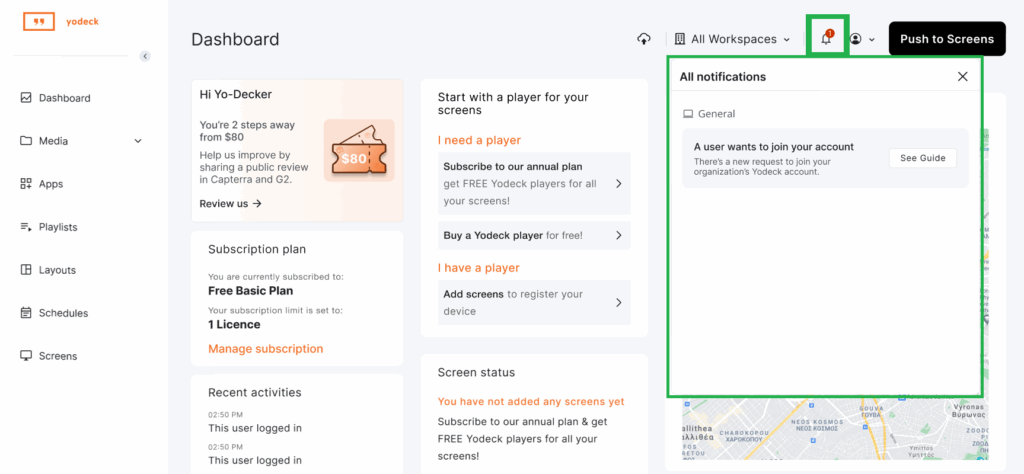
An alert is sent to the Admin or Account Owner of the organization’s paid plan, accessible via the Notifications bell icon. This informs them when a free plan user is seeking to join the organization and offers guidance on facilitating the plan change.
- Log in to your Dashboard.
- Click the Notification Bell icon (top-right corner).
- You’ll see a notification:
“A user wants to join your organization account.” - At this stage, you need to reach out to our support team for the transfer process to be completed. Specifically, you can reach a support associate by submitting a support ticket, by chat, by email, or by phone.
Final Steps for Completing the Transfer via the In-app Support Chat Instructions for New Users & Admins
The following steps explain the instructions from the in-app support chat for new users and admins/account owners.
Before proceeding with the numbered steps below, please know the following:
– Only the newly signed-up user profile will be moved under the organization’s paid account.
– Any media you uploaded or players to that paid account will not be moved.
– The current free account will be deleted.
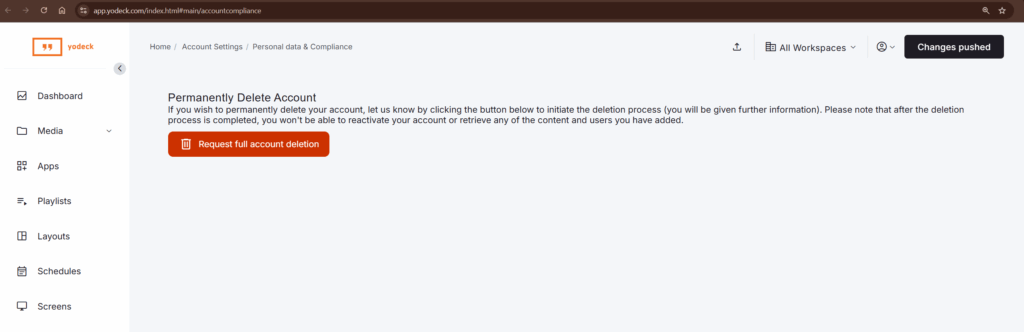
- Go to the account deletion page: You need to visit: https://app.yodeck.com/index.html#main/accountcompliance
- Follow the deletion process: The system will guide you through the account deletion steps.
- Check for the confirmation email: A confirmation email is sent to your registered email address. You should check both your inbox and spam/junk folder for this email.
- Confirm the deletion: You’ll need to confirm the deletion through email to complete the process.
Completion of the Account Transfer
Once the new user or admin/account owner completes the step-by-step instructions in the in-app support chat, as analyzed above, one of our support agents will reach out as soon as possible to transfer the user’s profile to the organization’s paid Yodeck plan once the free account is completely deleted.
Need Help?
The Yodeck Support Team can help you out! Log in to your Yodeck account and send us a message from the bottom right corner!
How can I change my subscription screen capacity or Plan?
You can easily change the screen count (subscription capacity), billing, and plan through our online wizard.
- First, please access your subscription section by clicking on the “Upgrade” option from the top right-hand drop-down menu (https://app.yodeck.com/index.html#main/changesubscription).
- You can adjust the number of screens to always reflect the final total screen count you manage.
- As a next step, you can change your billing frequency if needed.
- You can select a Plan other than the one currently in use (which will be preselected). If you add more screens to any annual billing subscription, you can also choose your Yodeck Player model (1GB or 4GB).
- Finally, you are asked to confirm any changes you wish to implement to your subscription. If you are about to increase your screen capacity or upgrade to a higher plan tier, click “Make payment” to complete your order. On the other hand, if you reduce your screen count or downgrade to the Free Plan, you confirm by clicking “Continue”.
What user roles do you provide?
Roles and Permissions define a User’s access rights to specific parts of your Yodeck Account, allowing you to control what each user can see and do within the platform.
These features are conveniently accessible under the “Users” section, located in the top-right menu of the Yodeck Portal. By assigning roles to your users, you can customize their level of access, ensuring that they only have access to the necessary features and functionalities required for their specific tasks.
This not only enhances security but also streamlines workflow and improves overall efficiency. Please refer to this article to learn more about the different roles you can assign to your users and how to manage their permissions.
✅Kindly check this article here for more details and see what roles you can assign to your users.
How can I configure Workspaces within my account?
Quick Intro
Workspaces provide an advanced way to set up detailed access permissions. With Workspaces, you can assign users specific access rights to specific content items (Media, Playlists, etc.) or specific Monitors. This means that you can control who has access to what content and screens within your Yodeck account.
Imagine you are a company with multiple branches, each with some screens. You want to manage some content centrally and allow your local store managers to partially manage some content (e.g., playlists) based on their local audience. This is a typical case where you set up one Workspace per local store and assign each manager access to the matching Workspace while giving an HQ employee access to all Workspaces.
The Workspaces feature is flexible enough to implement any access restriction scenario. This means that you can customize the access permissions for each user or group of users, depending on your specific needs. For example, you can give a specific user access to only one Workspace or give a group of users access to multiple Workspaces.
If you have difficulty setting up Workspaces independently, please contact our support team. We will be happy to help you optimize your use of our Enterprise Plan.
✅ To learn more about creating and managing Workspaces under your Yodeck account, please visit our User Manual.
Can I have an annual plan on Yodeck?
Yes, you can! You can receive a free media player by selecting our Annual Plan when placing your order. Note that this promotion is exclusively available for annual billing and not for monthly plans. You can order new players from the link below.
Follow these steps to upgrade your plan and claim the free media player:
- Log in to your Yodeck account.
- Navigate to your subscription settings.
- Change your billing cycle to Annual.
- Complete the checkout and payment process.
Remember: Annual Plans come with a FREE media player (also referred to as “Yodeck Player”) for each screen in your subscription! Note that the $8/month rate applies only when paying annually upfront. Check out all of your options in our Pricing section.
Do you save my credit card details?
Is My Credit Card Information Stored in Your System?
At our company, we prioritize the security of your personal information. We understand the importance of keeping your financial data safe and have implemented stringent measures to protect it.
One of the ways we ensure the security of your information is by partnering with Stripe, a widely trusted and secure payment platform utilized by numerous Software as a Service (SaaS) providers, including ours.
With Stripe, you can have peace of mind knowing that your financial data is handled carefully. As a leading global payment processor, Stripe adheres to strict industry standards and regulations, providing a safe and reliable environment for all your transactions.
So, to answer the question, no, your credit card details are not stored in our system. Your information is encrypted and securely transmitted using industry-standard SSL (Secure Socket Layer) technology, ensuring it remains private and inaccessible to unauthorized parties.
By leveraging Stripe’s advanced security features, we can confidently guarantee that your credit card details are never stored within our system. This means that your sensitive information remains uncompromised even in the unlikely event of a data breach.
Can I pay via PO/Invoice/Direct deposit/Wire transfer?
Invoiced Payments in Annual Plans
At our company, we understand that customers have different preferences when it comes to payment methods. That’s why we offer a variety of options to make the payment process as convenient as possible. One of these options is invoiced payments, which are available in all our Annual Plans.
What are Invoiced Payments?
Invoiced payments refer to paying for your annual fees in advance through a purchase order (PO) and an invoice. This means that instead of paying for your plan immediately upon purchase, you can receive an invoice and make the payment later.
How to Make an Invoiced Payment
You can make a direct deposit or a wire transfer to invoice the payment. The necessary wiring information will be provided in the invoice that you will receive from our Sales team. This information will include our bank account details and any other relevant information needed to complete the payment.
Why Choose Invoiced Payments?
By offering invoiced payments, we aim to provide flexibility and convenience to our customers. This lets you plan and budget your expenses accordingly, ensuring a hassle-free payment process. Whether you prefer to pay via direct deposit or wire transfer, you can rest assured that our Sales team will guide you through the entire process and provide any necessary assistance.
How to Initiate an Invoiced Payment
Our annual plans offer this option if you prefer to pre-pay your annual fees and receive an invoice for the payment. Simply reach out to our Sales team (sales@yodeck.com) to initiate the process, and they will provide you with all the necessary details and information to complete the payment via direct deposit or wire transfer.
We strive to make the payment process seamless and convenient for our customers. With invoiced payments in our Annual Plans, you can choose the payment method that works best for you. If you have any further questions or need assistance with the payment process, please don’t hesitate to contact our Sales team. We are always happy to help!
How can I add more screens to my Subscription?
Adding screens to Your Subscription
Adding screens to your Yodeck subscription is easy and allows you to expand your digital signage network. You can add as many screens as you want up to your subscription limit.
Subscription Limits
If you have reached the limit of active screens for your subscription, you cannot add any new screens. However, you can easily upgrade your subscription to increase your limit. Any price difference caused by upgrading or downgrading will be automatically calculated to ensure you only pay what you should.
Inactive screens
New screens will appear inactive (“Not registered yet”) in your account until the player connects for the first time and registers successfully. You can manage inactive screens like registered ones; they are not paired with an actual player.
Annual Plan Benefits
Did you know that upgrading to an annual plan also means you get FREE Yodeck Players for all your additional screens? This is a great way to save money and expand your digital signage network.
Getting the VAT Number on Invoices
Online Invoices do not provide a VAT number. But if you click on the “PDF link in the top-right corner of the Online Invoice, you can download a PDF version of the Invoice that contains the VAT number (or other Tax ID, like EIN, EEIN, TIN, etc). Make sure that you have updated your billing details to include the VAT in your profile.
Supported Languages for the Yodeck account
You can also change the Language except for the changes for Continent/Country and/or your City/Zone through My User Profile.
In the list below, you will find the following Languages available to choose from.
Danish
Dutch
Finnish
French
French (CA)
German
Italian
Japanese
Norwegian
Portuguese
Portuguese (BR)
Russian
Swedish
Turkish
Vietnamese
Subscription Plans within the account
Subscription Plans
Within your account, you have the option to choose between two different subscription plans: monthly or annual. These plans determine the length of time you will have access to our services.
The monthly subscription plan allows you to pay for our services monthly. This means that you will be charged once a month for your subscription and will have access to our services for that month.
The annual subscription plan, on the other hand, allows you to pay for our services on a yearly basis. This means that you will be charged once a year for your subscription and will have access to our services for that year.
It is important to note that your account can only have one type of subscription active at a time. This means you cannot have players with different subscription plans within the same account. If you wish to switch from a monthly subscription to an annual one, you must cancel your current subscription and sign up for the new one.
How can I cancel my Yodeck subscription?
Are you looking to cancel your Yodeck subscription? We’re sorry to see you go, but we understand that sometimes things change. In this article, we’ll walk you through the steps to cancel your subscription.
Cancelling Your Subscription
To cancel your Yodeck subscription, follow these simple steps:
- Log in to your Yodeck account
- Follow this link: https://app.yodeck.com/index.html#main/reducescreens
- Set the “How many licenses do you want to keep?” to 1
- Click Next
- Click Continue
That’s it! Your subscription will now be canceled. Of course, you can use the one screen free forever.
Share Your Feedback
We’re always looking to improve our services, so please share your feedback with us at success@yodeck.com. Let us know why you decided to cancel your subscription and if you are facing any issues. We’re here to help and would be happy to assist you with any problems you may be experiencing.
Thank you for choosing Yodeck. We hope to see you again in the future!
Do you ship globally?
Global Shipping 🌎
We are proud to offer global shipping to our customers. We understand that our customers come from all over the world, and we want to make sure that everyone has access to our products.
Whether you live in the United States, Europe, Asia, or anywhere else in the world, we are happy to ship our products to you. Our dedicated team works hard to ensure that your order is processed and shipped in a timely manner.
Shipping Rates and Delivery Times ⌛
Shipping rates and delivery times may vary depending on your location. We offer a variety of shipping options, including standard and expedited/priority shipping.
💡The shipping cost and estimated delivery time will be displayed during the checkout process.
International orders may be subject to customs fees and import taxes. Your country’s customs agency determines these fees, which are the customer’s responsibility. We recommend that you check with your local customs office for more information on potential fees.
Shipping Information by Country
When it comes to shipping, it’s essential to know that delivery times can vary depending on the country you are shipping to. In this article, we will break down the shipping information for different countries and how it may affect your delivery times.
EU Countries
If you are shipping to any of the following EU countries: Austria, Belgium, Bulgaria, Croatia, Cyprus, Czech Republic, Denmark, Estonia, Finland, France, Germany, Greece, Hungary, Ireland, Italy, Latvia, Lithuania, Luxembourg, Malta, Netherlands, Poland, Portugal, Romania, Slovakia, Slovenia, Spain, or Sweden, please note that the following information applies:
Standard delivery days are 2-3 business days.
Priority delivery days are 1-2 business days.
In cases where the standard and priority delivery days are the same, the priority delivery time is omitted.
US
If you are shipping to the United States, the following information applies:
Standard delivery days are 2-3 business days.
Priority/Express delivery days are 1-2 business days.
In cases where the standard and priority/express delivery days are the same, the priority delivery time is omitted.
UK
If you are shipping to the United Kingdom, the following information applies:
Standard delivery days are 2-4 business days.
Priority delivery days are 1-3 business days.
In cases where the standard and priority delivery days are the same, the priority delivery time is omitted.
All Other Countries
If you are shipping to any country not mentioned above, the following information.
Standard delivery days are 5-10 business days.
Priority delivery days are 4-7 business days.
In cases where the standard and priority delivery days are the same, the priority delivery time is omitted.
Understanding the shipping information for different countries can help you better plan and manage your delivery times. If you have any more questions or concerns, please don’t hesitate to contact our customer support team for help.
Tracking Your Order
Once your order has been shipped, you will receive a shipping confirmation email with a tracking number. You can use this tracking number to track your package and see the estimated delivery date.
📖 Read more details here on how to track your order!
How to find your 2FA Security Key
Introduction to Two-Factor Authentication (2FA)
Two-factor authentication (2FA) is a security feature that adds an extra layer of protection to your online accounts. It goes beyond just using a password by requiring a second form of verification, ensuring that only authorized users can access sensitive information. This additional step significantly reduces the risk of unauthorized access, even if your password is compromised.
Most platforms offer 2FA as an optional but highly recommended feature. You can typically enable it within the Security or Privacy Settings section of your account. Depending on the platform, this feature might be referred to as:
- Two-Step Verification
- Two-factor authentication (2FA)
- Multi-Factor Authentication (MFA)
💡 Additional Tip: We highly recommend creating a dedicated account for Digital Signage, granting limited access only to the content you intend to display. This minimizes the risk of exposing unrelated or sensitive content.
Why the Secret Key is Important
When enabling 2FA, you will usually be required to set it up using an Authenticator App. The platform will provide a Secret Key (also referred to as a Security Key or Digit Key). This key is essential for linking your account to the app and generating time-based one-time passwords (TOTP).
🔔 Note: If we need to access your Digital Signage content and your account has enabled the 2FA, it is necessary to provide us with the Secret Key to enable the integration.
🔔 Note: The security key we are asking for is not the same as the Emergency Security Key or Recovery Key. It’s mandatory to proceed with the app configuration flow.
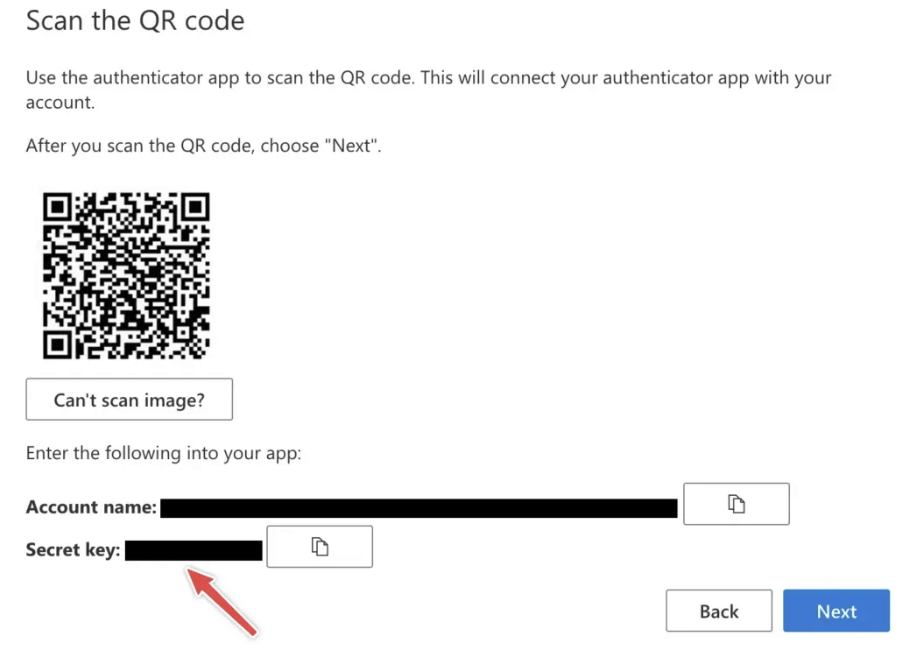
⚠️ Important – Microsoft 365 May Not Show a Secret Key
If you are setting up Microsoft 365 (Entra ID) MFA and cannot see the option “I want to use a different authenticator app”, this is expected behavior in some environments.
When a Microsoft 365 tenant is configured for “Push Notifications only”, Microsoft does not provide a Secret Key, only a Microsoft-specific activation link.
👉 What to do: 👈
Your company’s IT administrator needs to enable Third-party Software Tokens (Software OATH) for your user account in the Microsoft Entra admin center. This can be done by navigating to Protection → Authentication methods and also ensuring that TOTP-based authentication is enabled. Once this is set up, the option “I want to use a different authenticator app” will appear during the MFA setup process. Microsoft will then display the Secret Key, which can be used for Yodeck integrations, such as the one with the Microsoft SharePoint app.
💡 This is a Microsoft security restriction, not an issue with Yodeck or your account setup.
Step 1: Access the Two-Factor Authentication Setup Page
- Log in to the platform where you want to enable 2FA.
- Navigate to the Security or Privacy Settings page.
- Look for an option like Two-Step Verification or Two-Factor Authentication (2FA) and follow the prompts to enable it.
Step 2: Choose the Authenticator App
- During the setup process, select Authenticator App as your 2FA method.
- The platform will display a QR code for app integration.
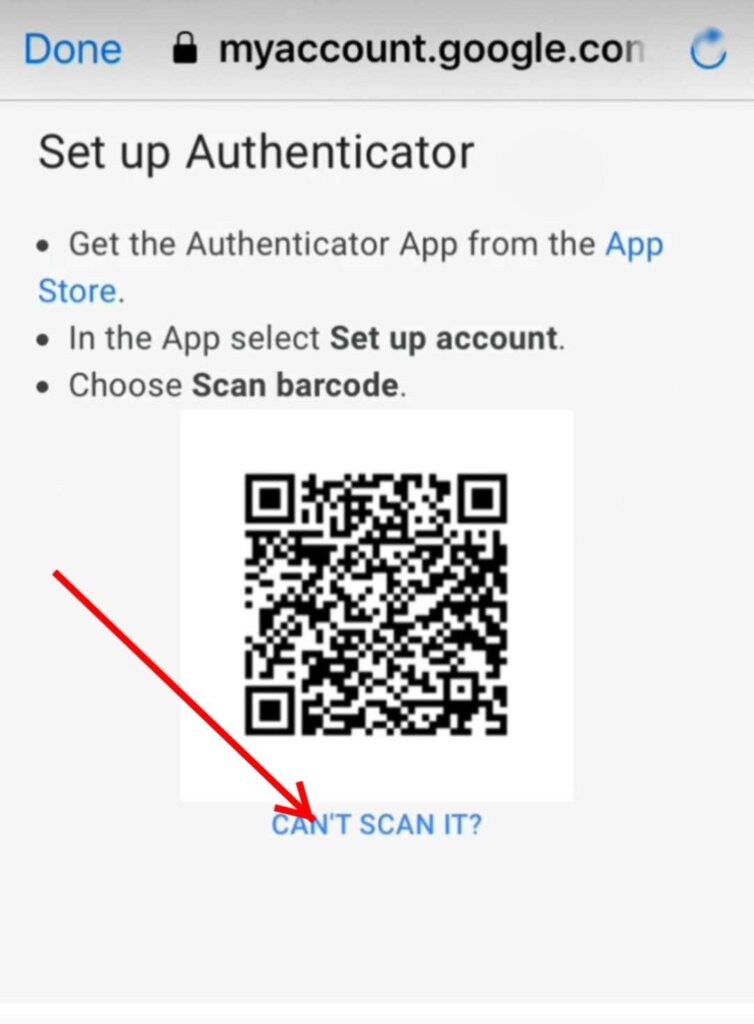
Step 3: Locate the Secret Key (If the QR Code Cannot Be Scanned)
- Below the QR code, look for a link or button such as Can’t Scan It? or Manual Setup.
- Clicking this option will display the 32-digit Secret Key.
Google Authenticator Example
Microsoft Example
Scenario 2: Using an Existing Account with 2FA Enabled
If you want to integrate an account that already has 2FA enabled into a new service, you will need the Secret Key from the original setup process. Follow these steps:
Option 1: Retrieve the Secret Key (If Previously Saved)
- Locate the Secret Key that was saved during the initial 2FA setup.
- Use it to configure the new service or app instance.
Option 2: Reset and Re-enable 2FA
If you do not have the Secret Key saved:
- Disable 2FA in the account’s Security Settings.
- Re-enable 2FA following the steps outlined in Scenario 1 to generate a new Secret Key.
⚠️ Important: When re-enabling 2FA, ensure you securely save the Secret Key for future use.
Need Help?
The Yodeck Support Team can help you out! Log in to your Yodeck account and Send us a message from the bottom right corner!
Groups & User Roles Updates on April’s 2023 Release
Intro
On April’s release, Groups and new User Roles have been introduced. You can read in this document the changes that have been made.
First, you don’t need to worry about the updated role names and descriptions, as the permissions of all users remain the same. Some roles have been discontinued, but users with these roles will still retain them.
User Roles changes
- “All Access” has been replaced by “Content & Device Manager.”
- “Content Publisher” has been replaced by “Content Manager,”
- “Content Manager” has been replaced by “Restricted Content Manager.”
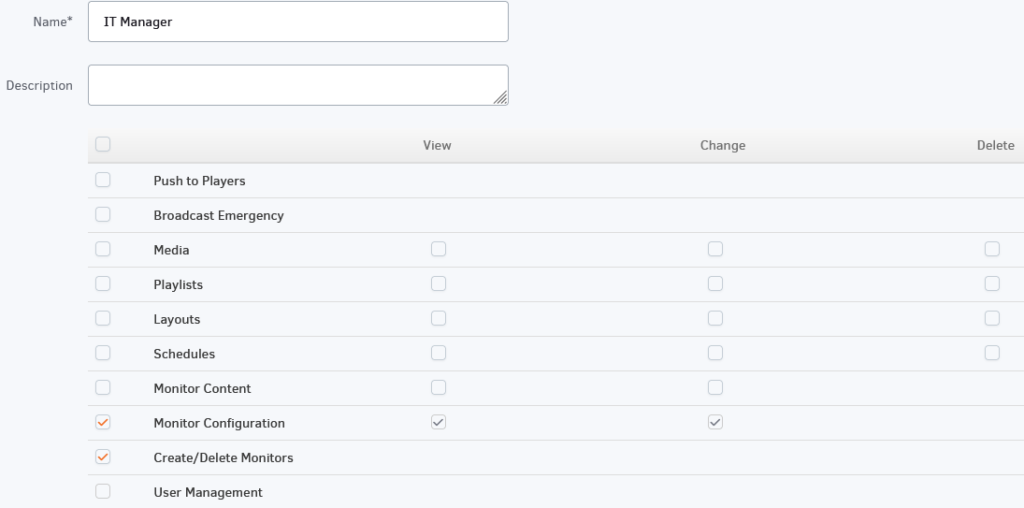
The roles “Publisher,” “Media Creator,” “Media Manager,” “IT Manager,” and “Emergency Broadcaster” have been discontinued, but existing users assigned to these roles will not be affected.
If you want to assign a new user with the deprecated role, you need to create a Custom Role and give them the relevant permissions.
Groups changes
You can read all details about Groups in Groups documentation. The changes for the existing users are about the Enterprise users:
- Global Admins have been decoupled from the Billing Access permission. Now you can have a Global Admin with access to everything in the account except billing.
- All existing Account Administrators have been migrated to both Global Admins & Billing Access groups.
Examples
If you want to continue having the IT manager role, for example, create a Custom Role and give the below permissions.
Need Help?
The Yodeck Support Team can help you out! Log in to your Yodeck account and send us a message from the bottom right corner!
How to change the account ownership to another user
Introduction
Account Owner
Only the Account Owner can change the account ownership to another user. The below procedure cannot be accomplished by an Admin or any other user role.
If you want to change/transfer the account ownership to another user, please follow the steps below:
- Login as the Account Owner, e.g., “current-owner@example.com”.
- Click at the top right of your screen and select the “My Profile” option.
- Change the email from “current-owner@example.com“ to “new-owner@example.com“. “new-owner@example.com” is the user that will be the new Account Owner and click “Save“.


- If the user “new-owner@example.com“ already exists as a user on your account, you must delete it first.


The new Account Owner would then have to reset his password when he tries to log in again.
Identical Emails
When creating a new account, if you get the error “An account already exists with that login email“, it means that this email already exists in our database in another account.
Identical emails cannot reside in our database.