Table of Contents
Overview
With Yodeck’s Google Drive Playlist feature, you can display images, videos, and documents from your Google Drive directly on your screens using a Yodeck Player. Once you’ve linked your Google Drive account, simply upload content to the designated folder, and the player will handle everything—no need to log into your Yodeck account or make additional changes. This is the easiest way to keep your digital signage content fresh and synced automatically from the cloud.
Limitations
- You can link only one Yodeck account to each Google Drive account.
- To use multiple Google Drive accounts within a single Yodeck account, you must be on the Enterprise Plan.
- If you wish to use more than one third-party cloud-based playlist (Google Drive, Dropbox, or OneDrive), you must be on the Enterprise Plan.
- Screen content preview is not available for third-party storage playlists.
Supported File Formats
Yodeck supports a wide range of file formats, including image, video, and document types.
👉 Click here to view all supported formats.
Additionally, we now support the following Google native files (up to 10MB of size per file):
- Google Docs
- Google Sheets
- Google Slides
Linking Your Google Drive with Yodeck
You can begin linking your Google account with the help of the following step-by-step guide.
Steps for Linking a Google Account
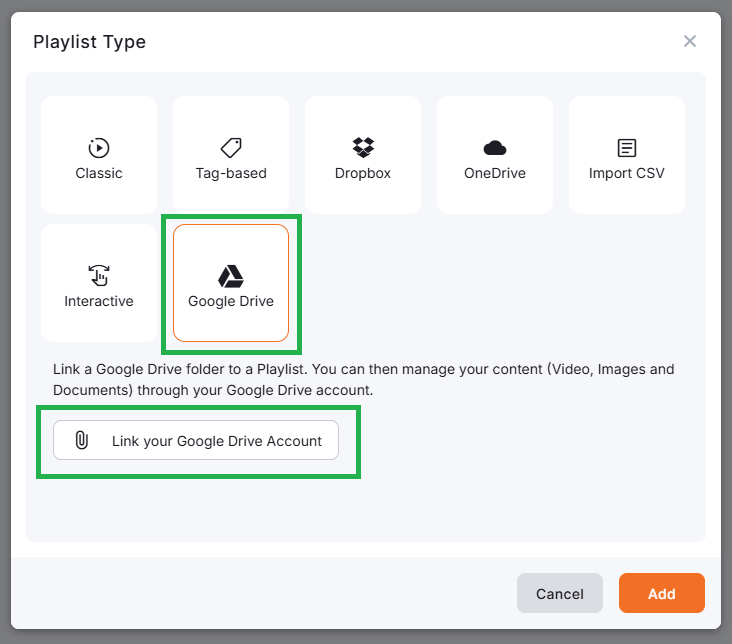
- Navigate to the Playlists section in your Yodeck dashboard.
- Click “Add Playlist” and select “Google Drive”.
- Then, click “Link your Google Drive Account”.
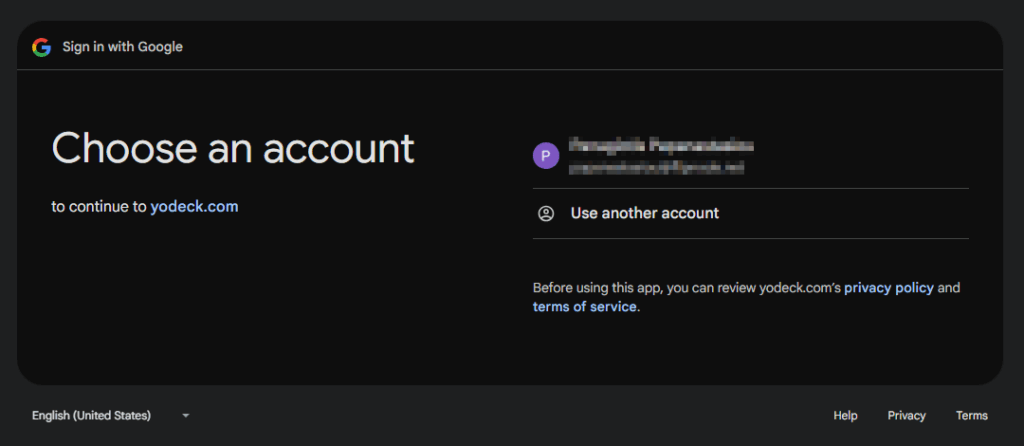
- A new tab will open where you can sign in with your Google account.
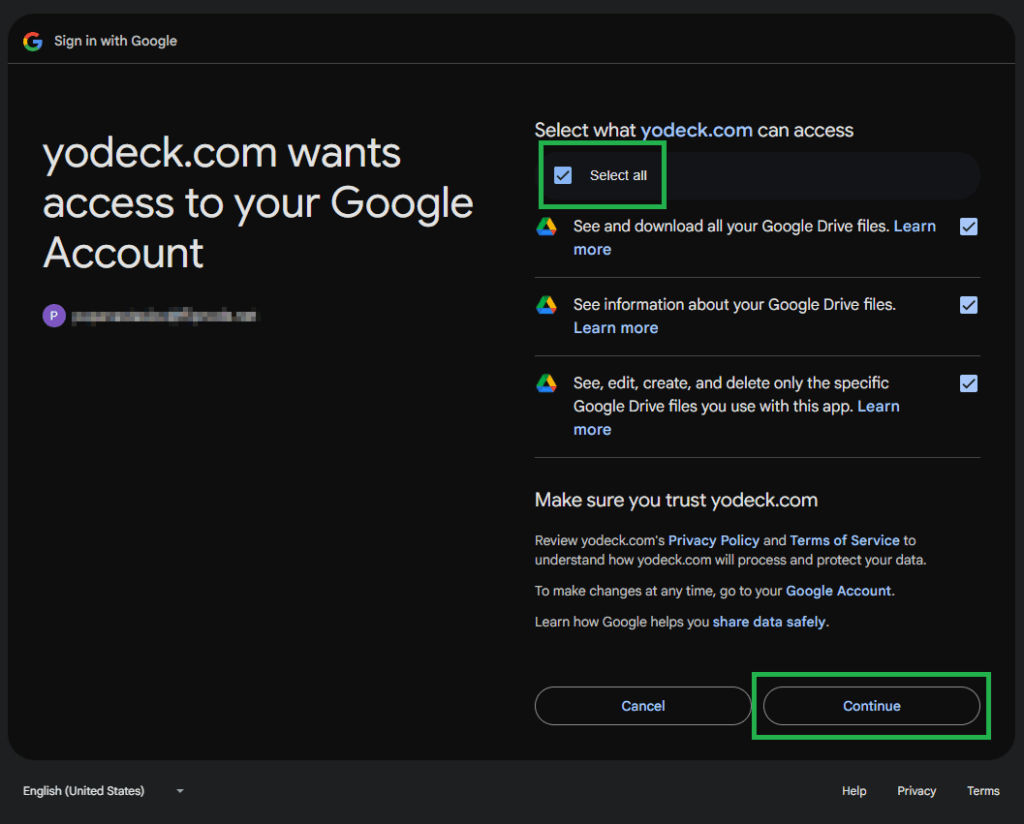
- On the following tab, you need to authorize Yodeck to access your Drive.
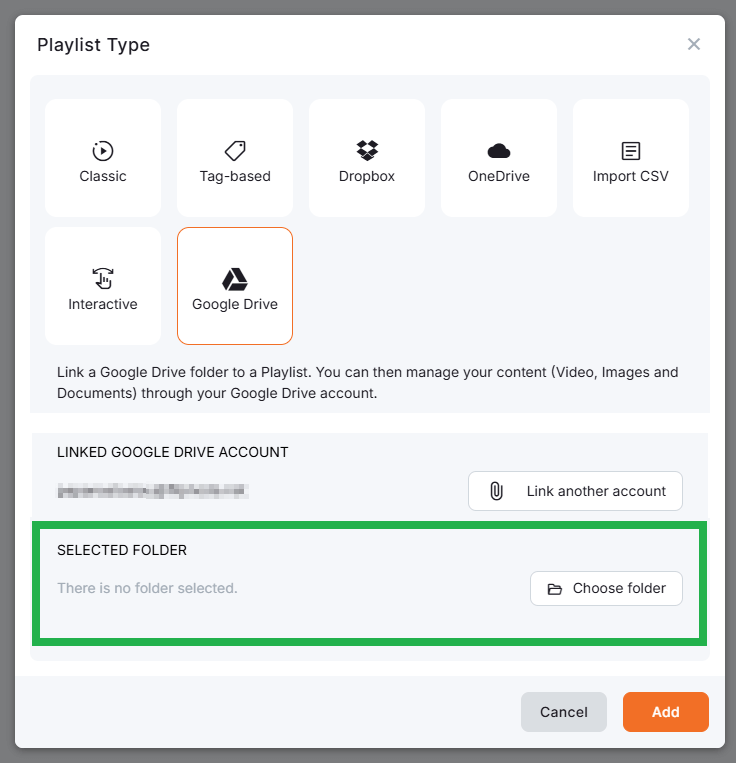
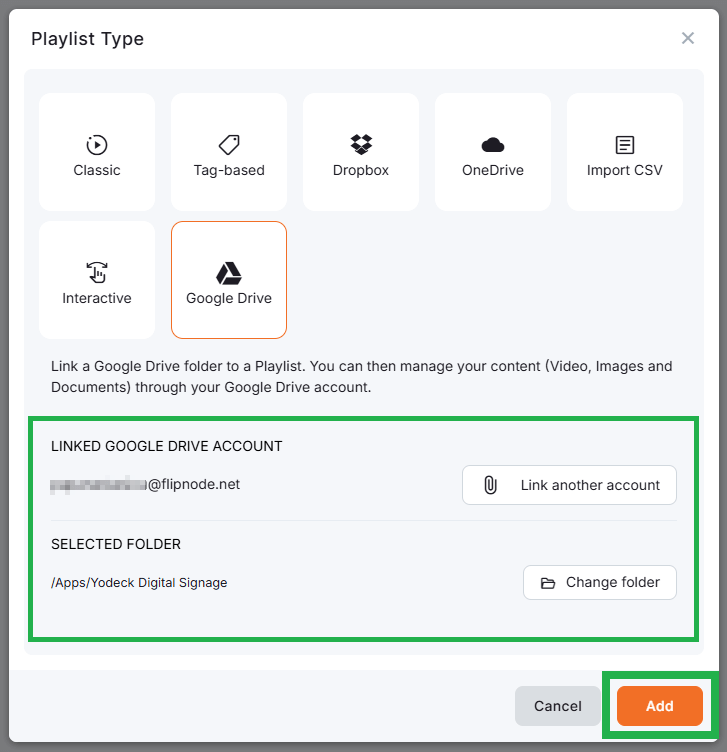
- After completing the authorization, choose any folder, including shared folders and folders from shared drives.
- Once the folder selection is complete, click the “Add” button to complete the playlist creation and be transferred to the playlist’s settings page.
Google Drive Playlist Settings
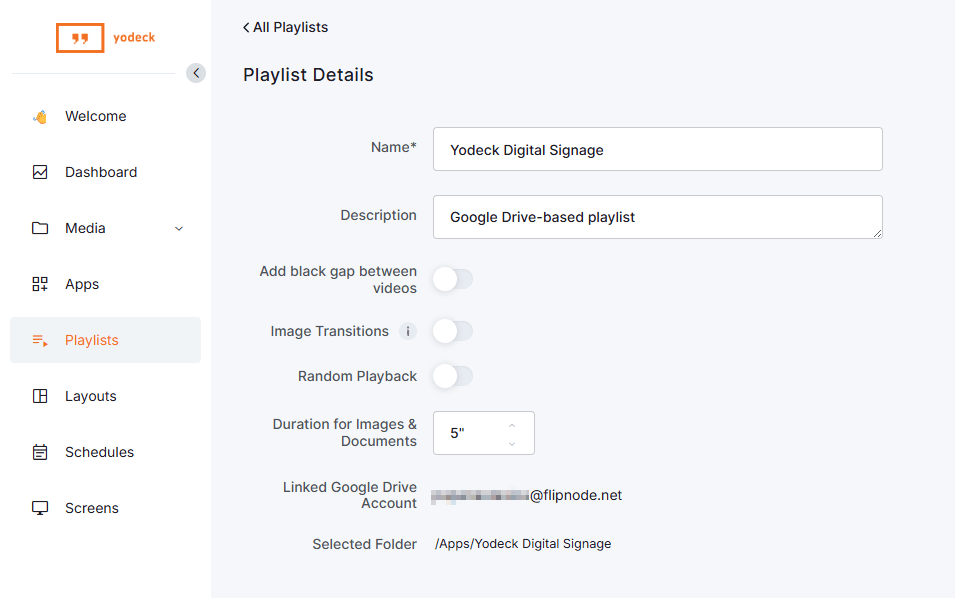
After creating your playlist, you can configure the following options, under the Playlist Details (settings) page:
- Name: Enter a clear name for your playlist.
- Description (optional): Add internal notes or usage context.
- Add black gap between videos: Inserts a 0.5-second black screen between videos. If disabled, videos transition seamlessly.
- Enable Image Transitions: Adds smooth visual effects between image slides.
- Enable Random Playback: Shuffles the playback order.
- Default Duration for Images & Documents: Sets how long non-video content is displayed.
- Linked Google Account: Shows the email address of the linked account.
- Selected Folder: Displays the Google Drive folder currently synced with the playlist.
How to Add Content to Your Google Drive Playlist
- You can upload your media files—images, videos, or documents—into the selected folder from your Google Drive portal.
- You can use any folder you’ve selected during the playlist’s setup.
Files will play in alphabetical order, as long as the option of Random Playback (from within the “Playlist Details” [settings] page) is not enabled.
After uploading the content to your Google Drive, you do not need to log into your Yodeck account or make any further changes, as the player will handle everything.
Removing Content from Your Google Drive Folder
If you remove content from your Google Drive folder, it is also automatically removed from the screen.
Syncing Files
The player will sync updates automatically after adding, removing or updating (changing a folder’s or item’s name, uploading a new version, or moving a folder to a different location) content in Google Drive.
ℹ️ Syncing takes up to 5 minutes, but only after the folder has been inactive (no file changes) for at least 5 minutes.
Moreover, updates made through the Google Drive account on the Google Drive Playlist will automatically appear on the screen(s). You do not need to select “Push to screens,” as the changes are automatically pushed, similar to how it works with OneDrive and Dropbox Playlists.
Limit Rapid File Changes
Avoid making rapid file changes if you want the player to update quickly.
Assigning a Google Drive Playlist to Screens
Once you have set up one or more Google Drive playlists, you can assign them to one or more screens in various ways.
Assignment to a Single Screen
To assign a Google Drive playlist to a specific screen, you can:
- Option 1: Click the three vertical dots icon on the right of each playlist listed under the Playlists page, and select the Set to Screen option.
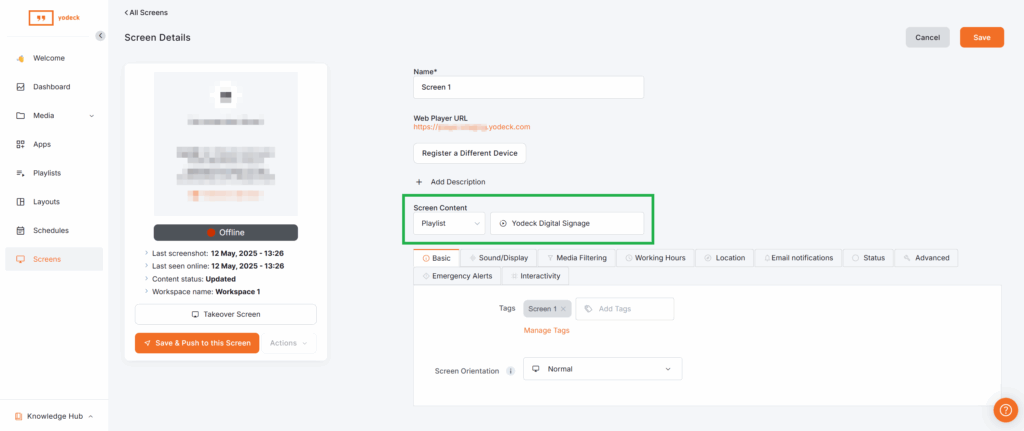
- Option 2: Navigate to the left Main Menu and select Screens.
- Choose your preferred screen from the list.
- Find the “Screen Content” type field and select the Playlist option.
- A new pop-up window will appear after your selection.
- Enter your playlist name and choose your preferred screen fitting option:
- Fit: display content in the assigned area, (addition of space or black bars).
- Crop: zoom in to cover the area, (possible cropping and distortion).
- Stretch: fill the area by stretching content (possible distortion).
- Afterwards, select the playlist name from the drop-down menu and click on OK.
- Click on the Save button in the top-right corner of the page.
You can push the changes to your screens for immediate effect.
Assignment to Multiple Screens
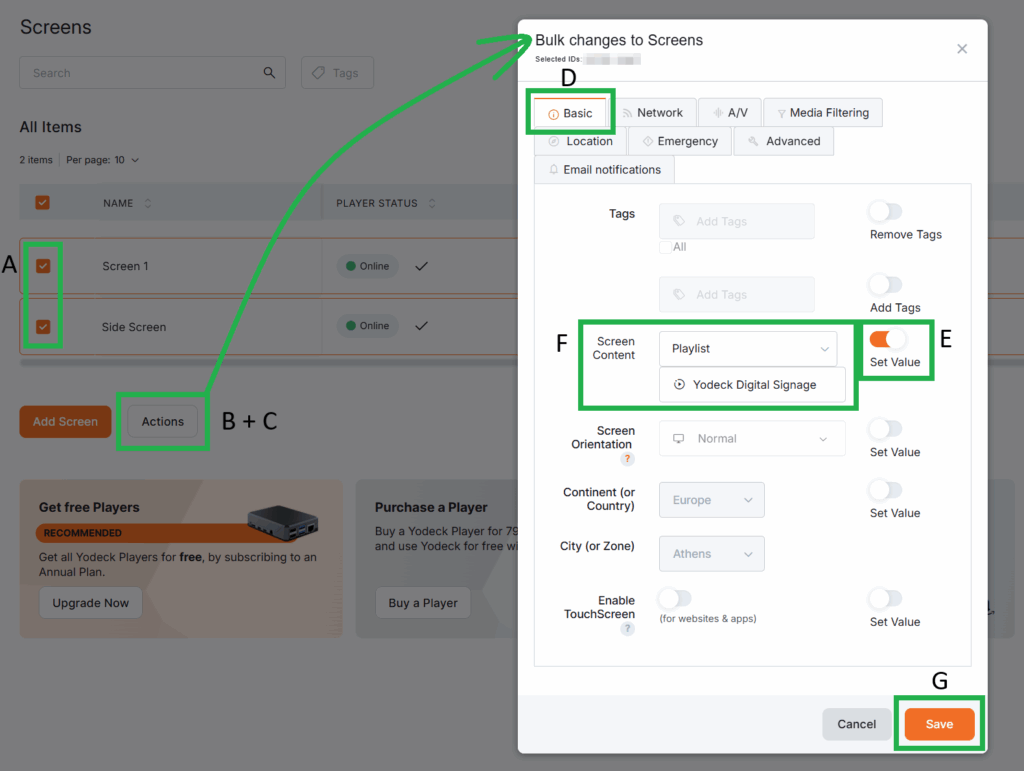
To assign a playlist to multiple screens through a bulk edit, you can:
- Select two or more screens from the Screens list page, located inside the Left Main Menu.
- Click on the Actions button.
- Select the Edit option.
- The Bulk changes to Screens pop-up window appears, where you need to select the Basic tab.
- Afterwards, enable the Set Value toggle button corresponding to the Screen Content field.
- Since the Screen Content field is now editable, choose your preferred playlist option to assign it to all the previously selected screens.
- Finally, click on the Save button in the bottom-right corner of the pop-up window.
You can push the changes to your screens for immediate effect.

How to quickly assign content to your Screens
For more information on how you can quickly assign content to your Screens, please check the related page here.
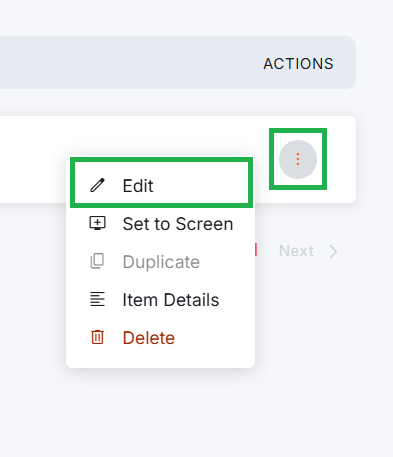
Editing a Google Drive Playlist
To edit the settings of an existing Google Drive playlist on our platform, proceed with the following steps:
- Locate the playlist you want to modify from the list.
- Click the three-dot icon at the end of the playlist’s row.
- Select the Edit option.
F.A.Q.
Got questions? We’ve got answers! This section addresses common questions about Google Drive Playlists.
Yes. Yodeck fully supports shared folders and folder’s from shared drives for all accounts. During the setup, select any folder, shared or individual, from your Google Drive (including MyDrive and Shared Drives). The playlist will sync content from the selected folder regardless of its ownership.
If you remove a file from the linked Google Drive folder, it will automatically disappear from your screens after the next sync cycle. The sync process typically begins after 5 minutes of folder inactivity, and updates are pushed to screens without needing to log into the Yodeck platform.
If you unlink your Google Drive account, any playlists using files from that Drive will stop working and display an error. Make sure to re-link the account or replace the content with local files or another source before removing access.
Yes, but only if you’re on the Enterprise Plan. This allows you to manage content from multiple Google Drive accounts, alongside other storage integrations like Dropbox and OneDrive.
Yes, the limitation applies to Google Docs, Google Sheets, and Google Slides, stating that native files must be no larger than 10MB to be played by a digital signage platform.
Need Help?
The Yodeck Support Team can help you out! Log in to your Yodeck account and send us a message from the bottom right corner!