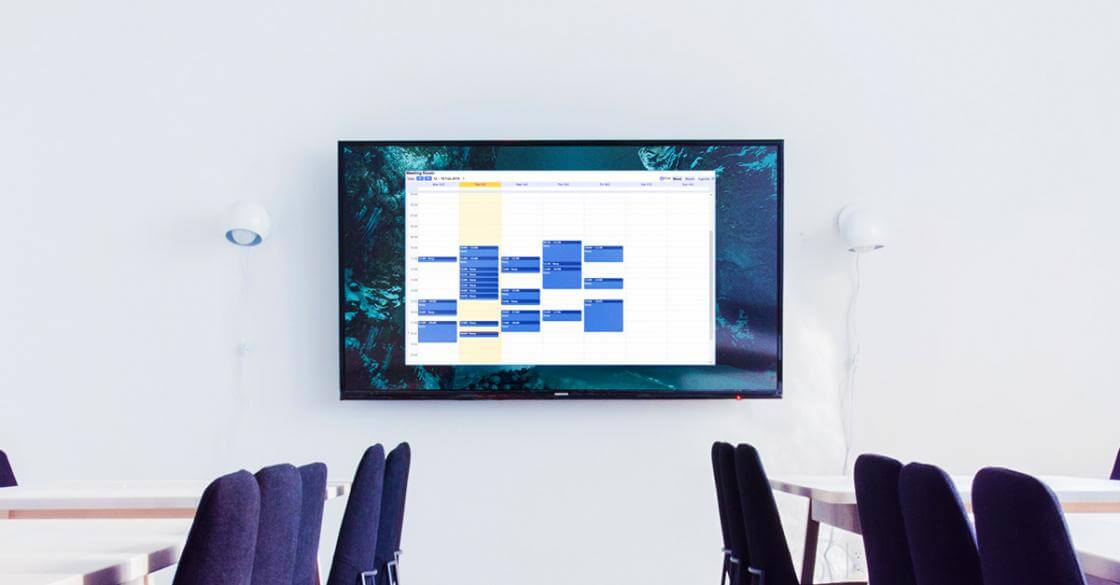
Set up a digital wall calendar and you’ll realize it’s one of the smartest things you’ve ever done. Think I’m exaggerating? A few months ago I would’ve agreed with you. But we started using digital calendar displays at the office and, let’s just say, we went from one screen to one for every meeting room. A Google calendar on a wall-mounted screen works perfectly for displaying schedules, events and meetings. Plus, it’s practical, keeps everyone organized and is extremely easy to use.
Being able to show a calendar on a display can be very useful, for various reasons. The most common usage scenario is mounting a screen outside a meeting room to show availability. Another use is digital signage in offices in order to show a calendar with corporate events in recreation areas, like cafeterias and reception areas.
The easiest way to set up Google Calendar (Our New App is here!)
Remember when I said it’s extremely easy to use a digital wall calendar? Here’s where I prove it to you. At Yodeck, we use Google Calendar for all our scheduling needs. And, because we know lots of our customers use it too, we created a handy little app, to help you get it on your screens in seconds; literally.
- Sign in to Yodeck.
- Click on “Apps”, then select “Add App”.
- Scroll down the App Gallery and then click on “Google Calendar”.
- Click on “Use”.
- Type in a name and optional description for your Google Calendar app.
- In the next two fields type in the email address and password connected to your Google Calendar.
- Set how often you want your Google Calendar to refresh and get any new updates in the “Refresh Interval” field.
- From the “Select Period” field, choose the type of Calendar (day, week or month) you want to display on your screen.
- Choose how long, in seconds, you want the Google Calendar to appear in a playlist.
- Click on “Save” and you’re done!
Getting your Google calendar on screen (with advanced security)
If you want to get your Google Calendar on a wall-mounted screen without signing in to your Google Calendar account through Yodeck, we got you covered. We know how important security is to most corporations. Also, this method works with other calendars, too, since most calendars have a web version. We use the power of our scripting engine to run custom code on that web page that shows the calendar. Why? Here are a couple of reasons:
- Authenticate in order to display the calendar, or display details for the events in the calendar.
- Get only the calendar data for the screen. In that case, you need to remove any surrounding buttons, links, service provider logos, and other stuff that just get in the way.
- Change the styling of the calendar, to better fit the rest of the content you might have on screen.
- Refresh contents periodically, in case the web version of the calendar does not refresh its content automatically.
With this technique, there is no limitation to what you can display on Yodeck; you can use any calendar provider, even a calendar from a local server, as long as it provides a link to view the calendar in a web browser.
For this guide, we will be showing you how to display a Google calendar on a wall-mounted screen, which is the most frequent request we get (we use it internally too!).
How it works with Yodeck on Raspberry Pi
Using a publicly accessible calendar
The easy way to display a Google calendar on Yodeck with Raspberry Pi, is to make it available as public. If you do not wish to have a public calendar, then you should check out the next section for using credentials to access a calendar.
If you log in to your Google Calendar account and navigate to the options of a calendar, you will find two options for making a calendar public.
- “See only free/busy (hide details)”
- “See all event details

Pretty self-explanatory, right? If you select the first option, then you will see the events in the calendar saying just “busy”, while the latter will allow you to see all the event details (namely, the event title).
(Note: If you are using G Suite, formerly known as Google Apps for Work, then you might not be allowed to select the “See all event details” option. Then, you either need to contact your administrator to allow this option, or go to the next section and use credentials to access the calendar.)
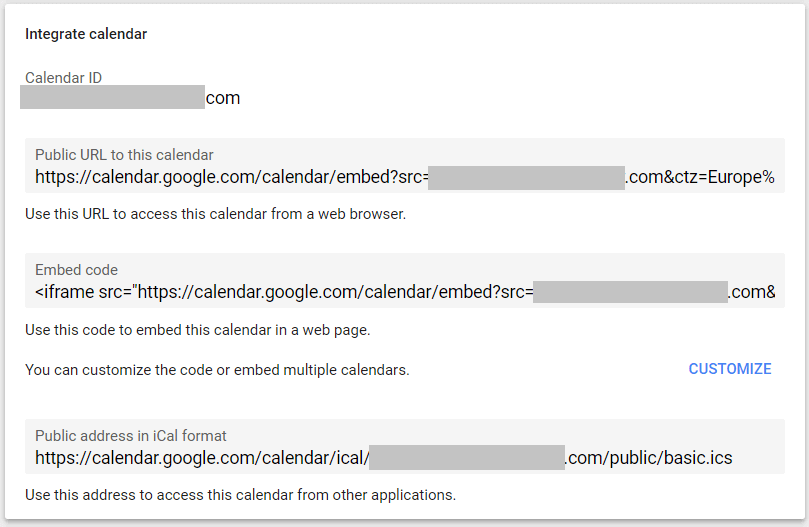
After that, scroll down and go to the “Integrate calendar” section. There you will find a “CUSTOMIZE” link.

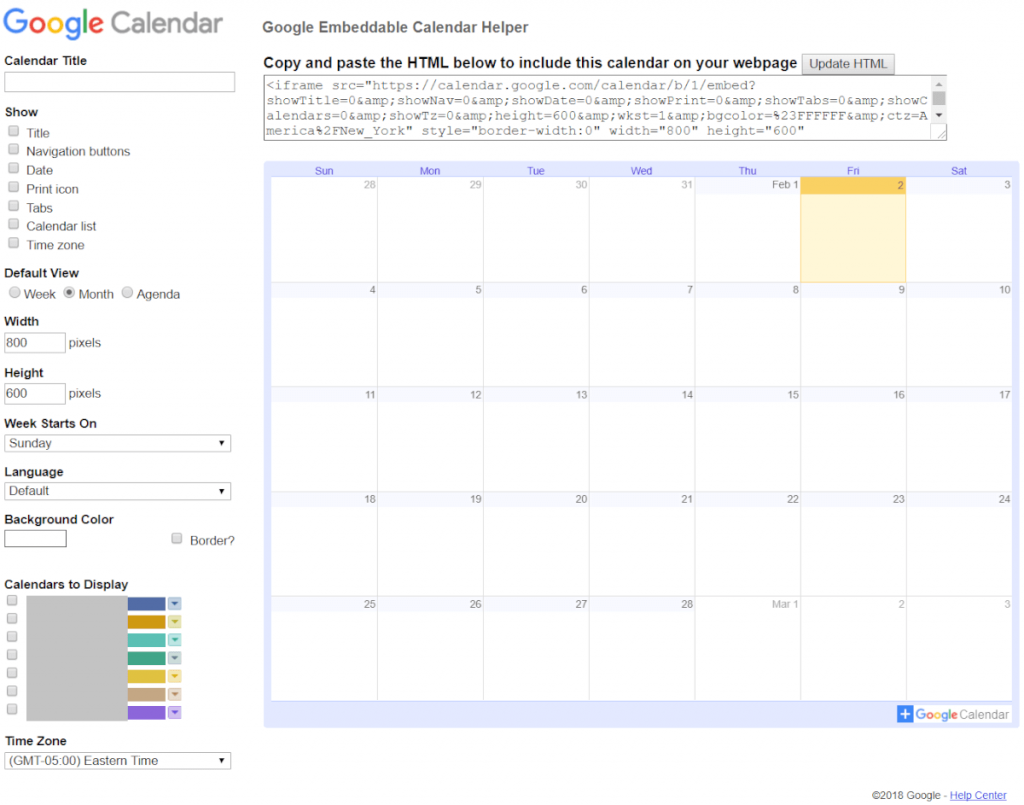
Click on “CUSTOMIZE”. You will be directed to a tool that allows you to define which of your calendars you want to see, as well as other options.

Now do the following:
- From the options column on the right, uncheck all options in the “Show”.
- Select the “Default View” you want to see. We use the “Week” view, but you can use any of the two options and see what fits you best.
- Set the “Week Starts On”, “Language” and “Time Zone” options to the desired values.
- Select the Google Calendars you wish to show by checking them in the “Calendars to Display” section.
- Click the “Update HTML” button on the top-right corner, just to update the preview of the calendar.
Still with me? Good. After doing all of that, from the produced HTML code text area on the top, there is an HTML code fragment that you will need to copy. Make sure you select whatever is within the “src” parameter (excluding the starting and ending quotes, and copy that to your clipboard.
Then, navigate to this page:
https://www.freeformatter.com/html-escape.html
Now, paste the text you copied into the text area, and click “UNESCAPE”. Within a couple of seconds, you will be shown the results in the “Unescaped string” textarea. Select all of it, and copy that.
The final step is within your Yodeck Account. Go to the “Web Pages” section and create a new Web Page with the following details:
- As the URL address, use the unescaped address you copied previously.
- As the Zoom Factor, this is up to you. You need to test 2-3 values to make it as readable as possible and still look good. Start with the default 100% and, if text looks small, go for 150% or even 300%. Trial and error guys!
- To remove the “Google” logo in the bottom-right corner, set the “Run Custom Script” toggle to “ON” and in the “Script Code”, type the following:
[code]runScript(“””jQuery(“#footer1 > tbody > tr”).remove();”””)
runScript(“””jQuery(window).trigger(‘resize’);”””)[/code]
Almost there
Next, click “Save”. You Web Page entry is ready! Now, go to “Layouts”, create a new Layout, add the Web Page you created, resize it to be full screen, click “Save”, and then got to “Monitors” and assign this Layout to a Monitor without assigning any Schedule to Playback. Push to your screens and you are all set! You should now see your Google calendar on a wall-mounted screen!
Using a username and password to access a private calendar
Showing only free/busy might not be enough. And making your calendar details public on the Internet might not be possible. In this case, you need to use a Google Account with access to the calendar, so that you can show your Google calendar on a wall-mounted screen through Yodeck.
First, make sure that you have a username and password for a Google Account that does indeed have access to the calendar(s) you want to show. Use these credentials to login and add these calendars, so that you can display them.
An important note:
The credentials for this Google Account will be saved in your Yodeck Account and in your Yodeck Players that display this calendar. Understand that if someone accesses your Yodeck Account or physically access your Yodeck Player, then they will have access to these credentials. We suggest creating a Google Account specifically for this type of use.
After you login into the Google Account, you repeat the whole process described in the previous section to get the final unescaped URL address to be used. Then, go into Yodeck and create a Web Page, but do the following instead:
- As the URL address, use: [code title=false]https://accounts.google.com/ServiceLogin[/code]
- As the Zoom Factor, again this is up to you. You need to test 2-3 values to make it as readable as possible and still look good.
- Set the “Run Custom Script” toggle to “ON” and in the “Script Code”, type the following:
[code]type(“””#Email”””, “””GOOGLEACCOUNT@DOMAIN.COM”””)
pause(1)
click(“””#next”””)
pause(1)
type(“””#Passwd”””, “””PASSWORD”””)
pause(1)
clickAndWait(“””#signIn”””)
pause(1)
openAndWait(“””GOOGLE_CALENDAR_ADDRESS”””)
runScript(“””jQuery(“#footer1 > tbody > tr”).remove();”””)
runScript(“””jQuery(window).trigger(‘resize’);”””)[/code] - Make sure that in the above code you:
- Replace GOOGLEACCOUNT@DOMAIN.COM with the email address of the Google Account you use to access the calendar.
- Replace PASSWORD with the password of that Google Account.
- Replace GOOGLE_CALENDAR_ADDRESS with the unescaped address you retrieved.
All set
Finally, click “Save”. Your Web Page entry is ready! Now, go to “Layouts”, create a new Layout, add the Web Page you created, resize it to be full screen, click Save, and then got to “Monitors” and assign this Layout to a Monitor without assigning any Schedule to Playback. Push to your screens and you are all set!
Your calendar should now be on display. Just a note, since you are logging in using credentials, it might take 15-20 seconds for the login to complete and for the calendar to show up. We hope you find this pro-level guide to displaying a Google calendar on a wall-mounted screen useful. As always, feel free to contact us if you have any comments or need help.
What are the benefits of using a digital wall calendar?
Firstly, you’ll see organization and collaboration levels soar. Why? Because meeting rooms are a limited resource that everyone wants. Office kerfuffles over who booked the room and for how long happen all the time. And they definitely don’t help team building and productivity. But if you’re using a digital wall calendar meeting room digital signage? Boom, argument over. Everyone can see what’s going on, clearly written in black and white. Sure, the calendar exists online for people to consult. However, you can’t beat the immediate effect of physically seeing it right there, on the wall.
Secondly, using a digital wall calendar means administrative assistants don’t need to keep a hand-written record. Similarly, employees don’t need to interrupt receptionists to get info about available time slots or ask if someone’s currently in a meeting. It’ll save everyone a whole lot of time.
Additionally, any last-minute schedule changes show up on screen instantly. Which means visitors and staff have a real-time picture of what’s going on. You’ll find it especially useful if you host an event or conference on-site. Just edit the calendar through an online app like Google Calendar, and voila! Your changes get displayed immediately on the digital wall calendar.
Other uses for a digital wall calendar
Most people limit their use of a digital wall calendar to displaying schedules outside each meeting room. But you can also set up a screen with a digital wall calendar in the break room or cafeteria. That way you can grab people’s attention to promote company events.
Also, don’t forget it can prove very useful outside of an office environment too. Schools and universities display digital wall calendars outside lecture rooms or in cafeterias. You won’t find a better place to display seminar schedules or campus events. After all, putting your calendar on a digital signage screen in a high traffic area gets the word out quickly. Plus you can add your calendar to a playlist with images and videos to create engaging digital signage for events.
Additionally, consider incorporating a digital wall calendar into your way-finding plan. Will you host an event on-site, at your school or corporate HQ? If visitors see a screen displaying the events and meetings taking place in each room, it helps people find their way around. Absolutely no one likes wandering around a maze of corridors, trying to figure out if they’re in the right department.
Benefits of showing Google calendar on a wall-mounted screen
Digital wall calendars are a quick and easy way of displaying scheduling and event info. They help teams get organized and coordinate their time better. Productivity improves too, because your poor receptionist won’t have to deal with disgruntled execs wondering when the conference room is going to be available. Whether you run a school or office, a digital wall calendar will transform into a tool you’ll come to rely on, every day.
