A Raspberry Pi screen is one of the first things you’ll need, regardless of what you’re using your Raspberry Pi for. But which one should you choose?
One of the first things you’ll need when setting up your Raspberry Pi is a display. Raspberry Pi screens serve as the primary visual output for most Raspberry Pi projects, allowing you to navigate the operating system, run software or interact with applications.
More importantly, by enhancing visual output and enabling touch interaction, Raspberry Pi screens play a pivotal role in expanding the capabilities of any project, from professional Raspberry Pi digital signage to DIY home automation.
In this blog post, we’ll go over all you need to know about Raspberry Pi screens, including what to consider when choosing your next Raspberry Pi display and a few use cases highlighting the versatility of Raspberry Pi screens in real-world applications.
What kind of display can be used as a Raspberry Pi screen?
All models of Raspberry Pi feature HDMI ports. Hence, the short answer is that you can use any kind of computer monitor or TV as a Raspberry Pi display. However, not many people can truly grasp how wide this range can be. Α Raspberry Pi screen can be anything from a traditional rectangular display to a 2-inch e-paper, a smart mirror, a carputer, a strip or bar display, a “retina” display or even a tridiminished rhombicosidodecahedron.
Nevertheless, the most common types of displays that are typically used as Raspberry Pi screens are portable 7-inch or 10-inch LCD displays with touchscreen functionality. And obviously, the most preferred choice among them is the official Raspberry Pi screen.
The Official Raspberry Pi Screen
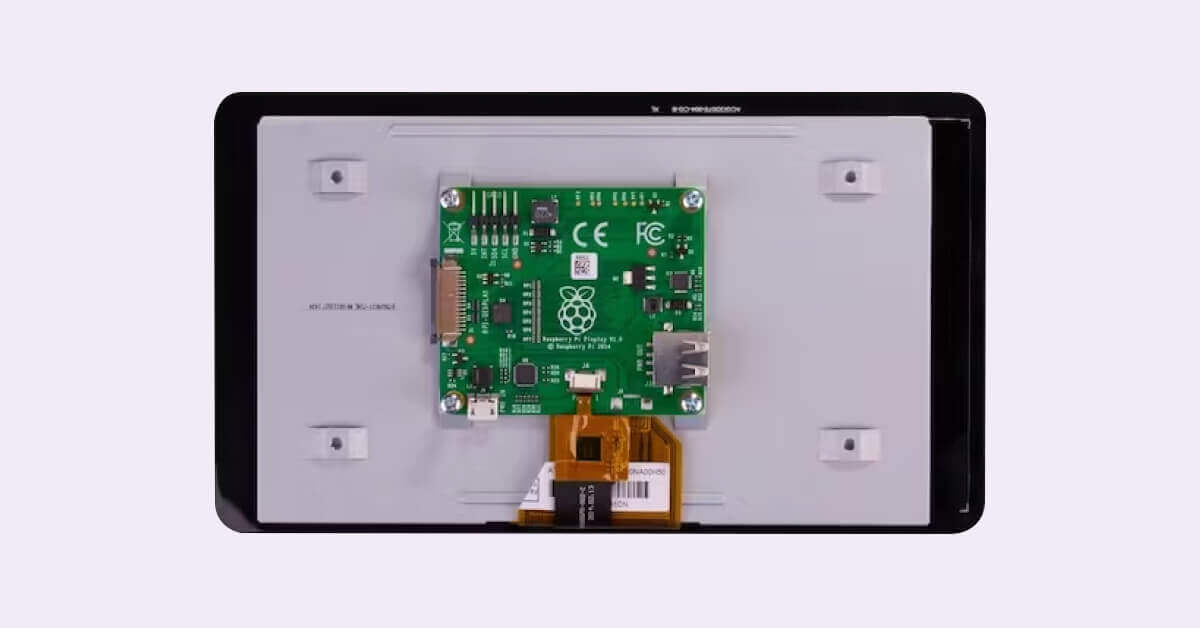
The first official screen for the Raspberry Pi is called Raspberry Pi Touch Display.
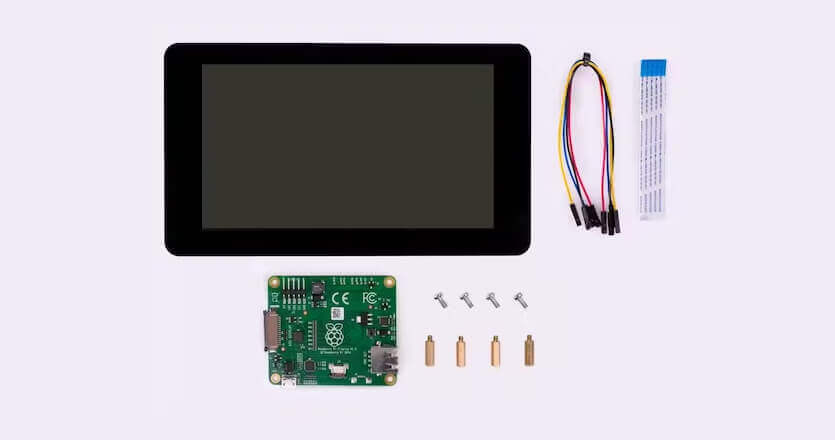
The Raspberry Pi Touch Display features a 7-inch touchscreen panel that supports a 10-point capacitive touch, ideal for any kind of portable or interactive project.
One of the things that make the Raspberry Pi Touch Display stand out from other Raspberry Pi screens is that it can be connected via the DSI port rather than through the GPIO pins or over the HDMI port. The adapter board handles both signal conversion and power without the need for any further adjustments. Keep in mind, however, that this is not possible with any of the Raspberry Pi Zero line products.
In addition, the Raspberry Pi OS comes with touchscreen drivers that support the 10-point touch functionality and an on-screen keyboard so you can use the full range of its capabilities without an external keyboard or a mouse.
Raspberry Pi Touch Display Specification
- Display size (diagonal): 7 inches
- Display format: 800 (RGB) × 480 pixels
- Active area: 154.08mm × 85.92mm
- Touch panel: True multi-touch capacitive touch panel with up to 10 points of absolution
- Assembly module size: 192.96mm × 110.76mm
- LCD type: TFT, normally white, transmissive
- Surface treatment: Anti-glare
- Color configuration: RGB-stripe
- Backlight type: LED B/L
- Production lifetime: The capacitive touch display will remain in production for at least until January 2028 (according to the obsolescence statement)
Price of the Raspberry Pi Touch Display
The price of the Raspberry Pi Touch Display typically ranges from $60 to $75.
What to look for in your next Raspberry Pi screen
As mentioned above, there are several different types of screens that you can connect to a Raspberry Pi apart from the official one. Determining which one is the best for you depends largely on the scope of your project. Therefore, instead of presenting alternatives, we’ll give you some insight on what to keep in mind when choosing the Raspberry Pi screen that is right for your needs.
Compatibility and Connectivity
First off, you’ll need to ensure that the screen you choose is compatible with Raspberry Pi boards. HDMI is the most common interface for Raspberry Pi screens but you can connect almost any screen through a DSI interface, USB ports or GPIO pins. In addition, you’ll need to consider the power requirements of the screen to guarantee that it can work seamlessly with your Raspberry Pi setup. Finally, make sure that the screen has proper drivers that are compatible with the Raspberry Pi OS or any other software you intend to use for your project.
The easiest thing you can do is look for displays that are specifically designed for Raspberry Pi compatibility.
Screen size
The size of a display’s viewable area will most probably be one of the most important deciding factors when choosing a screen. Depending on your use case, you might need a screen that is as small as 1,5 inches or even one large enough to serve as part of a digital signage video wall.
Screen shape
This might only apply to a more peculiar raspberry pi project, but there is a wide variety of unusual screen shapes that you can use with Raspberry Pi. These include square, triangular or circular screens and everything in between.
Screen resolution
The resolution of a Raspberry Pi screen can vary depending on the specific model and display you are using. The most common screen resolution used with Raspberry Pi is Full HD or 1080p (1920×1080 pixels). This option provides a good balance between image quality and performance for most applications.
However, keep in mind that both Raspberry Pi 4 and Raspberry Pi 400 can support a dual monitor setup with a 4K resolution.
Monitor Refresh Rate
The refresh rate of a display (measured in Hertz) refers to how many times the screen image is updated per second. A standard 60Hz refresh rate will be sufficient for most tasks, but higher refresh rates produce smoother motion that can be very convenient for gaming and fast-paced multimedia.
Touchscreen Functionality (Resistive touch vs Capacitive touch)
Touchscreen displays are commonly employed as Raspberry Pi screens due to their ability to provide interactivity, which is essential for various applications such as control panels, dashboards, and gaming. If you are looking into touchscreen digital signage applications, you’ll soon find out that there are two touch panel types available: capacitive and resistive touch.
Capacitive touchscreen display technology is the kind you find in smartphones and laptops. A capacitive touch display requires a conductive input, meaning it only works with fingers or a capacitive stylus. It provides a more responsive and precise touch experience while supporting multitouch functionality.
On the contrary, resistive touch displays register input through physical pressure. They can respond to any kind of input method, including gloves, styluses or fingers, with high precision but have limited multitouch capabilities.
Type of LCD Display (TFT vs IPS)
The term TFT (Thin-Film-Translator) refers to the technology used in an LCD display. A TFT display uses active matrix technology, offering faster response times and reduced motion blur at a significantly lower cost than an IPS LCD screen.
On the other hand, IPS (in-plane-switching) displays are a more advanced iteration of the TFT module, offering improved capabilities like better contrast ratios, color accuracy and wider viewing angles. However, an IPS LCD display tends to be much costlier than a TFT display.
Additional Features
Apart from all the above, there are many more features you might need for your project. For example, some screens may feature integrated speakers or other audio output options, built-in cameras, light sensors, or GPIO pins for easier connection to Raspberry Pi boards or other accessories.
In addition, some screens may offer better contrast or brightness ratios, enhanced color performance or wider viewing angles. Lastly, you’ll need to assess the screen’s mounting options depending on the intended use.
Uses of a Raspberry Pi screen
Although they might seem unimpressive at first glance, most Raspberry Pi screens exhibit a remarkable versatility that opens up a world of possibilities. From DIY home entertainment systems to complex robotics projects, the range of applications of a Raspberry Pi screen is limited only by your own creativity.
Below we’ll present just a few use cases for Raspberry Pi screens to give you a glimpse into their vast potential.
- Learning and Education
Raspberry Pi screens have found their way into the classrooms as a great educational tool that allows students to learn about programming and computer science through an uncomplicated visual interface.
- Video Games
Raspberry Pi screens are ideal for building your own gaming console. Just connect your Raspberry Pi to a screen and a joystick, run a retro gaming emulator and dive into nostalgia with some classic arcade games. You can even turn a touchscreen display into a handheld gaming system.
- Build a compact media center
In just a few simple steps, you can turn your Raspberry Pi screen into a portable media center that can stream online content and playback video. You can then integrate it into your home entertainment system as a digital photo frame, an internet radio interface or a real-time weather touch screen display.
- DIY Home automation
You can use a Raspberry Pi screen as a dashboard for monitoring and controlling smart (IoT) devices in real time. By displaying a user-friendly control panel with touch input you can easily track the status of TVs, monitors, speakers, thermostats, bulbs and kitchen appliances through a central hub.
- Car infotainment system
With features like music playback, Bluetooth connectivity and GPS navigation, a Raspberry Pi screen can turn into a complete infotainment system for any kind of vehicle.
- Smart Mirrors
This one might require a bit more effort, but you can actually turn a Raspberry Pi screen into a smart mirror that displays weather updates, calendar events or the latest news.
- Digital Signage
We saved the best for last. Due to its low cost and high performance, Raspberry Pi and digital signage go hand-in-hand. And with Yodeck, you can easily use any Raspberry Pi Screen as a digital sign in just a few clicks.
Using a Raspberry Pi Screen for Digital Signage
Digital signage is one of the compelling use cases for Raspberry Pi screens, offering an affordable and flexible solution for displaying content in any setting.
By utilizing a Raspberry Pi screen for digital signage, you can create eye-catching digital menu boards for a cafe or a restaurant, connect with your students through engaging educational content or transform a retail store with a captivating promotional campaign.
All you are going to need apart from a Raspberry Pi screen is easy-to-use digital signage software. Luckily for you, Yodeck supports screen resolution up to 4K for every standard display size and as well as customizable aspect ratios to fit any type of screen.