
From picking the right Pi model to choosing software that scales with your business.
Key Takeaways
Raspberry Pi has become one of the most widely deployed digital signage media players in the world. The hardware is proven, affordable, and available everywhere. The real decision is the software you run on it, and that is what this guide covers.
What is Raspberry Pi and how does digital signage software use it?
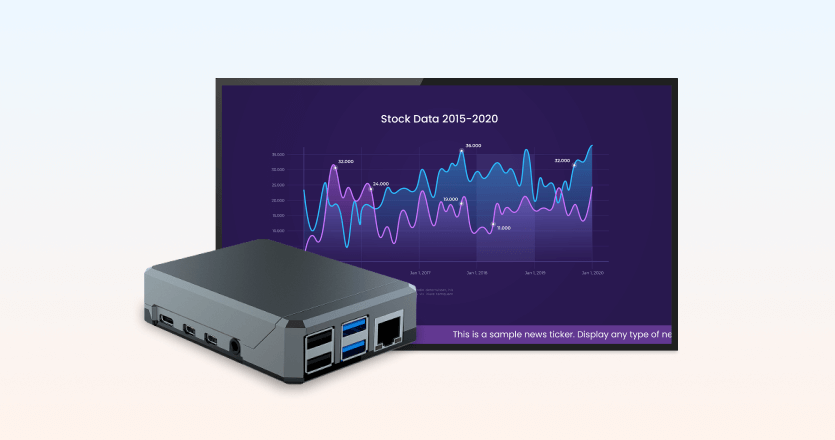
Raspberry Pi digital signage starts with understanding what the hardware actually is. Raspberry Pi is a credit card-sized single-board computer developed by the Raspberry Pi Foundation. It connects to a display via HDMI, runs on a Linux-based operating system, and stores its software on a microSD card. Originally designed as an affordable computer for education, it has become one of the most widely deployed media player platforms in commercial digital signage.
According to Electronic Specifier, Raspberry Pi’s revenue grew 25% to $323.2M in fiscal year 2025, with digital signage explicitly cited as a key growth driver alongside industrial automation and smart buildings.
For signage purposes, the Pi functions as a media player: it receives content from a cloud dashboard or local server, stores it on an SD card, and outputs it to the screen 24/7. The hardware on its own, though, is just a computer connected to a display. The software is what turns it into a managed, remotely controlled, content-scheduling signage system, and choosing the right software is what this guide is about.
Why businesses use Raspberry Pi for digital signage
Several practical factors have made Raspberry Pi the dominant low-cost player for business signage.
- Low hardware cost. The board alone costs consistently under $100, compared to proprietary commercial players that often start at $200 to $400 per unit. For a business deploying ten or twenty screens, the difference compounds fast.
- Low power consumption. Raspberry Pi consumes significantly less power than a Windows small-form-factor PC, exact wattage varies by model, peripherals, and workload, but the difference across a 24/7 multi-screen deployment adds up to a meaningful reduction in operating costs.
- Global availability. Unlike specialized signage hardware that goes through long procurement cycles, Raspberry Pi boards are sold worldwide through distributors in most markets. IT teams managing multi-site deployments can source replacement units locally without waiting for a specific vendor to ship.
- Long product lifecycle. The Pi 4, released in 2019, remains the default recommended model for most cloud signage platforms in 2026. That stability matters for IT managers who need consistent hardware across a fleet over several years.
EXCLUSIVE OFFER
Get Raspberry Pi Players for free!
Get our Yodeck Player for free with an annual plan and save up to $155€145£125CA$235AU$240 for each player.
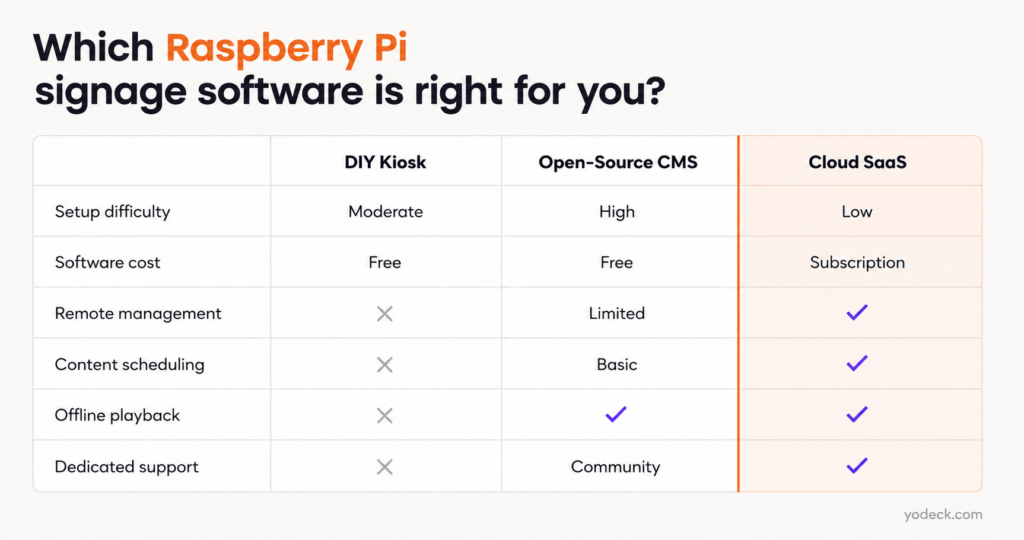
Types of digital signage software for Raspberry Pi
Choosing the wrong software category is a common mistake. The three main types of digital signage software for Raspberry Pi have meaningfully different implications for management overhead, cost, and scalability.
DIY kiosk mode
This approach involves configuring the Pi’s operating system to boot directly into a full-screen browser, typically Chromium, pointing at a URL. There is no dedicated signage software involved. The Pi boots to Chromium kiosk mode, loads a webpage, and displays it full screen. It works for simple, single-screen setups where the content is a static web page, a live dashboard, or a URL that updates automatically.
✔ Pros
- No monthly software cost
- No external platform or account required
- Quick to set up for a single, static URL
✘ Cons
- No remote management, any issue requires physical access to the device
- No content scheduling or playlist management
- No offline playback; if the URL breaks or the network drops, the screen goes blank
- Does not scale beyond a single screen without significant manual effort
This approach is practical for a developer’s side project. It is not practical for a business running more than one screen.
Open-source self-hosted CMS
Several open-source platforms are built specifically for Raspberry Pi digital signage. The most common pattern: the software installs via Docker, runs a local web server on the Pi, and lets you manage content through a browser interface on your local network. Most support images, web pages, and 1080p video playback. More full-featured self-hosted options add layout zones, scheduling calendars, and multi-screen management, but require a separate Linux server or virtual machine to run the CMS.
✔ Pros
- Free to use regardless of how many screens you run
- No recurring software subscription cost
- Full control over the infrastructure and data
- Active communities with guides and forum support
✘ Cons
- Requires Linux administration skills for setup, maintenance, and troubleshooting
- No dedicated support team; community forums are the primary resource when something breaks
- Self-hosting a CMS adds infrastructure overhead that grows with your screen count
- Updates and security patches are your responsibility
For an IT team comfortable with Linux that wants zero recurring software costs across a large deployment, this is a viable path. For an SMB manager who needs screens running without IT involvement in day-to-day operations, it introduces more operational risk than it saves in cost.
Cloud-based SaaS CMS
A cloud-based digital signage CMS does what the Pi’s hardware cannot do on its own: it provides a centralized dashboard to manage content, scheduling, and devices across all screens from one place, with no local server to maintain. You create content in the cloud, push it to the player over the internet, and the player stores it locally for offline playback. If the internet goes down, the screen keeps playing cached content. When the connection is restored, updates sync automatically.
✔ Pros
- Low setup barrier, no Linux or server administration required
- Full remote management, scheduling, and monitoring from one dashboard
- Offline playback through local content caching on the SD card
- Dedicated support included with paid plans
- Scales from one screen to hundreds without additional infrastructure
✘ Cons
- Recurring per-screen subscription cost
💡Yodeck’s free plan covers one screen indefinitely, and the first sign-up includes 30 days of unlimited access for up to five screens, so you can test a real multi-screen setup before spending anything. - Content that relies on live web feeds or streams still requires internet connectivity
💡 Yodeck mitigates this with a fallback image feature: if a web page becomes unreachable, the screen displays a pre-set image instead of going blank. - Dependent on the platform vendor’s uptime and roadmap
💡 Yodeck players store content locally on the SD card and continue playing for at least 30 days without any connection to Yodeck’s servers, so a platform outage does not affect what your screens are showing.
This is the most common choice for IT managers and SMBs deploying more than a handful of screens, because it removes the operational burden of self-hosting while adding the management features that make a signage network practical to run.
Software comparison by type
What to look for in digital signage software for Raspberry Pi
Not all cloud-based digital signage software for Raspberry Pi is equivalent. These are the six criteria that matter most for IT managers and SMBs evaluating platforms.
- Remote management: The ability to monitor player status, push content updates, reboot devices, and receive alerts when a screen goes offline are basic requirements for any multi-screen deployment. Without remote management, every issue becomes a site visit. Three capabilities in particular are worth checking before you commit to a platform.
1. Player monitoring and control. The dashboard should show real-time player status, flag offline screens immediately, and let you push content updates or trigger a remote reboot without touching the device. For IT teams managing screens across multiple locations, this is table stakes.
2. HDMI-CEC support. Raspberry Pi includes a CEC adapter on its HDMI port, which a good signage platform uses to automatically power TVs on and off and switch to the correct HDMI input on a schedule, with no manual interaction with the screen. This is particularly useful in environments where displays need to turn off overnight to reduce power consumption.
3. Network flexibility. Look for platforms that support Ethernet, Wi-Fi, 3G/4G/LTE USB dongles, static IP configuration, and HTTP proxy setups. For IT managers deploying in environments with strict network controls, this flexibility is a real operational advantage. - Content scheduling: Business signage needs to run different content at different times: morning promotions, lunchtime menus, after-hours messaging. Look for scheduling that goes down to the day, time, and individual screen level, not just playlist rotation.
- Offline playback: Internet connections drop. A signage system that goes blank when the network goes down is a liability in customer-facing environments. Look for platforms that cache content locally on the device and continue playing during outages — and check how long that offline buffer lasts before a resync is required.
- Security certifications: For IT teams with compliance requirements, check whether the platform holds ISO 27001 (information security) and ISO 9001 (quality management) certifications. These are meaningful independent verifications that the platform manages security and operations to auditable standards.
- Scalability: A platform that works well for one screen should work equally well for a hundred. Look for centralized management, bulk content updates, screen grouping, and role-based access controls. Enterprise deployments also need SSO via SAML, audit logs, and workspace-level permissions.
- Integrations: The most useful signage content pulls live data from the tools your team already uses: Google Drive, SharePoint, Microsoft Teams, Canva, Power BI, Monday.com, Airtable, Notion. A platform with native integrations removes the need to manually re-upload content every time something changes.
Yodeck covers all six.
✔ Remote management works across Ethernet, Wi-Fi, 3G/4G/LTE, static IP, and HTTP proxy setups, all configurable through the portal, with a dedicated manual configuration guide for complex network environments.
✔ Scheduling goes down to the day, time, and individual screen level.
✔ Players store content locally on the SD card and continue offline playback for at least 30 days; after roughly 30–40 days offline, playback stops until the connection is restored.
✔ The platform is ISO 27001 and ISO 9001 certified.
✔ It scales from one screen to thousands, with SSO, audit logs, and workspace-level permissions on enterprise plans.
✔ And with 130+ native app integrations (including Google Drive, SharePoint, Canva, Power BI, and Microsoft Teams) content that lives in your existing tools reaches your screens without manual re-uploading.
> If you want, you can explore the full feature set to have the complete picture.
Which Raspberry Pi model does your signage setup need?
The right Pi model depends less on raw specs and more on what you are planning to display. Here is how the main models map to real signage use cases in Yodeck.
Raspberry Pi 4, the standard choice for most deployments.
Best for: video playlists, image slideshows, web pages, data dashboards, single-screen setups running 1080p. The Pi 4 with 4GB or more RAM handles the majority of business signage use cases smoothly and reliably. 💡 It is the model Yodeck ships as the default Yodeck Player and the one recommended for new deployments unless there is a specific reason to go further.
Raspberry Pi 5, for demanding content
Best for: 4K video playback and dual-screen setups at full 60Hz on both displays. The Pi 5 delivers two to three times the CPU performance of the Pi 4 and more than double the GPU throughput. Yodeck is fully compatible with Raspberry Pi 4 and Pi 5. If your deployment involves 4K content or simultaneous dual outputs, the Pi 5 is worth considering.
> See what changed with the Raspberry Pi 5.
Raspberry Pi 400, if the Pi doubles as a workstation
Best for: single-screen setups where the same device handles both signage playback and local administration. The Pi 400 is the keyboard-integrated model built on Pi 4 internals. It works with Yodeck and suits environments where staff need occasional hands-on access to the device.
> See the full Raspberry Pi 400 signage guide for how it compares.
Raspberry Pi 3 and older, proceed with caution
Best for: simple image and video playlists only, on a tight budget. The Pi 3B+ will struggle with web-based content, multi-zone layouts, and real-time apps.
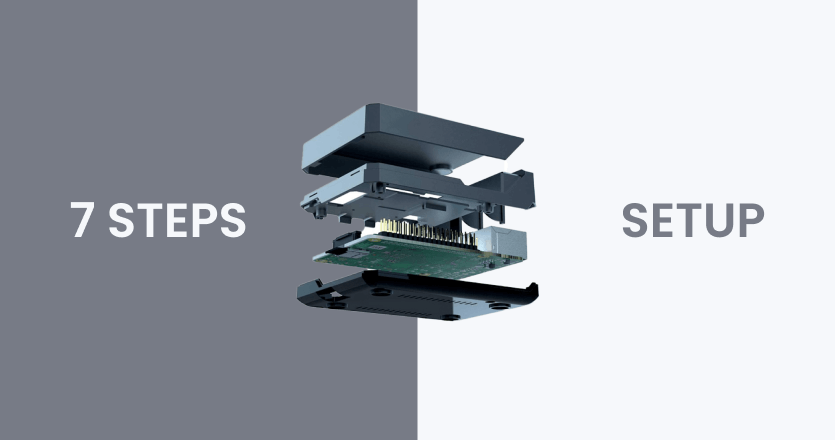
How to set up Raspberry Pi for digital signage: step by step
Setting up a Raspberry Pi for digital signage follows the same core sequence regardless of which software you choose. The steps below apply to any platform.
💡 If you are using Yodeck with an annual plan, you can skip most of this.
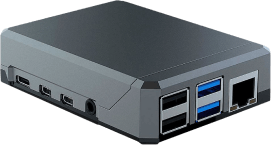
Yodeck ships a pre-configured Yodeck Player based on Raspberry Pi 4, with the SD card image pre-loaded, the metal case included, and the power supply and HDMI cable in the box. Basic annual plan subscribers receive a 1GB Pi 4 player free; Premium and Enterprise subscribers receive a 4GB Pi 4 player free. You plug it in, connect it to your screen and internet, and it starts up ready to register. No flashing, no assembly.
You will need a Raspberry Pi board (Pi 4 or Pi 5 for any business deployment), a Class 10 microSD card with at least 32GB, the official power supply for your model, a micro-HDMI to HDMI cable, a display with HDMI input, and a reliable internet connection. Using the official power supply is not optional, underpowered adapters cause random reboots and SD card corruption.
This decision shapes everything that follows. A cloud-based platform gives you a pre-built OS image to flash, remote management from day one, and no server to maintain. An open-source self-hosted platform gives you full control but requires a Linux-capable setup process. A DIY kiosk mode requires only a browser and a URL but offers no management layer.
Most platforms provide a custom OS image built on Raspberry Pi OS. Download the correct image for your Pi model, Pi 4 and Pi 5 use different images on most platforms. Use Balena Etcher to write the image to the SD card. The process takes two to three minutes. Do not use the standard Raspberry Pi OS image; use the one provided by your signage platform.
Insert the SD card into the Pi. Connect to your display via micro-HDMI and to the internet via Ethernet, use a cable for the first boot, not Wi-Fi, to avoid connectivity issues during initial setup. Power on and wait. On first boot the file system expands automatically, which takes three to five minutes. Do not remove power during this process.
Once booted, the screen displays a registration code or a setup prompt depending on your platform. Complete the registration to link the player to your account or local server. Configure network settings (Wi-Fi, static IP, proxy) and display settings (resolution, orientation) at this stage.
Add your media (images, videos, web pages, documents, or live data dashboards) and organize it into playlists. Set schedules to control what plays on which screen and when. Test playback before finalizing the installation.
Install the Pi behind the display or in a nearby enclosure. Ensure the case has ventilation or a heatsink. Secure the SD card so it cannot be dislodged by vibration or accidental contact. Label the device with its screen name and location for easier fleet management later.
Setting it up with Yodeck’s Software
Yodeck has dedicated documentation for each setup path. Follow the guide that matches your situation:
- Raspberry Pi 4 → Create a Yodeck Player based on Raspberry Pi 4
- Raspberry Pi 5 → Create a Yodeck Player based on Raspberry Pi 5
- Already own a Pi and want to register it → DIY Raspberry Pi registration guide
Note: these guides are relevant if you are setting up a Raspberry Pi yourself. If you are on a Yodeck annual plan, your player arrives pre-configured and ready to plug in, no manual setup required.
Questions and answers by Yodeck’s software experts
What digital signage software works with Raspberry Pi?
Several software categories are compatible: DIY kiosk mode using Chromium, open-source self-hosted platforms, and cloud-based SaaS CMS platforms. Cloud-based options are the most widely used in business deployments because they add remote management, content scheduling, and offline playback on top of the Pi’s hardware. Yodeck is purpose-built for Raspberry Pi and supports Pi 4 and Pi 5 across all plan tiers.
Does digital signage software run on Raspberry Pi without internet?
It depends on the software. DIY kiosk mode and most web-based dashboards require a live internet connection. Cloud-based platforms that cache content locally on the SD card continue playback during outages. Yodeck players store content locally and continue playback for at least 30 days without a network connection; after roughly 30–40 days offline, playback stops until the connection is restored. Only content that requires a live feed, such as web pages or live streams, needs connectivity to update.
Can I manage multiple Raspberry Pi screens from one place?
Yes, with the right software. DIY kiosk mode and basic open-source setups offer no centralised management, each device must be configured individually. Cloud-based platforms manage all screens from a single dashboard regardless of how many players you have or where they are located. The digital signage CMS layer is what makes fleet management practical at scale.
> Read more about Raspberry Pi screens.
What is the difference between free and paid digital signage software for Raspberry Pi?
Free open-source software has no recurring cost but requires Linux administration skills, self-hosted infrastructure, and community-only support. Free tiers on cloud platforms give you managed infrastructure and dedicated support, with a per-screen subscription when you scale beyond one display. The cost difference narrows quickly once you factor in the time and expertise required to maintain a self-hosted setup.
Is Raspberry Pi proven hardware for serious digital signage deployments?
The perception that Raspberry Pi is hobbyist hardware does not match how it is actually deployed. Raspberry Pi Ltd. reports that more than 70% of units sold today go to industrial use cases, and the company actively markets the platform for industry. Sharp (formerly NEC) builds entire ranges of commercial large-format displays with Raspberry Pi as the embedded system-on-chip, Heathrow Airport’s flight information displays run on them. In a discussion on Reddit’s r/digitalsignage, a Yodeck team member noted that after ten years and hundreds of thousands of units shipped, total hardware returns amount to around 50 to 100, the kind of reliability record that defines a platform proven in serious commercial deployments.
Raspberry Pi digital signage works. The software is what makes it work for you.
Raspberry Pi is proven, affordable, and reliable enough for commercial deployments. That part is settled. The real decision is the software that runs on it.
Get that wrong and you have a device that needs constant manual attention, goes blank when the internet drops, and cannot be managed without a site visit. Get it right and you have a remotely controlled, automatically scheduled signage system that runs itself, whether you have one screen or a hundred.
The software category you choose (DIY kiosk, open-source self-hosted, or cloud-based SaaS) determines your management overhead, your recovery options when something breaks, and how much your setup costs as it scales.
Want to see it in practice? Yodeck’s free plan is the fastest way to find out, no credit card required.
Get players for FREE
That’s right! Select any Annual Plan and we will give you all the players you need for your monitors, preconfigured and for free. Just plug them in and you’re good to go!
Get the offer