A practical guide from a blank TV to a board that updates itself, sells more, and works across restaurants, cafes, food trucks, and drive-thrus.
Key Takeaways
A printed menu board commits you to a price for as long as the lamination holds up. The moment your coffee supplier raises wholesale by $2 a kilo, or a meat shortage forces a swap on the burger line, you’re either eating the margin or sending someone to a print shop.
The good news: setting up a digital menu board is far simpler than it sounds. If you can plug in a streaming stick and drag a photo into a template, you can build a digital menu board this afternoon. This guide walks through the hardware, the software, the design decisions, and the cost in the order you’ll actually face them, whether you run a sit-down restaurant, a cafe, a drive-thru, or a single food truck.
What is a digital menu board?
A digital menu board is a screen that displays your menu, controlled by software that lets you update content remotely. That’s the whole concept. What separates a real digital menu board from a TV running a PowerPoint loop is not the screen. It’s the management layer.
A working setup has three parts:
- The display (a TV, a commercial monitor, or an outdoor screen) shows the content.
- The media player is the small device that runs the signage software and feeds the screen, either as an external box plugged into the HDMI port or as software built into a smart commercial display.
- The digital signage software is where you design the menu, schedule what plays when, and push changes to one screen or a thousand.
Static images in a folder don’t qualify. The point of using digital menu boards is that prices update in the morning without anyone climbing a ladder. The breakfast menu vanishes at 11AM on its own. A sold-out special disappears the moment the kitchen calls it out. Without the right software doing that work, you’ve just bought a more expensive printed menu.
What you need before you start
You need four things, in this order: a screen, a media player, software, and your content.
How to create a digital menu board in 6 steps
Step 1: Pick the right screen for the environment
For indoor counter service or a sit-down dining room, a 43 to 55-inch consumer TV at 250 to 350 nits brightness is fine. Mount height matters more than panel size. The bottom of the screen should sit at customer eye level, roughly 5 feet from the floor for a counter-service line. Drive-thrus and storefront-facing screens need brightness of at least 1,500 nits, and ideally 2,500 or higher for direct sunlight. Outdoor-rated enclosures with IP65 or higher are non-negotiable once the screen sees rain or dust.
Step 2: Connect a media player
Plug your media player into the screen’s HDMI port and connect it to your Wi-Fi or a wired Ethernet line. If you bought a player pre-configured by your signage provider, this is genuinely a five-minute job. Power the screen on, switch to the right HDMI input, and the player will pair itself with your software account. If you’re using a smart commercial display with the software built in, skip this step and install the signage app from the TV’s app store instead.
Step 3: Choose digital menu board software
Yodeck’s free plan gives you a single screen with no credit card required, plus 30 days of unlimited feature access for up to 5 screens on first signup, which is enough to test multi-screen workflows before you commit. The criteria that matter for restaurants: template library size, scheduling flexibility, integration with the design tools you already use (Canva, in most cases), and how the platform handles offline playback when the internet goes down.
💡 Pro tip by Yodeck Team: Want the click-by-click in Yodeck? The Yodeck digital menu board tutorial walks through the setup inside the portal with screenshots, from picking a template to scheduling dayparts. Worth bookmarking before you start.
Step 4: Design your layout (or start from a template)
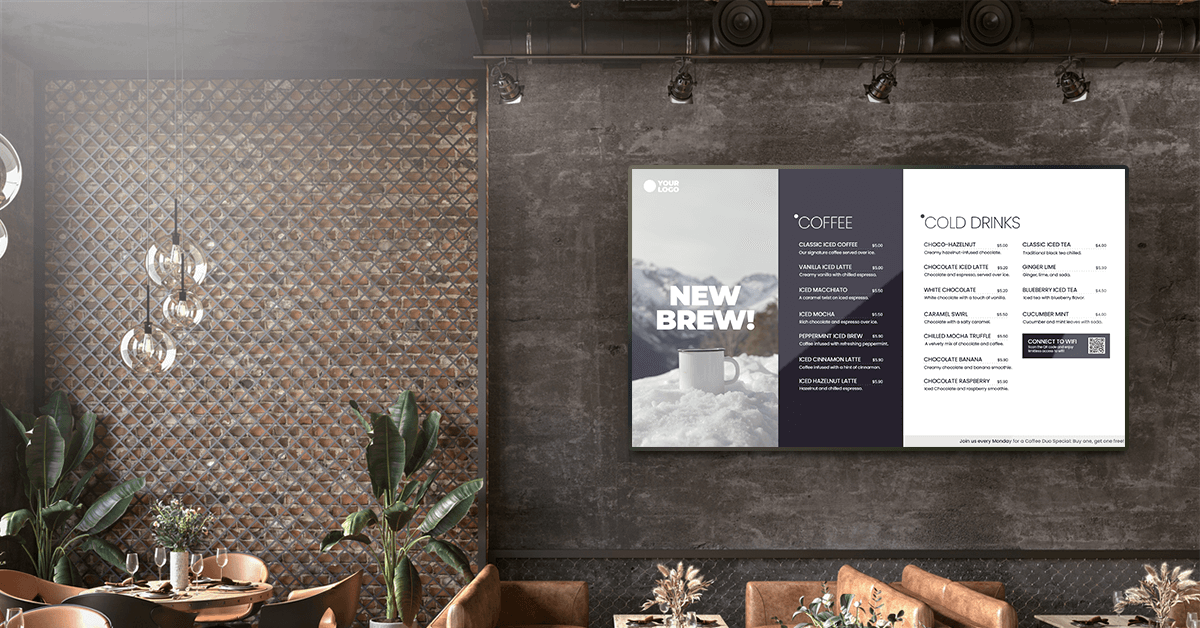
Building a menu layout from a blank canvas is the wrong move unless you have a designer on staff. Yodeck includes 700+ templates, including a dedicated category for food service. Pick one that matches your screen orientation. Most menu boards run landscape, but tall counter-side screens use portrait. Drop your logo and brand colors in, replace the placeholder items with your menu, and adjust the prices. The whole step takes 15 to 30 minutes for the first board, less for the second and third.
Step 5: Schedule dayparts and promotions
Dayparting is the step that justifies the whole investment. Create separate menus for breakfast, lunch, and dinner, then schedule each one to display during the right window. A breakfast menu that disappears at 10:30 AM removes the customer-service problem of someone walking up to order pancakes at 11 AM. Limited-time offers, happy hour drink specials, and weekend brunch menus all work the same way: built once, scheduled once, then they handle themselves indefinitely.
Step 6: Push to your screens and monitor remotely
After the menu is built and scheduled, push it live from the dashboard. Good signage software shows you whether each screen is online, what’s currently playing, and flags any device that’s gone offline. Make this part of your morning routine. A 10-second check on the dashboard confirms every board in every location is showing the right menu.
💡 Pro tip by Yodeck Team: Build one master menu first, then duplicate and modify it for breakfast and dinner versions. Editing a copy is much faster than starting each daypart from scratch, and the typography and brand elements stay consistent across all three.
Design tips that change buying behavior
A digital menu board lives or dies on readability, not on how polished the design looks at desk distance. The customer is reading it from 8 to 15 feet away in variable lighting, often while deciding in under 10 seconds.
💡 For more design directions broken down by restaurant type, check out a few menu board ideas that cover practical layouts for cafes, QSRs, bars, and full-service restaurants.
How much does a digital menu board cost?
A working digital menu board costs anywhere from $0 in software fees (using your existing TV on a free plan) to $5,000+ per location for outdoor commercial-grade setups. The variables that matter are whether you reuse an existing screen, whether you run indoors or outdoors, and whether you go consumer or commercial-grade on the display.
Here’s an approximate price range for each component:
| Component | Indoor (consumer-grade) | Indoor (commercial) | Outdoor / drive-thru |
|---|---|---|---|
| Display (per screen) | $300–$700 | $1,000–$2,500 | $2,000–$5,000+ |
| Media player | $30–$300 (or free with annual signage plan) | Often built into display (SoC) | $200–$500 |
| Mounting hardware | $50–$150 | $100–$300 | $300–$800 |
| Signage software | $0–$25 per screen/month | $0–$25 per screen/month | $0–$25 per screen/month |
| Installation | DIY or $200–$500 | $300–$700 | $500–$2,500 |
The software subscription is the smallest line item in this stack, which surprises most first-time buyers. Yodeck’s free plan covers a single screen indefinitely with no credit card required, which is enough to fully test the workflow before paying anything. Paid plans start in the single digits per screen per month, and free Yodeck Players ship with annual subscriptions, which removes the player line from the budget entirely.
For ROI context, our own research found that 86% of restaurant operators see a sales increase after deploying digital signage, which is why most operators recover the setup cost faster than they expect.
💡 Pro tip by Yodeck Team: The component that surprises most operators is mounting. A $50 wall mount works for a 32-inch screen behind a coffee bar. A 55-inch outdoor totem with a weatherproof enclosure and concrete-anchored pole runs $800+ in mounting and installation alone.
Indoor vs. outdoor: drive-thrus and food trucks
Outdoor digital menu boards need different hardware than indoor screens: higher brightness, weatherproof enclosures, and wider operating temperature ranges. The moment your screen sees daylight, the spec sheet changes.
Food trucks live in a third category. The screen needs sunlight readability and weather resistance, but it also needs to handle vibration during transit, run from a generator or inverter cleanly, and tolerate temperature swings inside a parked truck that can hit 60°C on a hot afternoon. Outdoor commercial displays handle this. Standard TVs don’t.
Drive-thrus account for a substantial share of QSR revenue, which sets the hardware bar much higher than indoor signage. According to data cited by Toast, there are just over 140,000 drive-thru locations across the U.S. restaurant industry as of 2026.
How to set up your first digital menu board for free
The fastest way to figure out whether digital menu boards belong in your operation is to install one and watch what happens for a month. A single screen on Yodeck’s free plan, paired with a TV you already own and a $30 streaming stick, costs effectively nothing to test. If sales lift, if the time saved on reprints is real, if the daypart switching solves the problem you bought it for, you can easily scale up.
Yodeck holds a 4.7 out of 5 rating on G2 across thousands of verified customer reviews, and powers digital signage for 60,000+ customers running 250,000+ screens in 135+ countries.
Our customer list includes operators at every scale, from single-location independents to multi-site chains like Domino’s, which runs centralized digital menu boards across its franchise network from one dashboard.