
We use Stripe as our payment service. And Xero for accounting.
What more natural than integrating the two services with our system?
Why not keep it simple?
Some SaaS companies treat Stripe as a single contact for bookkeeping and book all net revenue from Stripe. This revenue appears in the bank statements and they just reconcile that inflow. Simple as that. So, why bother?
For one, when you book Stripe’s net revenue, you miss out on 2.9% of your revenue (that’s Stripe fees). You could adjust on a monthly basis with a manual journal, crediting sales and debiting banking expenses. But that’s ugly.
Then, there is the invoice issue. The “invoices” Stripe sends to your customers are not the invoices in your books. They are just payment receipts.
Finally, manually issuing invoices to be paid through Stripe (using the Xero-Stripe integration) or outside of Stripe (e.g. using wire transfers), causes additional confusion.
We saw the problems happening in other SaaS businesses, so we did it the right way back in early 2016 when we launched our paid plans.
What we did
First, we integrated with Stripe to handle our payments. We will not be getting into details on this integration; you can find plenty of resources out there for using Stripe as your payment service.
If you have already integrated with Stripe, you can do the rest of the work described below now. It is perfectly fine. We did so 2 months after we started accepting payments through Stripe. You just need to add a few lines of code to take into account the already existing payments.
Here is our setup:
1. We set up Stripe Direct Feeds in Xero to get a virtual Bank Account in Xero with all Stripe transactions. (We previously used SilverSiphon for that, but switched.)
2. We integrated with the Xero API for issuing Invoices in Xero to customers for each transaction in Stripe, since we use Xero as our accounting SaaS.
3. We created the Xero Reconcile Robot for automatically reconciling hundreds of transactions in Xero.
The result is perfect bookkeeping, with everything correctly depicted in Xero. Each transaction (subscription-generated or simple charge) has an invoice in Xero, belonging to a specific contact. No mess. And you can even use Xero Items (SKUs) for getting more insight into your sales in Xero.
Here is how to make it work.
Setting up Stripe Direct Feeds in Xero.
Stripe Direct Feeds allow you to connect your Stripe account with your Xero account. What they give you is a Bank Account in Xero with all your Stripe transactions coming in automatically. If you have used the Paypal Bank Feed, it is pretty similar. Just keep in mind that Paypal is really a kind of a real account, since it can hold funds there, while Stripe constantly transfers all funds to your real bank account. Here is a sample of the reconcile section of that Stripe “Bank Account” in Xero:
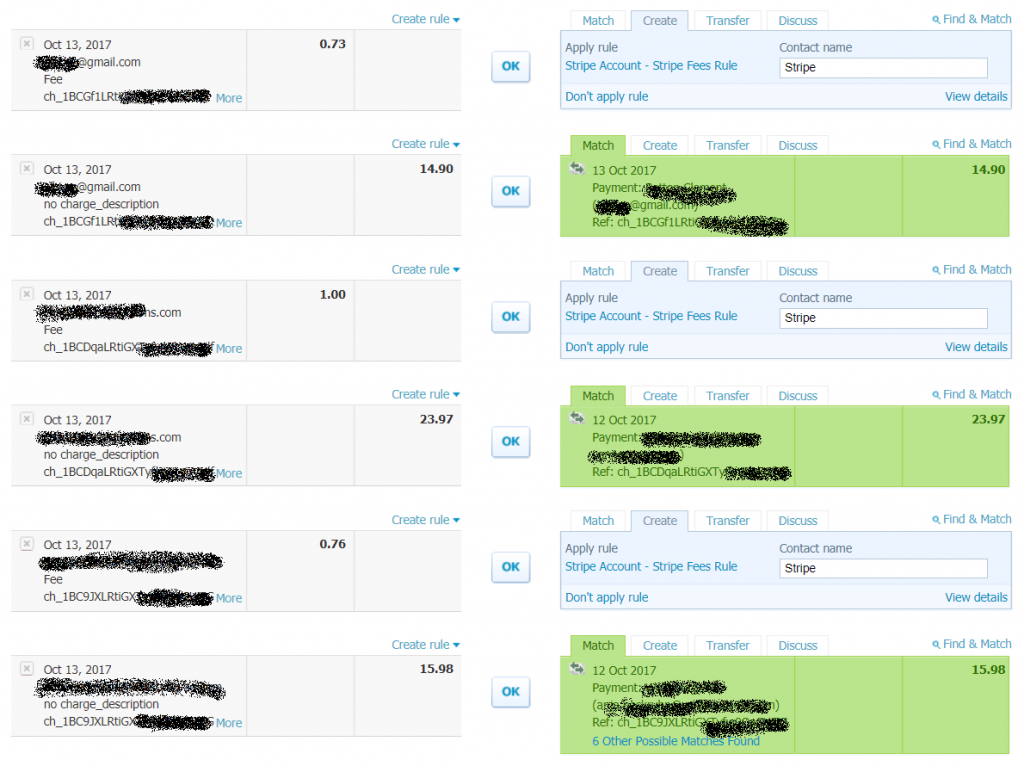
Each Stripe transaction appears as two statement items; the amount paid and the associated Stripe fee for the transaction.
Make sure that the statement lines you get in the feed have the Stripe charge reference number (a long string code starting with “ch_”, as seen in the screenshot above). This will be important later on for correct and fully automated reconciling detailed below.
Also, you need to set up some Xero Bank Rules to automatically suggest transactions in Xero for Stripe fees, fee refunds and Transfers. Then, it is just click-click-click on the “OK” buttons. First, make sure that you have a “Stripe” Contact to assign the fees to.
- In the Bank Accounts list, click on the “Manage Account” button of the Stripe Bank Account, and then click “Bank Rules”. A new screen appears.
- Click the “Create rule” button and then click the “Spend Money Rule” to create a rule for Stripe fees.
- Fill out the form so that the Rule works for your business. Here is how we have set it up in our Xero Account:
IMPORTANT: The “Description” needs to be equal to “Stripe Fee” instead of “Fee” shown below!
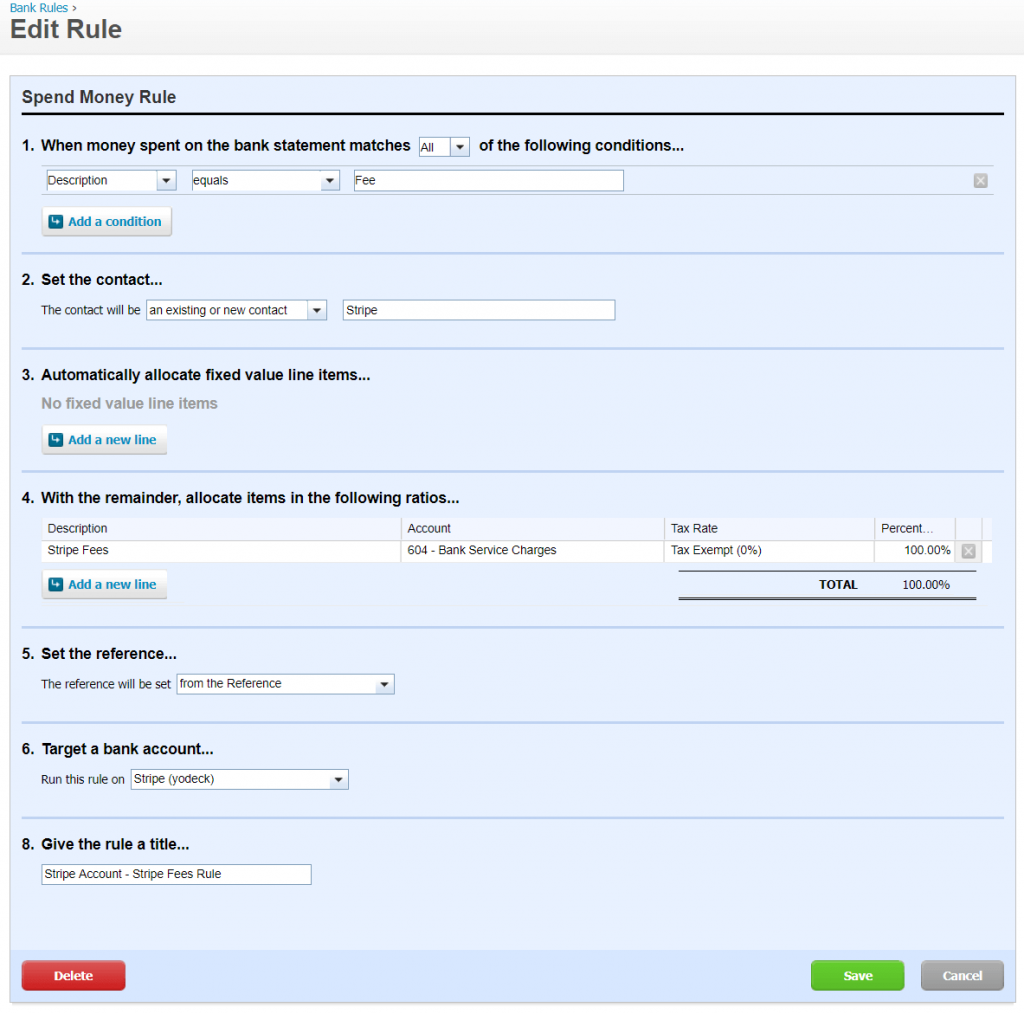
- Save the Rule.
- Click the “Create rule” button again and then click the “Receive Money Rule” to create a rule for refunds of Stripe fees.
- Fill out the form so that the Rule works for your business. Here is how we have set it up in our Xero Account:
IMPORTANT: The “Description” needs to be equal to “Stripe Fee” instead of “Fee Refund” shown below!
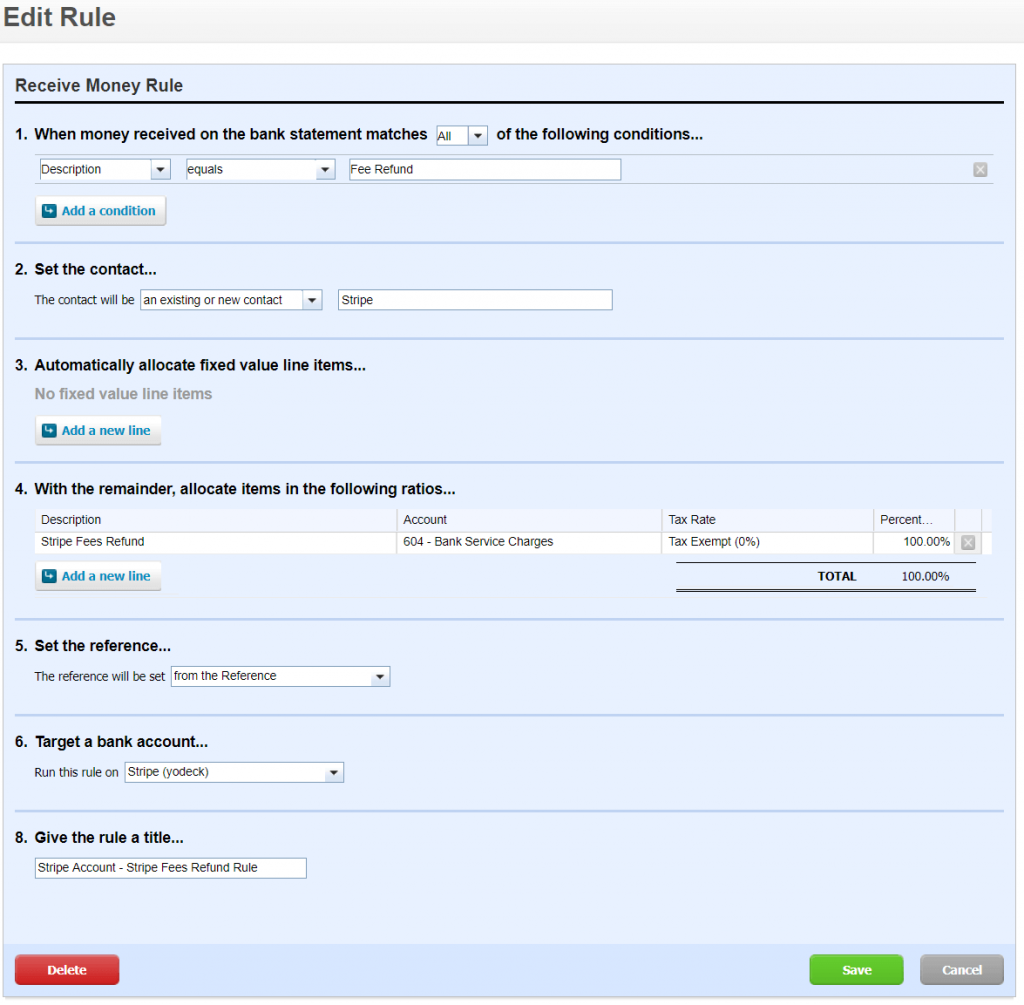
- Save the Rule.
- Click the “Create rule” button again and then click the “Transfer Rule” to create a rule for transfers of funds from Stripe to your actual Bank Account.
- Fill out the form so that the Rule works for your business. Here is how we have set it up in our Xero Account:
IMPORTANT: The “Description” needs to be equal to “STRIPE PAYOUT” instead of “Transfer to ….” shown below!
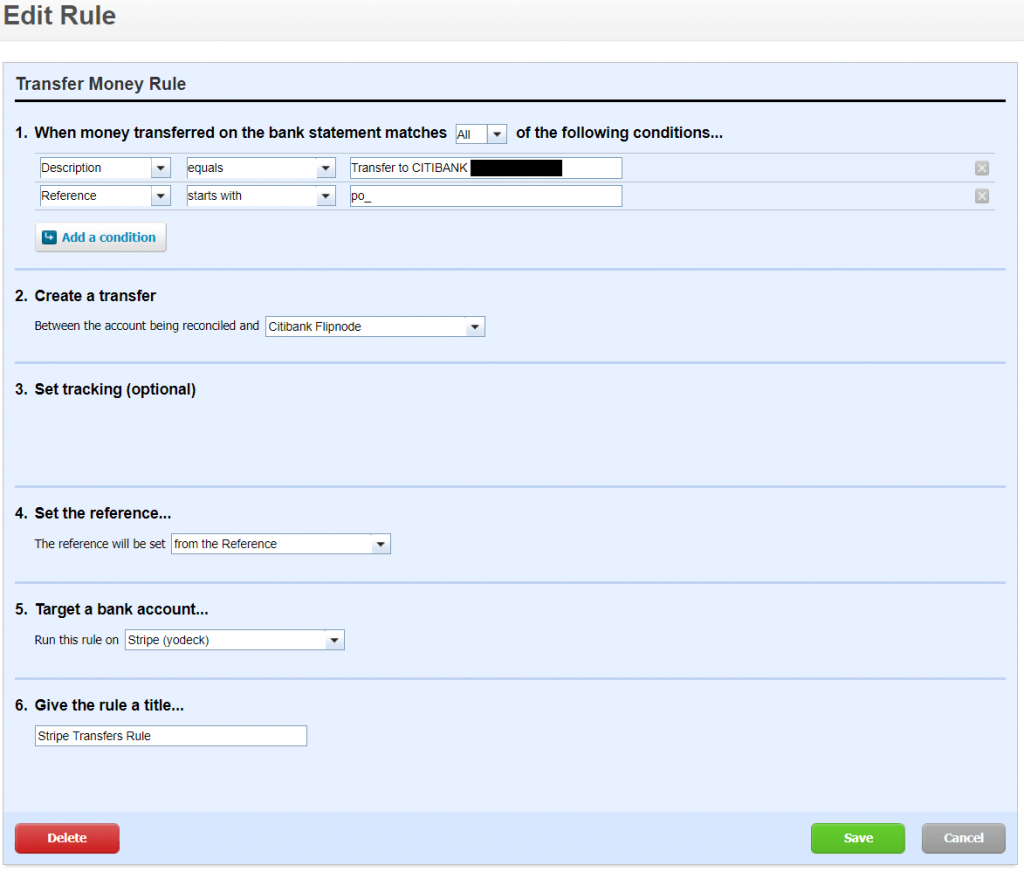
- Save the Rule.
Now you have set up all required rules to make your life easier (and safer) when reconciling your Stripe virtual bank account.
Integrating with Xero
Xero has an extensive API. We use three endpoints:
- Contacts – to create and update contact details of customers in Xero
- Invoices – to create Invoices for each transaction
- Payments – to create the Payment for each Invoice so that the Invoice is considered “paid”
To use the Xero API, you first need to get authenticated. Check out the Xero Developers site for details on getting authentication credentials, it’s easy.
When a payment is successful, you get a webhook from Stripe. We only issue invoices on a successful charge, so we listen for the right events. That webhook handler needs to perform the API calls to Xero. Keep in mind that any call to the Xero API might fail (either randomly or due to you hitting the API limits). So, you need to make sure failed requests are retried after a timeout, and eventually, you will get a notification that a Xero API call failed, so that you can check it out manually. We use Celery to queue tasks like these API calls, but you can do it any way you like.
Creating/Updating a Contact in Xero
First, you need to create a new Contact in Xero for your customer. You will have to keep the Xero Contact ID in your system for future use. The ID is that UUID in the URL when you visit a Contact in Xero.
If the customer updates their billing details, then you also need to update the Contact in Xero, so that future invoices are issued with the correct details.
Creating an Invoice in Xero
Once you receive a payment, and the customer exists as a Contact in Xero, then you need to issue an Invoice with the respective line items.
Given that you are using Stripe, you probably use Stripe’s proration. You will need to use the invoice line items provided by Stripe so that you correctly depict in Xero what the customer is actually paying for.
After you issue the invoice, you can fetch a link for an online version of the Invoice. You can save and use this link on your system as part of the billing history. This way, the customer gets the ACTUAL invoice you issued, both as an online web page and as a PDF file to download.
Some tips:
- Invoice issuance in Xero should occur at both the first purchase as well as subscription renewals. So, make sure you use Stripe’s webhooks.
- You are better off creating a special Invoice Template for the Invoice you issue this way. This Theme does not need to include any payment instructions (since they have already paid) and might provide different wording.
Create a Payment for an Invoice in Xero
With the Invoice created, the next step is to add a Payment to it, since it has been paid.
You will need to find the UUID of the virtual Stripe account you created with Stripe Direct Feeds, so that you can specify that as the bank account where you received the payment. In the request, you also need to specify the reference number for the payment, which is the Stripe charge reference code (a long string starting with “ch_”).
The Xero Reconcile Robot
With the Stripe Direct Feed and the Xero API integration, you are all set. But you have to reconcile the bank account yourself manually. The Xero API does not provide for automating the bank reconciliation process. And that’s ok if you have a few tens of transactions per day; it’s just click-click-click on the OK buttons. But if you have hundreds of transactions daily, it can be a real chore. Here is where the Robot jumps in.
We internally developed a Chrome Extension titled the “Xero Reconcile Robot” that automatically reconciles statement lines with payments and invoices suggested by Xero. To use it, you need to use Chrome (or Chromium) and install the “Xero Reconcile Robot” as an Extension.
The Robot provides a “Start” and “Stop”. By clicking “Start”, it will start clicking those pesky “OK” buttons, reconciling. By default, the Robot will only reconcile the following transactions suggested by Xero:
- matching payments for which the “Reference” code from the bank statement matches the “Reference” code in the Xero payment; this always stands in a Stripe Direct Feed
- transactions matching Bank Rules (Stripe fees and Stripe transfers to your actual bank account can be set up this way); new transactions will be created as you need them to be
This is to avoid accidental reconciliation of partially matching items or other non-automated payments, e.g. refunds, or Xero Invoices issued manually that get paid through the Xero-Stripe integration (the “Pay Now” button of online invoices by Xero) and not having a matching reference code for any reason.
Conclusion
If you use Stripe and Xero for your Cloud SaaS, you should definitely consider the above scheme. It has worked really well for our own platform. Although it does require some development effort, it will pay off in proper reporting, billing support efficiency, unified management of Stripe and non-Stripe (invoiced) customers, and more down the road.
Coming up: Revenue recognition and the new ASC 606 standard
Starting on January 1st, 2018, all US companies must use the new ASC 606 guidelines for recognizing revenue. SaaS businesses (private or public) with thousands of customers on annual subscriptions need to conform. We need to conform too. And based on the above integration (mainly with Stripe and Xero), we managed to comply easily, properly deferring revenue from annual (even monthly) subscriptions.
But that’s a whole different story, kids. Stay tuned till next week for how we worked out this riddle.